
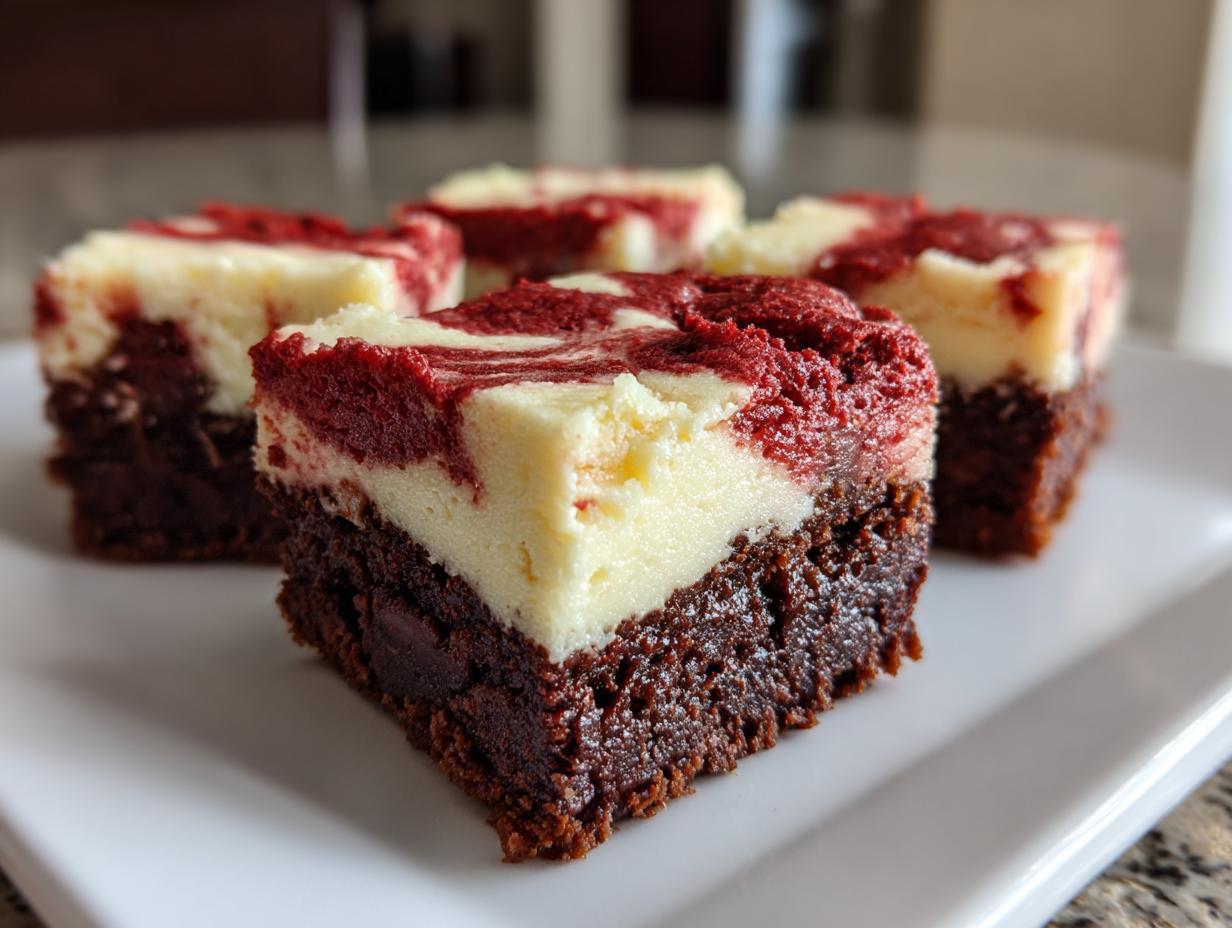
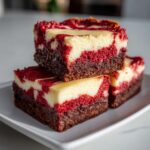
I’ve always believed that if you’re going to bake something, you might as well go big! Why decide between a fudgy chocolate brownie, a creamy cheesecake, and a beautiful, deep red velvet cake when you can have all three? It sounds like a lot of work, but trust me, these are the ultimate red velvet cheesecake brownies you’ll ever try. We’re talking about a rich, fudgy base holding up a beautifully tangy cream cheese swirl. They look fancy, but they are so dependable when you need a showstopping bake sale treat or something truly special for the holidays. My grandkids always fight over who gets the corner pieces!
- Why You Will Love These Red Velvet Cheesecake Brownies
- Ingredients for the Ultimate Red Velvet Cheesecake Brownies
- Step-by-Step Instructions for Red Velvet Cheesecake Brownies
- Tips for Perfect Cream Cheese Swirl Baked Goods
- Storage and Serving Suggestions for Red Velvet Cheesecake Brownies
- Troubleshooting Common Issues with Red Velvet Cheesecake Brownies
- Frequently Asked Questions About Red Velvet Cheesecake Brownies
- Nutritional Estimates for One Serving of Red Velvet Cheesecake Brownies
- Share Your Showstopping Bake Sale Treats
- Share Your Showstopping Bake Sale Treats
Why You Will Love These Red Velvet Cheesecake Brownies
Honestly, what’s more satisfying than taking three of the best desserts ever and putting them in one pan? These aren’t your ordinary layered dessert bars. You get that unmistakable texture contrast every single time.
- The base is perfectly fudgy—truly decadent!
- That tangy cream cheese swirl cuts through the chocolate richness beautifully.
- They are absolutely showstopping; the vibrant red color gets everyone talking.
- They are simple to assemble, making them perfect for holidays or bake sales.
Ingredients for the Ultimate Red Velvet Cheesecake Brownies
When you’re creating something this layered, you simply have to start with the best building blocks. You know I teach my students that good food hinges on dependable ingredients, and these ultimate dessert bar combinations are no exception. Because we are layering fat and flavor, make sure your cream cheese is truly softened—there’s nothing worse than baking with cold cheese lumps! Here is what you’ll need for this showstopper:
- 1 cup (2 sticks) unsalted butter, melted
- 1 3/4 cups granulated sugar
- 3/4 cup unsweetened cocoa powder
- 1 teaspoon salt
- 1 teaspoon vanilla extract
- 4 large eggs
- 1 cup all-purpose flour
- 1 teaspoon baking powder
- 1/4 cup buttermilk
- 2 tablespoons red food coloring (gel preferred—this helps with the vibrant red dessert recipes look!)
- 8 ounces cream cheese, softened
- 1/2 cup granulated sugar (for the cheesecake layer)
- 1 large egg (for the cheesecake layer)
- 1/2 teaspoon vanilla extract (for the cheesecake goodness)
Step-by-Step Instructions for Red Velvet Cheesecake Brownies
Now that we have all our components ready, let’s put this masterpiece together! I’ve simplified the process so that even if you’re new to swirled dessert bars tutorial, you’ll get a beautiful marble effect. Remember, the key to that fudgy texture we love is in how we combine these layers.
First things first: get your oven warmed up to 350 degrees F. You must line that 9×13 inch pan with parchment paper first, leaving plenty of overhang. That overhang is your handle later, so don’t skip it!
Preparing the Pan and Brownie Batter for Red Velvet Cheesecake Brownies
In a big bowl, you’ll mix together your melted butter, the main cup of sugar, cocoa powder, salt, and vanilla. Make sure that’s nice and smooth before you start adding the eggs—beat those four eggs in one at a time until everything looks happy together. Separately, just whisk your flour and baking powder. Finally, mix your buttermilk with the gel food coloring until it’s that deep, gorgeous red—that’s how you nail those vibrant red dessert recipes! Gently fold that red liquid into your chocolate mix until you don’t see streaks anymore. It’s rich!
Making the Cream Cheese Swirl Layer
This part is so easy; it practically makes itself. Take your softened cream cheese and beat those 1/2 cup of sugar until it’s wonderfully smooth—no lumps allowed! I find using a hand mixer here helps out a lot. Then, just beat in that last single egg and the vanilla until it’s all just combined. Don’t stand there whipping it into a frenzy; just combine it nicely, like we do for our cream cheese swirl baked goods.

Assembling and Swirling the Red Velvet Cheesecake Brownies
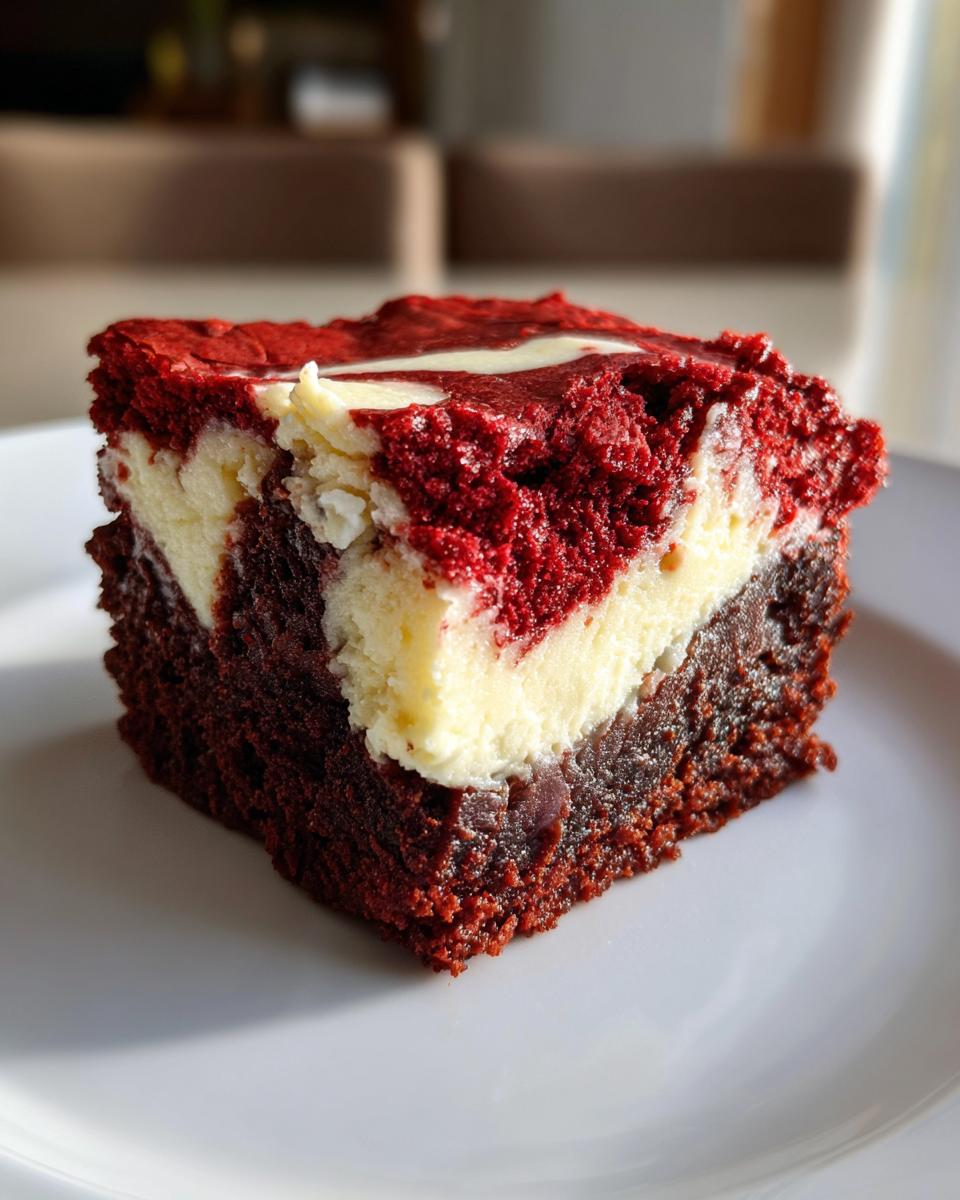
Time for the artistry! Spread about two-thirds of that stunning red velvet batter evenly across your prepared pan. Now, drop spoonfuls of the cheesecake mixture right over the top of that. Don’t worry about placement, just try to cover most of the surface. Pour the last third of the red velvet batter over the cream cheese dollops. Now, take a dull knife or a wooden skewer and gently run it through the layers just a few times—maybe five or six passes total. We want marbling, not mud! Bake these gorgeous fudgy brownies with cream cheese for 30 to 35 minutes. They should look mostly set, but the center needs to retain some moisture. Let them cool completely before you even think about slicing them, please! Chilling helps immensely.
Tips for Perfect Cream Cheese Swirl Baked Goods
When you make these beautiful cream cheese swirl baked goods, a couple of little chef tricks make all the difference. First, let’s talk about that color! If you want that deep, vibrant red—the kind that just screams ‘special occasion’—you really should use a high-quality gel food coloring instead of the liquid drops most people keep in their pantry. It’s worth the extra trip to the store.
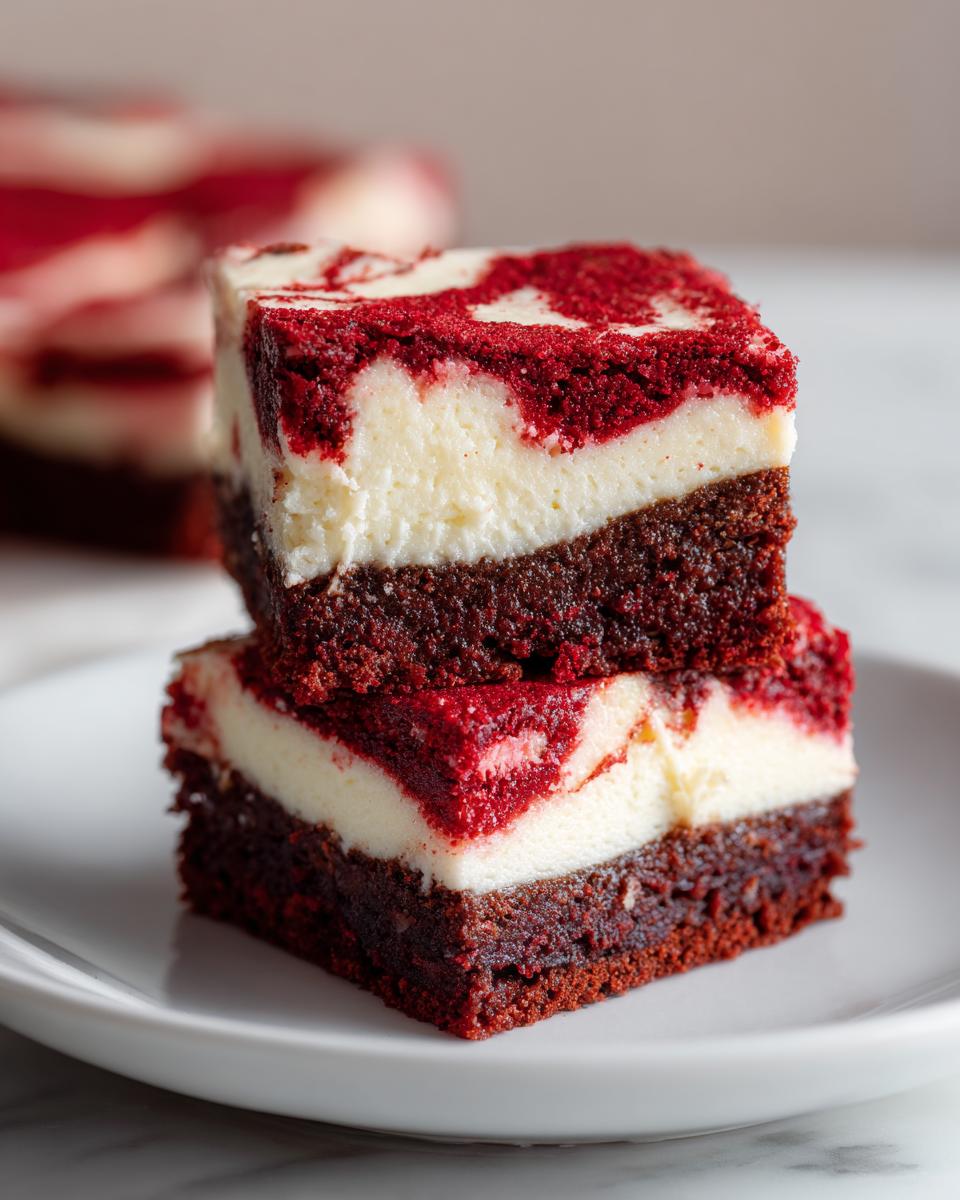
My biggest piece of advice for keeping that lovely cheesecake layer crack-free? Don’t overbake! Bake them until you see moist crumbs on your toothpick, not when it comes out clean. Overcooking dries out the cheesecake part and almost guarantees cracks later on. And here’s my personal rule for slicing: You simply must chill these completely—I insist on leaving them in the fridge for at least two hours before cutting. It gives you these incredibly clean, professional-looking bars!
Storage and Serving Suggestions for Red Velvet Cheesecake Brownies
These decadent dessert recipes store beautifully, which is wonderful because you’ll want to save some for later! Because of that creamy cheesecake filling, I always recommend keeping them in an airtight container in the refrigerator. They stay fresh and hold their texture perfectly for up to five days this way.
When it comes to serving, you have options! Some folks prefer them straight from the fridge because the cheesecake layer is nice and firm. But if you let them sit out on the counter for about 20 minutes before serving, the brownie part softens up beautifully. They pair perfectly with a strong cup of coffee or maybe a nice scoop of vanilla bean ice cream if you’re feeling extra indulgent!
Troubleshooting Common Issues with Red Velvet Cheesecake Brownies
Sometimes, even when we follow the rules, things don’t turn out exactly as planned in the kitchen. Don’t you worry, we’ve all been there! If you’re wondering, ‘What if?’ here are my quick thoughts on keeping these cheesecake brownie hybrids perfect.
If your brownies seem too cakey rather than fudgy, that usually means you either mixed the flour in for too long, developing too much gluten, or you just baked them a few minutes too many. Remember, we want moist crumbs! As for getting that bright red color, if you used liquid coloring and it turned out dull, next time try the concentrated gel kind. That makes all the difference in these gorgeous gourmet brownie recipes.
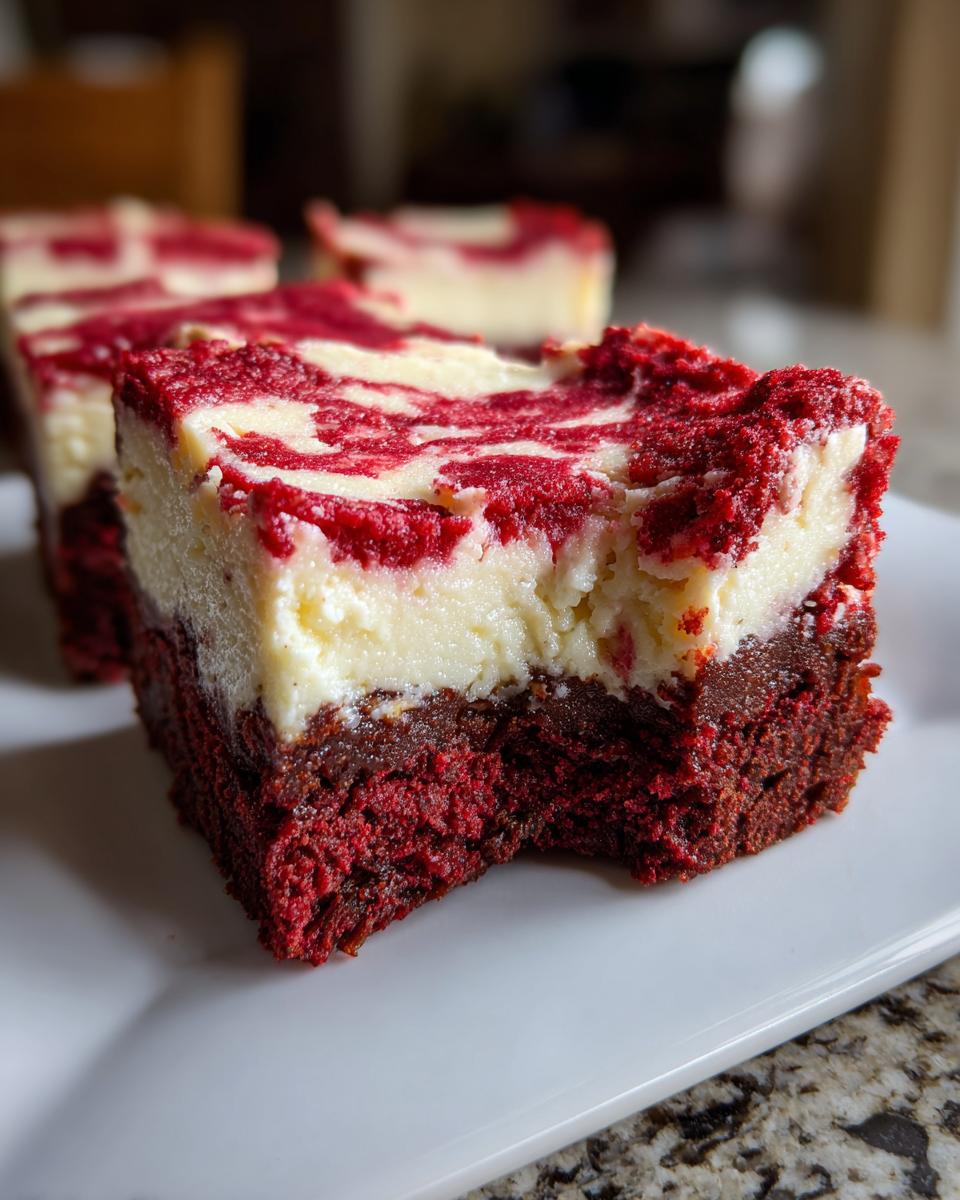
And if your cheesecake layer cracked? It’s almost always due to temperature shock or overbaking. Let them cool down slowly on the counter before you even think about chilling them!
Frequently Asked Questions About Red Velvet Cheesecake Brownies
When it comes to baking up these amazing layered dessert bars, readers always have a few sensible questions pop up. It’s smart to double-check before you start mixing up treats that are this much of a showstopper! Here are the questions I get asked most often about these gourmet brownie recipes.
Can I skip the buttermilk in this red velvet cheesecake brownies recipe?
Oh, that’s a great question about the acidic balance! Buttermilk does something special for red velvet; its acidity reacts with the cocoa powder and helps bring out that rich red color we are aiming for. If you absolutely don’t have it, don’t panic! You can substitute it by taking 1/4 cup of regular milk and stirring in 3/4 teaspoon of white vinegar or lemon juice. Let it sit on the counter for five minutes until it looks a little curdled—that’s your quick buttermilk substitute!
How do I get a perfect fudgy texture in my red velvet cheesecake brownies?
This is key to making them taste like a brownie and not a cake! The fudginess comes down to two main things, really. First, when you add the flour mixture, stop mixing the moment the streaks disappear. Overmixing the flour is the fastest way to make a cakey texture instead of a fudgy one. Second, watch that oven like a hawk! Pull them out when the toothpick has moist crumbs, not wet batter. They finish setting up as they cool.
Are these red velvet cheesecake brownies suitable for Valentine’s Day baking ideas?
Are you kidding? They were practically invented for Valentine’s Day baking ideas! The gorgeous red color and the decadent combination of chocolate and cream cheese make them incredibly romantic and special. They look like something from a fancy bakery but taste like home. They are perfect for sharing with someone you love, or just keeping all to yourself—I won’t judge!
Nutritional Estimates for One Serving of Red Velvet Cheesecake Brownies
Now, I know most of us aren’t counting calories when we’re enjoying something as wonderfully *extra* as these showstopping bake sale treats, but I always like to provide the estimate just in case! Remember, baking with butter and cream cheese means these are rich, which is what makes them so delicious. These numbers are just an approximation based on the recipe breakdown, so treat them as a general guide for your ultimate dessert bar combinations.
- Serving Size: 1 bar
- Calories: 350
- Fat: 22g (Saturated Fat: 13g)
- Carbohydrates: 35g (Sugar: 35g)
- Protein: 5g
- Cholesterol: 80mg
Share Your Showstopping Bake Sale Treats
I truly hope you enjoy making these as much as my family does. There’s nothing I love more than hearing that one of my dependable recipes turned out perfectly for you! If you baked up a batch of these bakery style dessert bars, I’d be so grateful if you left a star rating below. And if you took a picture of that gorgeous swirl, please share it in the comments—I always love seeing your beautiful creations!
PrintRed Velvet Cheesecake Brownies
Create decadent, layered dessert bars combining fudgy red velvet brownies with a rich, tangy cream cheese swirl. This recipe delivers showstopping bake sale treats.
- Prep Time: 20 min
- Cook Time: 35 min
- Total Time: 55 min
- Yield: 16 servings 1x
- Category: Dessert
- Method: Baking
- Cuisine: American
- Diet: Vegetarian
Ingredients
- 1 cup (2 sticks) unsalted butter, melted
- 1 3/4 cups granulated sugar
- 3/4 cup unsweetened cocoa powder
- 1 teaspoon salt
- 1 teaspoon vanilla extract
- 4 large eggs
- 1 cup all-purpose flour
- 1 teaspoon baking powder
- 1/4 cup buttermilk
- 2 tablespoons red food coloring (gel preferred)
- 8 ounces cream cheese, softened
- 1/2 cup granulated sugar
- 1 large egg
- 1/2 teaspoon vanilla extract
Instructions
- Preheat your oven to 350 degrees F. Line a 9×13 inch baking pan with parchment paper, leaving an overhang for easy removal.
- In a large bowl, mix the melted butter, 1 3/4 cups sugar, cocoa powder, salt, and 1 teaspoon vanilla extract until combined.
- Beat in the 4 eggs one at a time until fully incorporated.
- In a separate bowl, whisk together the flour and baking powder. Gradually add the dry ingredients to the wet ingredients, mixing until just combined.
- In a small bowl, mix the buttermilk and red food coloring until you achieve a vibrant red color. Gently fold the red mixture into the brownie batter until streaks disappear.
- Prepare the cheesecake layer: In a medium bowl, beat the softened cream cheese and 1/2 cup sugar until smooth. Beat in 1 egg and 1/2 teaspoon vanilla until just combined.
- Spread two-thirds of the red velvet batter evenly into the prepared pan.
- Dollop the cheesecake mixture over the batter. Pour the remaining one-third of the red velvet batter over the cheesecake layer.
- Use a knife or skewer to gently swirl the layers together to create a marbled effect. Do not overmix.
- Bake for 30 to 35 minutes, or until a toothpick inserted near the edge comes out with moist crumbs attached but not wet batter. The center should be mostly set.
- Let the brownies cool completely in the pan on a wire rack before lifting out using the parchment overhang and cutting into squares.
Notes
- For the brightest color, use a concentrated gel food coloring instead of liquid drops.
- Do not overbake; these should remain fudgy. Overbaking causes the cheesecake layer to crack.
- Chill the bars for at least two hours before slicing for clean cuts.
Nutrition
- Serving Size: 1 bar
- Calories: 350
- Sugar: 35
- Sodium: 200
- Fat: 22
- Saturated Fat: 13
- Unsaturated Fat: 9
- Trans Fat: 0.5
- Carbohydrates: 35
- Fiber: 1
- Protein: 5
- Cholesterol: 80