
There is nothing in the world quite like the aroma of freshly baked bread filling your home, is there? It just pulls everyone right into the kitchen! When I was teaching, I always told my students that food traditions are how we keep the best parts of our family history alive. That’s exactly what this recipe is for me—my go-to for the absolute Soft & Fluffy Homemade Cinnamon Raisin Bread with a Perfect Swirl. Forget those dry, crumbly loaves you buy at the store; this raisin bread will redefine breakfast for you.
It really is the best way to usher in a cozy morning. Making a beautiful loaf that slices perfectly is easier than you think, and I’m going to walk you through every little detail so you get that incredible cinnamon ribbon in every single slice. You know, just like how simple applesauce adds that little something extra to a meal, these small, perfect steps make all the difference in bread making. See my easy homemade applesauce if you are looking for another comforting staple!
- Why This Soft Baked Raisin Bread Recipe is the Best Raisin Bread Recipe
- Ingredients Needed for Your Fluffy Raisin Bread
- Step-by-Step Instructions for Homemade Raisin Bread
- Tips for Perfect Raisin Bread Baking Success
- Variations for Your Sweet Raisin Loaf
- Serving Suggestions for Warm Baked Bread Aroma
- Storage and Reheating Instructions for Homemade Raisin Bread
- Frequently Asked Questions About Baking Raisin Bread
- Estimated Nutritional Data for Your Sweet Bread Recipes
Why This Soft Baked Raisin Bread Recipe is the Best Raisin Bread Recipe
If you ask me, this has become the best raisin bread recipe because it fixes all the problems I used to have with homemade loaves—namely, dryness and a messy filling. We aren’t aiming for some tough, artisan crust here; we are going for that pillowy soft texture that melts in your mouth. That fluffiness comes from carefully balancing the fat content, especially using that full stick of softened butter in the dough. It’s a richer dough, which is why this truly becomes a soft baked raisin bread experience!
When you get this right, the comforting aroma when it’s baking is just heavenly. I know many bakers struggle to keep the spice where it belongs, but we have a trick for that—it’s all in the layering technique. It’s these little bits of knowledge, learned over years of baking for my own family, that make this recipe dependable, just like my old fluffy buttermilk biscuits. It creates a beautiful, uniform loaf every single time.
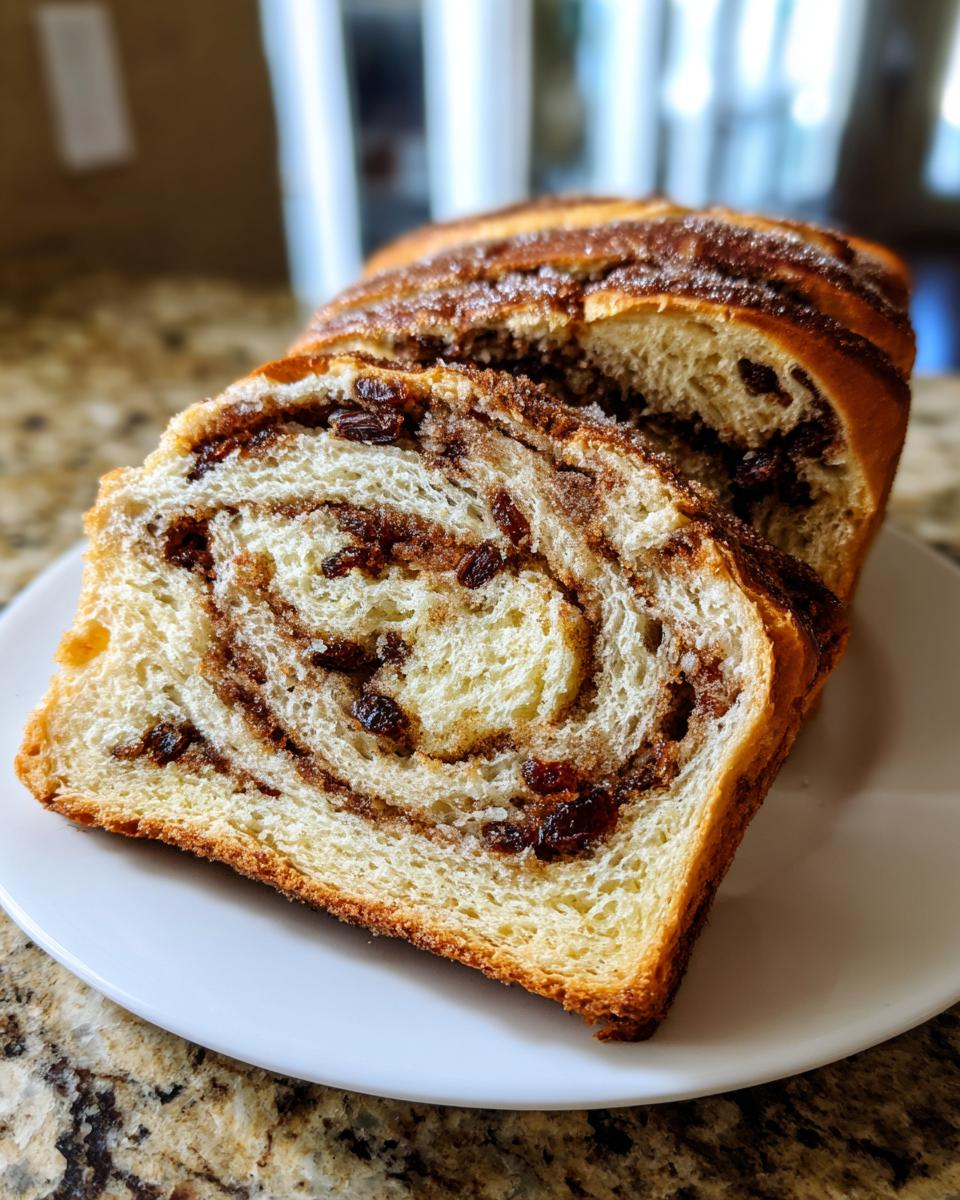
Achieving the Perfect Cinnamon Swirl Raisin Bread
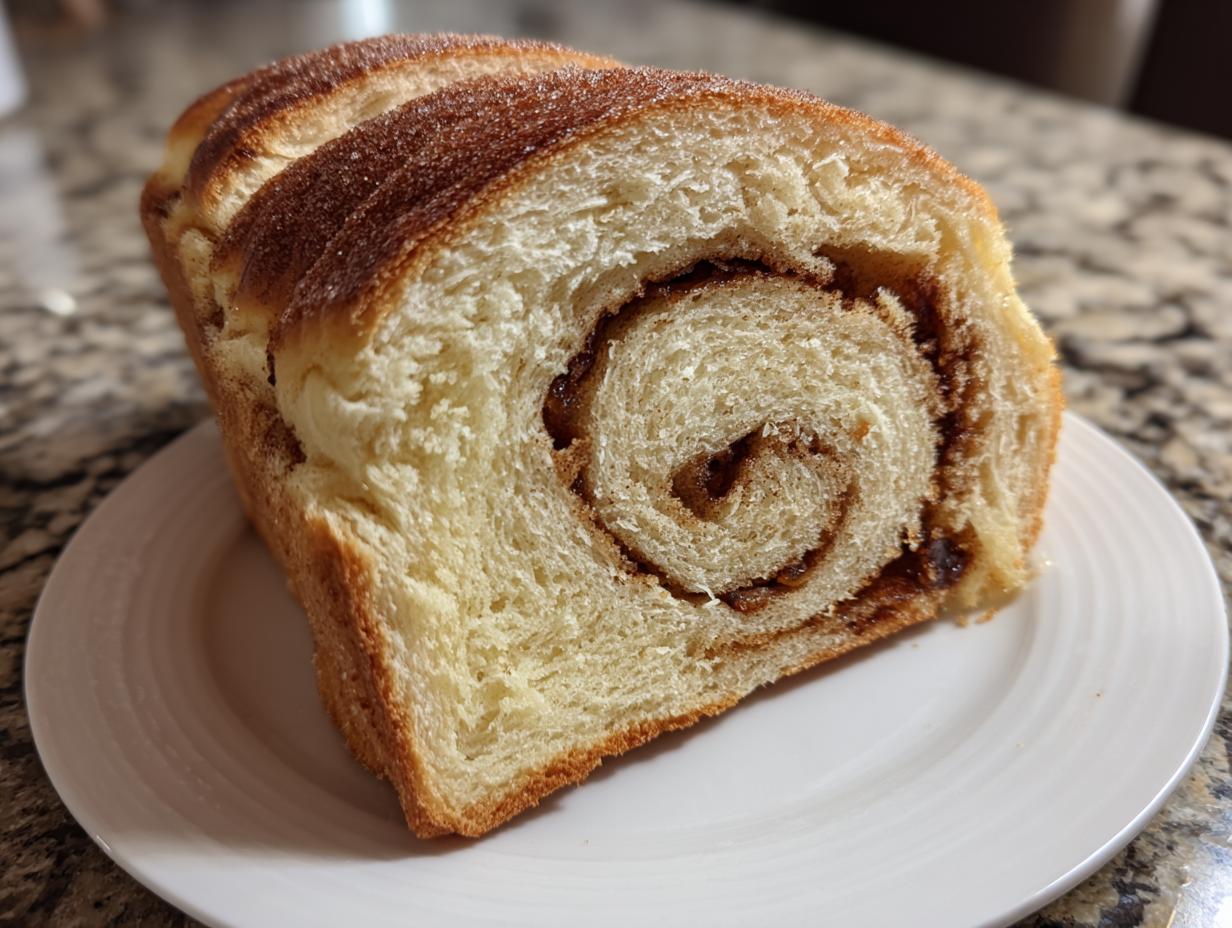
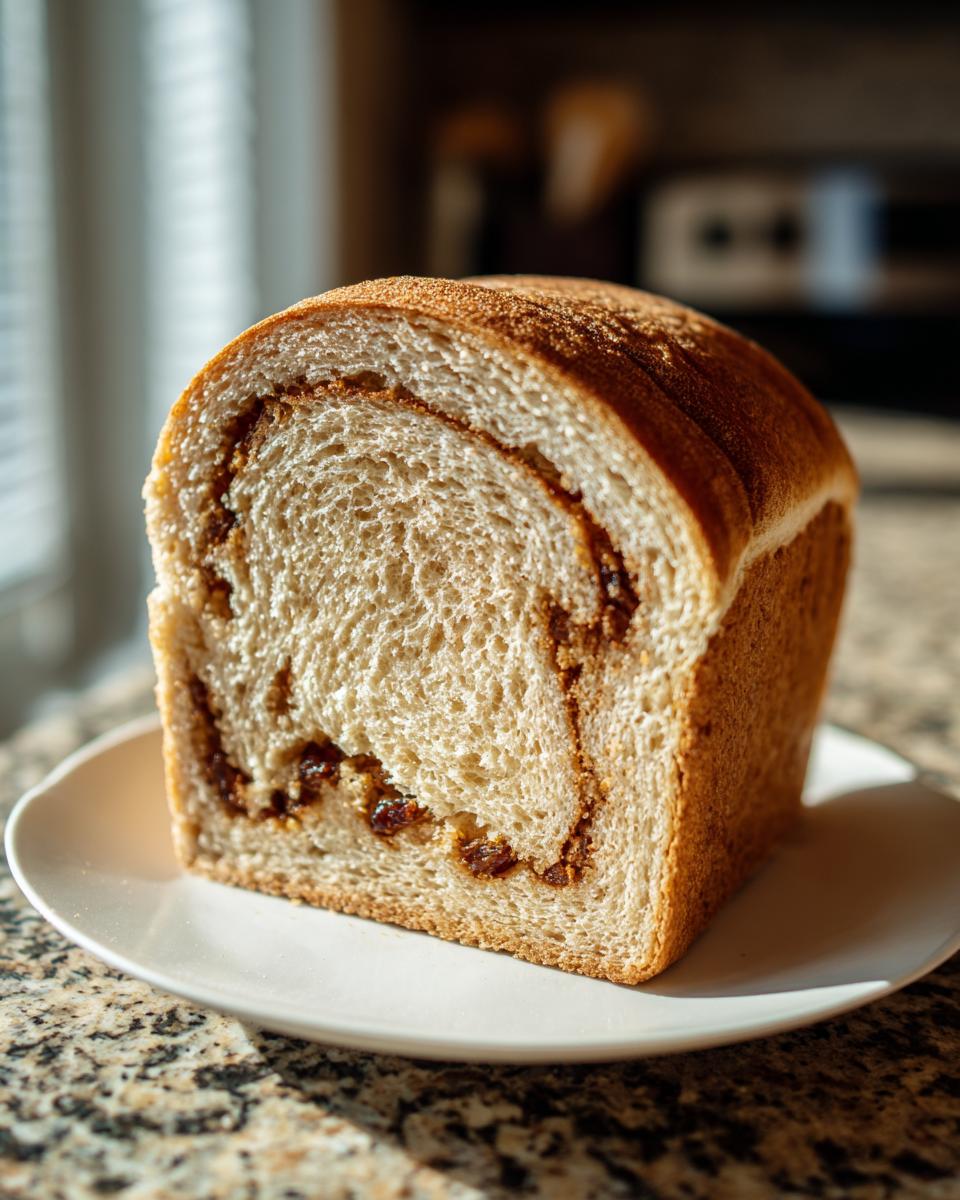
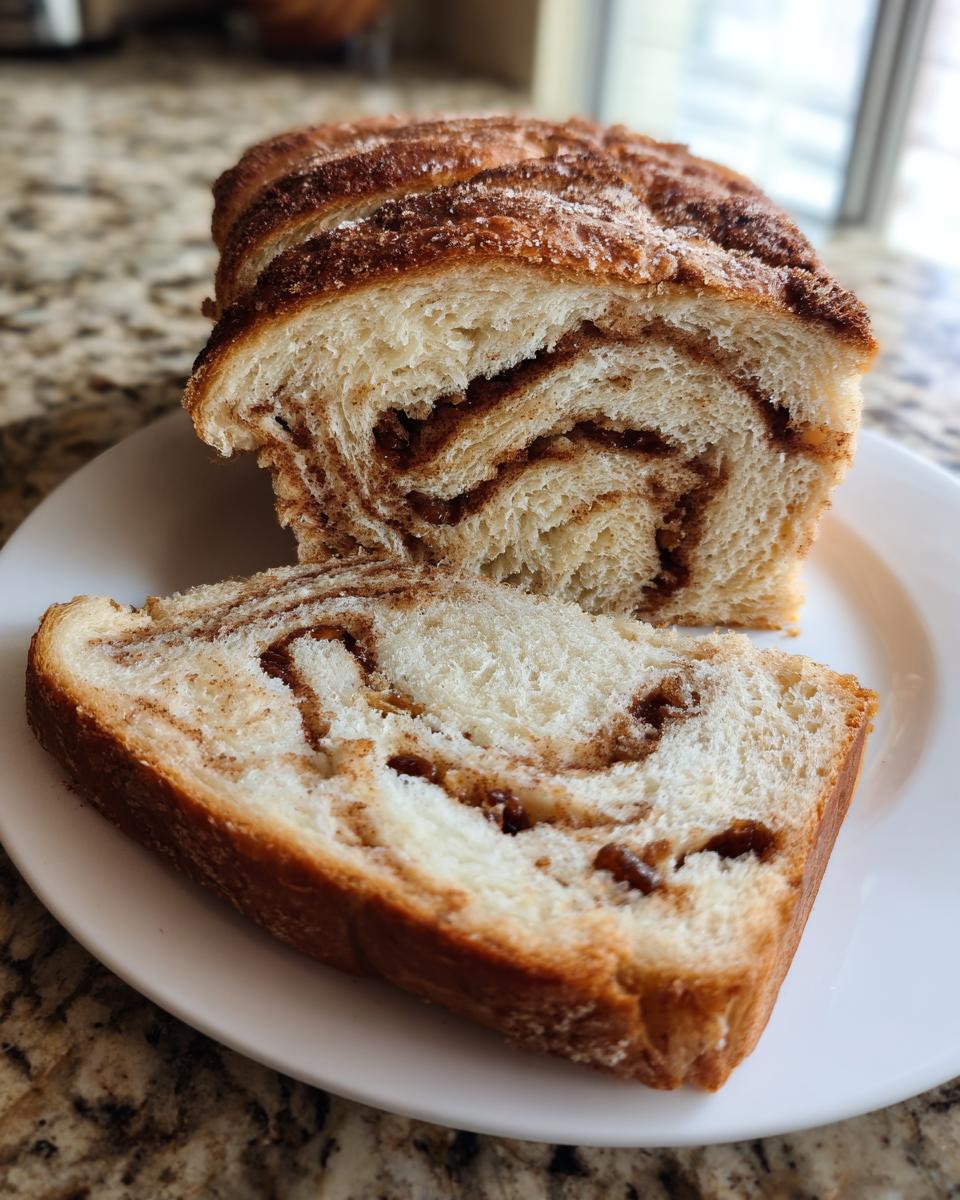
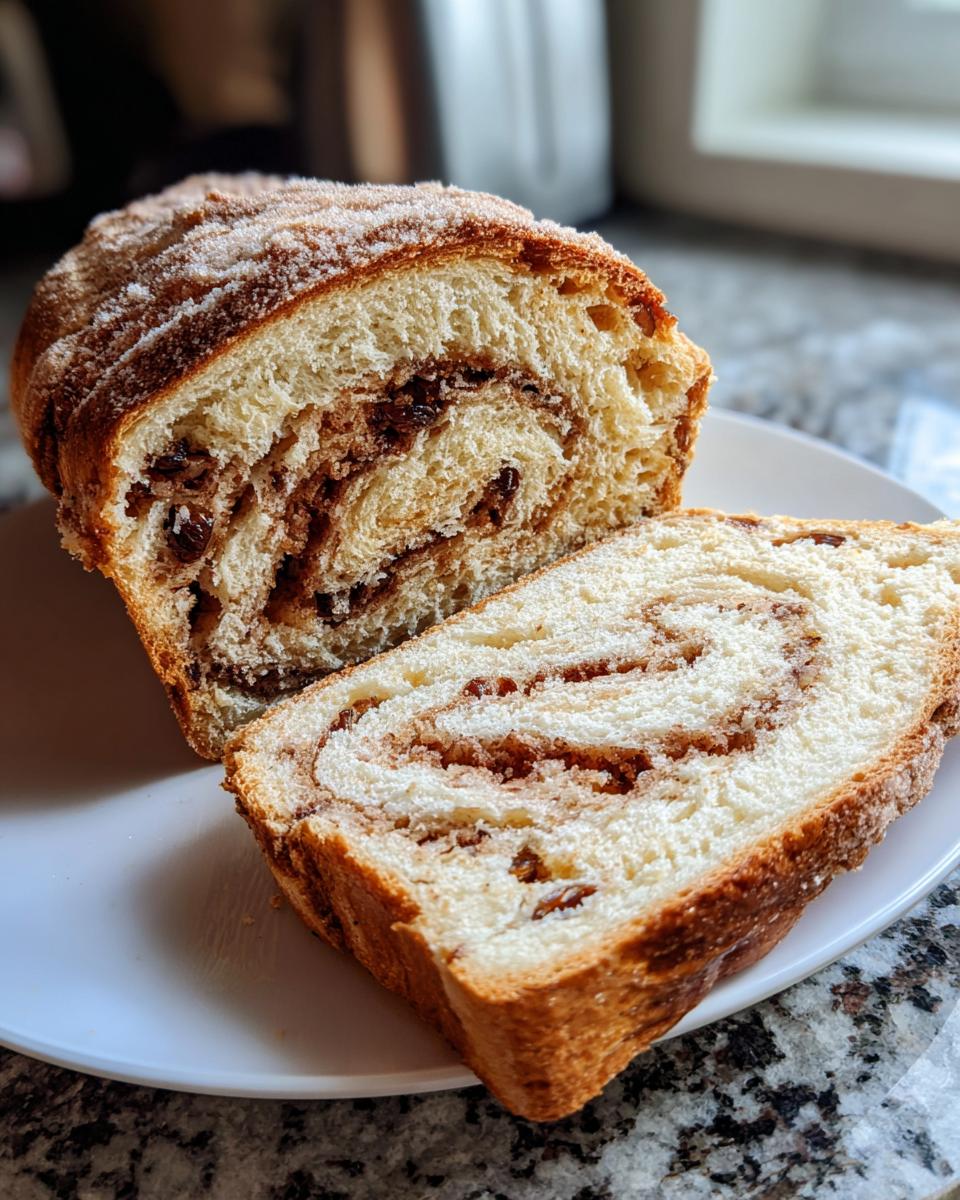
The secret to that gorgeous ribbon of spice swirl is making sure that buttery cinnamon mixture sticks exactly where it’s supposed to on the rolled-out dough. First, you must brush the melted butter right to the edges—don’t skimp! Then, after sprinkling your cinnamon and brown sugar mix, roll it up TIGHTLY, starting from the longest side.
When you pinch that seam closed at the bottom of the pan, that tightness is what forces the cinnamon layer to stretch and create that wonderful spiral pattern as the bread expands during the second rise and bakes. A loose roll means the filling just escapes and burns on the pan sides, and we certainly don’t want that!
Ingredients Needed for Your Fluffy Raisin Bread
Gathering your ingredients is the first promise you make to this delicious sweet raisin loaf. Because this is a yeast bread, precision matters, especially with the milk temperature! We need quality butter here—it makes that flavor pop and ensures that ultra-soft crumb we are aiming for. I always use real, unsalted butter; you can absolutely taste the difference when you compare it to substitutes.
Here is what you’ll need for the dough and that gorgeous swirl:
- 1 cup warm milk (it needs to be between 105–115°F, trust me!)
- 2 1/4 teaspoons active dry yeast
- 1/4 cup granulated sugar plus 1 teaspoon for the yeast activation
- 1/2 cup (1 whole stick!) unsalted butter, softened to room temperature
- 1 large egg
- 1 teaspoon salt
- 3 1/2 to 4 cups all-purpose flour (keep that extra flour handy!)
- 1 cup raisins, plumped beforehand
- 1/2 cup packed light brown sugar (this is for the swirl!)
- 2 tablespoons ground cinnamon for the swirl
- 1/4 cup (1/2 stick) unsalted butter, melted, for brushing
If you’re looking for other rich, tender bakes, you must try my sour cream coffee cake recipe next time!
Step-by-Step Instructions for Homemade Raisin Bread
Now we get to the fun part—putting it all together! Baking bread might seem intimidating, but follow these steps closely, especially the timing, and you’ll see why I call this my most dependable recipe. Remember those wonderful loaves you can make in a bread maker? Well, this hands-on method gives you superior texture, which is worth the little extra effort.
Activating the Yeast and Mixing the Dough for Yeast Raisin Bread
First things first: we need to wake up that yeast! In a small bowl, combine your warm milk—and I stress warm, aim for 105°F to 115°F. If it’s too hot, you’ll kill the yeast, and if it’s too cool, it won’t wake up properly. Add the 1 teaspoon of sugar and the yeast. You’re looking for the mixture to get foamy and bubbly after about five to ten minutes. That beautiful foam tells Carla that your yeast raisin bread is alive and ready to work!
Once foamy, mix that into your creamed butter and sugar mixture with the egg and salt. Then, start adding that flour slowly. We’re aiming for a soft dough, not a stiff, heavy one. Start with 3 1/2 cups and see how it feels.
Kneading and First Rise for Your Cozy Homemade Bread
Turn that shaggy dough out onto a lightly floured counter. Time to knead! Just like putting a little love into your homemade bread bowls, this takes a little elbow grease. Knead it firmly for a good 6 to 8 minutes until it feels smooth and springy, not sticky. Tuck it into an oiled bowl, cover it, and let it sit somewhere warm. We’re looking for it to double in size, which usually takes about an hour to an hour and a half. Don’t rush this first rise; it builds the structure for your cozy homemade bread.
Creating the Cinnamon Swirl and Shaping the Raisin Bread Loaf
While it’s rising, mix your brown sugar and cinnamon together for the filling. When the dough is big and puffy, gently punch it down! Turn it out and roll it into that big 12-by-18-inch rectangle. Now, brush every inch with that 1/4 cup of melted butter, making sure you get most of the way to the edges. Sprinkle the cinnamon sugar evenly, followed by your plumped raisins.
This next part is important for that tight spiral: starting on a long side, roll it up as tightly as you can manage without squishing the air out completely. Pinch that final seam closed really well and place it seam-side down in your greased 9×5 pan. If you roll it tight, you guarantee that fantastic cinnamon swirl raisin bread structure!
Second Rise and Baking the Best Cinnamon Raisin Bread
Cover the pan lightly and let it rest again until it crests about one full inch over the rim—this second, shorter rise is crucial. Preheat your oven to 375°F during the last 15 minutes of that rise. Bake for 30 to 35 minutes. If the top starts getting too dark before the center is cooked through (check for 200°F internal temp!), just loosely tent a piece of foil over it. And out it comes! This loaf is the best cinnamon raisin bread cooling on the rack, ready for slicing.
Tips for Perfect Raisin Bread Baking Success
Even the most dependable yeast raisin bread recipe benefits from a couple of little secrets tucked away in the notes. Like when you prepare my cocktail sauce—a little extra step makes it pop! When it comes to our loaves, always take a moment to plump those raisins first. Soaking them in hot water or, if you’re feeling fancy, a splash of rum (for the adults, of course!) for ten minutes hydrates them beautifully. Make sure you drain and pat them dry before adding them to the dough, though, or you’ll end up adding too much liquid!
Also, for that show-stopping, bakery-quality gloss, brush the top of your loaf with a tiny bit more melted butter right as it comes out of the oven. It helps seal in the moisture and gives the crust a wonderful sheen. These are the small efforts that really elevate your homemade raisin bread!
Making a No Knead Raisin Bread Variation
I hear from so many of you who love the flavor but maybe don’t have the time to knead. Good news! This recipe is flexible. If you want to skip the kneading step entirely to make a no knead raisin bread, you certainly can. Just let that first rise go much longer—I suggest letting it sit at room temperature for about three hours instead of the usual hour and a half. It takes longer to develop, but the results are wonderfully tender!
Variations for Your Sweet Raisin Loaf
Part of the fun of baking is making a recipe your own, and this sweet raisin loaf is just begging for a little creative input! While the base recipe stands perfectly on its own, sometimes you want a little extra texture or maybe just a different depth of flavor. I always encourage you to treat my recipes as a wonderful starting point, just like how I treat my chocolate covered cherries recipe!
If you love crunch, definitely consider making a raisin walnut bread next time you bake. About a half cup of chopped walnuts stirred right in with your plumped raisins during the shaping stage adds a beautiful texture contrast. Make sure you toast the walnuts lightly first for the best flavor!
Another easy change that makes a huge impact is nodding to regional styles. If you want a slightly richer, almost cake-like flavor profile, try adding a teaspoon of pure vanilla extract into your wet ingredients right along with the egg. This creates a lovely vanilla raisin loaf that pairs perfectly with coffee. It doesn’t change the structure at all, but it sure changes the aroma filling your kitchen!
Serving Suggestions for Warm Baked Bread Aroma
That incredible, warm baked bread aroma means it’s time to eat, and this loaf truly shines when served simply. We baked this wonderful raisin bread specifically to be the star of your morning, so let’s treat it right! Honestly, when the loaf is this good, you don’t need to do much to distract from that perfect interior.
My absolute favorite way, the one that makes my grandkids run from every corner of the house, is to slice it thick while it’s still just slightly warm (but not too hot, or it will fall apart!). A generous smear of good, real butter melts right into those little honeycombs of dough. If you happen to have my easy cinnamon butter recipe ready, even better! That spiced swirl plus the extra cinnamon butter is pure decadence.
But if you prefer something tangy alongside the sweetness, a thick layer of full-fat cream cheese is just divine on this raisin bread for breakfast. Just make sure the bread has cooled down just enough so the cream cheese softens beautifully without completely melting away. A nice homemade strawberry jam is also wonderful if you like a bit more fruit flavor. See? This sweet bread is perfect for every kind of morning spread!
Storage and Reheating Instructions for Homemade Raisin Bread
Once you’ve pulled that perfect golden loaf off the rack, the next challenge is making sure it tastes just as good tomorrow morning! Because this is such a rich, soft homemade raisin bread, it stays wonderfully tender, but keeping it fresh requires a little care. Remember, bread likes to breathe, but not too much!
For simple room temperature storage, I always recommend an airtight container or a sturdy zip-top bag, but don’t seal it completely right away. Let the loaf cool completely on the rack first—if you trap steam inside, you’ll end up with a gummy crust, and we worked too hard for a gummy crust!
Once cooled, place it in plastic or a bread box. Stored this way, it stays marvelous for about three or four days. Since it’s so soft, it generally does quite well at room temp, and I usually avoid the refrigerator unless I know I won’t finish it within five days; the fridge just dries bread out too quickly, no matter how well you wrap it.
But what if it’s day four, and you just need that perfect slice for breakfast? Don’t throw it out! Reviving this bread is so easy. The microwave is quick: just wrap a single slice in a slightly damp paper towel and heat it for about 10 to 15 seconds. It softens right up.
For the absolute best experience, though, toast it! Popping a slice into the toaster or under the broiler brings back that warm baked bread aroma instantly. That light crispness on the outside next to the moist interior? That’s unbeatable for your morning coffee. It’s the easiest way to enjoy this rich loaf all week long.
Frequently Asked Questions About Baking Raisin Bread
Baking is all about building confidence, and I know you might have a few questions swirling around before you dive in. That’s perfectly normal! When something smells as good as this homemade raisin bread is supposed to, you want to make sure you get it right the first time. I’ve gathered the most common things people ask me when they are tackling this tender loaf.
Can I use a bread machine for this raisin bread recipe?
Oh, that’s a great question! I know everyone loves the convenience of a bread machine raisin bread cycle, and while this recipe is written for loaf pan baking, you can absolutely adapt it. If you look in my notes above, I mention the secret for a no knead raisin bread variation. For the bread machine, you’ll want to use the ‘Sweet Dough’ or ‘Basic Dough’ cycle only, skipping the baking function on the machine. Once the cycle finishes kneading and the first rise, remove the dough, shape it exactly as I describe for the cinnamon swirl, place it in a greased loaf pan, and let it do its second rise on the counter. Then, bake it in your preheated 375°F oven! That way, you get the convenience of the machine doing the hard work but the superior texture from oven baking.
What type of flour is best for a truly fluffy raisin bread?
For the fluffiest, softest bread possible—the kind that makes the very best raisin bread for breakfast—I strongly recommend using standard All-Purpose flour. It has just the right amount of protein content. Bread flour has a higher protein level, which is fantastic if you want a chewier, more structured loaf, like an artisan white bread. But for this specific recipe, where we are aiming for tenderness and that melt-in-your-mouth quality, the AP flour keeps things light and airy. I only call for using just enough flour until the dough is *soft*—don’t add extra just because the recipe says 4 cups total. Stop when it feels right in your hands!
I hope those questions help you feel ready to start assembling your ingredients! If you’re interested in another easy baking project that uses similar techniques for tender results, check out how I make my easy zucchini pizza bites!
Estimated Nutritional Data for Your Sweet Bread Recipes
When you bake something this heavenly, it’s good to have an idea of what you’re looking at, though honestly, I never worry too much about the label when something tastes this much like home! This recipe for your sweet bread recipes is rich because we use real butter and plenty of glorious brown sugar for that swirl, so it’s definitely a treat and not an everyday low-cal staple.
Please keep in mind that these numbers are just estimates! Once you start adding extra raisins or maybe choosing to brush on that extra butter, the values shift a little bit. But for reference, here are the general guidelines based on the main ingredients used for one slice of this wonderful loaf:
- Serving Size: 1 slice
- Calories: 240
- Carbohydrates: 40g
- Sugar: 15g (It’s mostly from the swirl, worth every grain!)
- Protein: 5g
- Fat: 8g
- Saturated Fat: 5g (That’s the butter doing its job!)
- Cholesterol: 30mg
If you are looking for ways to sneak in extra health, I always recommend checking out my easy high protein egg bites for a non-bread option! But truly, for this delicious, comforting cinnamon raisin bread, just enjoy the slice and know you made something wonderful from scratch.
PrintSoft & Fluffy Homemade Cinnamon Raisin Bread with a Perfect Swirl

Bake a soft, sliceable homemade cinnamon raisin bread with a clean cinnamon-sugar swirl. This recipe delivers the comforting aroma and flavor of the best cinnamon raisin bread for your breakfast table.
- Prep Time: 30 min
- Cook Time: 35 min
- Total Time: 2 hr 40 min
- Yield: 1 loaf (12 slices) 1x
- Category: Breakfast
- Method: Yeast Baking
- Cuisine: American
- Diet: Vegetarian
Ingredients
- 1 cup warm milk (105-115°F)
- 2 1/4 teaspoons active dry yeast
- 1/4 cup granulated sugar plus 1 teaspoon for yeast
- 1/2 cup (1 stick) unsalted butter, softened
- 1 large egg
- 1 teaspoon salt
- 3 1/2 to 4 cups all-purpose flour
- 1 cup raisins, plumped
- 1/2 cup packed light brown sugar for swirl
- 2 tablespoons ground cinnamon for swirl
- 1/4 cup (1/2 stick) unsalted butter, melted, for brushing
Instructions
- In a small bowl, mix the warm milk, 1 teaspoon sugar, and yeast. Let stand for 5 to 10 minutes until foamy.
- In a large bowl, cream together the 1/2 cup softened butter and 1/4 cup granulated sugar until light and fluffy. Beat in the egg and salt.
- Add the yeast mixture to the butter mixture and mix well. Gradually add the flour, one cup at a time, mixing until a soft dough forms. You may need slightly less or more flour.
- Knead the dough on a lightly floured surface for 6 to 8 minutes until smooth and elastic. Place the dough in a lightly oiled bowl, turning to coat. Cover and let rise in a warm place for 1 to 1.5 hours, or until doubled in size.
- While the dough rises, prepare the cinnamon swirl filling: In a small bowl, mix the brown sugar and ground cinnamon thoroughly.
- Gently punch down the risen dough. Turn it out onto a lightly floured surface. Roll the dough into a large rectangle, about 12×18 inches.
- Brush the entire surface of the dough evenly with the 1/4 cup melted butter. Sprinkle the cinnamon-sugar mixture evenly over the buttered surface. Scatter the plumped raisins over the sugar layer.
- Starting from the long edge, tightly roll the dough into a log. Pinch the seam closed.
- Carefully place the log, seam-side down, into a greased 9×5 inch loaf pan. Cover the pan loosely and let the dough rise again in a warm place for 30 to 45 minutes, or until the dough has crowned about 1 inch over the rim of the pan.
- Preheat your oven to 375°F (190°C) during the last 15 minutes of the second rise.
- Bake for 30 to 35 minutes, or until the top is golden brown and the internal temperature reaches 200°F (93°C). If the top browns too quickly, loosely tent it with foil.
- Remove the loaf from the pan immediately after baking and let it cool completely on a wire rack before slicing to enjoy your best cinnamon raisin bread.
Notes
- To plump raisins quickly, soak them in hot water or rum for 10 minutes, then drain and pat them dry before adding them to the dough.
- For a beautiful, shiny crust, brush the top of the loaf with a little extra melted butter immediately after it comes out of the oven.
- If you prefer a no-knead raisin bread, allow the first rise to go for 3 hours at room temperature, then proceed with the rolling and shaping steps.
Nutrition
- Serving Size: 1 slice
- Calories: 240
- Sugar: 15g
- Sodium: 250mg
- Fat: 8g
- Saturated Fat: 5g
- Unsaturated Fat: 3g
- Trans Fat: 0g
- Carbohydrates: 40g
- Fiber: 2g
- Protein: 5g
- Cholesterol: 30mg