
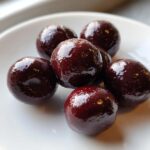
There’s just something magical about a classic candy, isn’t there? Those little treasures that taste like nostalgia and pure indulgence all wrapped up in one bite. If you’ve ever admired those beautiful, glossy confections in a candy shop window—the perfect **chocolate covered cherries**—you might think they’re impossible to recreate at home. Well, I’m here to gently tell you they are wonderfully simple, even for beginners! After thirty years of teaching patience in a classroom, I promise to share this chocolate covered cherries recipe with the clarity and kindness you deserve. We’re going to wrap juicy cherries in the smoothest fondant and dip them in rich chocolate. It’s a truly impressive dessert that proves you don’t need complex skills to make something gourmet.
- Why You Will Love This Classic Homemade Chocolate Covered Cherries Recipe
- Ingredients for Perfect Chocolate Covered Cherries
- Essential Equipment for Making Chocolate Covered Cherries
- Step-by-Step Instructions for Homemade Chocolate Covered Cherries
- Tips for Success When Making Chocolate Covered Cherries
- Making Chocolate Covered Cherries for Valentine's Day Gifts
- Storage and Reheating Instructions for Chocolate Covered Cherries
- Frequently Asked Questions About Chocolate Covered Cherries
- Share Your Homemade Chocolate Covered Cherries Creations
Why You Will Love This Classic Homemade Chocolate Covered Cherries Recipe
I truly believe this recipe for chocolate covered cherries is going to become a staple in your kitchen, especially when you need an elegant gift. It’s just so satisfying making something that looks this fancy right in your own home. Here’s why it’s a winner:
- That Homemade Texture: Get that perfect snap from the rich chocolate shell followed by the soft, melt-in-your-mouth fondant surrounding the tart cherry. It’s heavenly!
- Perfect for Gifting: These look absolutely gourmet! Box them up nicely as homemade Valentine’s day chocolate gifts or for holiday candy trays. If you love easy homemade sweets, you’ll adore these.
- Simple Steps for a Classic Treat: Even though they taste very fancy, the main steps—mixing the fondant and chilling—are straightforward. It’s one of my favorite no-bake chocolate candy recipes. If you enjoyed how simple the easy fudge recipe was, you’ll master these!
- Fondant Magic: You control the coating, meaning you can go thick or thin with your chocolate, unlike the store-bought versions.

Ingredients for Perfect Chocolate Covered Cherries
Okay, writing out the ingredient list is my favorite part because it shows just how few things you really need to make something this luxurious! Trust me, good quality ingredients go a long way here, especially that chocolate. It’s always best to have everything measured out before you even start creaming the butter, right?
For the Fondant Cherry Centers
The secret to a smooth coating is starting with smooth insides! We’re using simple pantry staples here to build that creamy shell around the fruit.
- 1 (10 ounce) jar maraschino cherries, make sure they are drained and patted very dry
- 1/4 cup butter, softened (no shortcuts here!)
- 3 cups powdered sugar, and please, sift this! It keeps lumps out of our fondant cherry centers.
- 1/4 cup milk
- 1 teaspoon vanilla extract
For Dipping the Chocolate Covered Cherries
This is where we get into the real decadence. For the best gourmet chocolate cherries tutorial results, use a good baking chocolate—something you’d enjoy eating on its own.
- 1 pound dark chocolate, either finely chopped or using good quality chips
- 1 tablespoon shortening (this is optional, but it really helps thin the chocolate for easier dipping!)
Essential Equipment for Making Chocolate Covered Cherries
Now, you don’t need a professional candy kitchen to make these lovely treats! I taught classes for thirty years, and I learned that having the right—even simple—tools makes the job much less frustrating. Think of this as gathering your supplies before you start any good project. Having these things ready means your process flows smoothly when it’s time to wrap and dip.
If you’re looking for more simple setup guides, you might enjoy checking out what I use for my easy homemade pretzel dogs recipe; the organization is similar!
Here is what you will need on your counter before we jump into the wrapping:
- A sturdy mixing bowl and a rubber spatula for creaming that fondant mixture together.
- Parchment paper (or wax paper) is absolutely necessary! You’ll need a couple of baking sheets lined with this so your beautiful homemade cherry cordials don’t stick when they set. Don’t even think about skipping this step!
- A double boiler setup, or a microwave-safe bowl if you prefer short bursts of power for melting the chocolate.
- Dipping tools! I usually use two standard kitchen forks, but candy dipping tools are wonderful if you have them. They help lift the cherry out cleanly so you get that lovely, thin chocolate shell.
- A small plate or bowl, separate from your main dipping bowl, to hold the cherries once they come out of the chocolate.
Step-by-Step Instructions for Homemade Chocolate Covered Cherries
Now for the fun part! This is where a few simple components turn into something truly special. Remember, when we make things ourselves, we control the quality, which is why these homemade cherry cordials taste so much better than anything store-bought. We’re moving step-by-step, so take your time, especially with chilling!
Preparing the Cherries and Fondant Cherry Centers
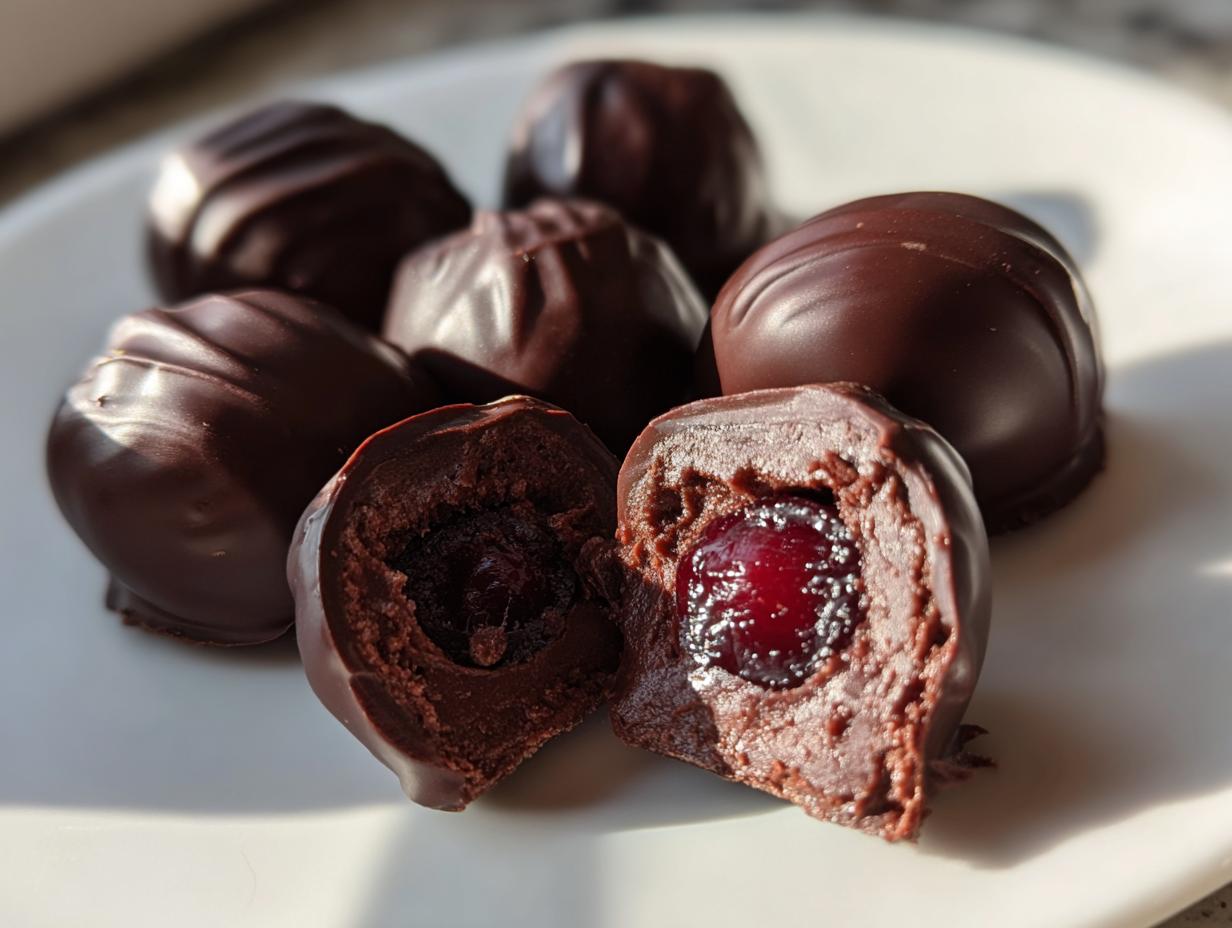
First things first, we have to deal with those cherries. Listen to me: you must pat them dry, dry, dry! If they are even a little bit damp, the fondant just won’t stick to them properly, and you’ll end up with a sticky mess instead of a clean wrap. I use a whole stack of paper towels for this part—it’s worth the effort! Once they are dry little bright red jewels, it’s time for the creamy filling. In your mixing bowl, beat that softened butter until it’s nice and creamy. Then, mix in that sifted powdered sugar, the milk, and the vanilla. Keep beating it until it looks like thick, smooth, delicious sugar dough. We want it firm, not runny!
Forming and Chilling the Fondant Covered Cherries
This step requires a little patience, but it’s wonderfully meditative once you get into the rhythm. Take about a teaspoon of your fondant mixture and flatten it into a little disc in your hand. Pop one of those very dry cherries right in the middle. Now, gently bring the edges of the fondant up and around the cherry, pinching it gently until it’s completely sealed inside. You want a nice, smooth little ball. Place each one onto your parchment-lined sheet. These absolutely MUST go into the refrigerator for at least two full hours. If they aren’t firm, they will just fall apart when they hit the warm chocolate!
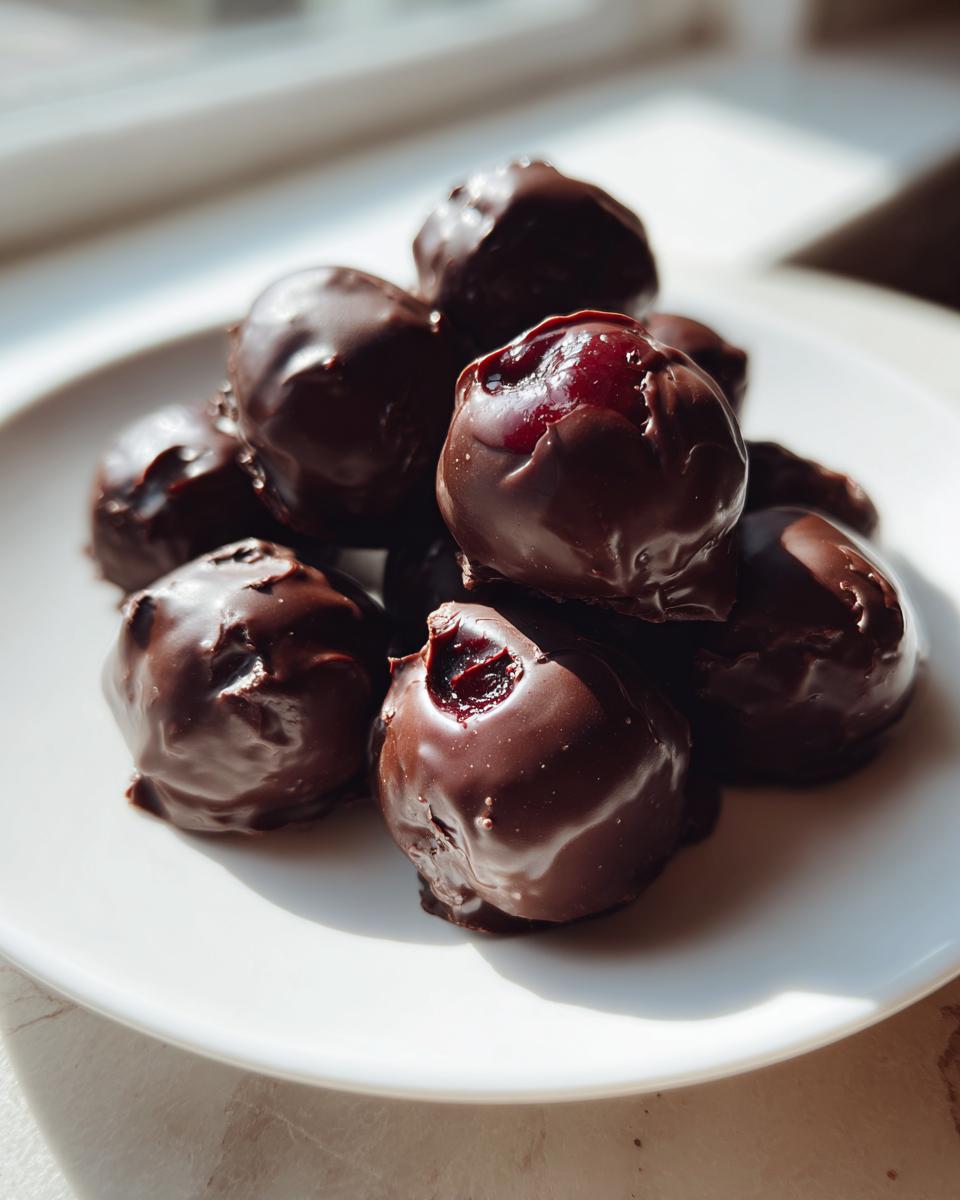
Melting Chocolate and Dipping Your Chocolate Covered Cherries
While those centers are chilling firm, melt your chocolate. I prefer the double boiler method to keep things gentle, but a microwave works fine if you use 30-second bursts and stir well between each one. If you’re using that optional shortening, mix it in once the chocolate is smooth—it makes the final coating glossy and easy to work with. Once the fondant balls are rock solid, it’s dipping time! Working quickly, dip one chilled cherry completely into the chocolate, lift it out, and let the extra drip back into the bowl. You can look at pro tips on chocolate dipping if you need a visual guide! If you want a really robust shell—perfect for gifting—let that first coat set for about fifteen minutes, and then give them a second dip. This really seals in the flavor and makes them look extra luxurious. You can find some great ideas for easy homemade chocolate desserts, like my easy chocolate mousse recipe, for other sweet events!
Tips for Success When Making Chocolate Covered Cherries
I’ve learned a few little secrets over the years making batches of these chocolate covered cherries for school events and family gatherings. If you follow these little nuggets of advice, you’ll skip right past the sticky-fingered frustration and get straight to the delicious part. Consistency is everything when dealing with candy like this!
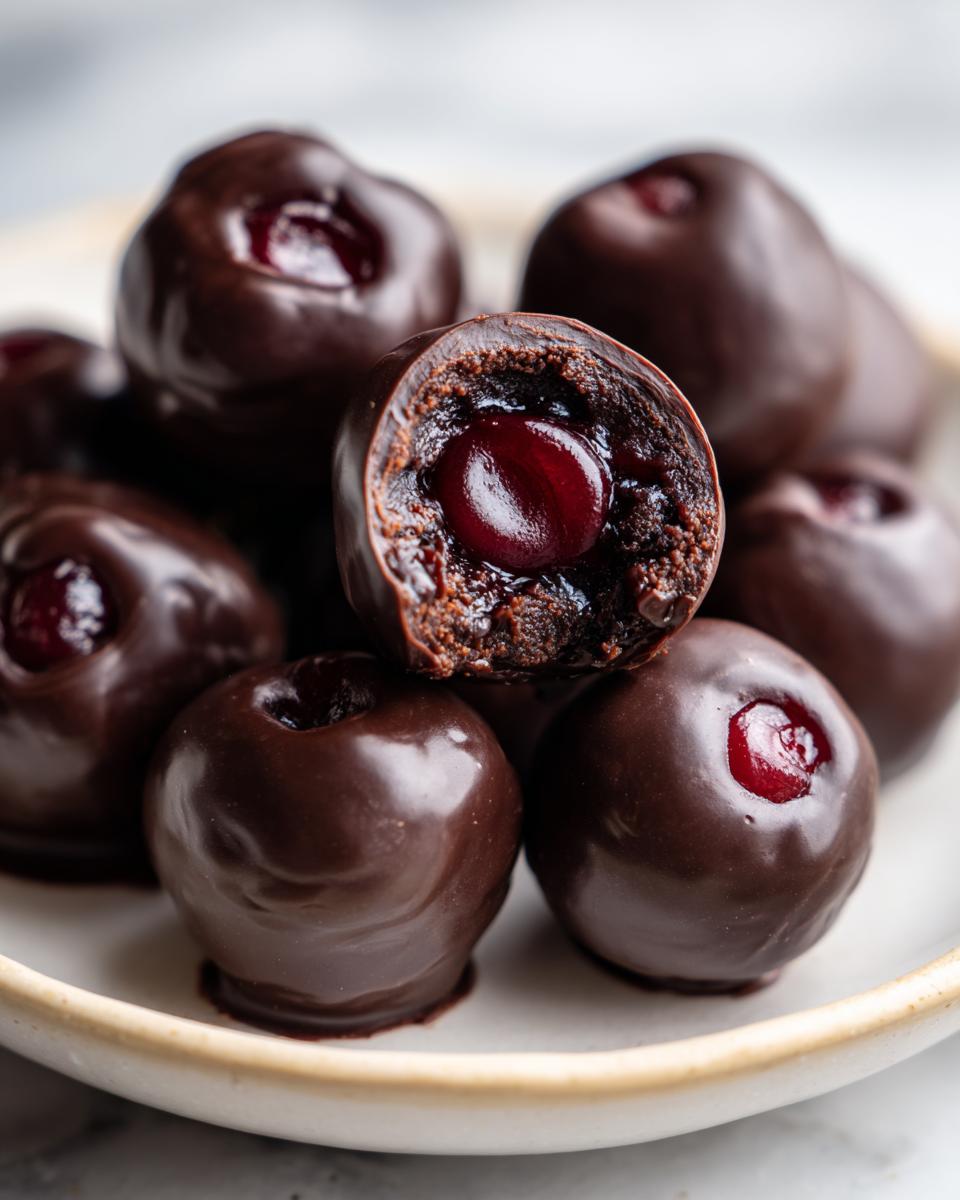
First, I want to talk about that magic liquid center. If you want that wonderful, gooey burst that reminds you of the best store-bought cordials, you must be patient after they are done! For a true liquid center effect, just let your finished candies sit out at room temperature for several days before you serve or gift them. The sugar in the fondant slowly draws the moisture out of that cherry—it’s just chemistry working on our behalf!
Also, don’t panic if your fondant gets too stiff while you’re wrapping. It happens, especially if the air conditioning is cranked up! If you find you can barely work it, just mix in a few extra drops of milk at a time—no more than that—until it softens back up to a manageable, though still firm, consistency. It helps immensely when you are moving onto the second batch. For more recipes where texture is key, take a peek at my cream cheese chocolate chip cookies for another creamy delight.
Finally, remember that chocolate choice is vital for these gourmet chocolate cherries tutorial favorites. Use high-quality dark chocolate; it cuts through the sweetness of the fondant so perfectly. If you want professional-looking results, check out what others have done with their dipping techniques over at this guide!
Making Chocolate Covered Cherries for Valentine’s Day Gifts
Oh, these candies just scream romance and thoughtfulness, don’t they? If you are thinking about making these for Valentine’s Day—or honestly, any occasion where you want to give something truly special from your kitchen—presentation matters just as much as the taste. These chocolate covered cherries feel inherently gourmet, but you can elevate them even further with just a little presentation magic!
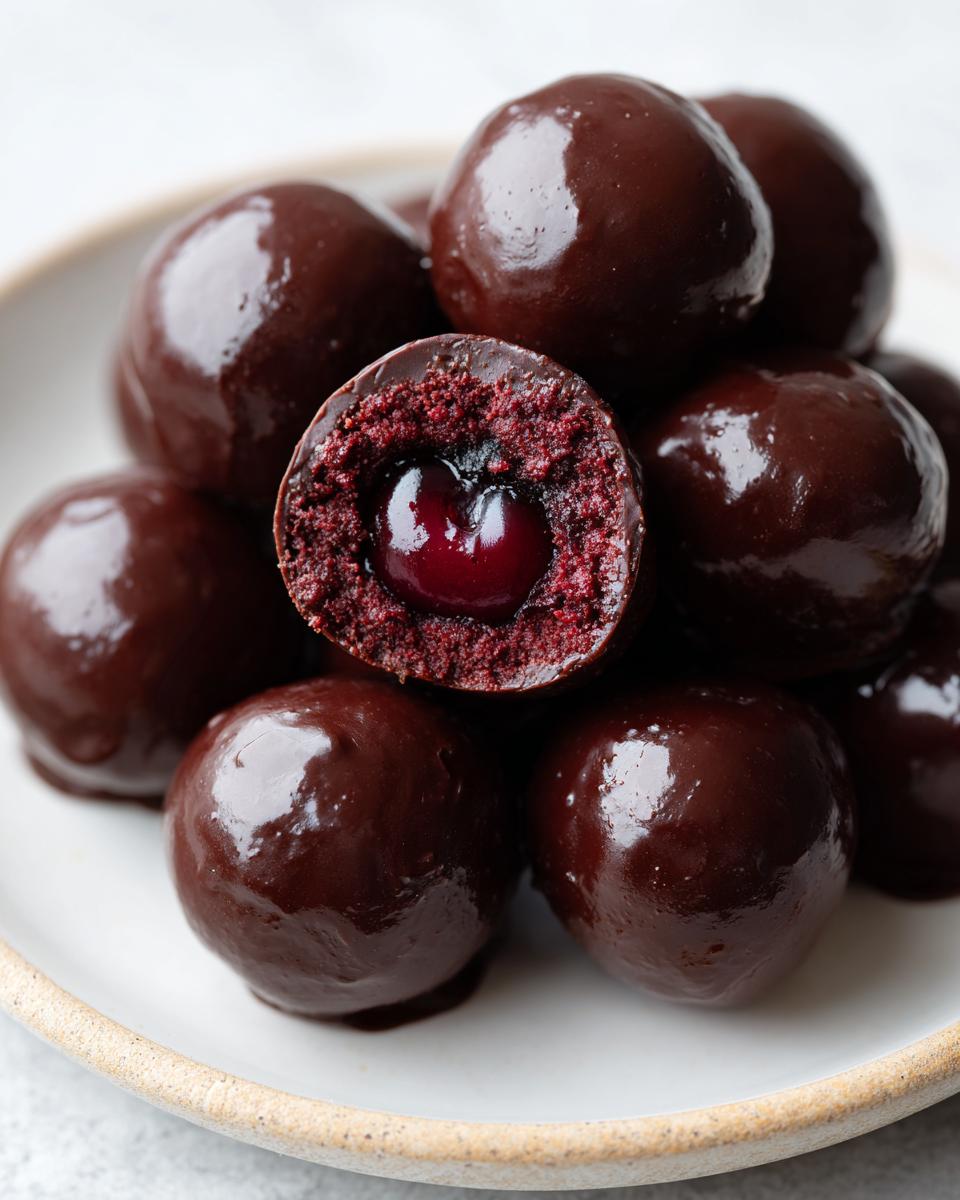
The key to making them look impressive is twofold: a smooth, unblemished chocolate coating and great packaging. If you got that second chocolate dip in, you’re already halfway there! A thick, even shell of dark chocolate looks so elegant next to the deep red cherry peeking out if you made a slight gap, or just sitting perfectly round in a little box.
For packaging, forget just tossing them in a Ziploc bag! Think small, clear cello bags tied with a wide, satin ribbon—maybe a deep red or a rich cream color. You can even use those tiny little paper candy cups, the ones you usually see those fancy truffles sitting in. Pop three or five of these homemade cherry cordials into a cup and arrange them in a small box. It instantly looks like something you bought from a fancy chocolatier.
If you are looking for other decadent treats that travel well as gifts, my easy chocolate fudge recipe is always a huge hit during the holidays, too. These cherries are beautiful on their own, but when you package them thoughtfully, you are truly giving someone a handcrafted gift of love. For some inspiration on creating that beautiful, glossy, impressive look, take a peek at the ideas shared in this selection of gorgeous chocolate treats!
Storage and Reheating Instructions for Chocolate Covered Cherries
Now that you’ve poured all your love into these beautiful chocolate covered cherries, we have to talk about keeping them perfect until it’s time to share (or devour them!). Unlike some cookies or brownies where refrigeration is a must, candy—especially this kind—needs careful handling. I’ve learned that temperature is everything when it comes to keeping that chocolate crisp and the fondant smooth.
Here is my number one rule for storing homemade candy: keep them cool and dry, but usually not the fridge! For the best texture, especially if you are hoping for that wonderful liquid center to develop, room temperature is absolutely the way to go. Aim for a cool spot, generally around 65 to 70 degrees Fahrenheit, away from any direct sunlight or anything that might give off a strong smell.
Do I need to refrigerate my chocolate covered cherries?
Generally, no, you don’t need to refrigerate them, and I actually advise against it if you can help it. Putting them in the fridge can cause condensation when you take them out later. That moisture is the enemy! It can cause the chocolate to bloom (that chalky white look) and it certainly won’t help the fondant stay firm and smooth. If your house is very warm—say, consistently over 75 degrees—then place them in an airtight container and pop them in the fridge. Just remember to let them sit on the counter for about 30 minutes before serving so the chocolate softens up just a touch.
How long do homemade chocolate covered cherries last?
This is the part that makes this recipe so great for holiday prep! Because they are essentially fruit preserved in sugar (that fondant layer), they keep quite well. If you stored them correctly at cool room temperature, you can expect them to be lovely for about two weeks. If they are refrigerated, they might push closer to three weeks, but remember to let them warm up a bit before eating.
And here’s that liquid center reminder again—that truly decadent, gooey center is a slow process! If you eat them the next day, the center will be firm fondant. If you let them sit for 5 to 7 days at room temperature, the sugar will start drawing the syrup out of the maraschino cherry, creating that beloved, slightly liquid core. It’s a sweet reward for your patience!
How should I store leftovers or extras?
If you’ve got extra and want to keep them fresh longer, definitely place them in a truly airtight container. I like using those nice glass containers that seal tightly. Don’t stack them too high, either! If you have a lot, it’s better to use a sturdy box lined with parchment paper and place them in a single layer, or use paper liners between layers. This keeps them from sticking to each other. For more great tips on storing homemade treats so they aren’t wasted, you might want to check out my guide on easy no-bake mini cheesecake recipe storage—the container advice is transferable!
Frequently Asked Questions About Chocolate Covered Cherries
It seems like every time I share this recipe for chocolate covered cherries, someone always has a little question about how to get that perfect bite. That’s perfectly normal! Making homemade chocolates can feel a little intimidating at first, but once you know the little tricks, you’ll feel like a seasoned candymaker. I’ve gathered the most common things folks ask me, especially when they are trying to make these as elegant homemade sweets for a party. If you are interested in making other simple, yet impressive sweets, you should see how easy my easy crockpot shredded buffalo chicken recipe is—sometimes you just need an easy win!
Can I use fresh cherries instead of maraschino cherries for chocolate covered cherries?
That’s a great question that comes up a lot! While fresh cherries sound lovely, for this particular recipe, I really steer folks toward using the good quality, jarred maraschino cherries. Why? Because fresh cherries have way too much natural moisture, and they need to be cooked down and heavily sugared—basically, candied—before they even get close to the fondant. If you just wrap a fresh cherry, the whole thing will likely turn into a soggy disaster before you even get to the chocolate step! Using the drained, pre-sweetened ones ensures your fondant cherry centers stay firm and your final product is one of those melt-in-your-mouth cherries you were hoping for.
What is the best chocolate for dipping homemade cherry cordials?
When we are making something simple, the quality of that one dominant flavor really shines through. For the best rich dark chocolate treats outcome, skip those waxy chocolate coating bars and go for real bittersweet or semi-sweet baking chocolate. Quality matters here! If you use chips, make sure they are high quality. Now, when you melt it down, if you find your chocolate is just too thick to get a smooth coat—almost goopy instead of drippy—that’s where the optional shortening comes in handy. Adding just a teaspoon or so of pure shortening helps thin out that chocolate nicely, making the dipping process much easier for that perfect shell on your homemade cherry cordials. Trust me, the slight addition of fat makes dipping less of a chore!
How do I get the liquid center in my chocolate covered cherries?
Ah, the coveted liquid center! This is the part that makes people think these are professionally made. The great news is that you don’t have to *do* anything extra to create the liquid center—it happens all by itself over time! Remember how we made sure those cherries were super dry before wrapping them in the fondant? That fondant layer is made primarily of sugar. If you let your finished, solid chocolate-covered cherries sit at cool room temperature for about five to seven days, the sugar in that fondant slowly starts drawing the moisture, or syrup, right out of the cherry. It’s a beautiful, natural process! Keep them in an airtight container away from heat, and the longer they sit, the gooier that center gets. It makes them the perfect item to prepare well ahead of your parties.
Share Your Homemade Chocolate Covered Cherries Creations
Well, that’s it! You’ve made a batch of truly decadent chocolate covered cherries. I’d absolutely love to hear how they turned out for you! Please take a moment down below to leave me a rating—it really helps other home cooks know this recipe is dependable.
Did you manage to get that nice, smooth chocolate shell? How long did you wait to get that perfect liquid center? If you snap a picture of your beautiful homemade candy, feel free to send it my way! And if you are looking for another wonderful treat to share, you have to try my cannoli cookies next time. Happy baking, dear friends!
PrintClassic Homemade Chocolate Covered Cherries with Fondant Center
Make decadent homemade cherry cordials with a smooth fondant center wrapped around juicy maraschino cherries, then dipped in rich dark chocolate. This recipe is perfect for gifting or serving as an impressive dessert.
- Prep Time: 45 min
- Cook Time: 15 min
- Total Time: 60 min
- Yield: About 24 candies 1x
- Category: Candy
- Method: No-Bake
- Cuisine: American
- Diet: Vegetarian
Ingredients
- 1 (10 ounce) jar maraschino cherries, drained and patted very dry
- 1/4 cup butter, softened
- 3 cups powdered sugar, sifted
- 1/4 cup milk
- 1 teaspoon vanilla extract
- 1 pound dark chocolate, chopped or chips
- 1 tablespoon shortening (optional, for smoother dipping)
Instructions
- Place the drained maraschino cherries on a paper towel-lined plate. Pat them thoroughly dry with more paper towels. This step is important for the fondant to stick.
- In a medium bowl, cream together the softened butter, powdered sugar, milk, and vanilla extract until a smooth, thick fondant forms. You may need to add a tiny bit more milk if the mixture is too stiff, but keep it firm.
- Take a small amount of fondant (about 1 teaspoon) and flatten it in your palm. Place one dried cherry in the center and carefully wrap the fondant around the cherry, sealing it completely. Roll it into a smooth ball shape.
- Place the fondant-covered cherries on a parchment-lined baking sheet. Chill them in the refrigerator for at least 2 hours, or until the fondant is very firm.
- Melt the chocolate and shortening (if using) together in a double boiler or in short bursts in the microwave, stirring until completely smooth.
- Working quickly, use a dipping tool or two forks to dip each chilled cherry ball into the melted chocolate, ensuring it is fully coated. Let excess chocolate drip off.
- Return the coated cherries to the parchment-lined sheet. If you want a double coat for a thicker shell, let the first layer set for 15 minutes at room temperature, then dip them a second time.
- Allow the chocolate to set completely at room temperature or briefly in the refrigerator before serving or storing.
Notes
- For a liquid center effect, allow the finished candies to sit at room temperature for several days before eating; the sugar will draw moisture from the cherry.
- If the fondant becomes too stiff while working, add a few drops of milk to soften it slightly.
- Use high-quality dark chocolate for the best flavor in your gourmet chocolate cherries.
Nutrition
- Serving Size: 1 candy
- Calories: 180
- Sugar: 25g
- Sodium: 15mg
- Fat: 9g
- Saturated Fat: 5g
- Unsaturated Fat: 4g
- Trans Fat: 0g
- Carbohydrates: 25g
- Fiber: 1g
- Protein: 2g
- Cholesterol: 10mg