
Oh, friends, I know the feeling. It’s 5:30 PM, you’re tired, and the last thing you want is a complicated mess filling your sink and your weeknights. That’s why I developed this baked ranch chicken recipe—it’s my absolute favorite way to get a flavorful, satisfying meal on the table without breaking a sweat. We aren’t messing around here; this version delivers the juiciest interior wrapped in the crispiest coating you can imagine, and it’s ready in under 35 minutes total! As a former teacher, I pride myself on making directions very clear, ensuring every home cook, like the ones I taught for over thirty years, can count on a wonderful result. This is dependable, family-friendly comfort food, pure and simple. If you are looking for the best in simple weeknight dinners, this is the one!
- Why This Easy Baked Ranch Chicken Is Your New Weeknight Chicken Recipe
- The Ingredients for Flavorful Baked Ranch Chicken
- Step-by-Step Instructions for Your Simple Chicken Bake
- Tips for Success with Baked Ranch Chicken
- Variations: Making Cheesy Ranch Chicken or Adding Veggies
- Serving Suggestions for Your Quick Chicken Dinner
- Storage and Reheating Instructions for Leftover Baked Ranch Chicken
- Frequently Asked Questions About This Chicken Bake
- Sharing Your Cooking by Carla Creations
Why This Easy Baked Ranch Chicken Is Your New Weeknight Chicken Recipe
When you’re trying to beat the clock on a Tuesday night, you need a recipe you can depend on, and this is it. We’re wrapping up prep and cook time in less than 35 minutes, making this the perfect quick chicken dinner. Forget soggy disappointment; this method guarantees a wonderfully juicy baked chicken breast wrapped up in flavor. It’s truly a family friendly chicken bake because my own grandkids devour it without complaint! It’s low effort, high reward, which is just how I like to keep things here at Cooking by Carla.
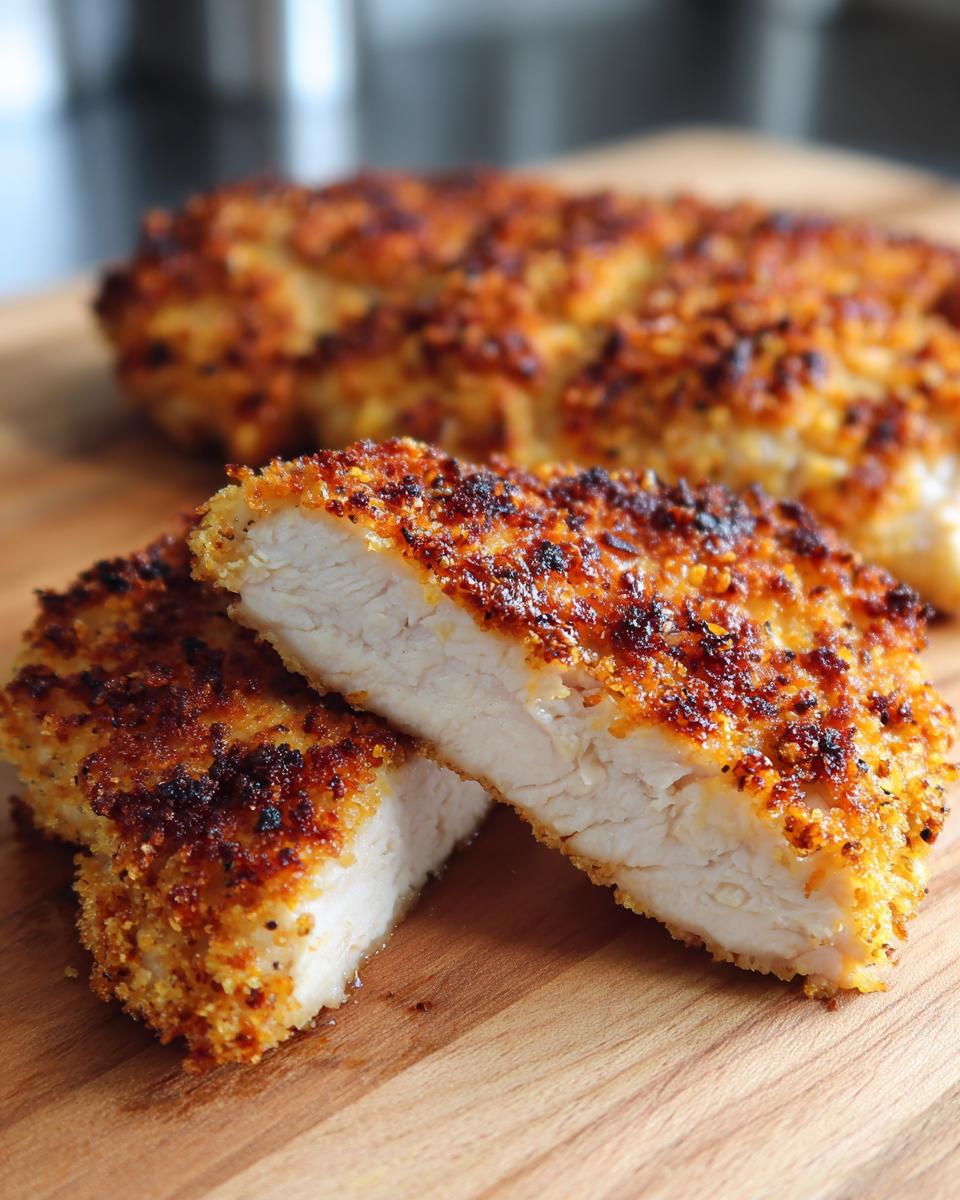
Achieving the Perfect Crispy Ranch Chicken Texture
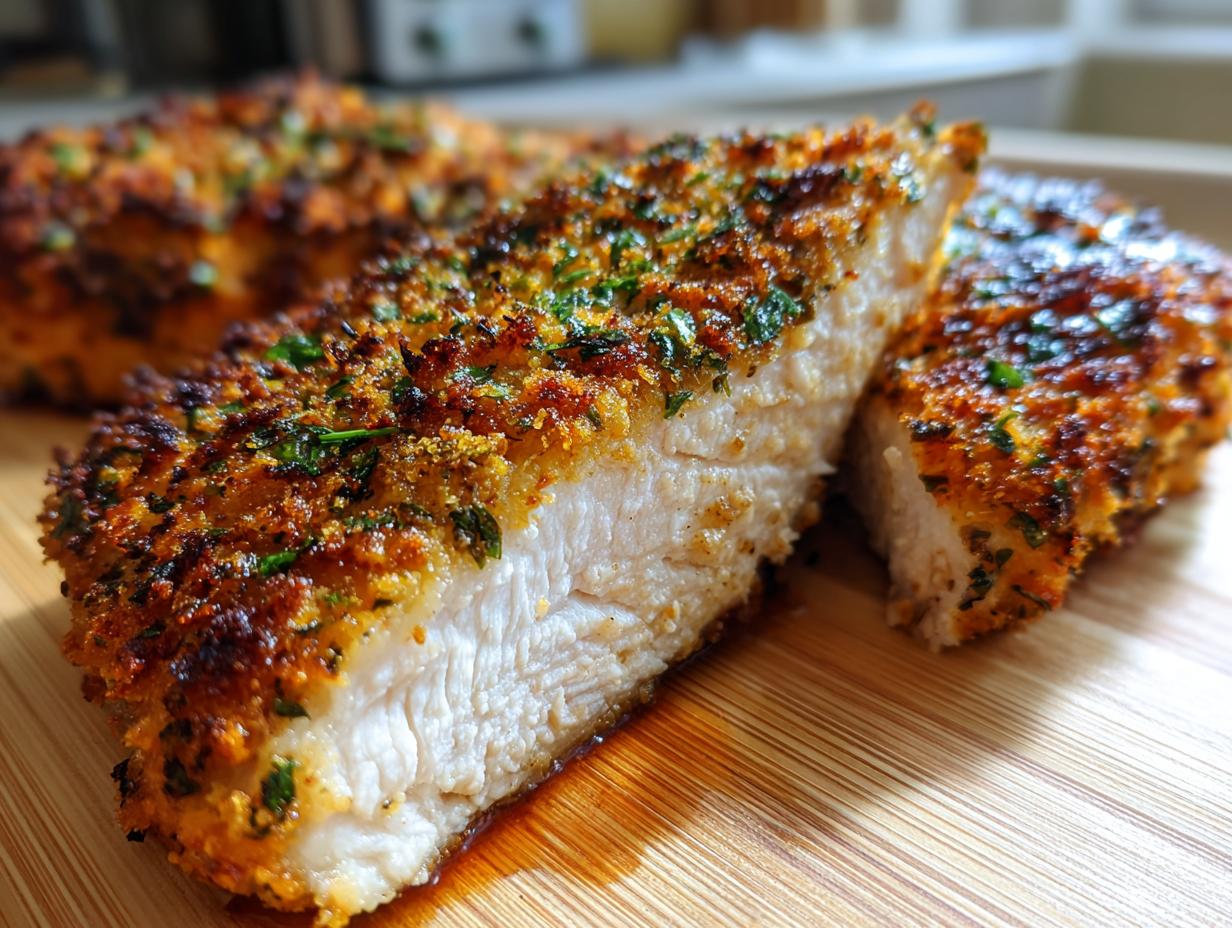
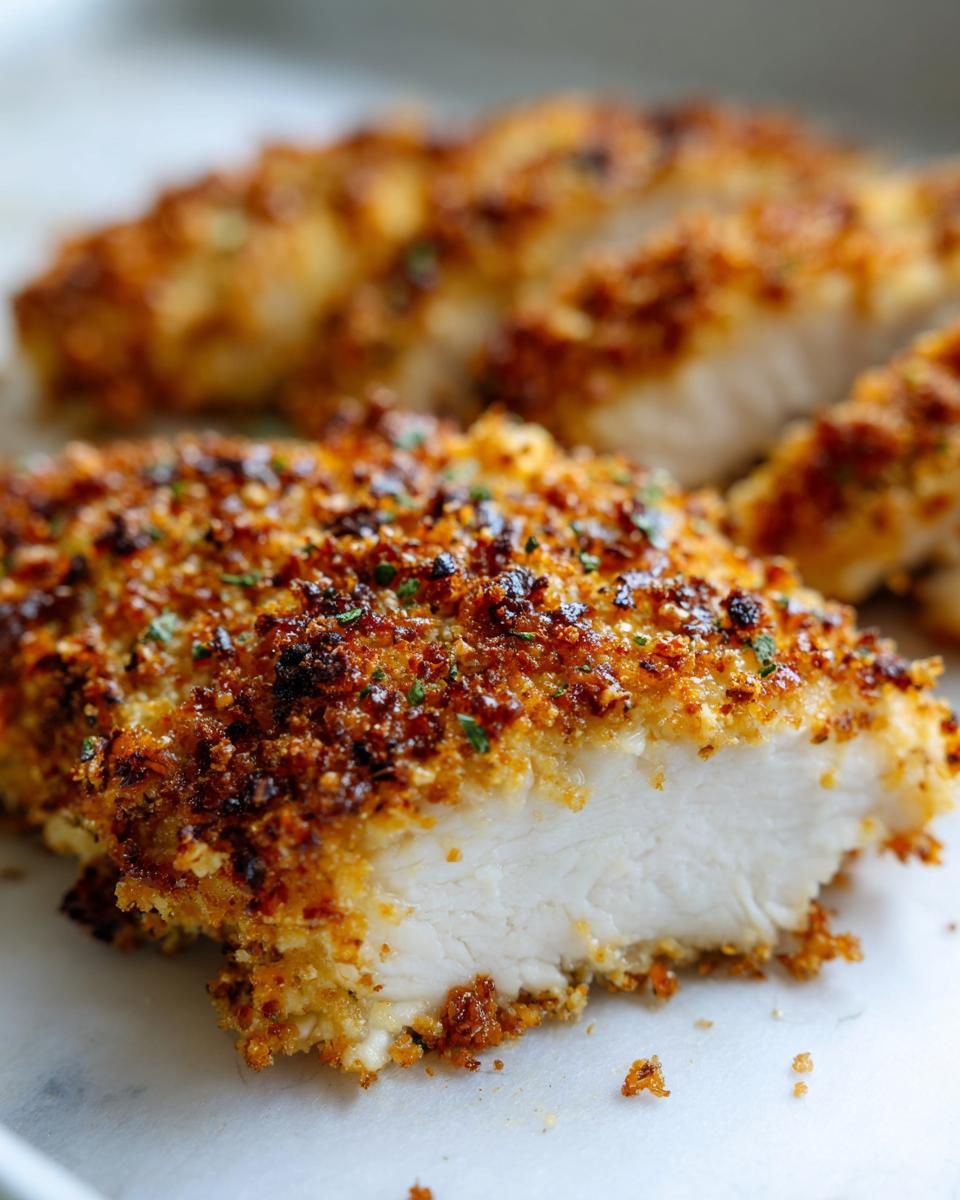
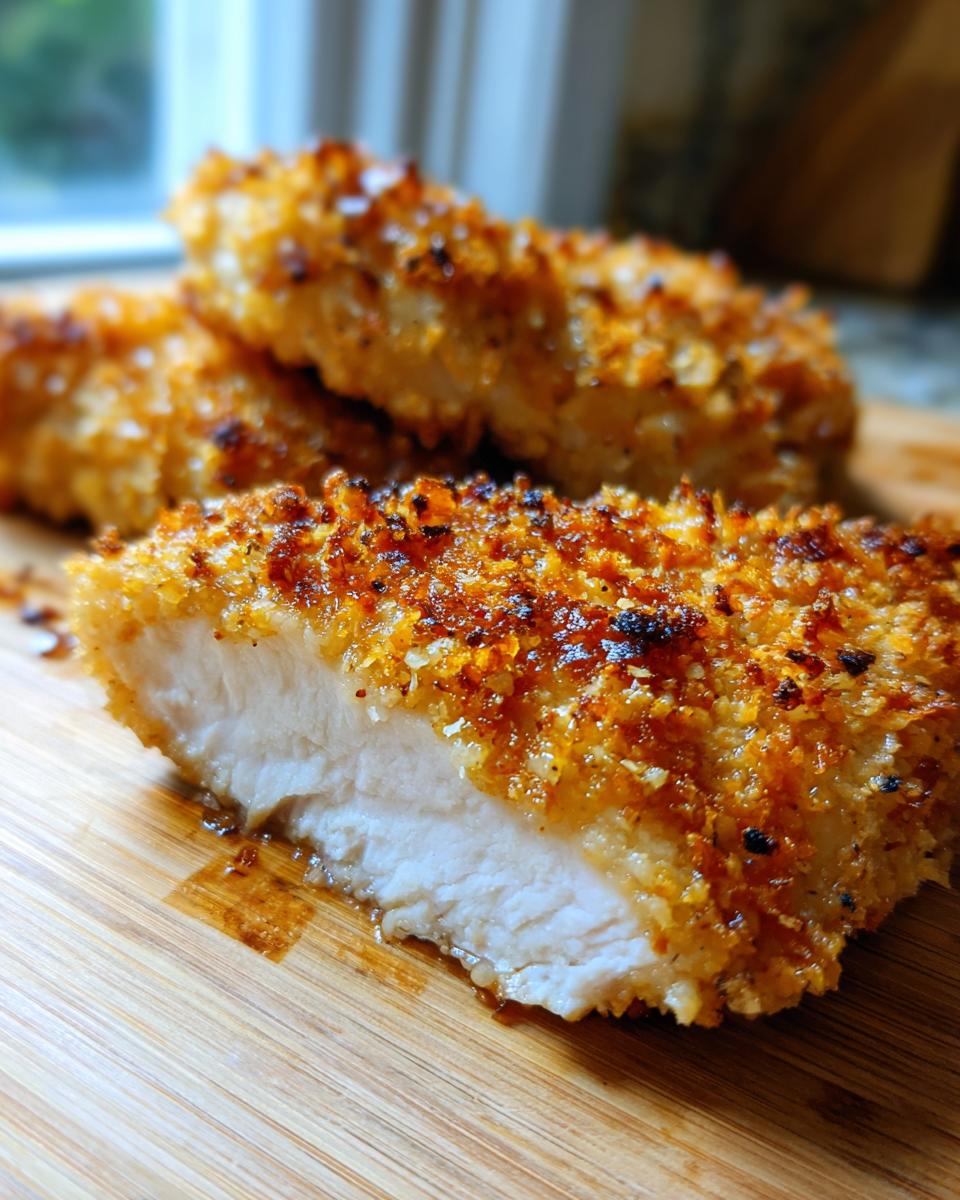
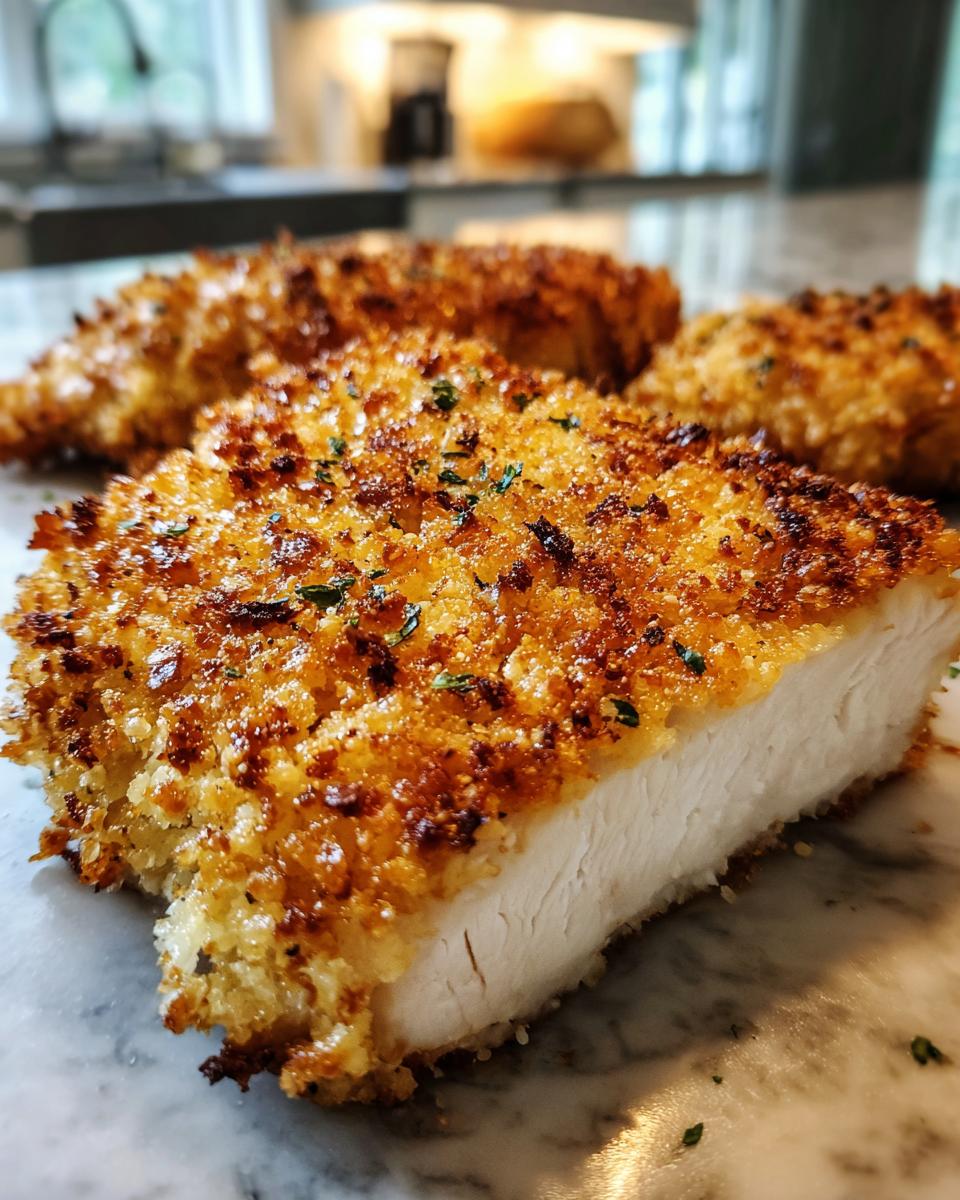
The secret to that satisfying crunch you crave doesn’t involve a deep fryer, thank goodness! It all comes down to our little three-step station: a dusting in flour, a gentle dip in milk, and then pressing it firmly into the panko and Parmesan mix. That final press is what locks everything down. It creates a sturdy shield around the chicken so you get that fantastic crispy ranch chicken crunch on the outside while locking all the moisture in. That satisfying crust is absolutely worth those two extra minutes of dipping!
The Ingredients for Flavorful Baked Ranch Chicken
When I measure out ingredients, I want everyone to feel confident that they have exactly what they need. There’s no sense in getting halfway through and realizing you’re short something important! This recipe uses simple pantry staples to achieve maximum flavor, especially that signature savory element. For this easy baked chicken, we need four nice chicken breasts, plus the ingredients for our custom crispy coating.
You’ll need:
- 4 boneless, skinless chicken breasts (about 6 to 8 ounces each)
- 1 packet (1 oz) dry ranch seasoning mix
- 1/2 cup all-purpose flour
- 1/4 cup grated Parmesan cheese (the good dusty stuff works great here!)
- 1/4 cup panko breadcrumbs
- 1/4 cup milk or buttermilk
- 2 tablespoons olive oil
- 1 teaspoon garlic powder
- 1/2 teaspoon black pepper
I like to lay everything out—my bowls, my measuring spoons—before I even turn the oven on. It keeps things calm when dinner time gets hectic!
Ingredient Notes and Substitutions for Baked Ranch Chicken
Now for a few little notes from my kitchen to yours. These details are what turn a good dish into a great one. If you want to pump up the richness slightly, go ahead and swap the regular milk for buttermilk. It adds a tiny bit of tang that plays so well with the savory ranch seasoning.
Also, I mentioned garlic powder, but if you really want to deepen that coating flavor, feel free to toss in an extra 1/2 teaspoon of onion powder with your flour mix. Don’t touch the pepper, though! That little bit balances everything out beautifully. Baking is chemistry, but it’s also a little bit of magic, and these small additions really help that magic happen.
Step-by-Step Instructions for Your Simple Chicken Bake
Now that we have our ingredients lined up like little soldiers ready for inspection, let’s get this baked ranch chicken into the oven! First things first, get that oven warmed up to 400°F (200°C). Don’t wait until you’re elbow-deep in flour to preheat; we need that heat ready to go when the chicken is breaded. Have your baking dish ready, either lightly greased or, my personal favorite, lined with parchment paper because cleanup is half the battle!
The instructions are straightforward: three dips, one drizzle, and into the heat it goes. This methodical approach ensures everything cooks evenly and gives us that lovely texture we are aiming for. Remember, patience during the coating process pays off big time once you take that first bite!This method is similar to how I approach my garlic parmesan chicken, focusing first on the breading.
Preparing the Coating Stations for Crispy Baked Ranch Chicken
You need three shallow dishes, friends. In the first, whisk your flour, ranch mix, garlic powder, and pepper until it looks uniform. That’s your dry base. Next, pour your milk or buttermilk into the second dish. Then, in the third, combine those breadcrumbs and Parmesan cheese.
The trick here is the final press. When you take the chicken out of the milk, you want it slightly wet, but not dripping everywhere. Then, you *press* it down into that panko mix. I mean press it—really coat those tops and bottoms firmly. Don’t just gently dredge it; we want that coating to stick tight so it comes out as crispy baked ranch chicken, not falling off halfway through the bake!
Baking Time and Temperature for Juicy Baked Chicken Breast
Once your ranch-crusted beauties are sitting snugly in that prepared pan, drizzle just a tiny bit of olive oil over the top of the coatings. This helps them brown up nicely while baking. Pop the tray into that hot 400°F oven. We are aiming for 20 to 25 minutes. Since we are talking about juicy baked chicken breast, you absolutely must check the temperature. It’s done when it hits 165°F (74°C) in the thickest spot. Seriously, do not skip the check! And please, let it sit on the counter for five minutes before you cut into it. That rest time is critical for keeping all those lovely juices right where they belong inside the meat.
Tips for Success with Baked Ranch Chicken
I have taught so many beautiful young people how to cook, and I’ve learned that the difference between a good version of a recipe and a *great* version often comes down to one or two small habits. For this baked ranch chicken to be absolutely perfect—juicy inside, rock-solid crisp outside—you need to keep a few things in mind when you set up your station.
Here are my four must-do tips, straight from managing a busy classroom kitchen for decades:
- Don’t Skip the Rest! I know it’s tough when that wonderful, savory smell fills your house, but resting the chicken for five minutes outside the oven is non-negotiable. If you slice it the second it comes out, all that delicious moisture just runs onto the pan. Let it sit, and it stays right inside the meat.
- Use Room Temperature Chicken (Almost): Don’t put ice-cold chicken straight from the fridge into the hot oven. It causes the outer coating to cook too fast while the center stays icy, leading to uneven results. Pull the chicken out with your flour station ingredients about 15 minutes before you start dredging. Not warm, just not freezing cold!
- Parchment Paper is Your Best Friend: Even though you can grease your dish, lining it with parchment paper is the easiest way to ensure you don’t get any sticky bits glued to the bottom of your casserole dish. Plus, it means cleanup is faster than washing a single dinner plate! You can find my favorite cleaning tips when making crispy oven roasted breakfast potatoes, which are great alongside this chicken.
- Keep Your Stations Dry: When you are dredging, try hard not to let the flour mixture get wet, and keep your buttermilk separate from your breading. If the dry ingredients clump up or get milky, your coating won’t adhere properly and you’ll end up with patches of soggy chicken, which defeats the whole purpose of this easy baked chicken recipe!
Variations: Making Cheesy Ranch Chicken or Adding Veggies
Once you master the base recipe for baked ranch chicken, you realize just how versatile it is for creating different spreads on family favorites. Who doesn’t love adding a little extra indulgence? If you want to turn this into a decadent cheesy ranch chicken, it’s super easy to achieve that creamy, melted topping everyone adores.
Right near the end of the baking time—I’m talking about the last five minutes—pull the pan out gently. Sprinkle a good amount of shredded sharp cheddar cheese right over the top of each breast. Pop it back in just long enough for the cheese to get melty and bubbly. It’s the perfect way to dress it up for a weekend meal.
Another wonderful addition that keeps things easy is bacon. Cook up a few strips of bacon until nice and crisp, then crumble them up small. You can mix those flavorful bacon bits right into your panko breadcrumb station before you start dredging the chicken. It adds a salty crunch that is just heavenly with that savory ranch flavor!
If you are trying to make this a more complete meal without making a separate side dish, you can absolutely bring some veggies right into the pan with your chicken. Asparagus is my go-to for this. Just toss the spears lightly with a little olive oil and salt, and nestle them around the chicken breasts in the pan before they go into the oven. They bake right alongside the chicken, absorbing all those delicious ranch drippings. If you have time for a full side vegetable element, you might want to check out my recipe for a fantastic broccoli cheese casserole!
Serving Suggestions for Your Quick Chicken Dinner
Part of making a wonderful evening meal is having everything ready at the same time, isn’t it? This baked ranch chicken shines because it cooks relatively quickly, leaving you time to put together a side dish or two. You want something that complements that creamy, savory ranch profile without fighting it. I always think about balancing the richness of the coating with something fresh or starchy.
As I mentioned in the tips section, my very favorite way to turn this into a complete meal is pairing it with some simple steamed or roasted broccoli. The slight bitterness of the green vegetable just cuts through the richness of the ranch beautifully. Another classic partner that everyone loves is a big scoop of creamy mashed potatoes. They are just pure comfort under that crunchy chicken!
If you need something that comes together quickly on the stovetop while the chicken is resting, I highly recommend a simple rice pilaf. It cooks up fluffy and absorbs all those wonderful seasonings floating around the baking dish. You can find a great, easy recipe for easy creamy one-pan cheesy rice that pairs wonderfully if you want to add just a *touch* more cheesy goodness to your quick chicken dinner plate!
Storage and Reheating Instructions for Leftover Baked Ranch Chicken
Even though this baked ranch chicken vanishes fast, sometimes you have a little bit left over. That’s a good thing! Store any cooled leftovers in an airtight container right in the refrigerator for up to four days. Now, I know the microwave is fast, but it will absolutely steam that lovely crust right into sogginess. Skip it!
For crispy results, use your oven or an air fryer set around 350°F. Just a few minutes is all it takes to wake that coating back up. You’ll have perfectly good, usable leftovers from your simple chicken dinner ready to go!
Frequently Asked Questions About This Chicken Bake
Oh, I always get questions once folks start making this! Don’t you worry if you have a different cut of meat or a specific dietary need—we can usually tweak recipes to fit right in. Here are a few things folks ask me often about making this baked ranch chicken work perfectly for their family.
Can I use Oven Baked Chicken Thighs instead of Breasts?
Yes, you absolutely can use bone-in or boneless chicken thighs! Thighs naturally have more fat, so they are almost impossible to dry out, which is wonderful. Since thighs are often thicker than breasts, you will need to adjust your baking time. Instead of that quick 20 to 25 minutes, keep an eye on them and expect them to take closer to 30 to 35 minutes, depending on the thickness. Just be sure to use a meat thermometer and pull them when they hit the safe 165°F internal temperature. These make an excellent, slightly richer oven baked chicken thighs supper, Carla-approved!
How to Make This Recipe Keto Friendly Ranch Chicken?
This is a great question for all my friends watching their carb count! The main sources of carbs here are the flour and the panko breadcrumbs, so we need smart swaps for those. For the flour dip, use almond flour or coconut flour instead—either works beautifully. For the crunch, ditch the panko entirely and crush up some pork rinds until they have a texture similar to breadcrumbs. It works like magic for creating that crunchy crust, which means you can enjoy this as a keto friendly ranch chicken dish! Just make sure your ranch seasoning packet doesn’t have added sugars, though most dry mixes are fine, unlike some recipes you might find, such as my keto meatloaf.
What if I don’t have buttermilk?
If you are out of buttermilk, don’t run to the store for just one ingredient! I usually tell people to make their own right there in the kitchen. Take your regular milk (whole milk is best here) and stir in one teaspoon of white vinegar or lemon juice for every one-quarter cup of milk you need. Give it a gentle stir and let it sit on the counter for about five to ten minutes. It will curdle just slightly, and bam—you have glorious, tangy buttermilk ready for your next simple chicken dinner idea!
Can I turn this into a Ranch Chicken Casserole?
Oh, that sounds like wonderful comfort food chicken! To take this recipe and turn it into a quick bake, you’d just cook your chicken breasts until they hit about 150°F internally (so they aren’t fully cooked). Shred the chicken right in the pan, then mix it with some cream cheese, a splash of milk, maybe some cheddar, and a little extra ranch seasoning. Bake it all together until bubbly and hot. Serve that right over rice or noodles for an easy ranch chicken casserole!
Sharing Your Cooking by Carla Creations
Now that you’ve made this wonderfully flavorful and easy baked ranch chicken, I truly hope you enjoyed the peaceful process of making it as much as I do. Seeing my recipes help folks create dependable, delicious meals on busy weeknights is the biggest reward for me!
Would you do an old teacher a favor, dear friend? If this recipe saved your dinner plans this week, I would be so happy if you could take a quick moment to leave it a 5-star rating right down in the comments. It lets other home cooks know they can trust this recipe too!
I absolutely love hearing about how these dishes turn out in your homes. Did you add the bacon? Did the kids ask for seconds? Let me know all about it below. And if you share a picture of your beautiful, crispy chicken on social media, please tag me! I always love seeing your results. If you ever have a question about ingredients or want to get in touch directly, you can always reach me on my Contact Page. Happy cooking, everyone!
PrintEasy Crispy Baked Ranch Chicken for Weeknight Dinner

Make this simple, juicy, and crispy baked ranch chicken. It is a family-friendly recipe perfect for a quick weeknight dinner.
- Prep Time: 10 min
- Cook Time: 25 min
- Total Time: 35 min
- Yield: 4 servings 1x
- Category: Dinner
- Method: Baking
- Cuisine: American
- Diet: Low Fat
Ingredients
- 4 boneless, skinless chicken breasts
- 1 packet (1 oz) dry ranch seasoning mix
- 1/2 cup all-purpose flour
- 1/4 cup grated Parmesan cheese
- 1/4 cup panko breadcrumbs
- 1/4 cup milk or buttermilk
- 2 tablespoons olive oil
- 1 teaspoon garlic powder
- 1/2 teaspoon black pepper
Instructions
- Preheat your oven to 400°F (200°C). Lightly grease a baking dish or line it with parchment paper.
- In a shallow dish, whisk together the flour, dry ranch seasoning mix, garlic powder, and black pepper.
- In a second shallow dish, place the panko breadcrumbs and Parmesan cheese, mixing them well.
- In a third shallow dish, pour the milk or buttermilk.
- Dip each chicken breast first into the flour mixture, shaking off any excess.
- Next, dip the floured chicken into the milk mixture, letting any extra drip off.
- Finally, press the chicken firmly into the panko and Parmesan mixture to coat both sides evenly. This creates the crispy crust.
- Place the coated chicken breasts in the prepared baking dish. Drizzle the tops lightly with olive oil.
- Bake for 20 to 25 minutes, or until the internal temperature reaches 165°F (74°C) and the coating is golden brown and crispy.
- Let the chicken rest for 5 minutes before serving.
Notes
- For extra flavor, you can add 1/2 teaspoon of onion powder to the flour mixture.
- If you prefer a richer flavor, substitute buttermilk for regular milk.
- This chicken pairs well with roasted broccoli or mashed potatoes for a complete family meal.
Nutrition
- Serving Size: 1 breast
- Calories: 380
- Sugar: 2
- Sodium: 650
- Fat: 12
- Saturated Fat: 3
- Unsaturated Fat: 9
- Trans Fat: 0
- Carbohydrates: 15
- Fiber: 1
- Protein: 51
- Cholesterol: 145