
Oh, if you’re looking to bring a little bit of true, sparkly magic to your table, you’ve come to the perfect place! Sometimes, cooking needs to step away from the everyday savory meals and just jump into pure, unadulterated fun, doesn’t it? That’s why I am simply tickled pink—or maybe blue—to share what I think is the best cotton candy cake recipe out there. It’s so easy, and I promise you, the resulting cake is unbelievably fluffy. My grandchildren always get the biggest bright eyes when I bring one of these out for a special celebration. It’s delightfully easy to make, and you can find the full recipe details for this moist cinnamon streusel coffee cake right here on the site, too, if you happen to be looking for something different next week!
- Why This Cotton Candy Cake Recipe is a Showstopper
- Gathering Ingredients for Your Cotton Candy Cake
- Step-by-Step Instructions for Your Cotton Candy Cake
- Tips for a Perfect Cotton Candy Cake
- Variations for Your Cotton Candy Cake
- Storing and Keeping Your Cotton Candy Cake Fresh
- Frequently Asked Questions About This Cotton Candy Cake
- Estimated Nutritional Data for This Cotton Candy Cake
- Share Your Beautiful Cotton Candy Cake Creations
Why This Cotton Candy Cake Recipe is a Showstopper
I always say, good cooking doesn’t have to mean complicated, and this cake proves it! When you pull this gorgeous, colorful creation out of the oven, you’ll get those gasps every time. It truly looks like something straight out of a dream, but I want you to know you didn’t need a fancy bakery school to achieve this magic.
Here’s why this cotton candy cake is becoming one of my family’s go-to whimsical cake recipes:
- The texture is just heavenly—so incredibly light and fluffy, melting right on your tongue.
- Achieving those signature pastel swirls is easier than you think, making it a true showstopper party cake.
- It tastes exactly like that wonderful, sticky sweetness you remember from the carnival, but it’s a simple execution from scratch.
It never fails to make kids (and frankly, me!) squeal with delight when the frosting goes on. Trust me on this one; it’s worth every happy second you spend mixing!
Gathering Ingredients for Your Cotton Candy Cake
Now, ingredient gathering is always my favorite part! It’s where the magic truly begins, isn’t it? For this cotton candy cake, you’ll notice we are using standard pantry staples, but the secret is making sure a few things are prepared just right before we start mixing. You’ll need soft butter—and I mean genuinely soft, not melted—and we absolutely must use the gel food coloring. Liquid coloring just won’t give us that beautiful, saturated pastel look we are aiming for. Take a peek at what you need, especially if you’re planning ahead for a beautiful chocolate frosting recipe later this week!
For the Fluffy Cake Layers
- 1 1/2 cups all-purpose flour
- 1 1/2 teaspoons baking powder
- 1/2 teaspoon salt
- 1 cup granulated sugar
- 1/2 cup unsalted butter, softened (very important!)
- 2 large eggs
- 1 teaspoon vanilla extract
- 1/2 cup whole milk
- 1 teaspoon cotton candy extract (or flavoring syrup)
- Pink and blue gel food coloring
For the Cotton Candy Frosting Recipe
This is where your cotton candy frosting recipe really comes to life. Remember, the butter needs to be perfectly softened so it creams up beautifully and light. Don’t rush this step; happy butter makes for happy frosting!
- 1 cup unsalted butter, softened
- 4 cups powdered sugar, sifted well
- 1 teaspoon vanilla extract
- 1/2 teaspoon cotton candy extract
- 2-4 tablespoons milk or heavy cream (we only add this slowly!)
- Pink and blue gel food coloring
Step-by-Step Instructions for Your Cotton Candy Cake
Alright, let’s roll up our sleeves and get this beautiful cake mixed! Baking is all about following the rhythm, and this process is quite straightforward, but we need to be patient in the right spots—especially when we are making those gorgeous swirled cake layers. Make sure your oven is warm; we need that 350°F (175°C) heat ready to go! I always use a little bit of my homemade cake goop to grease the pans, which ensures nothing sticks, but flour and butter work just fine too. If you love making things from scratch, you might also enjoy my guide for making genuinely fluffy buttermilk pancakes some weekend morning!
Preparing the Swirled Cake Layers
First things first, dry ingredients go into one bowl—whisk your flour, baking powder, and salt together. In your big mixing bowl, that’s where the action starts: cream your softened butter with the cup of sugar until it’s pale and fluffy—this creates air, which keeps our cake light! Beat in those two eggs one at a time, followed by the vanilla. Now, get your milk ready; mix that with your teaspoon of that sweet cotton candy extract right in a separate little cup. When combining, you must alternate: start with a bit of the dry mix, then a little milk mixture, and follow that pattern, always ending with the dry ingredients. And here’s the big rule for airiness: Do not overmix! Mix only until you barely see the last streaks of flour disappear.
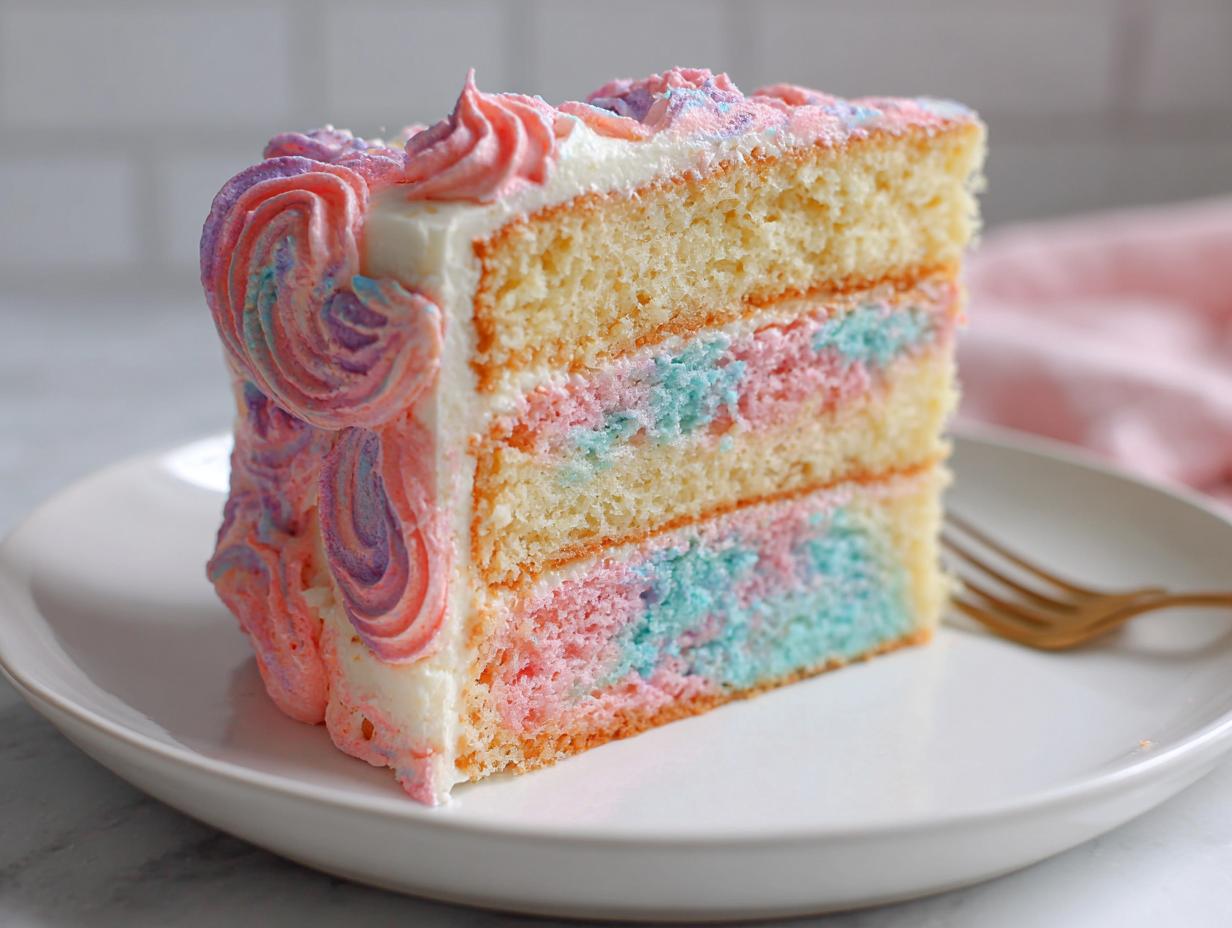
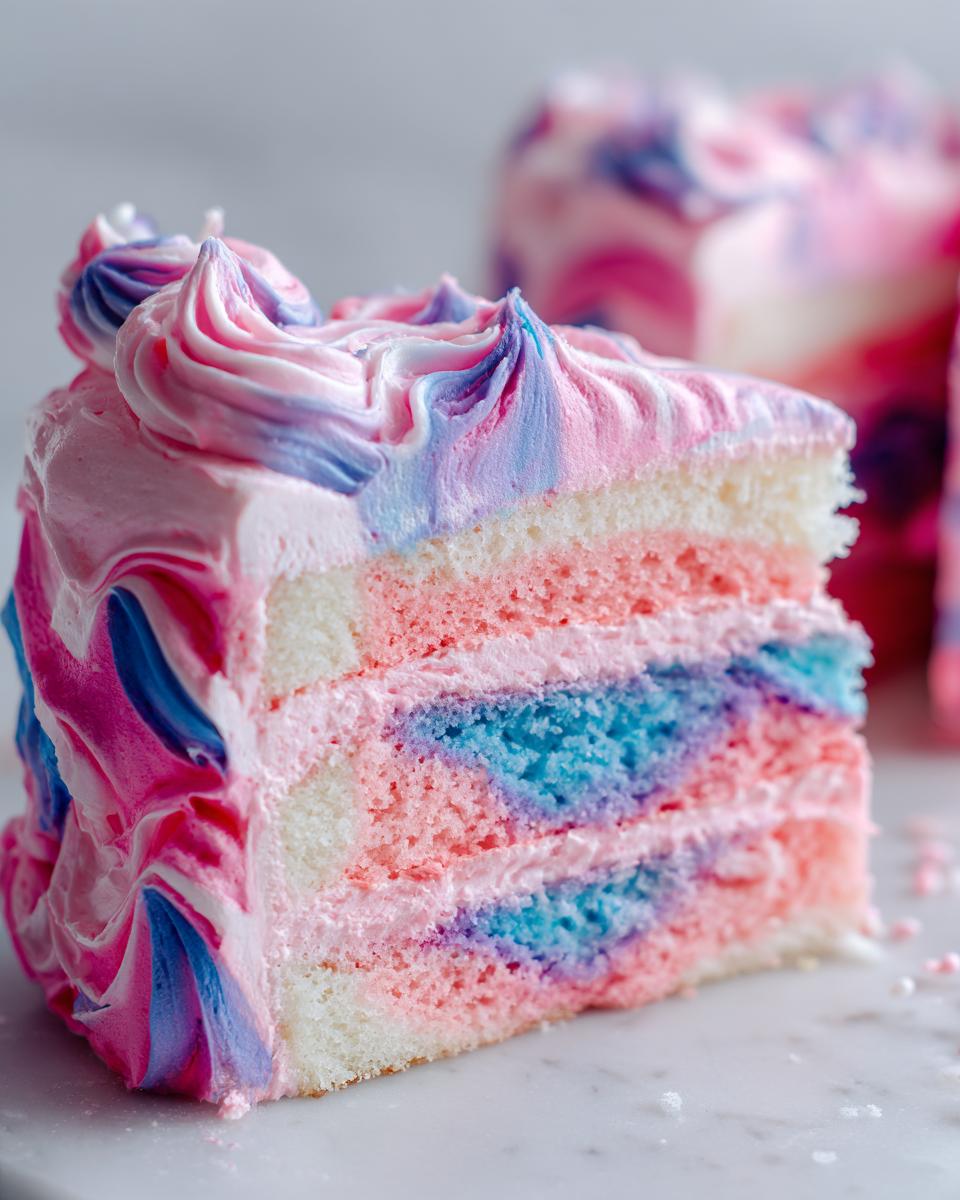
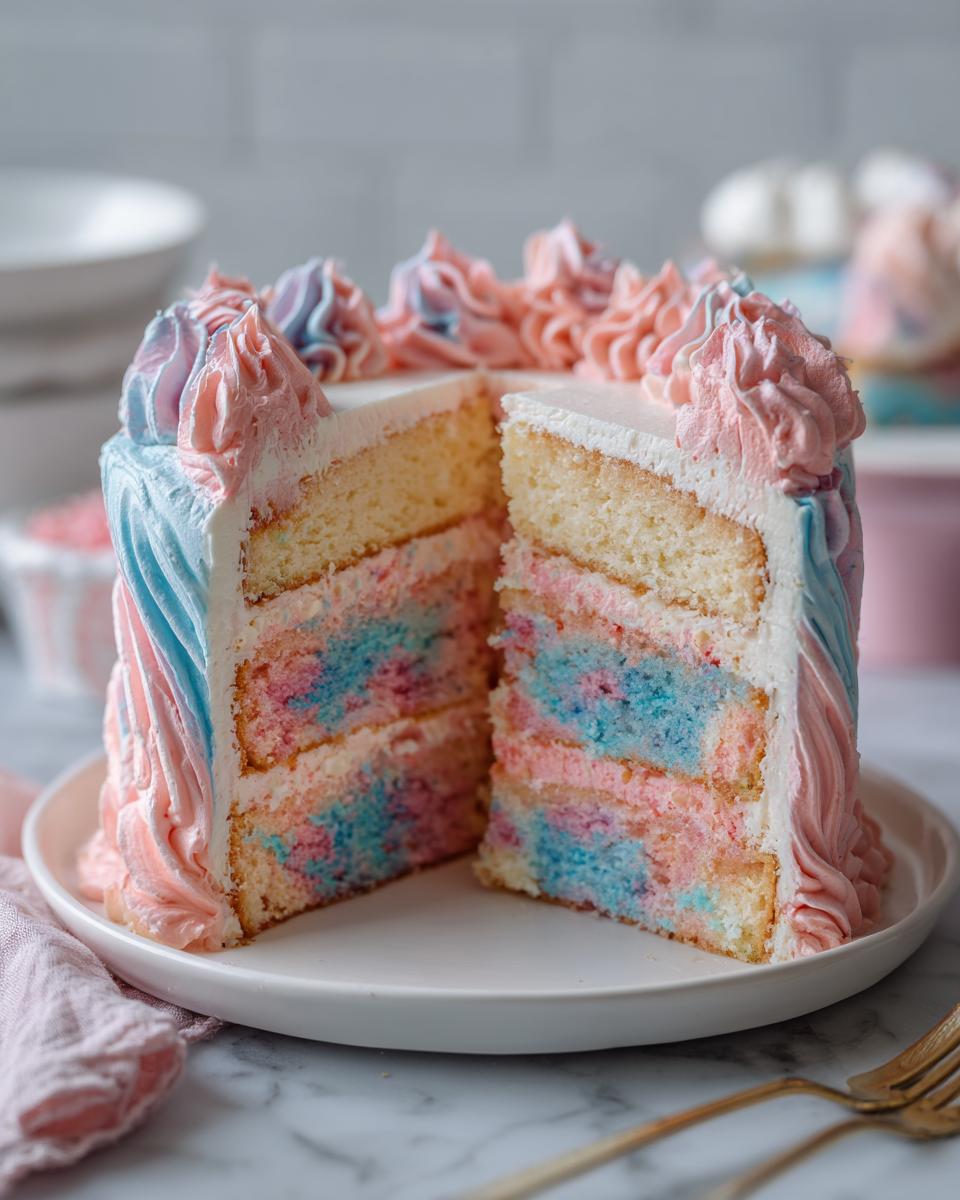
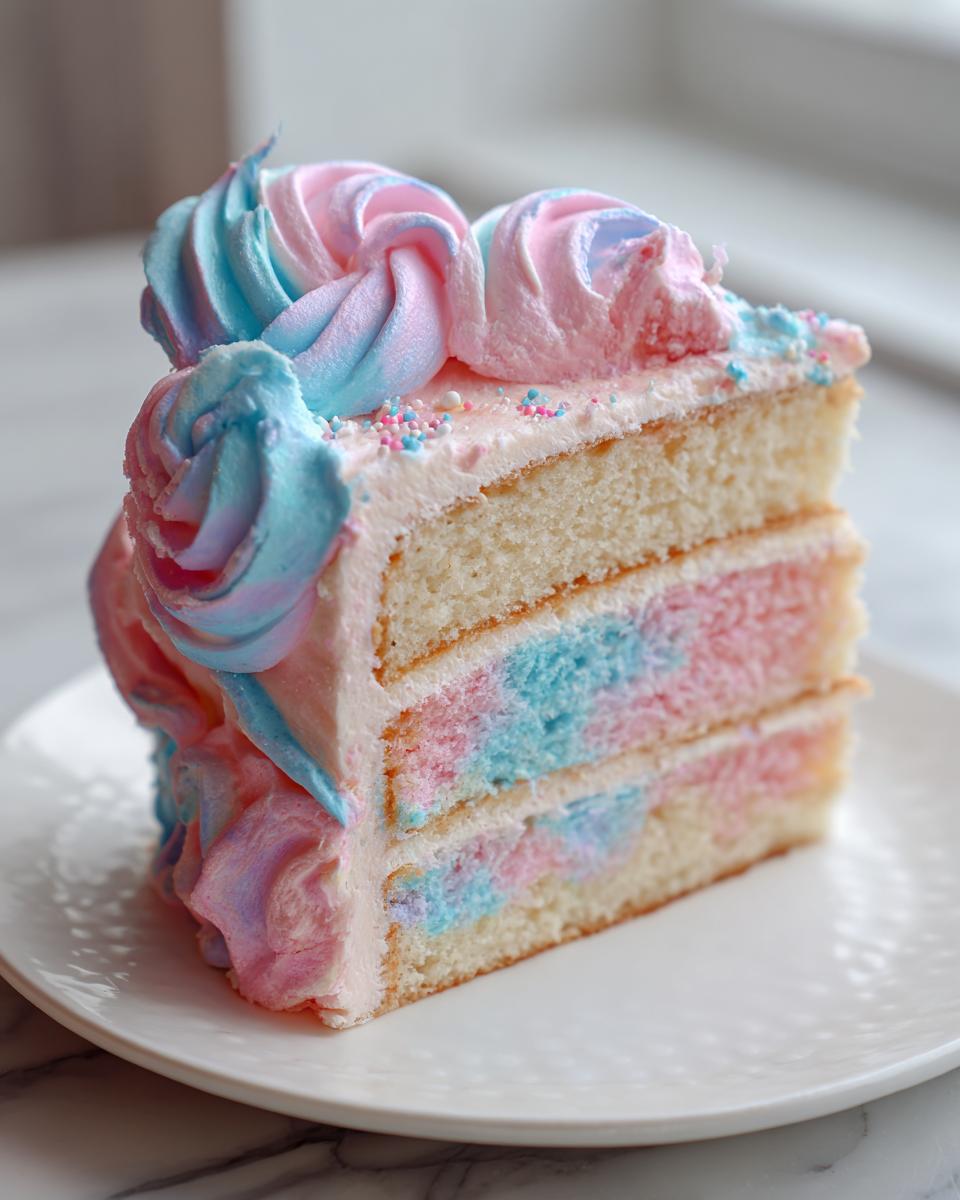
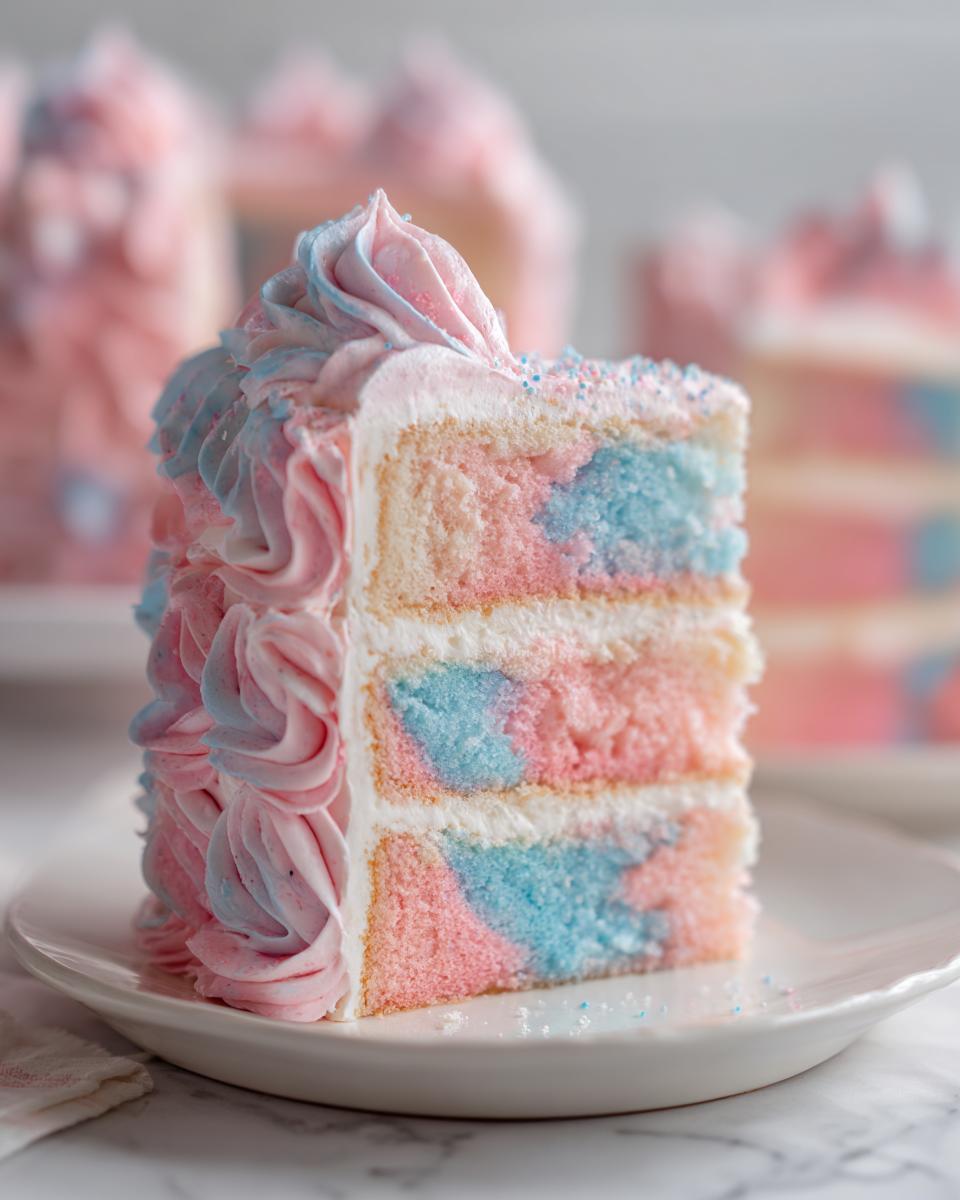
Now we make the colors! Divide that beautiful vanilla base evenly into two bowls. Drop a few little dots of your pink gel coloring into one and your blue into the other, folding it gently until you have soft, dreamy pastel batters. Next, for the swirl effect, you won’t mix these two colors together in the pan! Just alternate spooning small dollops of pink, then blue, pink, then blue all over the bottom of your prepared pans. It looks messy now, but trust the process! Bake them until that toothpick you jab in the center comes out clean, usually about 30 minutes.
Making the Sweet Cotton Candy Frosting
While those lovely layers cool down—and let them cool completely, please, or you’ll have a melted mess—we tackle the cotton candy frosting recipe. Start by beating that soft butter until it’s slick and smooth. Now, slowly, and I mean slowly, add that sifted powdered sugar, one cup at a time, mixing on a low speed so you don’t end up wearing it! Once it’s mostly combined, whip in your vanilla and the cotton candy extract. That consistency might look a bit stiff, so we add milk or cream just a teaspoon at a time until it’s soft and perfectly spreadable—not runny! Then, just like the batter, divide it and tint one part pink and one part blue with your gel colors.
Assembling Your Colorful Celebration Cake
Once those fluffy cakes are totally cool, place your first layer down on your serving plate. I like to spread a thin layer of plain white frosting—or maybe thin pink—just to help glue the layers together. Pop the second layer on top, and now for the fun part! Take your pink and blue frostings and dollop them all over the top and sides of your colorful celebration cake. Use an offset spatula to gently smooth them around, letting the colors mingle just a tad to create that wonderful, whimsical, cloud-like swirl on the outside. If you want that extra bit of carnival fun, you can press a little bit of actual spun cotton candy right on top, but only right before you serve it!
Tips for a Perfect Cotton Candy Cake
Now that you have successfully layered and frosted your beautiful creation, I want to share a few little tricks I’ve learned over the years to make sure this cotton candy cake is truly perfect from the first slice to the last. Remember, success in the kitchen often comes down to small details!
First, use only gel food coloring—I cannot stress this enough! Liquid coloring can upset the delicate balance of the batter and frosting, turning your beautiful vanilla cake with cotton candy flavor into something a bit too soggy. Also, if you skip the flavor extract and decide to use a syrup instead, remember that syrup has more liquid, so you’ll need to cut back slightly on the milk in the frosting, which is key for a thick application.
As for keeping it fresh, this cake is really best eaten within a day, as that delicate carnival flavor really shines when it’s new. If you do need to store it, wrap it snugly under a cake dome. And Carla’s biggest tip for that beautiful spun sugar topping? Do not put it on until 15 minutes before serving! If you put actual cotton candy on the frosting too early, the sugar will start weeping from the moisture in the buttercream and just dissolve into a sticky puddle. We want fluffs, not puddles!
For more reliable baking fundamentals, you might want to check out my favorite recipe for melt-in-your-mouth butter cookies; the creaming method is very similar!
Variations for Your Cotton Candy Cake
Even though this recipe for a cotton candy cake is perfect as is, I always encourage my readers—especially grandmothers like me—to feel free to tinker a little bit! Baking should be fun, and sometimes a little tweak makes the recipe perfect for your specific celebration. It’s such a wonderful base for a truly kid friendly birthday cake, but we can jazz it up even more!
If you want to make it special for a slightly different crowd, you could explore some flavoring variations. The cotton candy extract is beautifully sweet, but sometimes I like to add just a *tiny* hint of something else right into the batter, maybe a quarter teaspoon of raspberry extract along with the cotton candy. It gives it this gorgeous, subtle fruity background note that really elevates the whole thing. And if you’re making one of these for an adult get-together, I even whisper a tiny bit of white rum flavoring in there!
Don’t forget presentation! While the layers are divine, I know sometimes big cakes just aren’t practical. You can easily use this recipe to make gorgeous cupcakes. Just use paper liners and reduce the baking time to about 18 minutes—keep an eye on them! You’ll have twelve little floating clouds ready to go.
Now, for those days when you just don’t want to turn the oven on, we can address that desire for a quick fix, even if it’s not a baked cake. For a simple no-bake cotton candy option, you can cheat a little! Grab a package of pre-made graham cracker crusts or those simple, ready-made no-bake cheesecake bases. Whip up a batch of the cotton candy frosting, stir in just a small teaspoon of milk so it’s softer, and smooth that right over the no-bake base. You can even swirl the colors in the top layer before chilling! It hits that sweet spot when you need a fun dessert fast. If you are looking for another easy project, my recipe for easy homemade chocolate pudding never fails to please a crowd!
Storing and Keeping Your Cotton Candy Cake Fresh
This is a lovely cake, but because it’s loaded with that sweet vanilla and cotton candy flavor, it really shines when it’s fresh. My advice is always to serve it the day you bake it if you can! If you have leftovers, wrap the entire thing tightly in plastic wrap or pop it under a good cake dome. Keep it right on the counter if your kitchen isn’t too warm—room temperature keeps the cake layers the fluffiest.
If your kitchen runs hot, though, you’ll need to refrigerate it. Just make sure you let it sit out on the counter for a good hour before serving so the frosting can soften up a bit. Nobody likes a hard, cold slice of cake!
Frequently Asked Questions About This Cotton Candy Cake
It makes my heart warm when you all have specific questions! That means you’re really thinking about the process, and I’m happy to walk you through any last details before you start baking. Getting these little things right is what separates a good bake from a truly wonderful cotton candy cake.
Can I make the cotton candy flavor stronger in the vanilla cake with cotton candy flavor?
That’s a fair question, dear one! The cotton candy extract is quite potent, and frankly, there’s a risk if you add too much. We only put one teaspoon in the batter, and that seems to be the sweet spot to give the cake that lovely, subtle hint without it tasting artificial or overwhelming the other nice vanilla base notes. If you feel like you want it bolder in the frosting, you can try adding just a tiny bit more there, but for the cake itself, I wouldn’t push past that one teaspoon unless you substitute it with a flavoring syrup, which sometimes handles a higher concentration a bit better.
How do I get the perfect pastel shades for my cotton candy cake?
This is where the gel colors truly shine! If you use the liquid drops, it adds too much moisture to the batter, and we risk deflating some of that lovely air we worked so hard to whip in during the creaming steps. My advice is always to use gel coloring. Put just one or two drops in the batter bowl, fold it gently until it’s mostly mixed, and stop! You’re aiming for light, dreamy colors, not deeply saturated ones. These lighter shades will represent the prettiest of the pastel birthday cakes when baked.
Is this a good ‘nostalgia dessert’ for adults?
Absolutely, yes it is! While this is certainly a champion kid friendly birthday cake, it plays beautifully on adult nostalgia too. Sometimes, we just need that flavor that reminds us of simpler times, right? If you are serving this to adults, I highly recommend pairing a slice with a strong, dark cup of coffee—the bitterness of the coffee really balances the sugary sweetness so wonderfully. Or, serve it alongside a cup of very strong black tea. It makes for a fun, bright addition to any afternoon gathering!
If you are looking for another simple, comforting classic to try next time—maybe for a weekend breakfast—you might want to check out my recipe for quick and easy homemade French toast.
Estimated Nutritional Data for This Cotton Candy Cake
Now, whenever I share a recipe this fun and sweet, people often ask about the numbers, and I completely understand! It helps to have a general idea of what we are serving up when we enjoy our delightful cotton candy cake. Remember, because we are baking from scratch, these figures are just my best estimates based on fairly standard serving sizes.
When you slice up one piece of this beauty, you can expect it to generally run about 450 calories. The breakdown generally looks like this for one slice:
- Calories: 450
- Sugar: 65g
- Fat: 20g (with 12g saturated)
- Carbohydrates: 68g
- Protein: 4g
This is definitely a treat meant for celebration, not an everyday snack! But what a wonderful, joyful treat it is. If you’re looking for another simple side to complete your meal, my easy honey butter skillet corn makes a great savory balance!
Share Your Beautiful Cotton Candy Cake Creations
Oh, my dear cooks, I truly hope you had as much fun bringing this whimsical dessert to life as I did sharing the recipe with you! There is nothing that warms my heart more than knowing one of my reliable recipes has made its way onto your celebratory tables. When you bake something as fun as this cotton candy cake, you just have to show it off!
If you followed along and created your own beautiful, fluffy layers, please come back and leave me a rating right here on the recipe card. Knowing what you think helps other home cooks feel confident trying one of these dreamy dessert recipes!
And please, snap a picture! I absolutely love seeing your creations, especially those perfectly swirled pastel layers. You can tag Cooking by Carla over on social media—I promise I look at every single one. You can also check out this wonderful recipe breakdown from our friends over at Orchard Cook to see how they made theirs: Make A Truly Fluffy Cotton Candy Cake. Go on now, get baking, and keep sharing that joy!
PrintEasy & Fluffy Homemade Cotton Candy Cake Recipe
Make a whimsical, fluffy cotton candy cake with pastel swirled layers and sweet cotton candy frosting. This simple recipe yields a show-stopping dessert perfect for birthdays and celebrations.
- Prep Time: 30 min
- Cook Time: 35 min
- Total Time: 65 min
- Yield: 10 servings 1x
- Category: Dessert
- Method: Baking
- Cuisine: American
- Diet: Vegetarian
Ingredients
- 1 1/2 cups all-purpose flour
- 1 1/2 teaspoons baking powder
- 1/2 teaspoon salt
- 1 cup granulated sugar
- 1/2 cup unsalted butter, softened
- 2 large eggs
- 1 teaspoon vanilla extract
- 1/2 cup whole milk
- 1 teaspoon cotton candy extract (or flavoring syrup)
- Pink and blue gel food coloring
- For the Frosting:
- 1 cup unsalted butter, softened
- 4 cups powdered sugar, sifted
- 1 teaspoon vanilla extract
- 1/2 teaspoon cotton candy extract
- 2–4 tablespoons milk or heavy cream
- Pink and blue gel food coloring
Instructions
- Preheat your oven to 350°F (175°C). Grease and flour two 8-inch round cake pans.
- In a medium bowl, whisk together the flour, baking powder, and salt. Set aside.
- In a large bowl, cream the softened butter and granulated sugar together until light and fluffy. Beat in the eggs one at a time, mixing well after each addition. Stir in the vanilla extract.
- In a small bowl, mix the milk and cotton candy extract together.
- Alternate adding the dry ingredients and the milk mixture to the butter mixture, beginning and ending with the dry ingredients. Mix until just combined. Do not overmix.
- Divide the batter evenly between two bowls. Add a few drops of pink gel coloring to one bowl and blue gel coloring to the other. Gently fold the color into each batter until you achieve light pastel shades.
- To create the swirl effect, alternate spooning small dollops of the pink and blue batter into the prepared cake pans. Do not mix the colors together once in the pan.
- Bake for 28 to 32 minutes, or until a toothpick inserted into the center comes out clean. Let the cakes cool in the pans for 10 minutes before inverting them onto a wire rack to cool completely.
- Prepare the Cotton Candy Frosting: In a large bowl, beat the softened butter until smooth. Gradually add the sifted powdered sugar, mixing on low speed until combined. Add the vanilla extract, cotton candy extract, and 2 tablespoons of milk. Beat on medium speed until fluffy. Add more milk, one teaspoon at a time, until you reach a spreadable consistency.
- Divide the frosting into two bowls. Color one bowl pink and the other blue using gel coloring.
- To assemble, place one cooled cake layer on a serving plate. Spread a layer of white or one of the colored frostings on top. Place the second layer on top.
- Frost the entire cake with the remaining frosting, using a spatula to create soft swirls of pink and blue on the outside for a whimsical look.
- For extra flair, you can top the cake with actual spun cotton candy just before serving.
Notes
- For the best pastel effect, use gel food coloring rather than liquid coloring, as it provides more intense color without adding extra liquid to the batter.
- If you cannot find cotton candy extract, you can use a high-quality cotton candy flavoring syrup, but reduce the amount of milk in the frosting slightly.
- This cake tastes best when served the day it is made, as the cotton candy flavor is most potent immediately after assembly.
Nutrition
- Serving Size: 1 slice
- Calories: 450
- Sugar: 65
- Sodium: 250
- Fat: 20
- Saturated Fat: 12
- Unsaturated Fat: 8
- Trans Fat: 0
- Carbohydrates: 68
- Fiber: 1
- Protein: 4
- Cholesterol: 65