
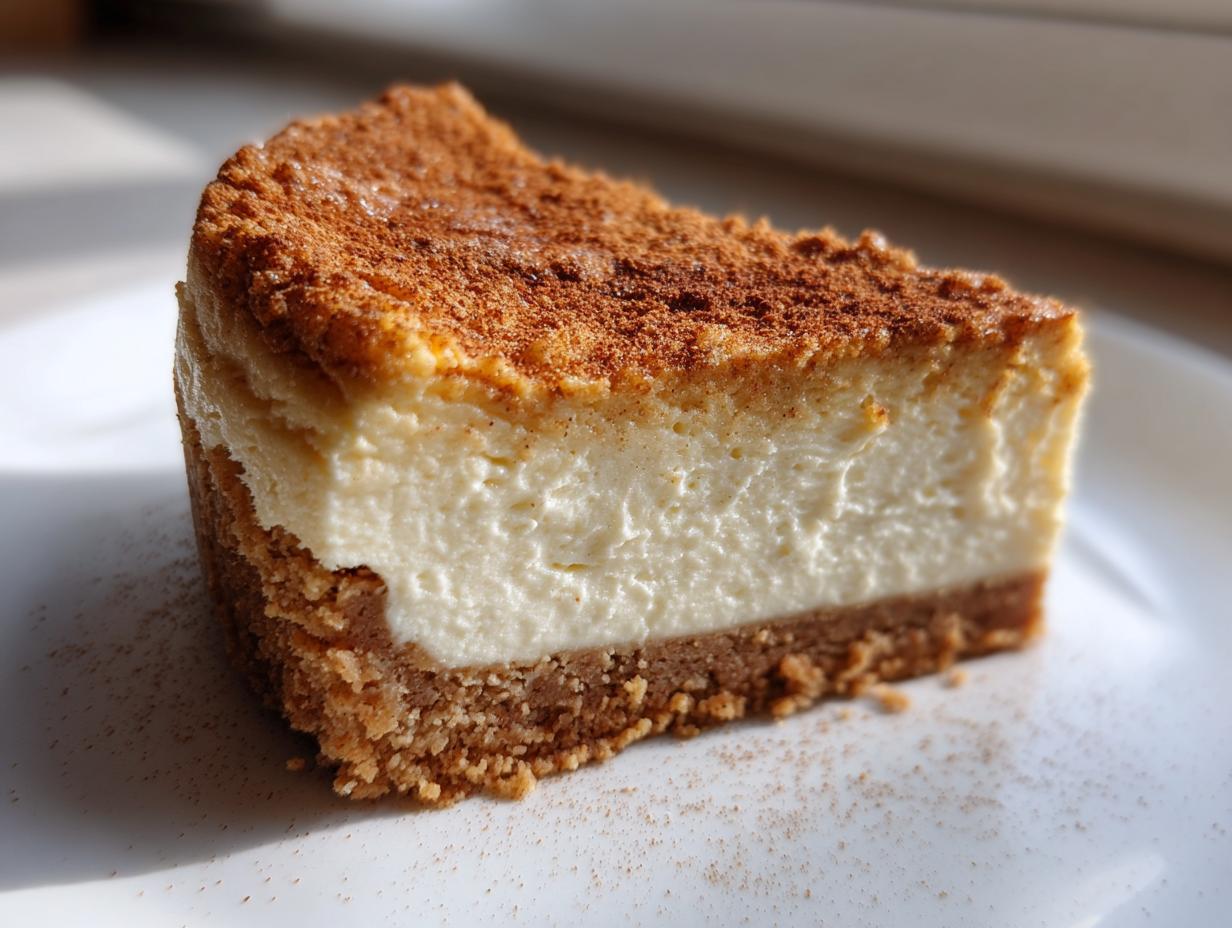
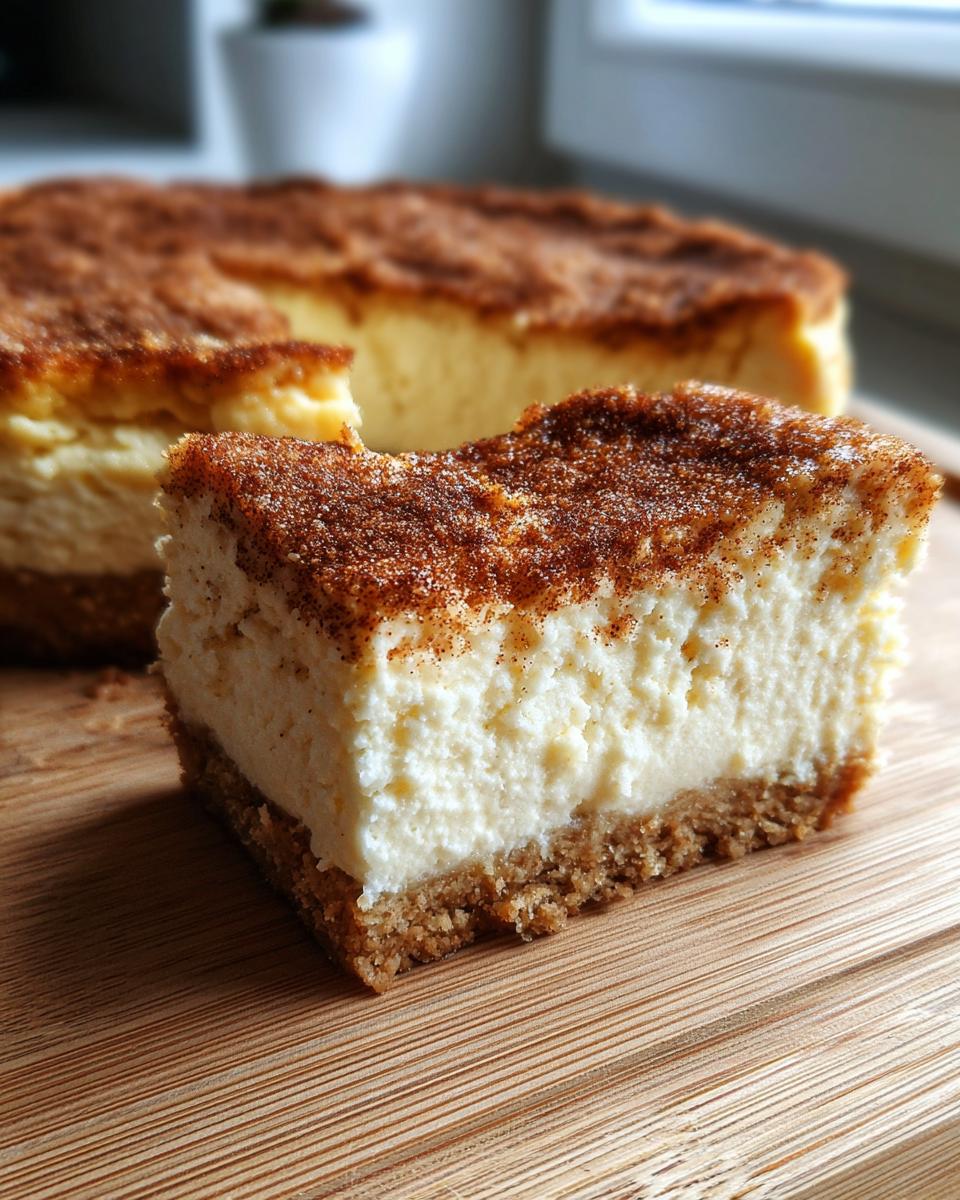
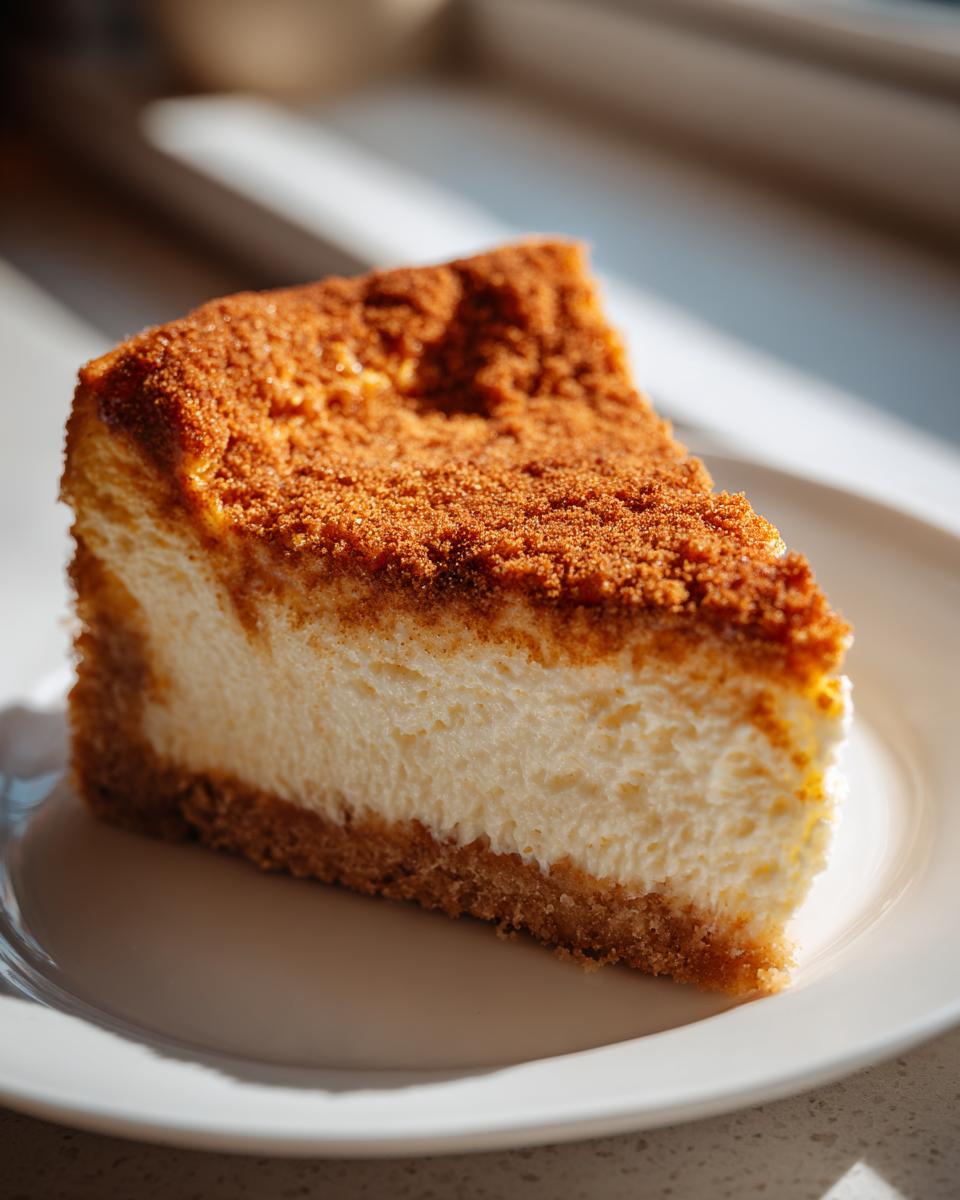
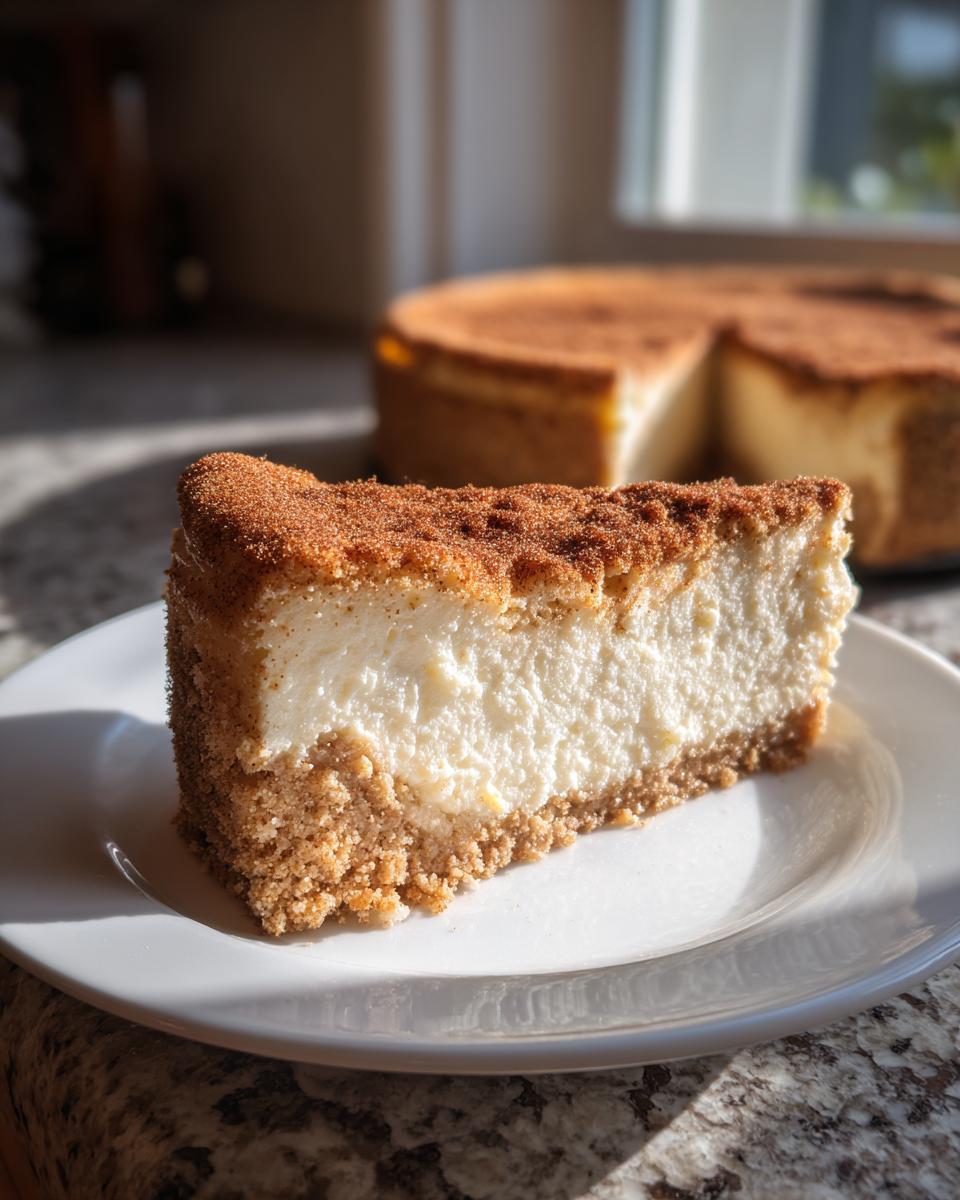
Oh, I just love a good dessert mashup! Sometimes taking two things you adore and mixing them up creates something even better than the original, doesn’t it? That’s exactly what we’ve done here with this snickerdoodle cheesecake. It is, simply put, the best of both worlds. You get that unmistakable warm, buttery cinnamon-sugar flavor that only a classic snickerdoodle cookie can deliver, but it’s married to the silkiest, most unbelievably creamy cheesecake you can imagine. After thirty years of teaching kids how to follow instructions patiently, I can promise you that if you follow the steps clearly, this recipe is totally foolproof. If you enjoy this combination, you might also like my recipe for sugar cookie cheesecake flavor profile! Forget everything else for today; this creamy dessert is what your holiday table needs.
- Why This Snickerdoodle Cheesecake is Your Next Showstopper Dessert
- Gathering Ingredients for the Ultimate Snickerdoodle Cheesecake
- Step-by-Step Baked Cheesecake Tutorial for Perfect Snickerdoodle Cheesecake
- Tips for the Best Snickerdoodle Cheesecake Texture
- Making This Snickerdoodle Cookie Mashup Ahead of Time
- Serving Suggestions for Your Holiday Cheesecake
- Frequently Asked Questions About Snickerdoodle Cheesecake
- Storage and Reheating Instructions for Your Creamy Dessert
- Share Your Snickerdoodle Cheesecake Success
Why This Snickerdoodle Cheesecake is Your Next Showstopper Dessert
If you’re looking for a genuine showstopper dessert that tastes exactly like nostalgia, you’ve found it. I developed this recipe because I truly felt the world needed a more reliable way to get that spiced flavor into a classic cheesecake. It’s not just a pretty face, though; it delivers every single time.
Here are the main reasons I think you should make room for this snickerdoodle cheesecake in your baking rotation, especially when the holidays roll around. It’s the ultimate Cinnamon Sugar Dessert because the flavor is deeply infused, not just sprinkled on top.
- Texture Perfection: We are aiming for a truly Velvety Cheesecake here. Thanks to the water bath technique I’ll show you, you get that unbelievably smooth, airy texture you usually only find in fancy bakeries. No lumps, no curdles, just pure creamy goodness.
- The Ultimate Holiday Treat: This screams cozy gatherings. Whether you’re planning for a big gathering or just want something special for the cooler months, this makes a wonderful Thanksgiving Dessert Idea. It pairs perfectly with warm coffee.
- Reliable Flavor Profile: I made sure the cinnamon and sugar got into every layer. From the crust right up to the spiced topping, you get that familiar buttery cookie taste mingled with the tang of the cheese. It’s comforting and familiar, which is why I trust it for big events.
- A True Dessert Mashup: Why choose between a cookie and a cheesecake when you can have both? This Snickerdoodle Cookie Mashup is an easy way to bring excitement to your dessert table without needing complicated assembly steps. Check out my thoughts on mixing favorite recipes, like my pecan pie cheesecake, if you like this concept!
Gathering Ingredients for the Ultimate Snickerdoodle Cheesecake
Now listen closely, because with any creamy dessert, the quality and the state of your ingredients matter more than you can imagine. I learned this when teaching second grade—if the supplies aren’t prepped right, the whole project ends up messy! For our ultimate snickerdoodle cheesecake, we break everything down. You need ingredients prepped for the crust, the spiced filling, and that wonderful cinnamon flourish at the end. Trust me on the temperature warnings coming up, especially for the cheese!
Getting everything out on the counter before you start mixing is key. This way, you can move straight from the crust to the filling without scrambling. If you’re curious about making a crust from scratch instead of using these crumbs, I have a lovely recipe for a classic butter pie crust, but for this cheesecake, the graham crackers really give us that cookie base we need.
For the Buttery Graham Cracker Crust
This is the foundation, so we want it sturdy and full of that buttery spice. Don’t skimp on pressing this down firmly!
- 1 1/2 cups graham cracker crumbs
- 1/4 cup granulated sugar
- 1/2 cup (1 stick) unsalted butter, melted
- 1 teaspoon ground cinnamon
For the Spiced Cheesecake Filling
This is where the magic happens! For the absolute best and Creamy Cheesecake Recipe outcome possible, please make sure your cream cheese and eggs have been sitting out on the counter for at least an hour. Cold ingredients simply do not blend smoothly, and that leads to lumps, my dears.
- 3 (8 ounce) packages cream cheese, softened
- 1 1/2 cups granulated sugar
- 1/4 cup all-purpose flour
- 2 teaspoons vanilla extract
- 1 teaspoon ground cinnamon
- 1/4 teaspoon ground nutmeg
- 4 large eggs
- 1/2 cup sour cream
For the Cinnamon Sugar Topping
This simple mix goes on *after* the cheesecake is fully chilled but *right before* you slice it. It adds that wonderful final crunchy texture.
- 1/2 cup granulated sugar (for topping)
- 1 tablespoon ground cinnamon (for topping)
Step-by-Step Baked Cheesecake Tutorial for Perfect Snickerdoodle Cheesecake
Now we get to the actual baking, and this is where patience—a skill I taught for years!—really pays off. Making a top-tier cheesecake, especially one as decadent as this snickerdoodle cheesecake, requires a couple of specific steps to ensure it comes out beautifully smooth. The absolute biggest secret to avoiding cracks and achieving that truly creamy dessert texture is using a water bath. I know it seems fussy, but trust me, wrapping that pan carefully is worth the effort. This tutorial walks you through exactly what I do in my kitchen every time I make this recipe. For more on getting that perfect texture, you might want to check out my guide on making an easy homemade crack-free cheesecake!
Preparing the Crust and Pan
First things first, get your oven set to 325 degrees F. Before anything else, grab a 9-inch springform pan and wrap it very securely outside with heavy-duty aluminum foil. You need to cover the bottom and go up the sides; this foil shield keeps any rogue water from our bath from seeping in. For the crust, just mix those graham cracker crumbs, the quarter cup of sugar, one teaspoon of cinnamon, and the melted butter right in a bowl. Press that mixture down super firmly into the bottom of your prepared pan. Then, pop it in the hot oven for 10 minutes. Let that crust cool down a bit while you tackle the filling.
Mixing the Velvety Cheesecake Filling
In a large bowl, start beating your softened cream cheese. We want it perfectly smooth before adding anything else! Once it looks like soft butter, mix in the main sugar and the flour until it’s just brought together. Next, add the vanilla, that key teaspoon of cinnamon, and the nutmeg. Now, here is a crucial moment for that Velvety Cheesecake texture: add your four eggs one at a time. Only mix on low speed until each egg disappears into the batter. Don’t whip it! Overmixing aeration will cause cracks later. Finally, gently fold in the sour cream until everything looks uniform and lovely.
Baking with a Water Bath for a Creamy Dessert
Carefully pour all that beautiful filling over your cooled crust. Now for the water bath setup—place your foil-wrapped springform pan inside a larger roasting pan. Bring some hot water (not boiling, just really hot from the tap is fine) and pour it into the *roasting pan* until the water comes about halfway up the sides of the cheesecake pan. Bake this setup for about 60 to 75 minutes. You’re looking for the edges to be set, but the center should still have a tiny wobble when you nudge the pan gently. Once done, turn the oven OFF, crack the door open just a tiny bit, and let it cool in there for a full hour. This slow transition is your best defense against cracks, just like I taught my students—slow and steady wins the race!
Chilling and Finishing the Cinnamon Sugar Dessert
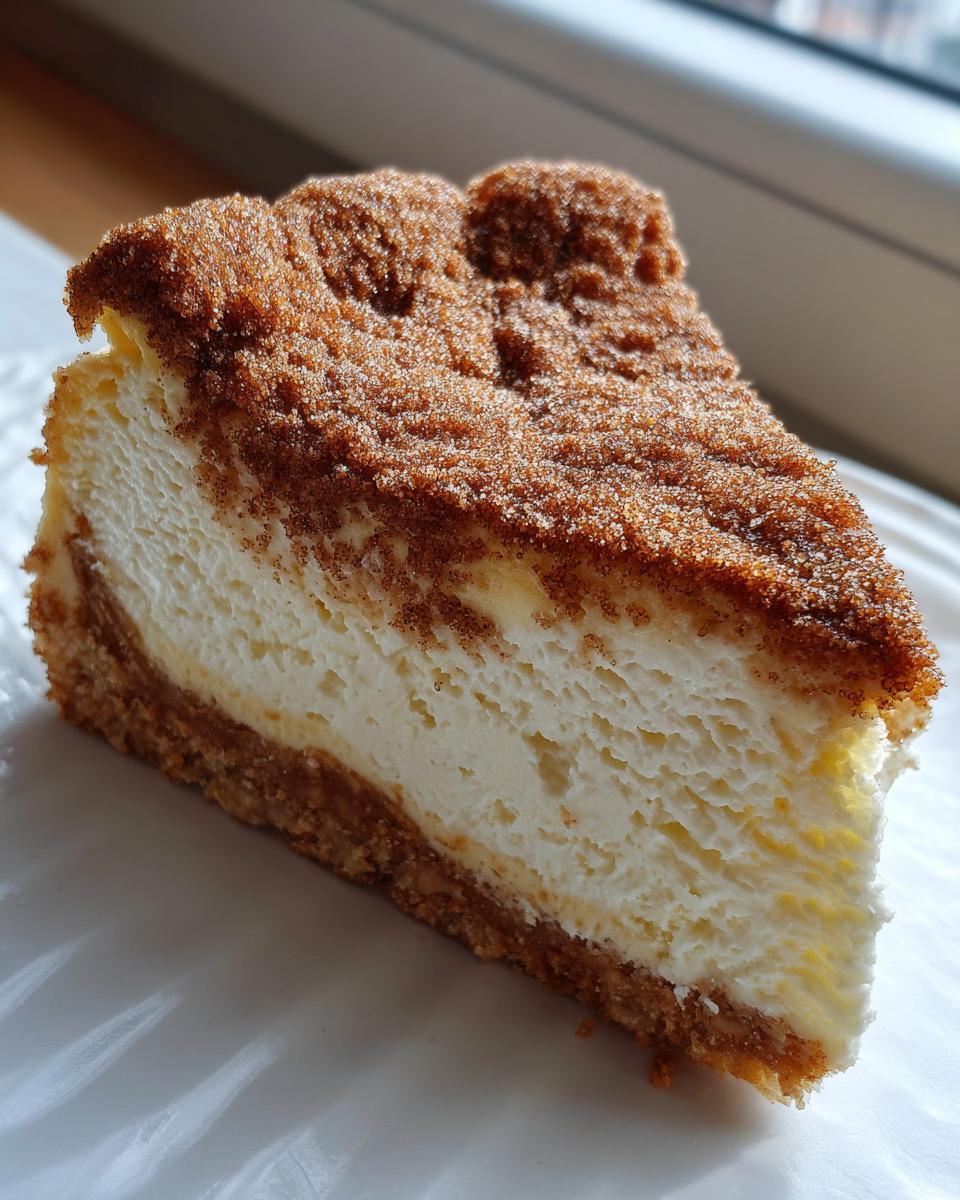
After the oven cool-down, remove the cheesecake from the water bath and take off the foil. Let it cool fully on the counter until it’s room temperature. Then, cover it loosely and refrigerate it. This part takes dedication! You must chill it for at least 6 hours, but for the best flavor and texture, leave it in there overnight. Right before you actually slice into this amazing Cinnamon Sugar Dessert, mix that last half cup of sugar and tablespoon of cinnamon, and sprinkle it evenly over the top. It adds that final sweet/spiced crunch!
Tips for the Best Snickerdoodle Cheesecake Texture
When you’re making something as creamy and luxurious as this snickerdoodle cheesecake, the texture is truly everything. If you’ve ever been disappointed by a cheesecake that cracked down the middle or, worse, ended up a little curdled, I want to assure you that it’s almost always about preparation, not luck. Baking, like teaching, requires following a few established rules before you get creative!
The biggest issues almost always come down to temperature and aggressive mixing. I’ve learned over the years that rushing the initial cream cheese step guarantees tears later on. Remember, we are aiming for a flawless, velvety cheesecake here.
Here are the things I never skip when developing a creamy cheesecake recipe:
- Everything Room Temperature is Non-Negotiable: I cannot stress this enough. Your cream cheese, your eggs, even your sour cream—they all need to be soft. Room temperature ingredients blend into a homogenous batter easily. Cold ingredients fight each other in the bowl, creating little lumps of cream cheese that never soften fully, which leads to a grainy filling, not a smooth one.
- Low Speed Only After Eggs: Once you add those four large eggs, switch your mixer to the absolute lowest speed and only mix until you see the yolks disappear. You’re incorporating the eggs, not whipping them into meringue! Too much air worked in at this stage will cause the cheesecake to puff up too high in the oven and then collapse and crack as it cools down.
- Respect the Water Bath: Honestly, using the water bath prevents almost 90% of texture disappointments. The steam creates a humid environment around the cheesecake, allowing it to bake evenly and gently. This slow, moist bake is what ensures that top layer stays soft and creamy instead of drying out and becoming tough while the center cooks.
- Never Skip the Slow Cool: After the bake time is up, the oven needs to become your best friend for one last hour. Turning the oven off and leaving the door cracked allows the temperature to drop gradually. A sudden blast of cool kitchen air hitting that hot cheesecake is the quickest way to shock the structure and cause it to shrink too fast—and *snap*—you have a crack. Patience pays off!
If you stick to these fundamental rules for incorporating your ingredients and managing the heat, you’ll produce a showstopper cheesecake that deserves to be covered in that beautiful cinnamon topping. If you want more tips on ingredients that can make or break baked goods, you can always refer back to my tips on making things like soft lemon scones, as using room temperature products is important there too!
Making This Snickerdoodle Cookie Mashup Ahead of Time
One of the best things about a good baked cheesecake is that it’s fantastic if you make it early! Since this snickerdoodle cheesecake is so rich, chilling it overnight really lets those cinnamon flavors meld perfectly into the cream cheese. I actually prefer making it a day ahead. If you need to freeze it, wait until it’s completely chilled and set—that’s usually after 8 hours in the fridge. Wrap that beautiful, untoppped cake tightly in a layer of plastic wrap, followed by a layer of foil. You can keep it frozen for up to a month!
When you’re ready to serve your dessert mashup, just pull it out and let it thaw slowly in the refrigerator overnight. Seriously, that’s it. Once it’s fully thawed the next day, then you sprinkle on that incredible cinnamon-sugar topping we mixed up, slice, and serve warm coffee alongside it. It saves so much stress on the day of your gathering! For other make-ahead ideas, check out my suggestions for easy no-bake protein bars, which are great for snacks later.
Serving Suggestions for Your Holiday Cheesecake
This rich snickerdoodle cheesecake truly shines when paired with the right sidekick. Because the flavor profile is so dominant—that warm cinnamon and tangy cream cheese—you don’t want to overwhelm it! I always lean toward simplicity so the cheesecake itself remains the star of the dessert table. It’s certainly an impressive sight, making it a wonderful centerpiece for any celebration, especially when you are looking for inspired Thanksgiving Dessert Ideas.
For me, the absolute best partner for this dessert is a strong, hot cup of coffee. The slight bitterness cuts through the sweetness perfectly, making every bite of the creamy dessert taste fresh. If you want a holiday coffee pairing, I highly suggest using a medium roast, or if you’re feeling extra cozy, try pairing it with the flavors from my coffee cake cookies recipe! The spices just sing together.
If you prefer something lighter alongside the slice, keep it simple. A little dollop of lightly sweetened whipped cream is always lovely, or perhaps some fresh raspberries if you want a touch of bright contrast. The tartness of the berries plays beautifully against the buttery crust. I also sometimes see people serve a small side of toasted, spiced pecans, which ties back nicely to that cookie crumb element. Do remember, though, that this is a very rich bite, so small portions with a strong palate cleanser, like coffee or tart fruit, work best!
You can see how beautiful this dessert is over at Just Worthi—it really stands tall on the plate!
Frequently Asked Questions About Snickerdoodle Cheesecake
It’s funny how many questions pop up once you start baking a new kind of dessert mashup! That’s perfectly normal, especially with cheesecakes, because we all want that gorgeous, crack-free top. I’ve gathered a few questions that I get asked often about this specific snickerdoodle cheesecake. I’m happy to share the answers so you can bake with confidence!
Can I make this a No Bake Cheesecake Recipes version?
That’s a great question, especially if you are trying to avoid turning on the oven during a hot day! While this recipe is designed to be a classic baked cheesecake tutorial—the structure of the filling really needs that gentle bake to set properly—the crust is very similar to what you’d find in many No Bake Cheesecake Recipes. For the filling here, the eggs and flour are crucial for that stability and creamy texture we’re aiming for. If you really want a no-bake experience, you’d need to swap the filling ingredients entirely for something using gelatin or whipped cream, but you’d lose that signature tangy cheesecake flavor.
What is the best way to get a smooth, Spiced Cheesecake Filling?
Oh, getting that smooth, spiced cheesecake filling is all down to two simple concepts: temperature and speed. First, make absolutely certain that your cream cheese and eggs are at room temperature—I mean genuinely soft to the touch, not just slightly cool. If they are cold, they simply won’t combine properly and you’ll end up with little bits of cheese resisting the mix. Second, remember what I taught my students: slow and steady wins the race! Mix on low speed, especially once the eggs go in. We want smooth, not foamy. If you treat the ingredients gently, the results will be gorgeously smooth and give you that perfect velvety cheesecake.
How do I prevent my Snickerdoodle Cheesecake from cracking?
Preventing cracks in any baked cheesecake recipe mostly boils down to managing temperature shock. The two biggest helpers we use in this recipe are the water bath and the slow cooling process. You must create that steamy environment with the water bath so the cheesecake bakes gently and evenly from the outside in. After that, the second you turn the oven off, resist the urge to immediately pull it out! Let that cheesecake sit inside the turned-off oven, door cracked open, for a full hour. This slow adjustment prevents the sudden temperature drop that makes the center shrink too quickly and pull away from the sides, which causes those frustrating cracks. Follow those steps, and you’ll get a beautiful top ready for that final cinnamon dusting!
For more specific help on ingredient selection, you can always refer back to my tips on making things like soft lemon scones, as using room temperature products is important there too!
Storage and Reheating Instructions for Your Creamy Dessert
Well, if you manage to have any leftovers of this incredible snickerdoodle cheesecake—and that’s a big ‘if’ in my house!—storing it properly is simple enough. Since we went to all that trouble to get that perfect, velvety texture, we certainly don’t want to spoil it now!
The golden rule for cheesecakes, much like my favorite moist carrot cake recipe, is that they must be kept well-chilled. Once the cheesecake is completely cold from its overnight rest, you need to cover it securely. I usually use plastic wrap first, making sure it doesn’t touch the cinnamon topping if you’ve already added it. If you haven’t added the topping yet, even better! An airtight container or a second layer of foil over the plastic wrap is what I do to keep any refrigerator smells out of our beautiful creamy dessert.
When stored properly, this snickerdoodle cheesecake will keep wonderfully in the refrigerator for about 4 to 5 days. It really is best on day two or three, when those cinnamon flavors have had time to soak in perfectly.
Now, for the crucial part: reheating. We absolutely do not reheat cheesecake, you hear me? Unlike a casserole or a slice of pie, heating cheesecake up will cause that beautiful, set structure to melt right back into a puddle of sweet cream cheese. It simply won’t ever set up right again. This dessert is designed to be served chilled or barely cool from the fridge. So, if you’re looking for leftovers, just keep them cold; that’s how you enjoy them best!
Share Your Snickerdoodle Cheesecake Success
Making this snickerdoodle cheesecake has been such a joy for me, and I truly hope it brought some comfort and sweetness to your table, whether it was for a major holiday or just a regular Tuesday night!
Gathering friends and family around food is the best part of cooking, and that’s why I started this whole blog—to share those dependable recipes that always deliver. Now that you’ve made this creamy, spiced delight, I’d love to hear all about it!
Did it come out perfectly smooth on the first try? Did you manage to keep any leftovers past the first hour? Please leave me a rating down below—five stars if you loved it! I read every single comment, and it builds my trust in these recipes when I see that you’ve had success too. Honestly, hearing about your experience helps me feel like I’m right there in the kitchen with you.
And if you got creative—maybe you added some toasted pecans to the crust or perhaps you tried swirling in a little caramel—I want to know! Share those wonderful variations in the comments. Your ideas help our whole community bake better.
If you want to know more about my philosophy on simple, comforting home cooking, you can always check out my About Page. Happy baking, friends, and thank you for treating this recipe as carefully as I do!
PrintUltimate Creamy Snickerdoodle Cheesecake Recipe
Make this ultimate Snickerdoodle Cheesecake, a rich dessert that combines the creamy texture of cheesecake with the warm cinnamon-sugar flavor of snickerdoodle cookies. This recipe is perfect for your holiday table.
- Prep Time: 25 min
- Cook Time: 75 min
- Total Time: 8 hours 40 min
- Yield: 12 servings 1x
- Category: Dessert
- Method: Baking
- Cuisine: American
- Diet: Vegetarian
Ingredients
- 1 1/2 cups graham cracker crumbs
- 1/4 cup granulated sugar
- 1/2 cup (1 stick) unsalted butter, melted
- 1 teaspoon ground cinnamon
- 3 (8 ounce) packages cream cheese, softened
- 1 1/2 cups granulated sugar
- 1/4 cup all-purpose flour
- 2 teaspoons vanilla extract
- 1 teaspoon ground cinnamon
- 1/4 teaspoon ground nutmeg
- 4 large eggs
- 1/2 cup sour cream
- 1/2 cup granulated sugar (for topping)
- 1 tablespoon ground cinnamon (for topping)
Instructions
- Preheat your oven to 325 degrees F. Prepare a 9-inch springform pan by wrapping the outside bottom and sides with heavy-duty aluminum foil to prevent water from entering during the water bath.
- Prepare the crust: In a medium bowl, mix the graham cracker crumbs, 1/4 cup sugar, 1 teaspoon cinnamon, and melted butter until combined. Press the mixture firmly into the bottom of the prepared springform pan. Bake for 10 minutes. Let the crust cool while you prepare the filling.
- Prepare the cheesecake filling: In a large bowl, use an electric mixer to beat the softened cream cheese until smooth. Add 1 1/2 cups sugar and flour, mixing until just combined. Beat in the vanilla extract, 1 teaspoon cinnamon, and nutmeg.
- Add the eggs one at a time, mixing on low speed after each addition until just incorporated. Mix in the sour cream until the batter is smooth. Do not overmix the batter.
- Pour the cheesecake filling over the cooled crust.
- Create a water bath: Place the foil-wrapped springform pan inside a larger roasting pan. Carefully pour hot water into the roasting pan until it reaches about halfway up the sides of the springform pan.
- Bake for 60 to 75 minutes, or until the edges are set but the center still has a slight jiggle.
- Turn off the oven, crack the oven door open slightly, and allow the cheesecake to cool slowly in the oven for 1 hour. This slow cooling helps prevent cracks.
- Remove the cheesecake from the water bath and foil. Let it cool completely on a wire rack at room temperature.
- Once cool, cover the cheesecake loosely and refrigerate for at least 6 hours, or preferably overnight, before serving.
- Prepare the topping: In a small bowl, mix the remaining 1/2 cup sugar and 1 tablespoon cinnamon. Sprinkle this cinnamon-sugar mixture evenly over the top of the chilled cheesecake just before slicing and serving.
Notes
- For the creamiest texture, ensure your cream cheese and eggs are at room temperature before mixing.
- If you skip the water bath, watch the baking time closely, as the cheesecake may cook faster and risk cracking.
- This dessert is a wonderful Thanksgiving Dessert Idea or Christmas Baking Recipe.
Nutrition
- Serving Size: 1 slice
- Calories: 420
- Sugar: 35g
- Sodium: 250mg
- Fat: 26g
- Saturated Fat: 16g
- Unsaturated Fat: 10g
- Trans Fat: 0.5g
- Carbohydrates: 40g
- Fiber: 1g
- Protein: 7g
- Cholesterol: 95mg