
Oh, the snacks of our childhood! Remember those perfectly round, shiny chocolate cakes you used to grab straight from the lunchbox? They hold such a special place in our hearts, but honestly, the store-bought versions never quite hit the spot when you crave *real* flavor. Well, my friends, that’s where we step in! As a teacher for all those years, my goal is always clarity and comfort, and this **ding dong cake** recipe delivers both in spades. We’re making the ultimate homemade copycat version—a seriously moist chocolate cake wrapped in that unmistakable dark chocolate shell with a creamy center. Trust me, this is the dependable, comforting dessert you’ll be turning to again and again.
- Why This Homemade Ding Dong Cake Recipe is a Family Favorite
- Ingredients Needed for the Best Ding Dong Cake Recipe
- Step-by-Step Instructions for Your Ding Dong Cake
- Tips for Success When Making a Copycat Ding Dong Cake Recipe
- Storage and Make-Ahead Tips for Your Ding Dong Cake
- Variations on the Classic Ding Dong Cake
- Frequently Asked Questions About Making Ding Dong Cake
- Estimated Nutritional Information for This Chocolate Cream Filled Cake
- Share Your Homemade Ding Dong Cake Creations
Why This Homemade Ding Dong Cake Recipe is a Family Favorite
When you bake this at home, you just immediately taste the difference. It’s a little sweeter, a little richer, and oh, so much moister than anything you’ll find in a plastic wrapper. It’s nostalgic without tasting artificial!
- Unbeatable Moisture: We use buttermilk and hot coffee in the cake batter, which results in a rich dark chocolate cake that stays soft for days. No dry edges here!
- Authentic Flavor Replication: Every element, from the vanilla-heavy creamy filling to the glossy ganache, is designed to taste exactly like your favorite retro snack cake, but better. It’s the ultimate chocolate dessert reimagined.
- The Fun Factor: Making a classic **ding dong cake** is just plain fun! You get to be the assembly expert, layering filling and pouring that shiny, beautiful coating over the top.
- Totally Dependable Recipe: Like all my recipes, this one is tested and true. You don’t need to worry about complicated techniques; I’ve broken it down so the mixing is straightforward, even for beginners.
Ingredients Needed for the Best Ding Dong Cake Recipe
Gathering your supplies is half the battle, right? When you get all your ingredients ready before you start mixing, everything just flows so smoothly. I’ve broken down exactly what you need for the cake layers, the fluffy filling, and that gorgeous, shiny chocolate coating. Don’t skip checking that the butter is really soft for the filling—it makes all the difference in the world!
For the Rich Chocolate Cake Base
This batter always seems way too thin, but trust me, that’s how we get that wonderful, velvety crumb in our final **ding dong cake**.
- 1 3/4 cups all-purpose flour
- 1 3/4 cups granulated sugar
- 3/4 cup unsweetened cocoa powder
- 1 1/2 teaspoons baking soda
- 1 1/2 teaspoons baking powder
- 1 teaspoon salt
- 2 large eggs
- 1 cup buttermilk
- 1/2 cup vegetable oil
- 2 teaspoons vanilla extract
- 1 cup hot water or hot brewed coffee (Coffee deepens the chocolate flavor beautifully!)
For the Creamy White Filling Layer
This simple filling whips up into something beautifully light. Make sure your butter isn’t melted—just softened nicely—so you can beat the air into it properly.
- 1 cup (2 sticks) unsalted butter, softened
- 4 cups powdered sugar, sifted (Sifting prevents lumps!)
- 1 teaspoon vanilla extract
- 1/4 cup milk
For the Chocolate Ganache Coating
This is the final layer that seals in all that creamy goodness and gives your **ding dong cake** that classic, irresistible exterior.
- 1 cup semi-sweet chocolate chips
- 1/2 cup heavy cream
Step-by-Step Instructions for Your Ding Dong Cake
Now for the fun part—actually making this amazing treat! Baking this cake is broken down into three easy phases: getting those chocolate layers baked perfectly, whipping up that cloud-like filling, and then doing the exciting final assembly. Take your time with each part, and don’t rush the cooling, or the ganache slide won’t look right!
Baking the Moist Chocolate Cake Layers
First things first, get that oven warmed up! Preheat it to 350 degrees F (that’s 175 degrees C). You need to prepare two 8-inch round cake pans—I grease mine well and then flour them lightly. Now for the dry stuff: whisk the flour, sugar, cocoa, baking soda, baking powder, and salt together in one big bowl until everything looks uniform. Don’t skip that whisking step!
Next, toss in your eggs, buttermilk, oil, and vanilla. Get your electric mixer going on medium speed and beat it for a good two minutes until it’s smoothly combined. Here’s my favorite trick for making this a true chocolate lover’s dream: carefully whisk in one cup of hot liquid. If you use hot brewed coffee instead of just hot water, that coffee smell goes away, but it really wakes up the chocolate flavor in the cake base.
The batter will look very thin—don’t panic! That’s what makes it moist later on. Pour it evenly between your pans. Bake them for about 30 to 35 minutes. You’ll know they are done when a little wooden pick stuck in the center comes out clean. Let them sit in those pans for about 10 minutes before flipping them out onto a wire rack to cool completely. Don’t try to fill or frost warm cakes, or you’ll have a melted mess!
Preparing the Fluffy Creamy Filling for the Ding Dong Cake
While those cakes cool down—and this is important, they must be completely cool—we make that glorious white filling! In a clean bowl, beat your softened butter until it’s nice and creamy. Now, slowly start adding that powdered sugar. I really suggest you sift it first; it’s crucial for a silky smooth filling that you expect in a quality **ding dong cake**.
Once the sugar is mostly mixed in, add your vanilla and the milk. Turn the mixer up to high speed and beat it for a minute or two until it looks light and super fluffy. Taste it! It should taste like sweet vanilla cloud heaven.
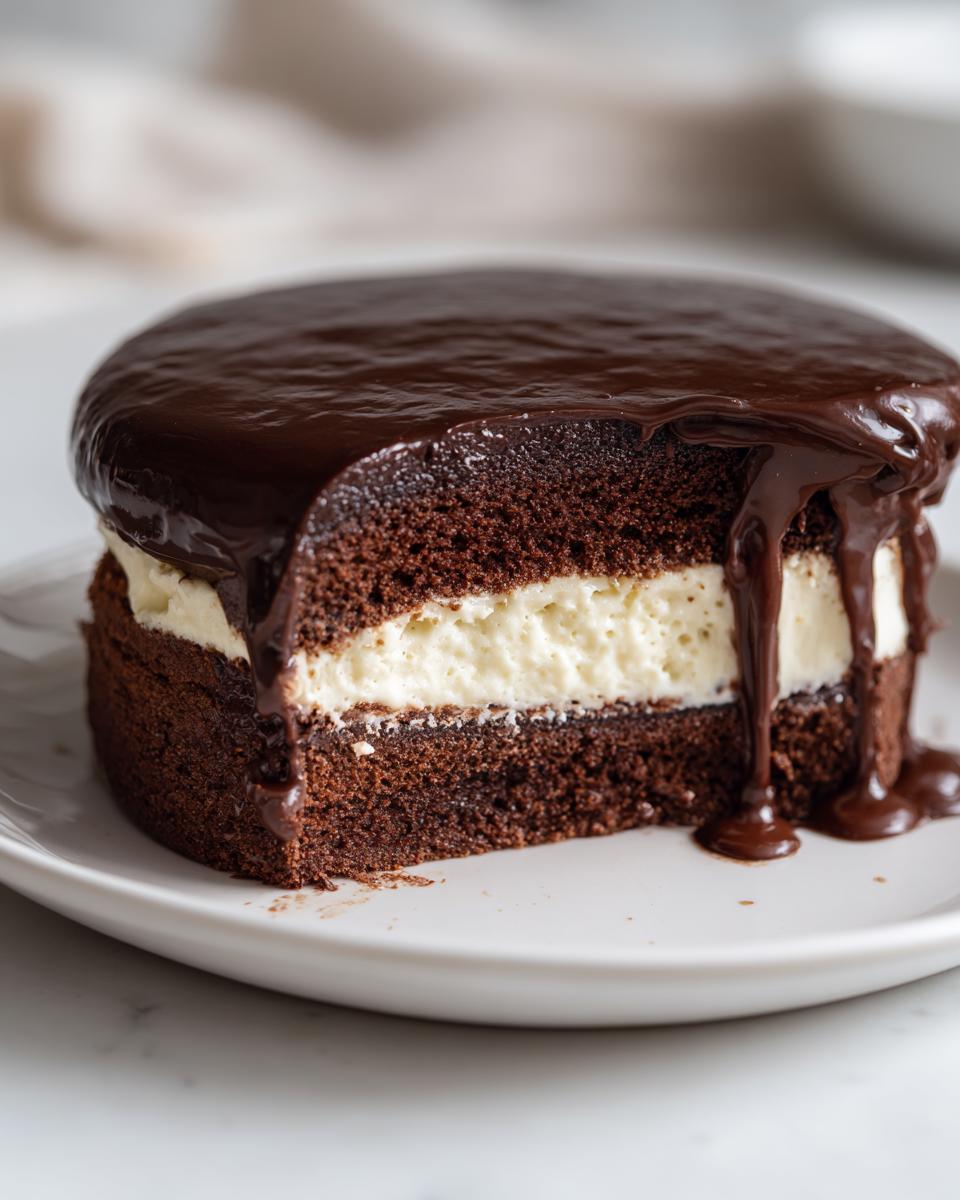
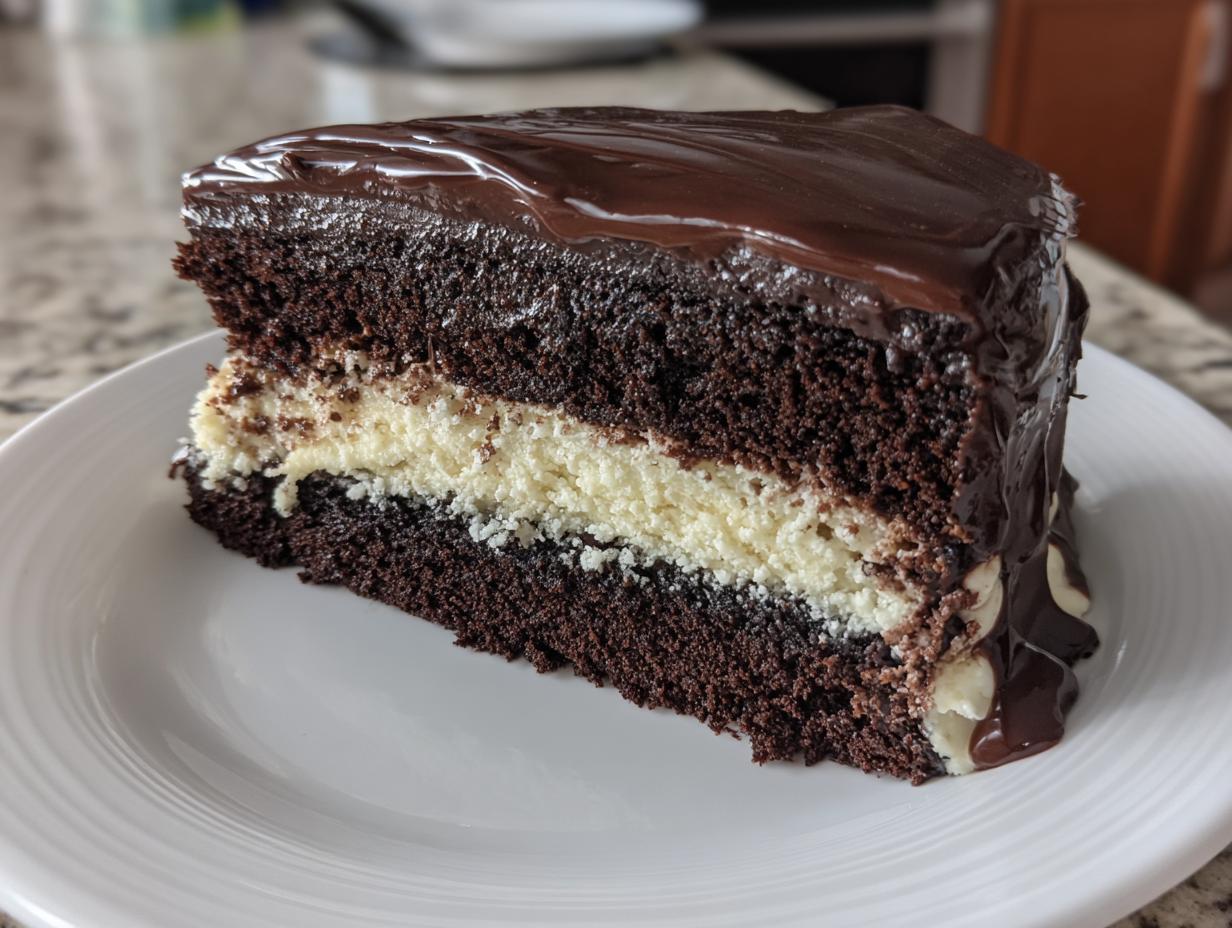
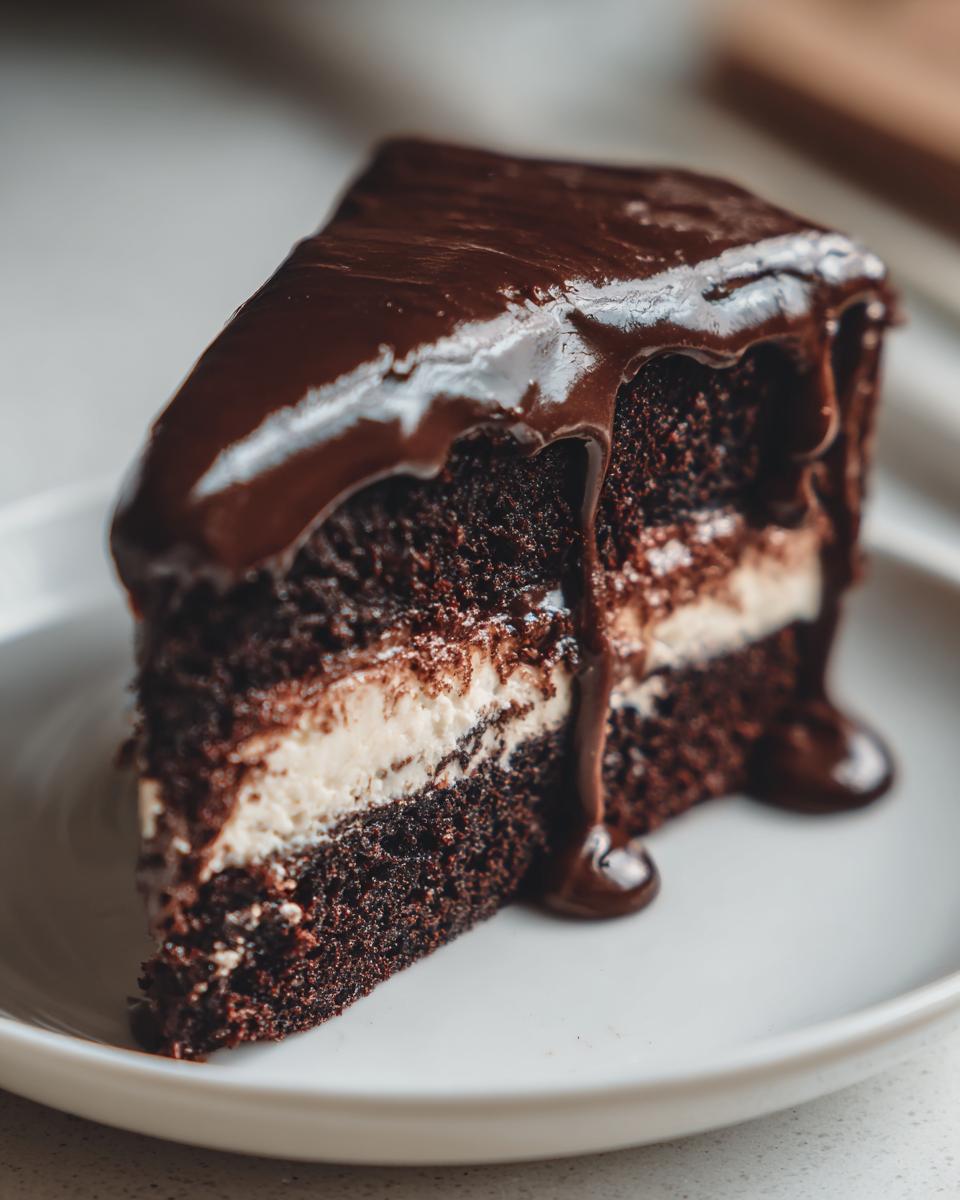
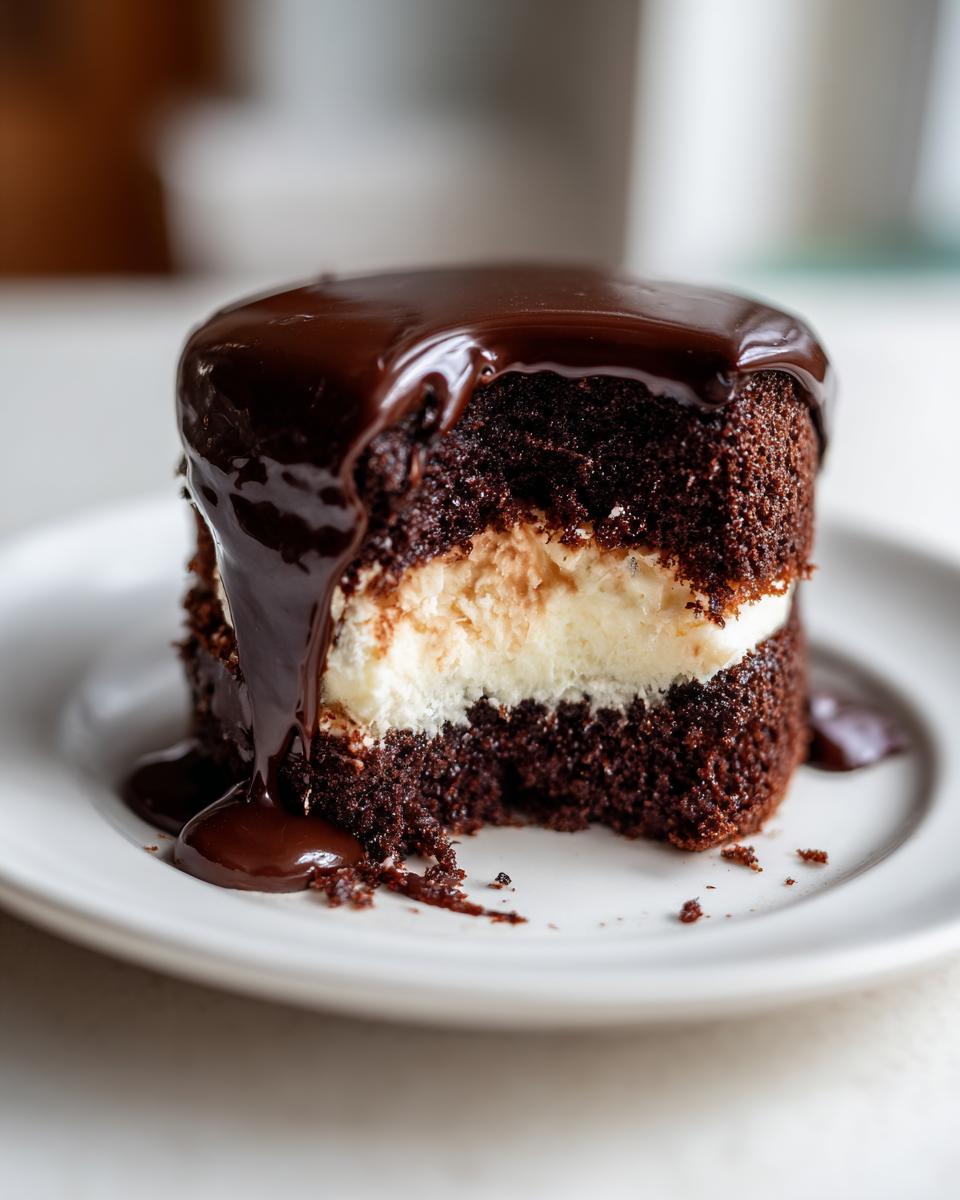
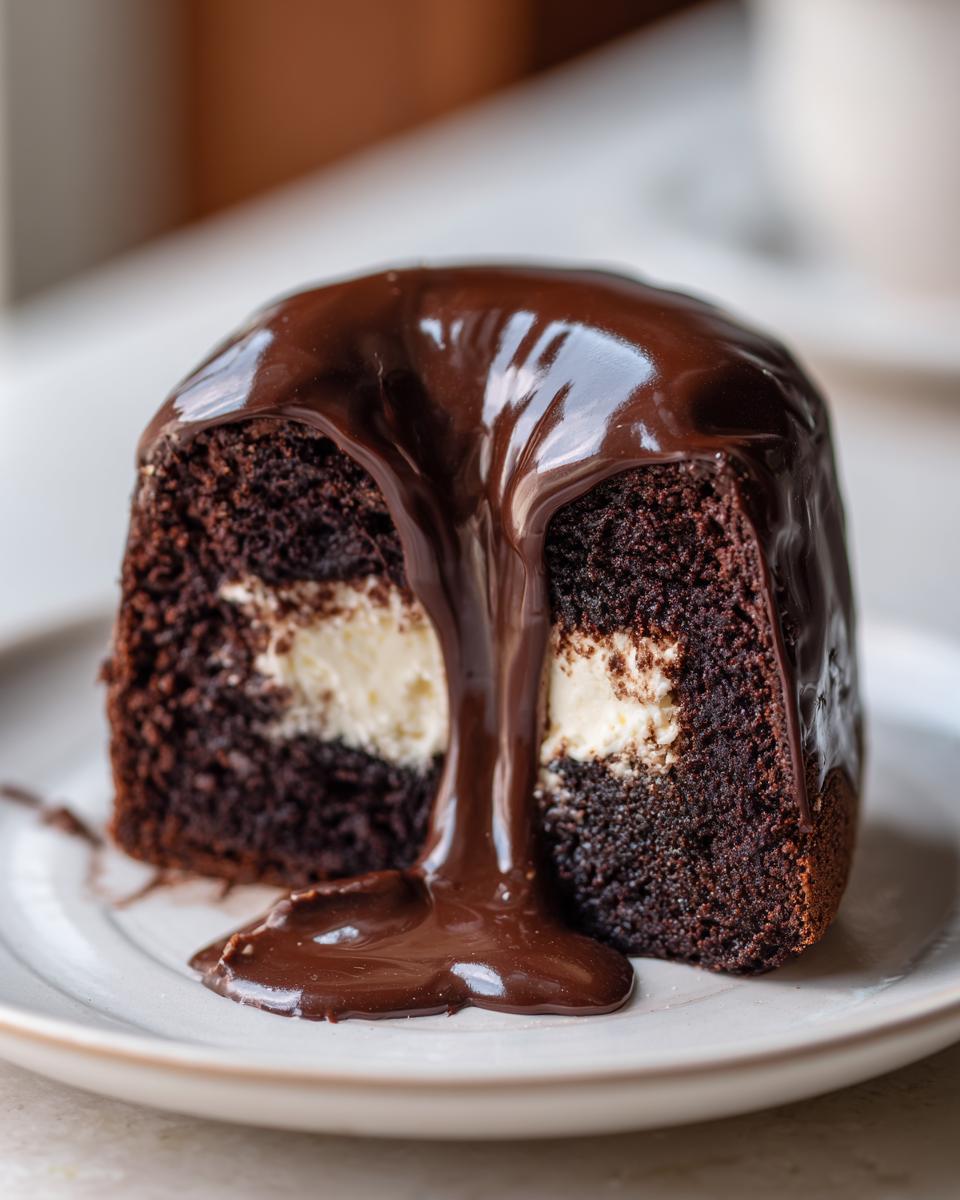
Assembling and Coating the Ding Dong Cake with Ganache
Time for assembly! If your cakes baked with a dome on top, carefully slice them level so they sit flat. Pop the first layer on your serving plate or cake stand. Spread all that gorgeous, fluffy cream filling evenly over that first cake. Then, gently place the second cake layer right on top.
For the chocolate cloak, we’re making a simple ganache. Put your semi-sweet chocolate chips in a heatproof bowl. Heat the heavy cream in a small saucepan until it just begins to simmer. Pour that hot cream over the chocolate chips. Let stand for 5 minutes, then whisk until smooth and glossy. If you want that extra rich finish, you can check out my recipe for a thicker chocolate ganache frosting, but this quick method is perfect!
When the ganache is slightly cooled but still completely pourable, pour it right over the top center of your assembled cake. Guide it slightly so it starts dripping down the sides in that characteristic **ding dong cake** look. Let that beautiful chocolate set up before you slice and serve!
Tips for Success When Making a Copycat Ding Dong Cake Recipe
There are a few little secrets in this process that take your homemade treat from just “a chocolate cake” to undeniably the best **ding dong cake** you’ve ever had. It’s all about controlling the texture! I’ve baked this recipe hundreds of times over the years, both for school events and family gatherings, and paying attention to these small details really makes sure your cake looks and tastes authentic.
Achieving the Perfect Moist Chocolate Cake
When you see that thin batter, your instinct might be to add more flour, but please resist! The buttermilk and the hot liquid—whether that’s water or coffee—are what make this cake so tender and moist. The buttermilk reacts with the baking soda to give it that perfect lift.
My main tip here is about mixing. Once you add the flour mixture, you only want to mix until the streaks just disappear. If you overmix, you develop too much gluten, and suddenly your cake turns dense instead of light and airy. Remember, we are going for that velvety crumb, not something tough! Remember to scrape down the sides of the bowl well, but once you see that smooth, thin batter, stop right there.
Tips for the Creamy Filling Layer in Your Ding Dong Cake
The filling can be tricky if your butter isn’t happy. If your butter is cold, the powdered sugar will just end up in dusty clumps, and nobody wants a gritty filling in their **ding dong cake**, right? So, make sure that butter is truly at room temperature—soft enough that if you gently press it with your finger, it gives way easily.
If you are worried about lumps developing, try beating the butter by itself for a full three minutes before you even think about adding the powdered sugar. Then, add the sugar one cup at a time on low speed until it’s incorporated. The high, fast beat comes last, bringing the air in to make it fluffy. If you follow this, you will get a wonderfully smooth layer ready for this fantastic chocolate cream filled cake.
Storage and Make-Ahead Tips for Your Ding Dong Cake
One of the best parts about making a spectacular dessert like this **ding dong cake**? It lasts! Unlike those flimsy store-bought ones that seem to go stale right away, this homemade version stays moist and delicious. Knowing how to store it properly is key to keeping that creamy filling perfect and the chocolate ganache shiny.
So, can you make this ahead of time? Absolutely! I often bake the cake layers one day and assemble the whole thing the next. The cake layers themselves, wrapped tightly in plastic wrap, are perfectly happy sitting out on the counter for a full 24 hours before you fill them. They actually seem to get *more* moist overnight!
Once it’s assembled with the filling and fully coated in the ganache, you have a decision to make. Because that creamy white filling is butter-based, I always suggest keeping the finished **ding dong cake** refrigerated if you aren’t planning to eat it all within a day. Cover it loosely with plastic wrap or stick it in a cake carrier to prevent the fridge air from drying out the sides.
When you pull it out of the fridge, that ganache might look a little stiff, and the filling will be firm. Don’t worry a bit! Let the cake sit out on the counter for about 30 to 45 minutes before serving. This allows the butter in the filling to soften up just enough so that when you slice it, you get that perfect, creamy texture that makes our copycat snack cake recipe so beloved. It should stay wonderfully fresh in the fridge for four or five days!
Variations on the Classic Ding Dong Cake
You know I love this classic, dependable recipe for our **ding dong cake**, but I also believe a good recipe should be a starting point, not a rigid structure! Once you’ve mastered the basics—the moist cake, the fluffy filling—it’s time to play around a little. Don’t be afraid to tweak things to suit your mood or what you have in the pantry. These little changes can turn a nostalgic treat into your very own signature dessert!
I always encourage my grandkids to try one new thing when we bake together. It keeps things interesting, and honestly, sometimes the accidental changes turn out to be the absolute best!
Boosting the Chocolate Intensity
If you’re baking for a real chocoholic—and let’s be honest, who isn’t?—you can really amp up the dark chocolate flavor in that cake base. Since we are already using hot coffee instead of water to deepen the chocolate, the next step is tweaking the coating. Instead of semi-sweet chocolate chips, try using high-quality bittersweet chips for the ganache. It gives you a deeper, richer, almost elegant finish that cuts through the sweetness of the interior filling.
You can also sneak a spoonful of instant espresso powder right into your dry cake ingredients along with the cocoa. Trust me, it doesn’t taste like coffee, but it absolutely makes the dark chocolate taste darker and more complex. It’s a little secret that transforms any chocolate cake!
Flavor Swaps for the Creamy Filling
The creamy filling is where you can really have fun, and it’s so easy to adjust! If rich vanilla isn’t quite catching your eye today, try swapping out that teaspoon of vanilla extract for a different flavor. A tiny bit of almond extract works wonders with chocolate, giving it a subtle, almost marzipan-like background note.
Another fun swap is using fruit zest! If you have a fresh lemon or orange sitting around, grate about a teaspoon of the zest right into the filling when you add the vanilla. The brightness cuts through the richness of the butter and sugar beautifully. It’s still that fluffy texture you expect in a **ding dong cake**, but with a little sunshine baked right in.
Baking Tips for Chocolate Lover Dessert Recipes
If you’re looking for new ideas, remember that presentation matters just as much as flavor! Instead of making one large cake, you can use this recipe to make individual treats. If you bake the batter in a standard muffin tin (using liners, of course!), you get perfectly sized little cakes that fit the snack cake vibe even better. Just drop the batter in about two-thirds full and watch them closely—they bake much faster, usually in about 18 to 20 minutes.
When turning those cupcakes into mini Ding Dongs, you can pipe the filling right into the center using an apple corer or a small knife for the cavity. Then, dip the top of the cupcake into that slightly cooled ganache rather than pouring it over a whole layer cake. It makes for such a fun presentation! For more ways to indulge your sweet tooth, take a look at my favorite chocolate lover dessert ideas on the site.
Frequently Asked Questions About Making Ding Dong Cake
I know you might have a few questions bubbling up—that’s totally normal when you’re trying out a new recipe, especially one that needs to live up to such sweet memories! Because I spent so long teaching, I really want to make sure you feel confident tackling this **ding dong cake**. Here are the most common things folks ask me when they’re ready to bake this copycat snack cake recipe.
Can I make this Easy Ding Dong Dessert as Cupcakes?
Oh, yes, you absolutely can! Making this into cupcakes is a brilliant way to serve them, especially when you want perfectly portioned treats. I mentioned this in the variations section, but here’s the detail: use standard muffin cups lined with paper liners, fill them about two-thirds full with that thin chocolate batter, and bake them for only about 18 to 20 minutes at 350 degrees F. Keep an eye on them—they go fast!
For the filling, instead of layering, use an apple corer or a small paring knife to gently scoop out a little plug from the center of the cooled cupcake, leaving a wall on all sides. Pipe or spoon the creamy filling into that hole. Then, instead of pouring the ganache over a whole cake, just carefully dip the top of each cupcake into the slightly cooled chocolate coating. They look adorable and are perfect for serving!
What is the best way to get a smooth Chocolate Ganache Covered Cake finish?
The secret weapon here is temperature control, my dear. If you pour the ganache when it’s too hot and runny, it will just soak into the cake layers or run all the way down the sides to the plate without leaving that satisfying, thick coating. If it’s too cool, it will get thick and clumpy before you even finish pouring it.
The sweet spot is letting that glossy mixture cool down for about 5 to 10 minutes after you whisk it smooth. It should still pour easily—like thick syrup—but it shouldn’t be steaming hot. When you pour it over the center of your assembled cake, give the bowl a little gentle swirl to encourage it to flow down the sides evenly. If you miss a spot, wait five minutes and use an offset spatula to spread a little more on gently. The key to that beautiful, shiny finish is gentle handling once the chocolate is at the right temperature!
Is this Homemade Ding Dong Cake Recipe difficult for beginners?
Not at all! I promise you that. When I was teaching, I always started my students on reliable recipes that had very clear steps, and this **Homemade Ding Dong Cake Recipe** fits that perfectly. The cake batter looks unusual because it’s so thin, but the mixing process itself is very standard—dry ingredients, then wet ingredients, then hot liquid stirred in gently.
The only part that requires a little patience is the filling, ensuring you beat the butter enough before adding the sugar so it stays light, but if you follow the instructions step-by-step, you won’t have any trouble. If you can follow directions, you can absolutely master this classic American snack cake. It’s one of my most dependable recipes for anyone stepping into baking!
Estimated Nutritional Information for This Chocolate Cream Filled Cake
Now, I feel it’s important to mention the numbers side of things, even though when we are eating something this delicious, we try not to think about it too much! We all know that a delicious, decadent dessert like our **ding dong cake** isn’t exactly a low-sugar snack, but knowing the breakdown can be helpful, especially when you’re planning meals for the family.
I’ve put together the estimated nutritional information below based on the ingredients list, but remember the golden rule from my teaching days: these figures are just estimates. They can swing a bit based on the exact brands of butter, cream, or chocolate chips you decide to use!
- Serving Size: 1 slice
- Calories: 450
- Sugar: 55g
- Sodium: 250mg
- Fat: 25g
- Saturated Fat: 14g
- Unsaturated Fat: 11g
- Trans Fat: 0.5g
- Carbohydrates: 58g
- Fiber: 2g
- Protein: 4g
- Cholesterol: 65mg
See? That’s why we save this spectacular **Chocolate Cream Filled Cake** for special occasions! It’s rich, it’s satisfying, and it’s worth every single bite. Enjoy it guilt-free when you do decide to bake it!
Share Your Homemade Ding Dong Cake Creations
Well, that’s it! You’ve tackled the **ding dong cake**, from the deep chocolate crumb to that perfect, shiny coating. I truly hope this recipe brought a little bit of nostalgic joy back into your kitchen today. I poured so much of my own time and love into testing this for dependability that seeing it come out perfectly for you would just make my whole week!
Now, the best part of all this for me is hearing from you folks! Did it transport you right back to childhood? Did your kiddos love diving into this **copycat snack cake recipe**? When you finish up, please, please—come right back here and let me know how it went.
If you had a great experience, it would mean the world to me if you could leave a star rating right below the recipe card. Five stars keep these reliable recipes circulating so other home cooks can find them!
And if you snapped a picture of that perfectly coated **Homemade Ding Dong Cake Recipe**, I’d love to see it! Tag me in your photos on social media—I always scroll through looking for your beautiful bakes. If you have any lingering questions that my FAQ didn’t cover, use the contact form here to reach out to Carla. Happy baking, friends!
PrintHomemade Ding Dong Cake Recipe

Make a moist chocolate cake with a creamy filling and rich chocolate ganache coating, recreating the classic flavor of the Hostess snack cake at home.
- Prep Time: 25 min
- Cook Time: 35 min
- Total Time: 60 min
- Yield: 10 servings 1x
- Category: Dessert
- Method: Baking
- Cuisine: American
- Diet: Vegetarian
Ingredients
- 1 3/4 cups all-purpose flour
- 1 3/4 cups granulated sugar
- 3/4 cup unsweetened cocoa powder
- 1 1/2 teaspoons baking soda
- 1 1/2 teaspoons baking powder
- 1 teaspoon salt
- 2 large eggs
- 1 cup buttermilk
- 1/2 cup vegetable oil
- 2 teaspoons vanilla extract
- 1 cup hot water or hot brewed coffee
- For the Filling: 1 cup (2 sticks) unsalted butter, softened
- 4 cups powdered sugar, sifted
- 1 teaspoon vanilla extract
- 1/4 cup milk
- For the Ganache: 1 cup semi-sweet chocolate chips
- 1/2 cup heavy cream
Instructions
- Preheat your oven to 350 degrees F (175 degrees C). Grease and flour two 8-inch round cake pans.
- In a large bowl, whisk together the flour, sugar, cocoa powder, baking soda, baking powder, and salt for the cake.
- Add the eggs, buttermilk, oil, and vanilla extract to the dry ingredients. Beat with an electric mixer on medium speed for two minutes.
- Carefully stir in the hot water or coffee until the batter is smooth. The batter will be thin.
- Pour the batter evenly into the prepared cake pans. Bake for 30 to 35 minutes, or until a wooden pick inserted into the center comes out clean.
- Let the cakes cool in the pans for 10 minutes before inverting them onto a wire rack to cool completely.
- To make the filling, beat the softened butter in a large bowl until creamy. Gradually add the powdered sugar, beating until combined.
- Add the vanilla extract and milk. Beat on high speed until the filling is light and fluffy.
- Once the cakes are cool, level the tops if necessary. Place one cake layer on a serving plate. Spread the entire cream filling evenly over the first layer. Top with the second cake layer.
- To make the ganache, place the chocolate chips in a heatproof bowl. Heat the heavy cream in a small saucepan until it just begins to simmer. Pour the hot cream over the chocolate chips. Let stand for 5 minutes, then whisk until smooth and glossy.
- Pour the warm ganache over the top of the assembled cake, allowing it to drip down the sides. Let the ganache set before slicing.
Notes
- Using hot coffee instead of hot water deepens the chocolate flavor of the cake base.
- For a very smooth filling, use room temperature butter and sift the powdered sugar.
- If you want a thicker coating, let the ganache cool slightly before pouring it over the cake.
Nutrition
- Serving Size: 1 slice
- Calories: 450
- Sugar: 55g
- Sodium: 250mg
- Fat: 25g
- Saturated Fat: 14g
- Unsaturated Fat: 11g
- Trans Fat: 0.5g
- Carbohydrates: 58g
- Fiber: 2g
- Protein: 4g
- Cholesterol: 65mg