
The holidays are wonderful, but let’s be honest—the stress of planning the perfect dessert spread can sneak up on you! If you’re staring down a long list of things to bake, I have your back. Forget worrying about last-minute scrambling; this Christmas chocolate cream pie is the ultimate solution. It’s rich, it’s decadent, and trust me, it’s absolutely foolproof. When I developed this recipe, I made absolutely sure it held up perfectly after chilling. That’s the secret Carla Mae learned growing up: dependable food for big family gatherings.
- Why This Christmas Chocolate Cream Pie is Your Perfect Holiday Dessert
- Gathering Ingredients for Your Christmas Chocolate Cream Pie
- Essential Equipment for Your Holiday Chocolate Pie Recipe
- Step-by-Step Instructions for the No Fail Chocolate Cream Pie
- Tips for a Perfect Christmas Chocolate Cream Pie Every Time
- Ingredient Notes and Substitutions for Your Holiday Chocolate Pie Recipe
- Serving Suggestions for Your Festive Christmas Dessert Ideas
- Storing Your Make Ahead Christmas Desserts
- Frequently Asked Questions About This Easy Holiday Pie Recipe
- Sharing Your Festive Christmas Dessert Ideas
Why This Christmas Chocolate Cream Pie is Your Perfect Holiday Dessert
When the holidays hit, every minute you save is like finding an extra present under the tree! This rich, dark chocolate pie isn’t just pretty; it’s genuinely hardworking. It checks all the boxes for that perfect festive Christmas dessert idea without demanding your attention on Christmas morning.
- It’s truly a no fail chocolate cream pie—the custard sets up like a dream every single time.
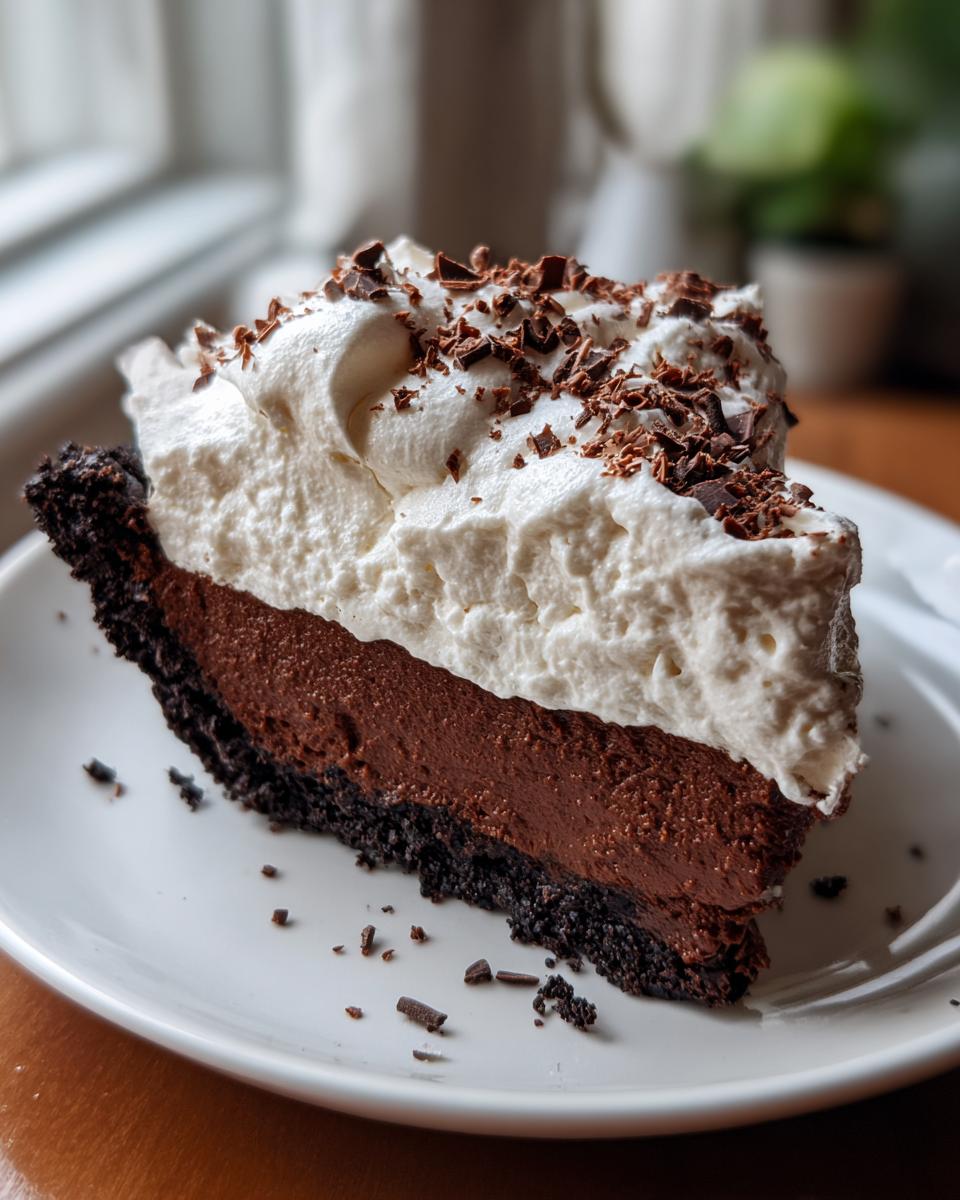
- That creamy chocolate filling nestled in the crunchy Oreo crust just screams comfort and celebration.
- Best of all? It’s one of those fantastic make ahead Christmas desserts you can complete the day before!
The Ultimate Make Ahead Christmas Desserts Strategy
Here’s my favorite part of this whole recipe. You finish cooking the chocolate filling and let it chill completely, maybe even whip up the topping and store it separately. Then, on the big day, all you do is pile that fluffy topping on top and decorate! No last-minute oven timing worries. That means you can spend your Christmas morning sipping coffee and actually talking to your family instead of babysitting a pudding mixture. It’s pure genius, honestly.
Gathering Ingredients for Your Christmas Chocolate Cream Pie
When we talk about easy holiday pie recipes, keeping the ingredient list straightforward is key! For this deep, dark chocolate dream, I’m starting you off with an amazing shortcut: a store-bought Oreo crust. No need to fuss with crumbs and butter when you have a rich custard to perfect. Growing up in the Midwest, Carla Mae always taught me to buy the best quality cocoa powder you can find—it makes such a difference in the final color and depth of flavor.
Ingredients for the Rich Chocolate Filling
You’ll need these essentials for the filling that sets up so beautifully:
- 1 9-inch pre-made Oreo cookie crust
- 1 1/2 cups granulated sugar
- 1/3 cup unsweetened cocoa powder
- 1/4 cup cornstarch (this is your thickener!)
- 1/4 teaspoon salt
- 3 cups whole milk
- 4 large egg yolks, lightly beaten
- 2 tablespoons unsalted butter
- 1 teaspoon vanilla extract
Ingredients for the Whipped Cream Chocolate Pie Topping
For the cloud-like topping that makes this a true whipped cream chocolate pie:
- 2 cups heavy whipping cream
- 1/4 cup powdered sugar
- 1/2 teaspoon vanilla extract
- Chocolate curls or holiday sprinkles for topping (the fun part!)
Essential Equipment for Your Holiday Chocolate Pie Recipe
Before you even think about turning on the stove, let’s make sure you have the right tools ready! Having everything out first makes this process so smooth—it’s just like setting up your station before a big teaching day, right? We aren’t doing anything complicated here, but a few key items make the difference between a lumpy mess and a perfect, glossy custard.
You don’t need fancy gadgets, trust me. Just gathering these basic pieces ensures you can tackle the steps without panic, especially when you’re mixing that hot milk in!
- A medium, heavy-bottomed saucepan is a must. It helps distribute heat evenly so your chocolate doesn’t scorch along the bottom!
- You need a good, sturdy whisk. You will be whisking constantly, so make sure it’s one you trust to keep lumps away.
- A small bowl dedicated to tempering your egg yolks. Don’t try to mix them right in the measuring cup, please!
- A rubber spatula helps you scrape down the sides of that saucepan to get every last bit of rich chocolate goodness.
- For the topping, you’ll want a large mixing bowl and an electric mixer, either a handheld one or a stand mixer, to get those stiff peaks without aching arms.
- A 9-inch pie plate (already containing your Oreo crust, ideally!).
Step-by-Step Instructions for the No Fail Chocolate Cream Pie
This is where the magic happens, but don’t panic! Like teaching fractions, breaking down a complex process into simple, manageable steps guarantees success. Anyone can make this! My goal, just like when I was teaching in the classroom all those years, is to give you clear instructions so you feel confident. Head over to our story if you want to know more about why I focus on dependable recipes!
Making the Thick Chocolate Filling Base
First things first: grab your medium saucepan. We start dry because this is the secret to beating those pesky lumps. Whisk together your sugar, cocoa powder, cornstarch, and salt until they look uniform. Now, gradually trickle in the whole milk while you keep whisking—slow and steady wins this race! Set it over medium heat. You must stir constantly here, don’t wander off! We need to cook this stirrer non-stop for about 8 to 10 minutes until it thickens up so much that it actually starts bubbling. You’ll know it’s ready when it holds a line across the spoon when you drag it through. That bubbling is the cornstarch doing its job!
Tempering Eggs and Finishing the Christmas Chocolate Cream Pie Filling
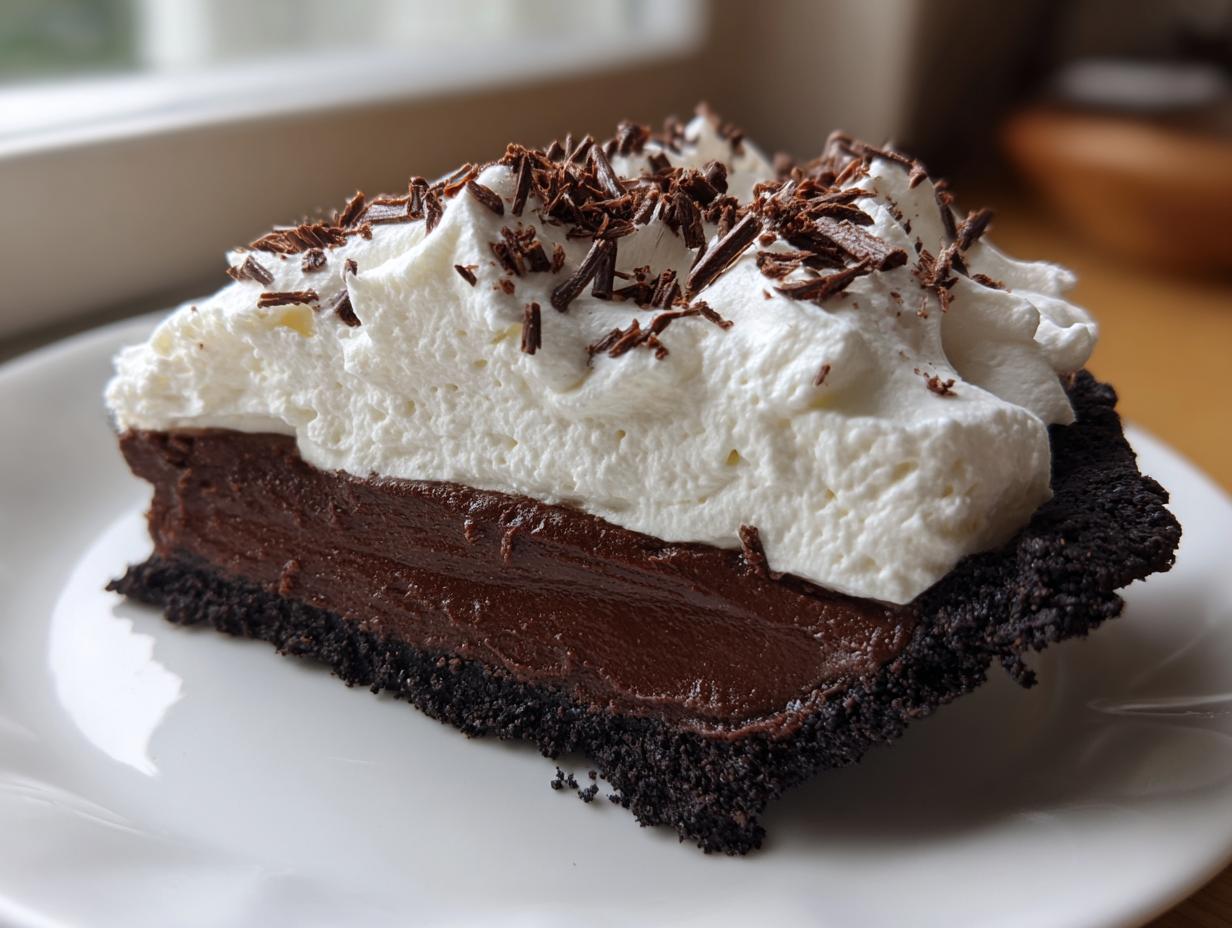
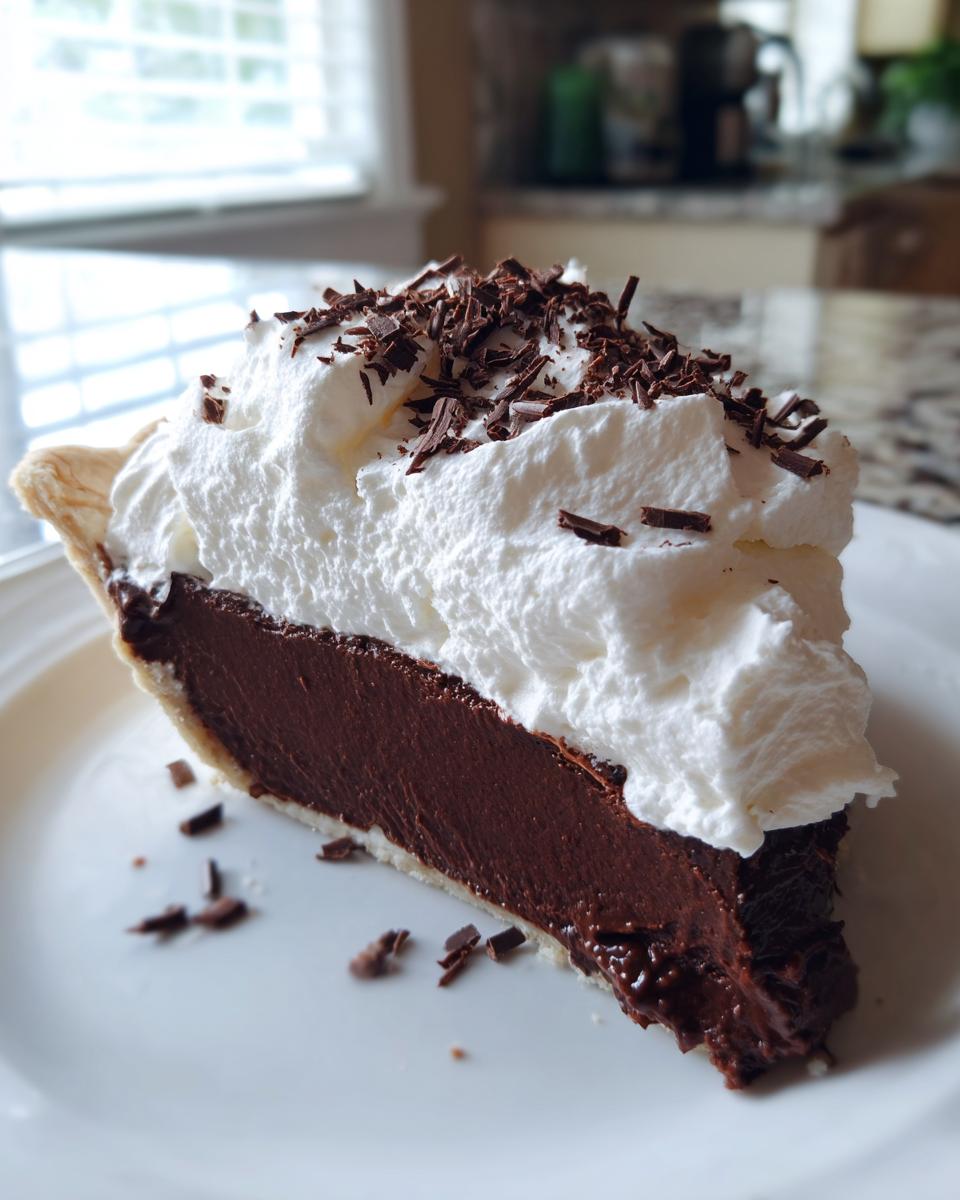
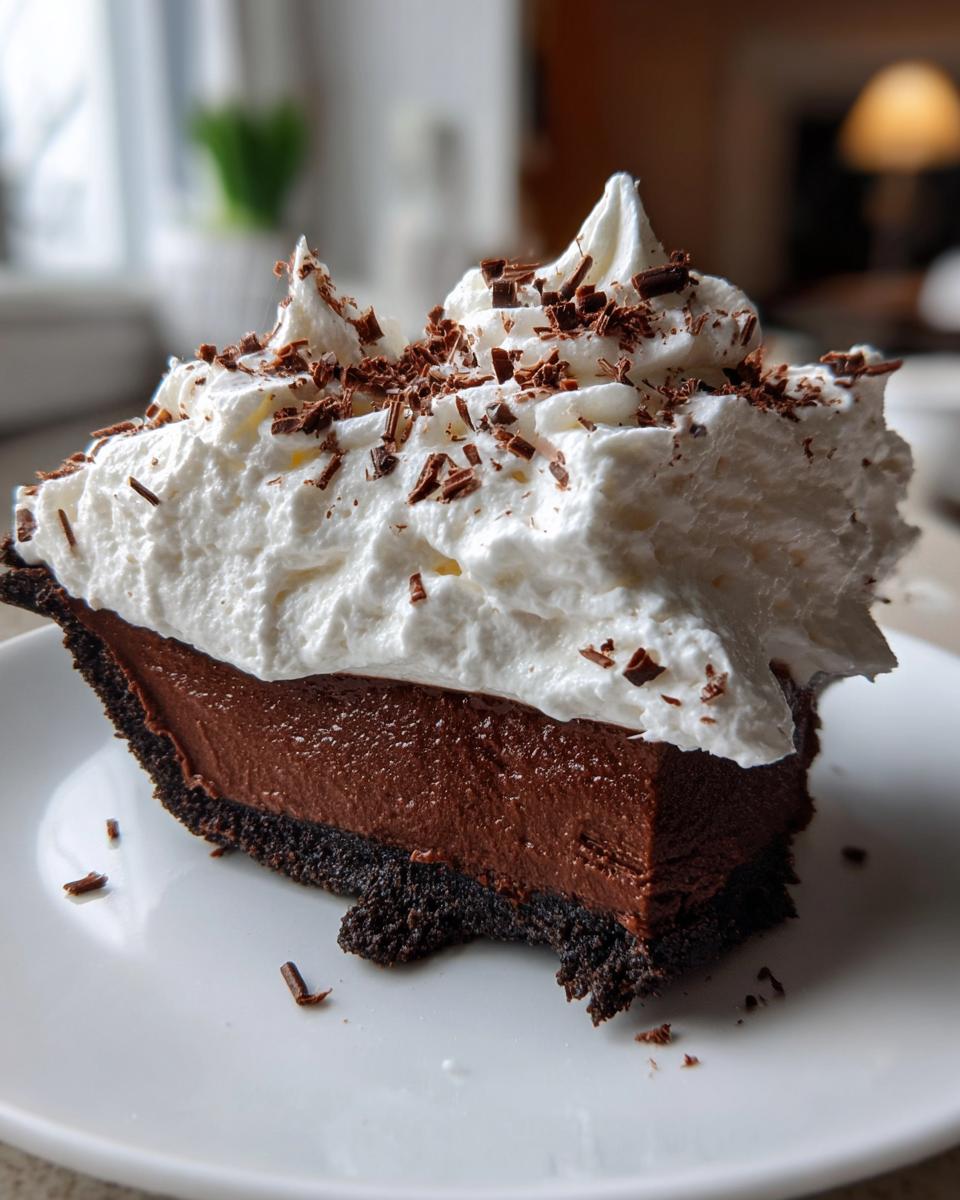
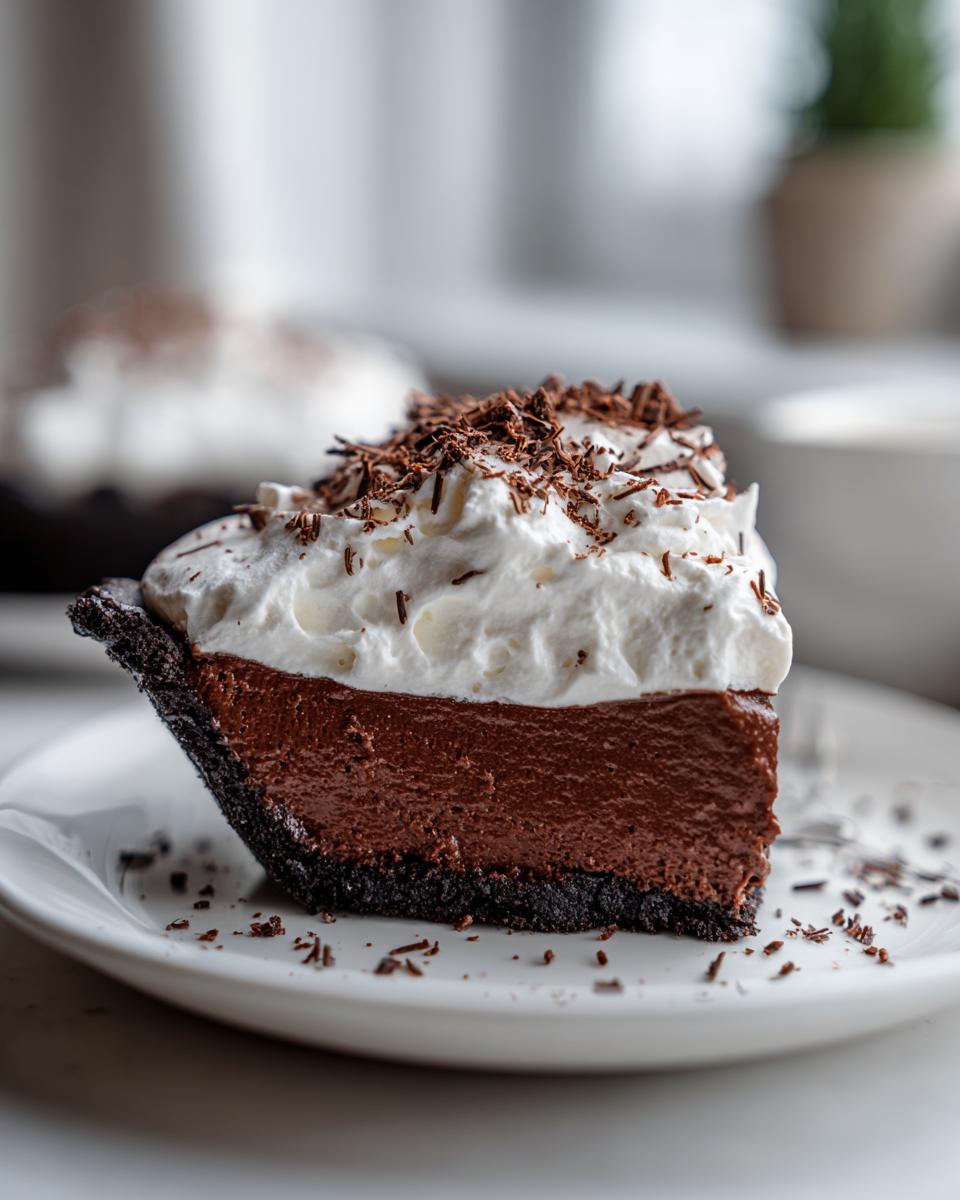
This next part seems scary, but it stops your eggs from scrambling—it’s called tempering! Once off the heat, slowly ladle about 1 cup of that hot chocolate right into your lightly beaten yolks while whisking the yolks furiously. This gently brings their temperature up. Then, pour that warmed yolk mixture back into the saucepan and return it to medium heat for just one more minute of cooking. Don’t let it boil! Remove it immediately. Stir in that tablespoon of butter and the teaspoon of vanilla until everything melts smooth. Pour this glorious, dark filling right into your Oreo crust.
Quick tip for chilling: Take a sheet of plastic wrap and press it *directly* onto the surface of the filling. This stops that awful rubbery skin from forming while it chills out in the fridge for at least four hours, or until it’s totally cold and firm.
Preparing the Whipped Cream and Assembling the Oreo Crust Chocolate Cream Pie
We only make the topping when the pie is cold! Grab your large bowl and whip the heavy cream with the powdered sugar and vanilla extract. Keep mixing until you reach stiff, beautiful peaks—when you lift the beater, the peak should stand straight up without flopping over. Now, pull that chilled pie out. Gently spoon or pipe that cloud of whipped cream over the cold chocolate filling. This is your final assembly before the big day!
Don’t wait too long after topping it to decorate! Sprinkle those chocolate curls or festive sprinkles right on top. Now, pop the whole Oreo crust chocolate cream pie back into the fridge until you’re ready to serve it for your celebrations.
Tips for a Perfect Christmas Chocolate Cream Pie Every Time
Even though I keep telling you this is a no-fail recipe, sometimes the kitchen throws a little curveball, right? Trust me, I’ve been there! If you want that custard to be absolutely silken smooth, you need to treat the cornstarch and cocoa powder gently right at the start. Think of it: if those dry, dusty powders aren’t fully mixed, they clump up later when liquid hits them!
My biggest tip, learned from years of working over that stove, is to always, always use a very good whisk when combining the dry ingredients with the **whole milk**. Don’t rush it! If you see any little specks hiding in the bottom of the pan before you even turn on the heat, whisk them out. A smooth start means a smooth finish.
Be Patient with Cooling and Chilling
The biggest mistake people make with this type of **holiday chocolate pie recipe** is getting impatient during the chill phase. If you try to put the whipped cream on that filling when it’s even slightly warm, the whipped cream melts right into the custard, and you lose that beautiful snowy-white layer. Patience is a virtue, especially around Christmas!
Make sure that filling has at least four hours in the fridge. If you’re worried about the structure, stick it in for six! It needs to be completely cold and jiggle-free before the topping goes on. That solid base is what keeps the tall pile of whipped cream standing proud on your dessert table.
Achieving Stiff Peaks for the Whipped Cream Topping
For that majestic mountain of cream, the temperature of your heavy whipping cream matters more than you think. If your cream is too warm, it will take forever to whip, and even worse, it might turn grainy or soupy before it ever reaches stiff peaks. I always chill my mixing bowl and my whisk attachments in the freezer for about ten minutes before I start beating the cream.
When you’re whipping, start slow until it just starts to thicken, then ramp up the speed. Once you add in the powdered sugar, watch it closely! Stop as soon as the peaks are firm. If you keep going past that point, you’re accidentally making butter, and we definitely don’t want that for our festive Christmas dessert ideas centerpiece!
Decorating Ideas for Extra Cheer
Since this pie is mostly dark brown and white, you need a little festive pop! I mentioned chocolate curls, which are easy to make if you just run a vegetable peeler down the side of a room-temperature chocolate bar. But for true holiday spirit, don’t be shy with the sprinkles!
Use deep red and green sprinkles over the top, or maybe melt a little white chocolate and drizzle it in a crisscross pattern over the whipped cream before sprinkling. It takes just thirty extra seconds, but it changes a lovely chocolate pie into a show-stopping festive Christmas dessert idea that everyone will rave about!
Ingredient Notes and Substitutions for Your Holiday Chocolate Pie Recipe
Now that you’ve mastered the technique, let’s talk about adjusting things slightly if you need to—because real life happens, right? Life as a mom and grandma means sometimes you have to pivot based on what’s in the pantry! The good news is this holiday chocolate pie recipe is incredibly forgiving.
Confirming the Make-Ahead Magic
Yes, yes, a thousand times yes! You can make this pie completely one day ahead of your big Christmas bash. That’s the beauty of a chilled cream pie. After the filling has set up completely, cover the whole thing tightly with plastic wrap—or maybe use a pie carrier if you have one—and tuck it into the refrigerator. It holds beautifully up to 24 hours. Just wait to put the whipped cream on until a few hours before serving if you want the absolute fluffiest texture possible, though I usually put the cream on the night before with no issues!
Swapping Out the Crust
Don’t sweat it if you couldn’t find an Oreo crust or if someone in the family has a preferred baked item. My original notes mentioned that if you do not have an Oreo crust, you can use a graham cracker crust instead. Honestly? They both work perfectly well, so use whichever one you prefer or whichever is on sale!
Just remember that when using a sturdy crust like these, you don’t need to pre-bake it or fill it with pie weights. We are making a chilled, set pie, not a baked one, so dump that cold filling right into that ready-made base!
The Secret to Deep Chocolate Flavor
Since this pie relies so heavily on that dark, chocolatey custard, please, please invest in the best cocoa powder you can find. I know sometimes we rely on the staple can in the pantry, but for a flavor this important, it’s worth grabbing a darker Dutch-processed cocoa if you can find it. It doesn’t taste bitter; it just deepens the color and makes the chocolate notes taste richer, almost like a fine brownie. A high-quality powder really elevates this simple dessert into something truly memorable for your festive Christmas dessert ideas table!
Serving Suggestions for Your Festive Christmas Dessert Ideas
Oh, once this gorgeous, velvety pie is chilled and sitting pretty, the real fun begins: pairing it up! This rich chocolate filling needs just a little something extra on the side to make it sing, but we want to keep it simple because it’s Christmas and we’re tired, remember?
Since this is such a decadent, creamy dream, sometimes you need something to playfully cut through that richness. Think about what you serve after a big holiday meal. You want a little zing or maybe just a warm hug in a mug!
Classic Coffee Pairings
For all my fellow adults who need that post-dinner pick-me-up, this pie honestly begs for coffee. Skip the big sugary lattes and go for something simple. A strong, freshly brewed pot of coffee is perfect. The slight bitterness of the dark roast works just like taking a bite of a good chocolate truffle—it enhances the chocolate flavor without making things too sweet.
If you want to get fancy but keep it homey, try making a small pitcher of cream liqueur or even just warming up some plain heavy cream with a tiny pinch of cinnamon to float on top of the coffee cup beside your slice of pie. That’s real home comfort right there.
A Tart Berry Counterpoint
If you’re serving this to folks who don’t drink coffee, you need acidity to balance the fat and sugar in the cream and custard. Don’t worry about making a complicated sauce! My favorite suggestion is super easy: grab a bag of frozen raspberries.
Just toss a cup of those raspberries in a small saucepan with just a tablespoon of sugar and maybe a splash of water. Heat them until they just start to break down—about five minutes—and then pour that warm, tart sauce over individual slices. The bright tartness from the berries is the perfect foil for the creamy filling. It feels incredibly fancy, but truly, it takes less time than finding the good sprinkles!
Simple Garnishes Beyond Sprinkles
If you skipped the sprinkles, I still want you to add something textural on top of that glorious whipped cream. This is all about making your simple holiday treat look like you worked twice as hard!
- A light grating of high-quality dark chocolate over the top section of the whipped cream works wonders.
- If you happen to have some toasted pecans or walnuts lying around from, say, making brittle earlier in the week, chop them roughly and sprinkle them lightly on one half of the pie. That crunch is wonderful!
- A sprig of fresh mint—even if it’s just plain garnish from the grocery store—adds a beautiful little pop of green that screams Christmas when placed strategically near the edges.
Storing Your Make Ahead Christmas Desserts
Okay, since this is one of the best make ahead Christmas desserts, let’s talk storage! You must keep this pie covered tightly in the refrigerator. It needs that chill to keep the custard firm underneath that beautiful whipped cream topping. It lasts wonderfully for up to a day or even two, but after that, the crust can soften up too much. Remember, we never reheat this pie; chilling is its best friend until it hits the holiday table!
Frequently Asked Questions About This Easy Holiday Pie Recipe
Can I use instant pudding mix instead of making the custard for this holiday chocolate pie recipe?
Oh, I hear you wanting to save time! Instant pudding is certainly faster, but for this specific texture, we really need that cooked custard. The process of cooking the sugar, cocoa, cornstarch, and milk together creates a much richer, denser, and absolutely velvety filling—that’s what makes it the no fail chocolate cream pie everyone asks about! Instant pudding just doesn’t have that same deep, satisfying richness that stands up so nicely in the fridge.
How far in advance can I prepare this Christmas chocolate cream pie?
This is one of my favorite things about this recipe! You can absolutely prepare the filling and let it set up completely one day before your party. That gives you tons of time back on Christmas Day. However, to keep that Oreo crust crispest, I like to wait until about four to six hours before serving to whip the cream and spread it on top. But yes, this is a prime candidate for your make ahead Christmas desserts rotation!
What if I want a darker chocolate flavor in my whipped cream chocolate pie?
If you like your chocolate dark and intense, I have two great tricks that work perfectly for the filling base! First, look for a Dutch-processed cocoa powder. It tastes deeper and less acidic than regular cocoa. Second, and this is a little secret: whisk in about a teaspoon of very strong, cold-brewed coffee along with the milk. You won’t taste coffee, but it dramatically enhances the chocolate notes in your whipped cream chocolate pie!
If you’re concerned about your privacy while browsing online, please remember you can always review our Privacy Policy; we value your trust here at Cooking by Carla!
Sharing Your Festive Christmas Dessert Ideas
Well, that’s it! You’ve mastered the richest, easiest, and most dependable Christmas chocolate cream pie for your holiday table. Now that you’ve got this gorgeous dessert ready to impress everyone, I really want to hear about it! Did the Oreo crust hold up? Did your family members ask for the recipe immediately? Don’t keep all that holiday baking joy to yourself!
Please take a moment to leave a rating at the top of this page. Five stars if you feel that way, or let me know if anything surprised you! I genuinely read every single comment because connecting with you—my readers—is the reason I share these simple, time-honored recipes.
Tell Me About Your Holiday Baking Experience
Did you make this pie an early-bird special, preparing it the day before, or did you whip it up last minute? I’m always curious to see how busy families incorporate these easy holiday pie recipes into their chaotic but wonderful holiday schedules. Hearing your stories about sharing food is what makes all this effort worthwhile for me!
If you snapped a picture of your finished festive Christmas dessert ideas masterpiece—especially if you went all out with the chocolate curls or unique sprinkles—please share it on social media and tag me! Seeing my recipes in *your* kitchens, bringing joy at *your* celebrations, is honestly the best gift a home cook could ever ask for.
A Reminder on Keeping Things Fair Online
As you come back to share your lovely comments and enjoy more recipes here on Cooking by Carla, remember that we keep a good, kind community atmosphere. If you need a refresher on how we all interact online, you can always check out the Terms of Use. Happy holidays, and thank you for letting my family’s favorite pie be part of yours!
PrintMake-Ahead Christmas Chocolate Cream Pie

A rich, no-fail chocolate cream pie with an Oreo crust, perfect for your holiday dessert table. You can prepare this festive pie ahead of time.
- Prep Time: 20 min
- Cook Time: 15 min
- Total Time: 35 min
- Yield: 8 servings 1x
- Category: Dessert
- Method: Stovetop and Chilling
- Cuisine: American
- Diet: Vegetarian
Ingredients
- 1 9-inch pre-made Oreo cookie crust
- 1 1/2 cups granulated sugar
- 1/3 cup unsweetened cocoa powder
- 1/4 cup cornstarch
- 1/4 teaspoon salt
- 3 cups whole milk
- 4 large egg yolks, lightly beaten
- 2 tablespoons unsalted butter
- 1 teaspoon vanilla extract
- 2 cups heavy whipping cream
- 1/4 cup powdered sugar
- 1/2 teaspoon vanilla extract
- Chocolate curls or holiday sprinkles for topping
Instructions
- Prepare the chocolate filling: In a medium saucepan, whisk together the granulated sugar, cocoa powder, cornstarch, and salt.
- Gradually whisk in the milk until smooth.
- Cook the mixture over medium heat, stirring constantly, until it thickens significantly and begins to bubble. This takes about 8 to 10 minutes.
- Remove the pan from the heat. In a small bowl, whisk the egg yolks. Temper the yolks by slowly whisking about 1 cup of the hot chocolate mixture into the yolks.
- Pour the tempered yolk mixture back into the saucepan with the remaining chocolate mixture. Return to medium heat and cook, stirring constantly, for 1 minute more. Do not boil.
- Remove from heat. Stir in the butter and 1 teaspoon of vanilla extract until the butter melts completely.
- Pour the hot filling into the Oreo crust. Press plastic wrap directly onto the surface of the filling to prevent a skin from forming. Chill in the refrigerator for at least 4 hours, or until completely cold.
- Prepare the whipped cream topping: In a large bowl, beat the heavy whipping cream, powdered sugar, and 1/2 teaspoon vanilla extract until stiff peaks form.
- Spread or pipe the whipped cream evenly over the chilled chocolate filling.
- Decorate the top with chocolate curls or holiday sprinkles before serving.
Notes
- You can make this pie completely one day ahead. Keep it covered in the refrigerator until you are ready to serve it at your Christmas gathering.
- For a firmer filling, chill the pie for at least 6 hours.
- If you do not have an Oreo crust, you can use a graham cracker crust instead.
Nutrition
- Serving Size: 1 slice
- Calories: 450
- Sugar: 45g
- Sodium: 300mg
- Fat: 25g
- Saturated Fat: 15g
- Unsaturated Fat: 10g
- Trans Fat: 0g
- Carbohydrates: 55g
- Fiber: 2g
- Protein: 6g
- Cholesterol: 110mg