
Oh, I just love when we can make those favorite candy bars right here in our own cozy kitchen! If you’ve ever looked at a store-bought treat and thought, “I bet I could make that better,” then friend, you are in the right place. Today, we are conquering the layers! We’re making the absolute best rich, spectacular, Homemade twix Cookie Bars. You get that perfect snappy shortbread on the bottom, the gooey, chewy caramel right in the middle, and that smooth chocolate coating—it just tastes like childhood! Because I spent thirty years teaching third grade, I promise I’m going to walk you through every single step clearly. No mystery here, just pure, dependable homemade deliciousness that tastes way better than anything wrapped in foil.
- Why You Will Love These Homemade twix Cookie Bars
- Gathering Ingredients for Your twix-Style Dessert
- Step-by-Step Instructions for Homemade twix Cookie Bars
- Tips for Success with Your Copycat Candy Recipes
- Variations on the twix Flavor Profile
- Serving Suggestions for these Easy Chocolate Caramel Bars
- Storage and Reheating Instructions for Homemade twix
- Frequently Asked Questions about twix Copycat Recipes
- Share Your Homemade twix Creations
Why You Will Love These Homemade twix Cookie Bars
When you make these from scratch, you get a thickness and flavor that the factory just can’t replicate. Seriously, these are the ultimate indulgence! You need to try these because:
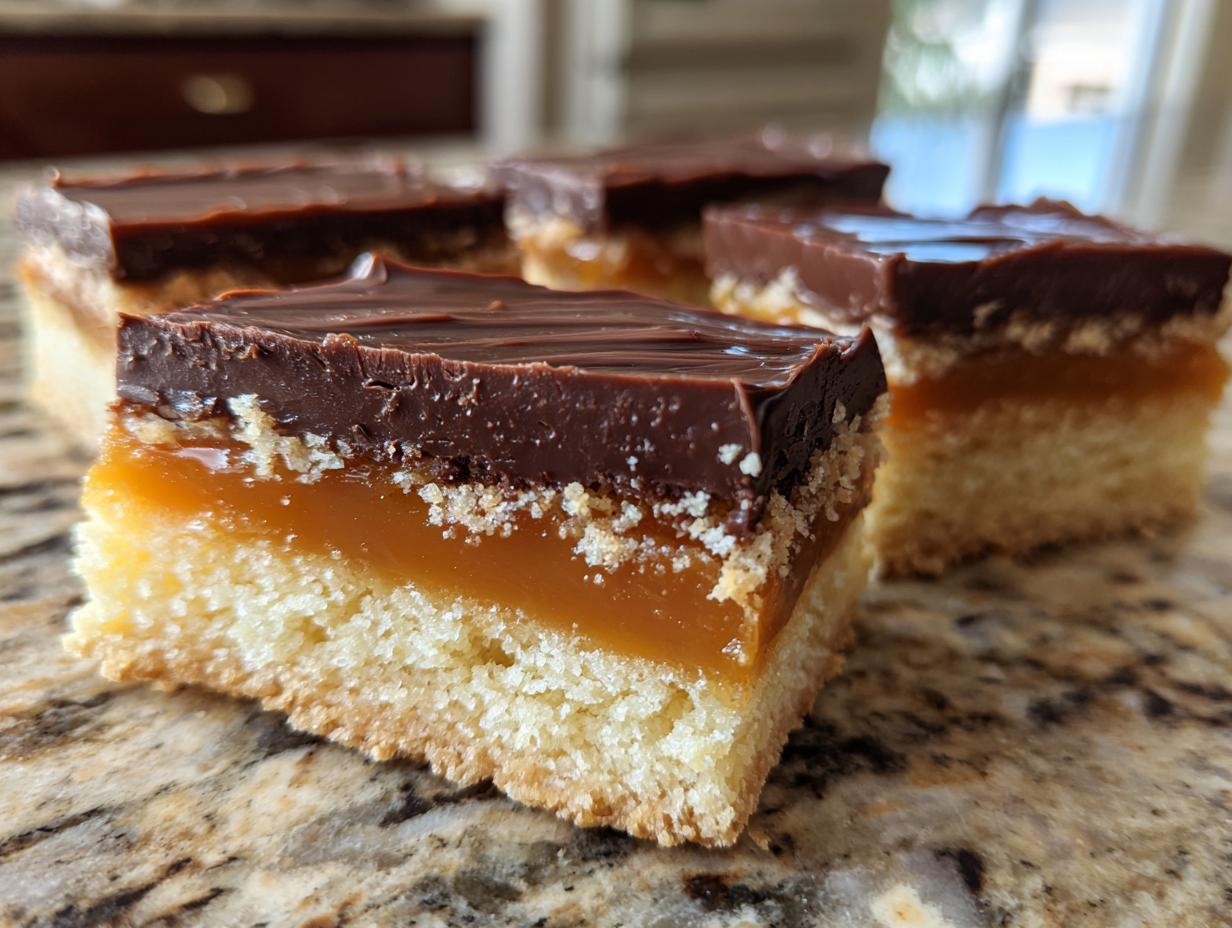
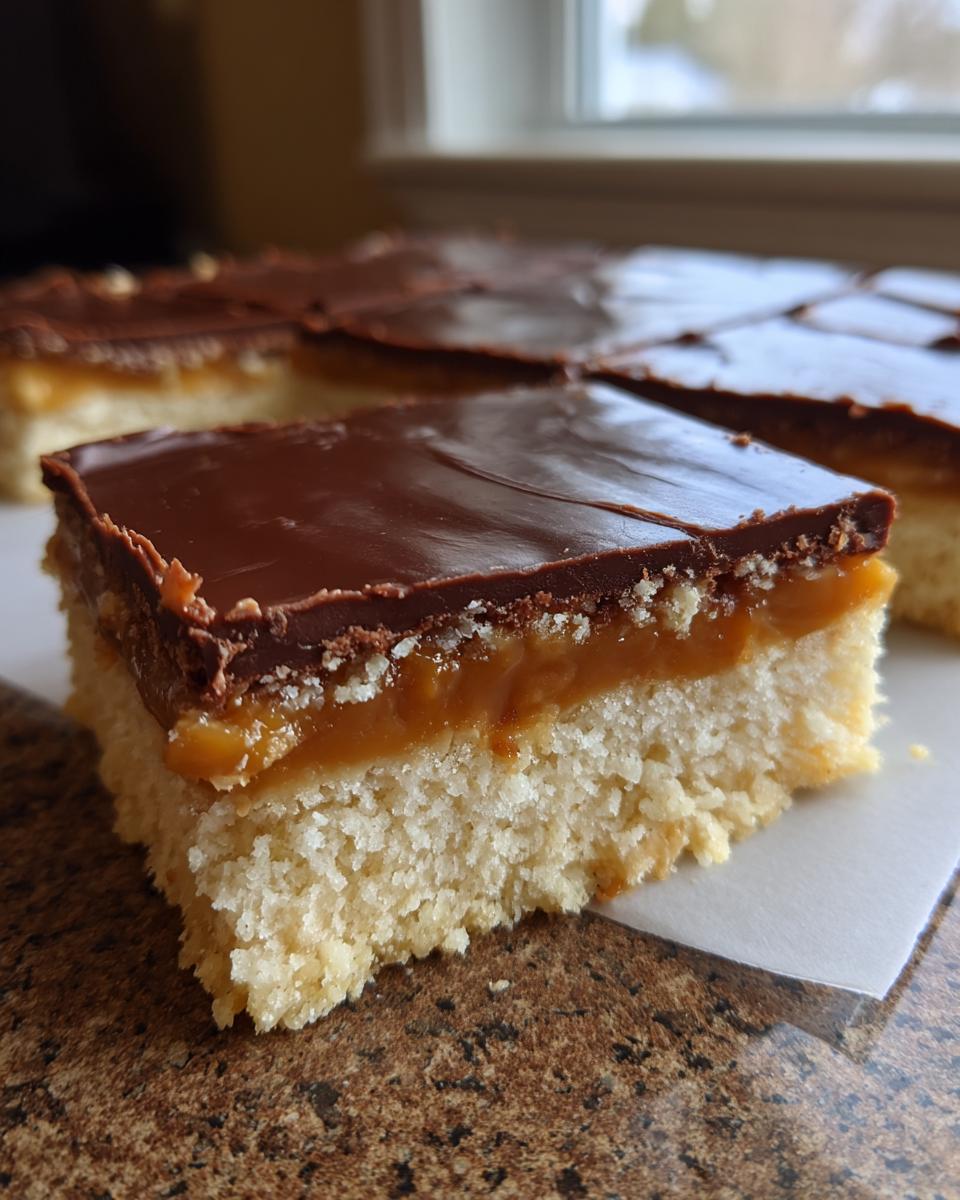
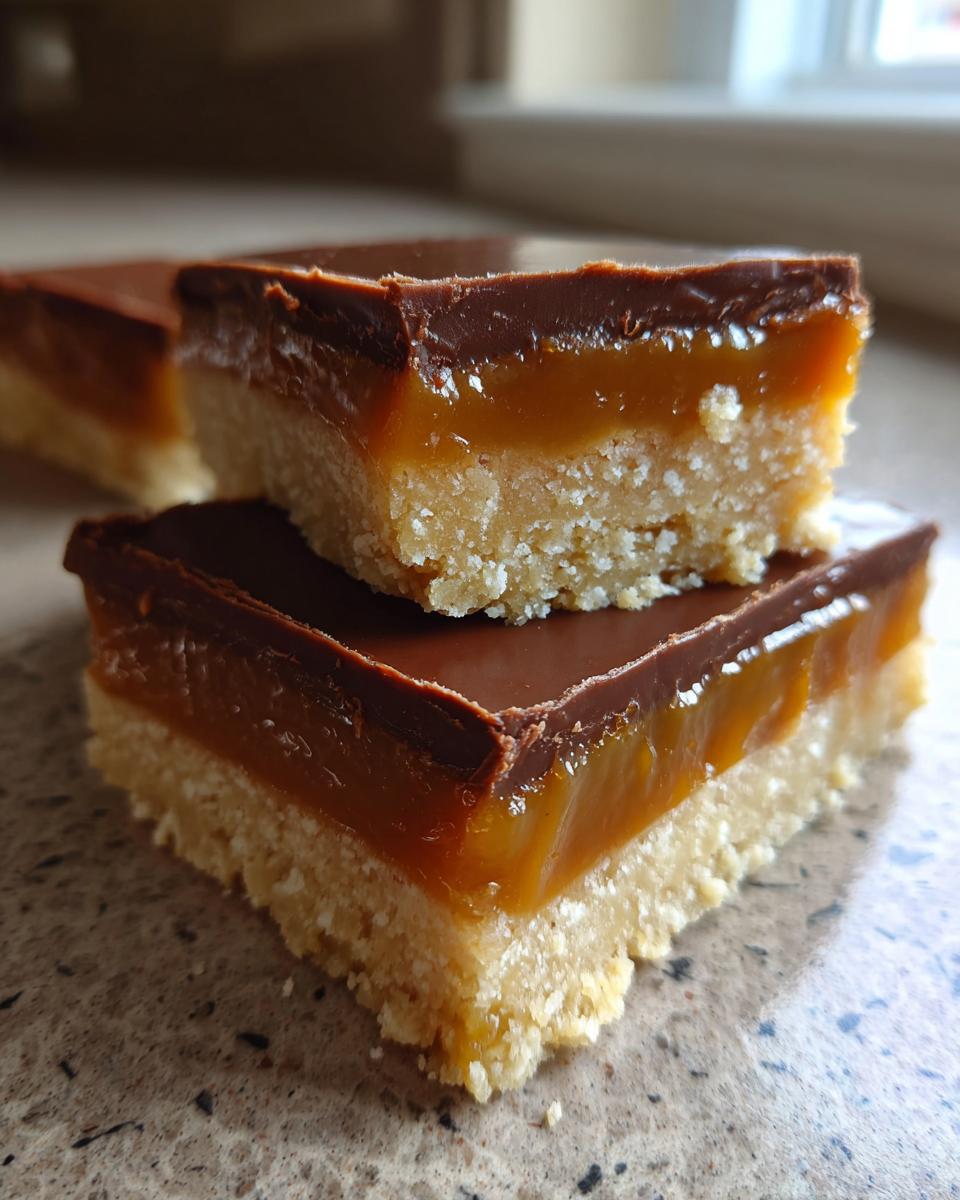
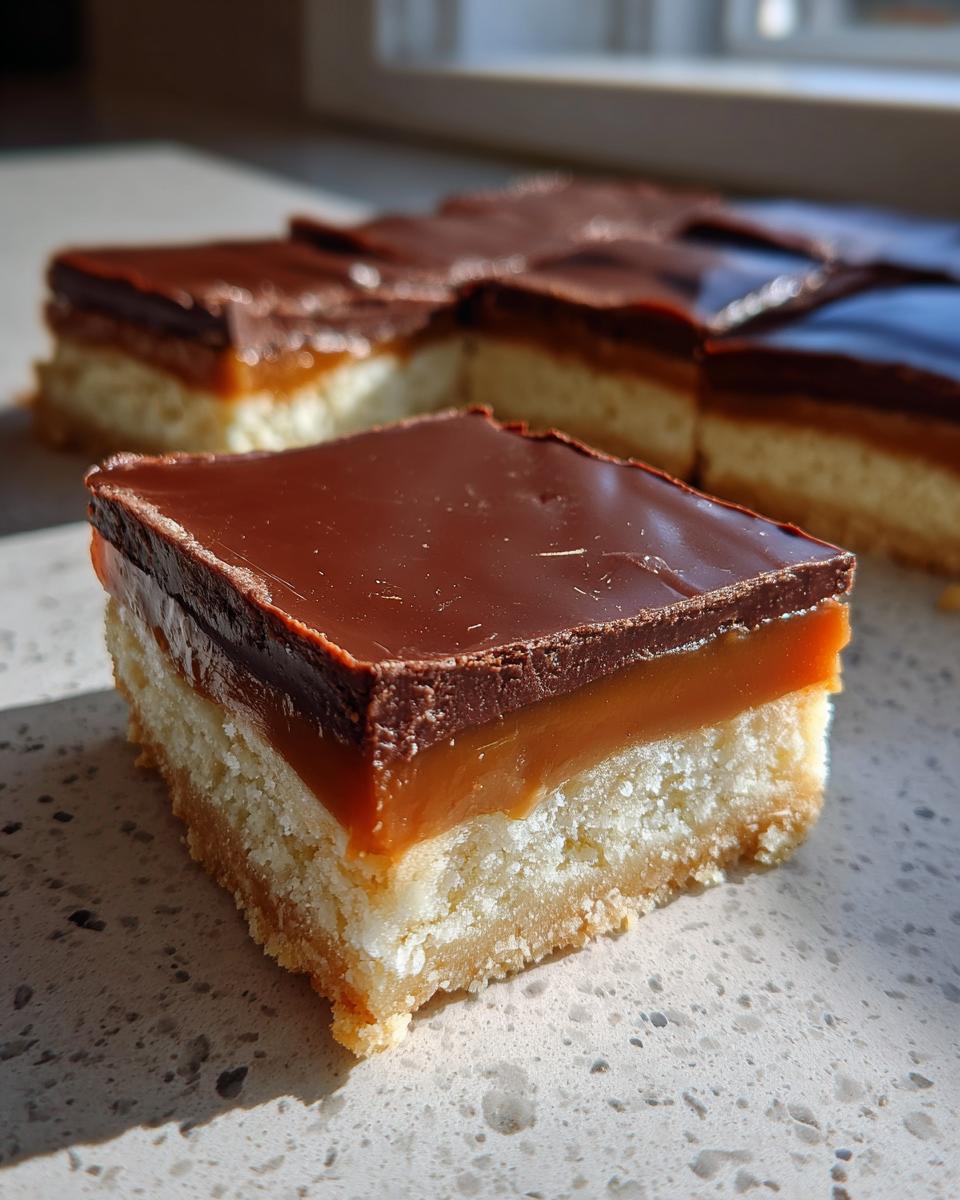
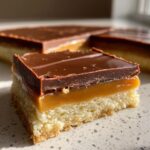
- They have that iconic three-layer structure: a wonderfully crumbly Buttery Shortbread Crust gives way to amazing caramel and chocolate.
- These turn out to be the most Decadent Layered Bars you’ll make all year—they look fancy but they’re surprisingly easy!
- You get to control the quality of every ingredient, meaning zero weird stabilizers, just real butter and real sugar.
- The caramel is perfectly gooey when warm, but sets just enough to slice beautifully once chilled—no wrestling with sticky messes!
- They freeze wonderfully, making them perfect for pulling out ahead of time for potlucks or your next Holiday Cookie Exchange Favorite.
Gathering Ingredients for Your twix-Style Dessert
Before we even dream about that perfectly crisp shortbread, we need to gather our troops! For dependable baking, especially when we are trying to recreate a famous flavor profile like this, we have to focus on quality ingredients that work well together. That’s how we make sure these copycat candy recipes truly shine! Don’t stress; nothing here is too exotic, but using good butter makes a huge difference in the crust and the caramel.
For the Buttery Shortbread Crust
This base needs to be sturdy enough to hold up all that gooey goodness, so make sure your butter is softened just right—not melted! Gather these items:
- 1 cup unsalted butter, softened
- 1/2 cup granulated sugar
- 2 cups all-purpose flour
- 1/4 teaspoon salt
For the Gooey Caramel Layer
This is where the magic happens, turning simple things into one of those Gooey Caramel Desserts everyone swoons over. You will need:
- 1 cup (that’s two full sticks!) unsalted butter
- 1 cup packed light brown sugar—use light brown for that perfect color!
- 1 (14 ounce) can sweetened condensed milk (Don’t substitute this, it’s crucial for the texture!)
- 1 teaspoon vanilla extract
For the Rich Chocolate Topping Recipes
We need a beautiful, shiny chocolate blanket to seal everything in. The little bit of fat we add helps the chocolate melt silky smooth and gives you a great topping that sets firm but still melts in your mouth when you eat it.
- 12 ounces semi-sweet chocolate chips (I love semi-sweet here, but milk chocolate works too!)
- 2 tablespoons coconut oil or vegetable shortening
Step-by-Step Instructions for Homemade twix Cookie Bars
Alright, time to roll up our sleeves! This is where we take those lovely ingredients and turn them into a true classic. Remember, the key to these layered bars is patience between steps—we have to let things cool and set properly so they don’t turn into a melty mess later. It’s like making good fudge; you can rush the chocolate melting, but you can’t rush the chill time! We want that gorgeous texture from the rich chocolate topping recipes to set just right.
Baking the Buttery Shortbread Crust
First things first: preheat that oven to 350°F (175°C). Grab your 9×13 inch pan and line it with parchment paper, making sure you leave a little overhang on the sides—that’s my secret handle for later! After you cream the butter and sugar and mix in the flour and salt to form a soft dough, press it firmly into the bottom of the pan. You want it perfectly even, so press down hard! If one side is thicker than the other, you’ll end up with uneven baking, and we want consistent texture throughout. Bake this shortbread crust for 15 to 18 minutes until you see the edges just starting to blush gold.
Creating the Gooey Caramel Layer
While that crust is cooling slightly, let’s tackle the caramel. This needs your full attention on the stove! In a medium saucepan, you’ll melt your butter, then whisk in the brown sugar until it’s smooth. Now, pour in the entire can of sweetened condensed milk. Keep stirring constantly over medium heat for about 5 to 7 minutes. We are looking for it to thicken up a bit and deepen in color, getting that beautiful amber shade. Watch it like a hawk, because boiling milk products turn to hard candy or burn FAST! Once it looks right, pull it off the heat, stir in your vanilla, and pour that hot caramel right over your warm shortbread layer.

Setting and Topping the twix Bars
Back into the oven it goes! Bake the bars again for just 10 more minutes; you’ll see the caramel bubbling up happily around the edges. Now comes the hardest part: waiting! You must let the bars cool completely, preferably chilling them in the fridge for at least one hour. A firm caramel is essential before we add the chocolate! When it’s set, melt your chocolate chips and coconut oil together gently—I use 30-second bursts in the microwave, stirring well each time—until it’s gorgeously pourable. Spread that chocolate evenly across the firm caramel. Pop it back into the fridge for another 30 minutes until the top chocolate layer is totally hard. Before cutting, I often stick the whole pan in the freezer for about 15 minutes; it makes getting those perfect rectangular bites so much cleaner! Check out how others remake these layered chocolate caramel treats [Just So Sweet] for inspiration!
Tips for Success with Your Copycat Candy Recipes
Making these amazing from scratch candy making treats depends mostly on controlling our temperatures and timing, especially with that caramel! Trust me, I’ve had batches that were too runny or a shortbread crust that baked up crumbly, not tender. Getting it right means treating those three layers with the respect they deserve.
My biggest tip revolves around that caramel layer. If you want that perfect, chewy texture inside your bars, cook the caramel mixture for the full 5 to 7 minutes until you see it deepen in color. If you pull it early, it will just seep into your shortbread crust when it’s sitting around, making the bottom soggy. If you cook it too long, you end up with something closer to hard toffee, and we want gooey, remember?
For the shortbread crust, don’t skip the chilling time after baking the first stage. Even 10 minutes on the counter before pouring the caramel on helps it hold its shape better when the hot caramel hits it. And here’s that pro-grandma move again: after the final chocolate layer has set enough to be firm, pop the whole pan into the freezer for about 15 minutes. Seriously! It firms up everything just enough that when you use those parchment paper handles to lift it out, you get those perfectly crisp, clean-edged rectangles. Trying to slice while it’s only room temperature results in a chocolate smear party, and we want neat squares!
Variations on the twix Flavor Profile
Now that you’ve mastered the classic layers, I love encouraging you to play around a little! While these bars are dynamite as written, thinking outside the candy wrapper is part of the fun of baking. If you’re looking for something beyond the bar, you could adapt these flavors into Twix Cookies by using a drop-cookie base instead of pressing the shortbread into a pan, or even layering the caramel and chocolate over your favorite brownie batter for Twix Brownies. That sounds decadent, doesn’t it?
For an easy flavor boost, try sprinkling a tiny pinch of flaky sea salt right over that hot caramel layer just before it chills—it really makes the chocolate pop! If you’re trying to make a healthier candy bar alternative, you could totally sub out the chocolate topping for a sugar-free chip blend. It’s all about making this recipe work for your kitchen!
Serving Suggestions for these Easy Chocolate Caramel Bars
These bars are incredibly rich, so part of the fun is figuring out the perfect way to serve them! Since they are so decadent, they pair wonderfully with something that cuts through that sweetness a little bit. Think about a cold glass of milk—nothing screams classic American home cooking louder than that!
If you’re bringing these to a big gathering, like a Holiday Cookie Exchange Favorite situation, serving them chilled straight from the refrigerator is probably best. When they are cold, the chocolate topping snaps nicely, and the caramel is firm enough that they hold their shape perfectly on a crowded platter. Plus, people can easily pick them up without getting too messy!
However, if you are just tearing into one on a quiet afternoon (and trust me, you will want to!), letting them sit out on a plate for about 20 minutes before enjoying them is dreamy. When they warm up just slightly, that caramel gets gloriously soft and gooey again. That’s when I love to serve a small sliver alongside a scoop of vanilla bean ice cream, or maybe even an espresso if I need an afternoon pick-me-up! We’ve got some great ideas for simple chocolate accompaniments over on my homemade chocolate pudding recipe page, too, if you want another creamy chocolate factor!
Storage and Reheating Instructions for Homemade twix
This is the part everyone stresses about, right? How do we keep these magnificent layers perfect for more than just five minutes after we cut them? The good news is that because these are truly from scratch candy making, and we have that chocolate cap sealing everything in, they actually keep wonderfully. My grandmother always said, “If you can keep your hands out of the tin, they’ll last for days!”
The best way to store these bars is absolutely in the refrigerator. Pop your cut rectangles into an airtight container, making sure you use parchment paper or wax paper between the layers. This stops the chocolate from sticking to itself or the caramel from getting strangely soft against another layer. You can totally keep them refrigerated for up to one week. Honestly, they taste just as good on Day 5 as they do on Day 1!
Now, here’s a little heads-up on texture: when they are cold, the chocolate topping will be firm—it snaps beautifully when you bite it, which I love! Also, that caramel layer will be quite firm. If you prefer a softer, chewier caramel experience, just take the container out of the fridge about 30 minutes before you plan to eat them. Don’t worry about setting them out for an hour or two; the high sugar content keeps them perfectly safe for serving at room temperature for a party.
I wouldn’t recommend trying to microwave these to reheat them, though. That tends to melt the chocolate unevenly, and the shortbread base can get oddly soft or oily when microwaved. Stick to just letting them warm up naturally on the counter, and you’ll have perfect, rich chocolate caramel bars every time!
Frequently Asked Questions about twix Copycat Recipes
Oh, I just know you’ll have some questions once you dive into making these delicious layers! That’s the joy of trying any Homemade Candy Bar Recipe—sometimes you need a little extra guidance to make it perfect. Here are some of the things I hear most often when folks try making their own version of these classic treats, especially folks who are trying to nail that perfect store-bought flavor.
Can I make a No Bake twix Inspired version of this recipe?
That is a fantastic question, especially when you are staring down a hot oven in the middle of summer! Yes, you absolutely can! For a No Bake twix Inspired version, you change the shortbread crust. Instead of baking it, you mix the flour, sugar, and softened butter until crumbly, then firmly press that mix into your pan. You need to chill this base for at least an hour to let it firm up before pouring on the caramel. The caramel layer itself still needs to be cooked on the stovetop, but once you pour it over the chilled crust, you just have to chill everything much longer before adding the chocolate topping—think 3 to 4 hours total chilling time. It works like a charm for a quicker assembly!
Can I use milk chocolate instead of semi-sweet for the topping?
You certainly can! I usually lean towards semi-sweet because I love how the slight bitterness balances out how incredibly sweet the caramel layer is, but if you prefer it sweeter, milk chocolate is a wonderful switch. Just be aware that milk chocolate melts a little faster and might require a slightly shorter time in the microwave when you’re melting it down. If you use milk chocolate, really watch those 30-second intervals so it doesn’t scorch!
My caramel layer isn’t setting; what did I do wrong?
Don’t panic! This is usually one of two things. If you cooked the caramel mixture for too short a time on the stovetop (less than 5 minutes), it just won’t have enough time to thicken properly before you bake it the second time. It needs that time to cook down where the water evaporates just a bit. The other culprit is often temperature; if you didn’t chill the bars for the full hour or an hour-and-a-half after the second bake, the caramel hasn’t had enough time to firm up before you put the chocolate on top. A longer chill is almost always the easiest fix for runny gooey caramel desserts.
Do I need to use shortening or coconut oil in the chocolate?
You don’t necessarily need both, but you definitely need the extra fat! That extra tablespoon or two of coconut oil or shortening is what helps the chocolate topping stay smooth and glossy rather than seizing up or drying out into a hard, brittle shell. It gives you that wonderful mouthfeel that makes these Chocolate Coated Sweets so satisfyingly good. If you use coconut oil, it sets up firmer in the fridge, which is great for cutting clean slices!
How can I make these into Bite Sized Candy Treats instead of big bars?
That’s a great idea, especially if you are making these for a big party! You can cut them into small squares, but for true bite-sized portions, I suggest making the shortbread crust as usual, but when you pour the caramel on, let it chill completely until it’s very firm. Then, instead of lifting out a big sheet, use a small round cookie cutter or a tiny square cookie cutter on the chilled layers before you add the chocolate topping. Cut the chocolate layer last, or dip the fully set shortbread/caramel pieces right into the melted chocolate and let them set on wax paper. They become little amazing homemade caramel nuggets!
Share Your Homemade twix Creations
Now that you’ve got all the secrets to these fantastic Homemade twix Cookie Bars, I truly hope you enjoy every single layered bite! Baking is always better when we share it, and I absolutely love seeing what you all create in your kitchens. When you finish up that rich chocolate topping and slice into those beautiful bars, please come right back here and let me know what you thought.
Did the shortbread stay perfectly crisp? How was that caramel—perfectly gooey, just like we wanted? Please tap those five little stars right below the recipe card to leave a rating! Sharing your rating helps other new bakers feel confident trying this recipe. And if you have a special story about making these, or if you tried one of those variations we talked about, leave a comment below. I read every single one, and it truly warms my heart to hear from you.
If you snapped a picture of your final, gorgeous, chocolate-coated creation, I’d be thrilled if you shared it on social media! Tag me so I can see your amazing work, or feel free to send a picture directly through my contact page—I cherish seeing your delicious results. Thank you so much for baking along with me today; remember, it’s all about bringing love and comfort to the table!
PrintHomemade Twix-Style Cookie Bars
Make your own layered dessert bars featuring a buttery shortbread base, gooey caramel filling, and a rich chocolate coating. These bars taste like the classic candy bar.
- Prep Time: 25 min
- Cook Time: 35 min
- Total Time: 1 hour 40 min
- Yield: 24 bars
- Category: Dessert
- Method: Baking
- Cuisine: American
- Diet: Vegetarian
Ingredients
- For the Shortbread Crust: 1 cup unsalted butter, softened; 1/2 cup granulated sugar; 2 cups all-purpose flour; 1/4 teaspoon salt
- For the Caramel Layer: 1 cup (2 sticks) unsalted butter; 1 cup packed light brown sugar; 1 (14 ounce) can sweetened condensed milk; 1 teaspoon vanilla extract
- For the Chocolate Topping: 12 ounces semi-sweet chocolate chips; 2 tablespoons coconut oil or vegetable shortening
Instructions
- Prepare the shortbread: Preheat your oven to 350°F (175°C). Line a 9×13 inch baking pan with parchment paper, leaving an overhang on the sides for easy removal.
- In a large bowl, cream together the softened butter and granulated sugar until light and fluffy.
- Gradually mix in the flour and salt until a soft dough forms. Press the dough evenly into the bottom of the prepared pan.
- Bake the crust for 15 to 18 minutes, or until the edges are lightly golden. Remove from the oven and let it cool slightly while you make the caramel.
- Make the caramel: In a medium saucepan, melt the butter over medium heat. Stir in the brown sugar until dissolved.
- Add the sweetened condensed milk and cook, stirring constantly, for about 5 to 7 minutes, until the mixture thickens slightly and turns a deeper amber color. Do not let it burn.
- Remove from heat and stir in the vanilla extract. Pour the hot caramel evenly over the warm shortbread crust.
- Return the pan to the oven and bake for an additional 10 minutes. The caramel should be bubbly. Let the bars cool completely at room temperature, then chill in the refrigerator for at least 1 hour to set the caramel.
- Prepare the chocolate topping: In a microwave-safe bowl, combine the chocolate chips and coconut oil. Microwave in 30-second intervals, stirring well after each, until the chocolate is smooth and fully melted.
- Pour the melted chocolate over the chilled caramel layer. Spread it evenly across the top.
- Refrigerate the bars for another 30 minutes, or until the chocolate is firm.
- Lift the bars out of the pan using the parchment paper overhang. Cut into rectangular bar shapes.
Notes
- For easier cutting, place the entire pan of bars in the freezer for 15 minutes after the chocolate sets.
- If you want a softer caramel, reduce the cooking time of the caramel mixture by 1 to 2 minutes.
- Store leftover bars in an airtight container in the refrigerator for up to one week.
Nutrition
- Serving Size: 1 bar
- Calories: 310
- Sugar: 30g
- Sodium: 110mg
- Fat: 19g
- Saturated Fat: 11g
- Unsaturated Fat: 8g
- Trans Fat: 0.5g
- Carbohydrates: 33g
- Fiber: 1g
- Protein: 3g
- Cholesterol: 40mg