
When the evening rushes in and dinner seems miles away, we all reach for something quick that still tastes like a hug. That’s exactly where my recipe for cheeseburger pockets crescent rolls comes swooping in to save the day! If you’re looking for a way to get that satisfying flavor of a hearty cheeseburger wrapped up in flaky, buttery pastry, this is your answer. It’s truly one of those brilliant ideas that works perfectly for a fast weeknight meal or an easy lunchbox filler. I love taking familiar comfort food flavors and simplifying them just a touch; it proves that delicious doesn’t have to mean complicated. Rest assured, this method has been tested many times in my own bustling kitchen—it’s sturdy, straightforward, and dependable, just like you need on a Tuesday night. You can check out more of my reliable meals over at simple weeknight dinners.
- Why This Recipe for Cheeseburger Pockets Crescent Rolls Works (Easy Crescent Roll Appetizers)
- Gathering Ingredients for Your Ground Beef Crescent Pockets Dinner
- How to Prepare Homemade Cheeseburger Pockets Baked
- Carla's Expert Tips for Perfect Cheeseburger Pockets Crescent Rolls
- Variations for Cheesy Beef Crescent Roll Ups
- Serving Suggestions for Your Quick Crescent Roll Lunch Ideas
- Storage and Reheating Cheeseburger Pockets Crescent Rolls
- Frequently Asked Questions About Cheeseburger Pockets Crescent Rolls
- Nutritional Estimate for Cheeseburger Pockets Crescent Rolls
Why This Recipe for Cheeseburger Pockets Crescent Rolls Works (Easy Crescent Roll Appetizers)
When you need something fast that everyone will actually ask for again, this recipe hits the mark every single time. It takes the big flavors we love—beef, onion, and melty cheese—and packages them perfectly. This is why I often turn to these when I need easy crescent roll appetizers for last-minute guests.
Quick Assembly for Busy Weeknights
We rely on refrigerated dough for a reason, don’t we? Using pre-formed crescent rolls means you skip all that messy rolling and proofing time. The meat cooks up in under ten minutes, and then it’s just assembly. You can have these assembled and ready for the oven before you even think about packing lunches for the next day!
Perfectly Portable Cheeseburger Pockets Crescent Rolls
The shape is just genius for portability. Once they are sealed up tight, these flaky little bundles are ideal for stuffing into lunchboxes for school or work. They hold their shape beautifully, so you get that classic, savory flavor of **cheeseburger pockets crescent rolls** without any messy drips. They travel well, which is what every busy family needs.
Gathering Ingredients for Your Ground Beef Crescent Pockets Dinner
Now that we know how quick these are, let’s talk about what you need to grab from your pantry and fridge. When making my excellent cheeseburger pockets crescent rolls, I always suggest keeping things simple, which is why this list is short and sweet. Whether you’re stocking up for a great lunch or need a fast assembly, these components come together beautifully. Finding dependable ingredients is key, and I share some of my favorites for creating quick, healthy lunch ideas.
Meat and Flavor Base for Cheeseburger Pockets Crescent Rolls
The heart of this meal is, of course, the beef. You’ll need a full pound of ground beef—I always lean toward 90/10 or leaner because we drain it well, and less grease means a crispier pocket. You’ll finely chop one small onion to cook right alongside the beef for that classic oniony sweetness. For seasoning, we keep it delightfully simple: a teaspoon of Worcestershire sauce, garlic powder, salt, and pepper. Stirring that Worcestershire in just adds that deep, savory background note we expect in a great burger.
Dough and Finishing Touches
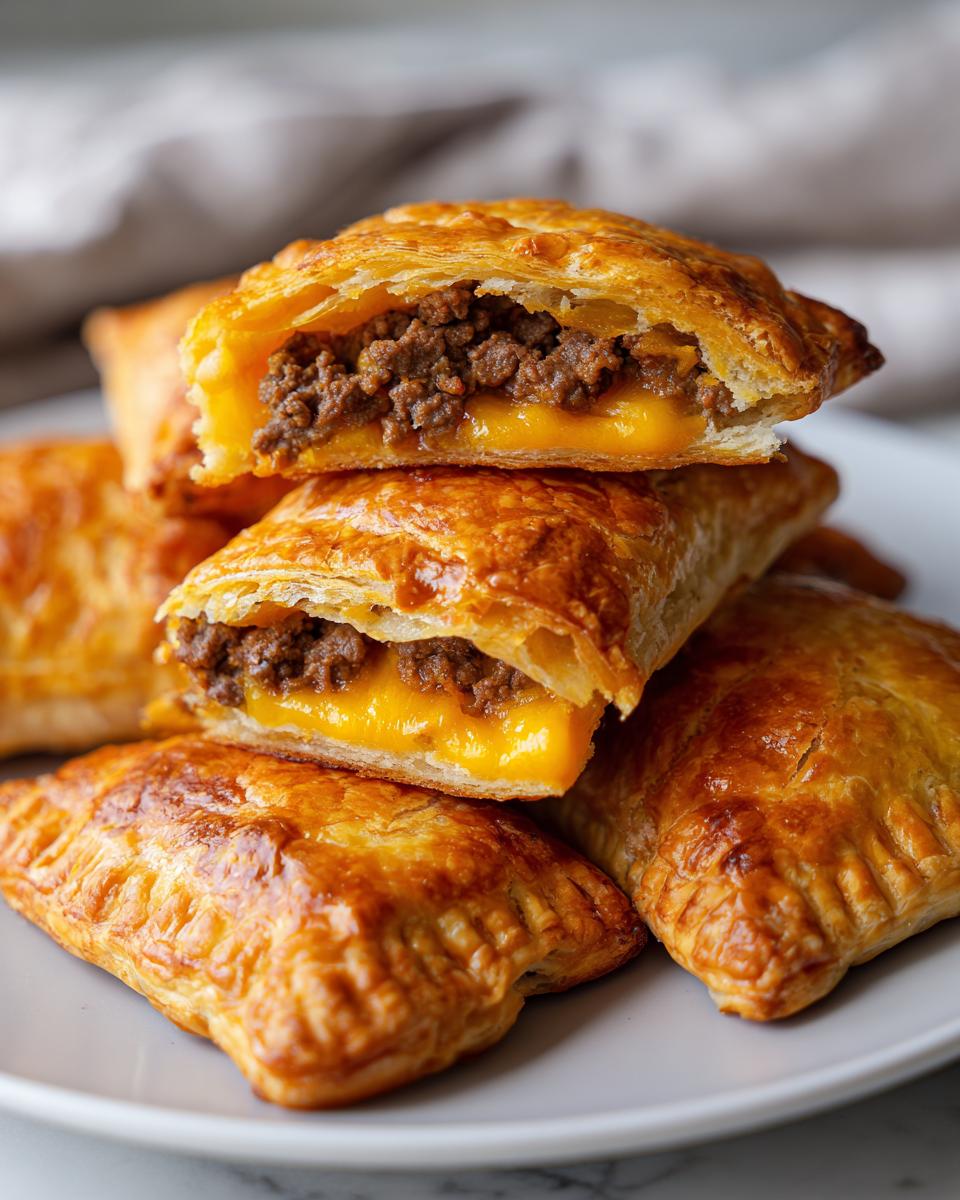
The magic wrap comes from one standard 8-ounce package of refrigerated crescent roll dough. Make sure it’s the kind that comes pre-cut into triangles! We follow that up with a cup of shredded cheddar cheese—it melts perfectly and gives you that necessary cheeseburger pull. Finally, for that gorgeous golden sheen when they come out of the oven, you’ll need one egg whisked together with a tablespoon of water for your egg wash. And don’t forget the pickles or ketchup if you want toppings on the side!
How to Prepare Homemade Cheeseburger Pockets Baked
Putting these together is like building a tiny, delicious envelope! The instructions are clear, step-by-step, and they allow you to move fast without making a mess. I promise, once you see how easily this dough handles the savory filling, you’ll be eager to try more easy breakfast recipes using crescent dough too.
Cooking the Filling and Prepping the Oven
First things first, get that oven humming! You want to preheat it to 375 degrees Fahrenheit and line a baking sheet with parchment paper. That paper is your friend; it keeps cleanup minimal. Next, take your ground beef and that finely chopped onion and cook them together over medium heat until the beef is nice and brown. The most important step here is draining all that excess grease off—we want flavor, not oil pockets! Once drained, stir in your seasonings—Worcestershire, garlic powder, salt, and pepper—and cook for just one quick minute. Then, take it off the heat immediately and let that meat cool down a bit so it doesn’t melt your dough prematurely.
Assembling Your Cheeseburger Pockets Crescent Rolls
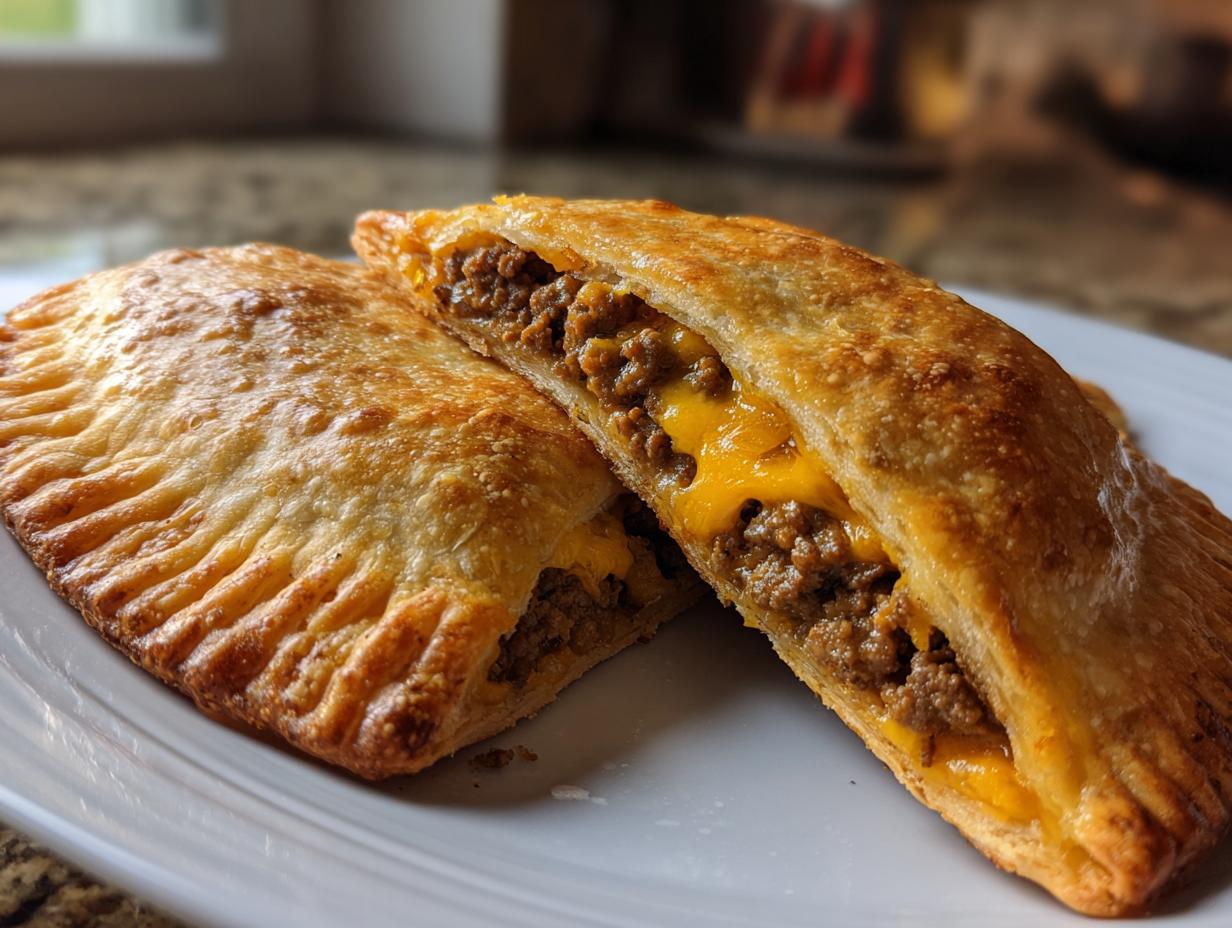
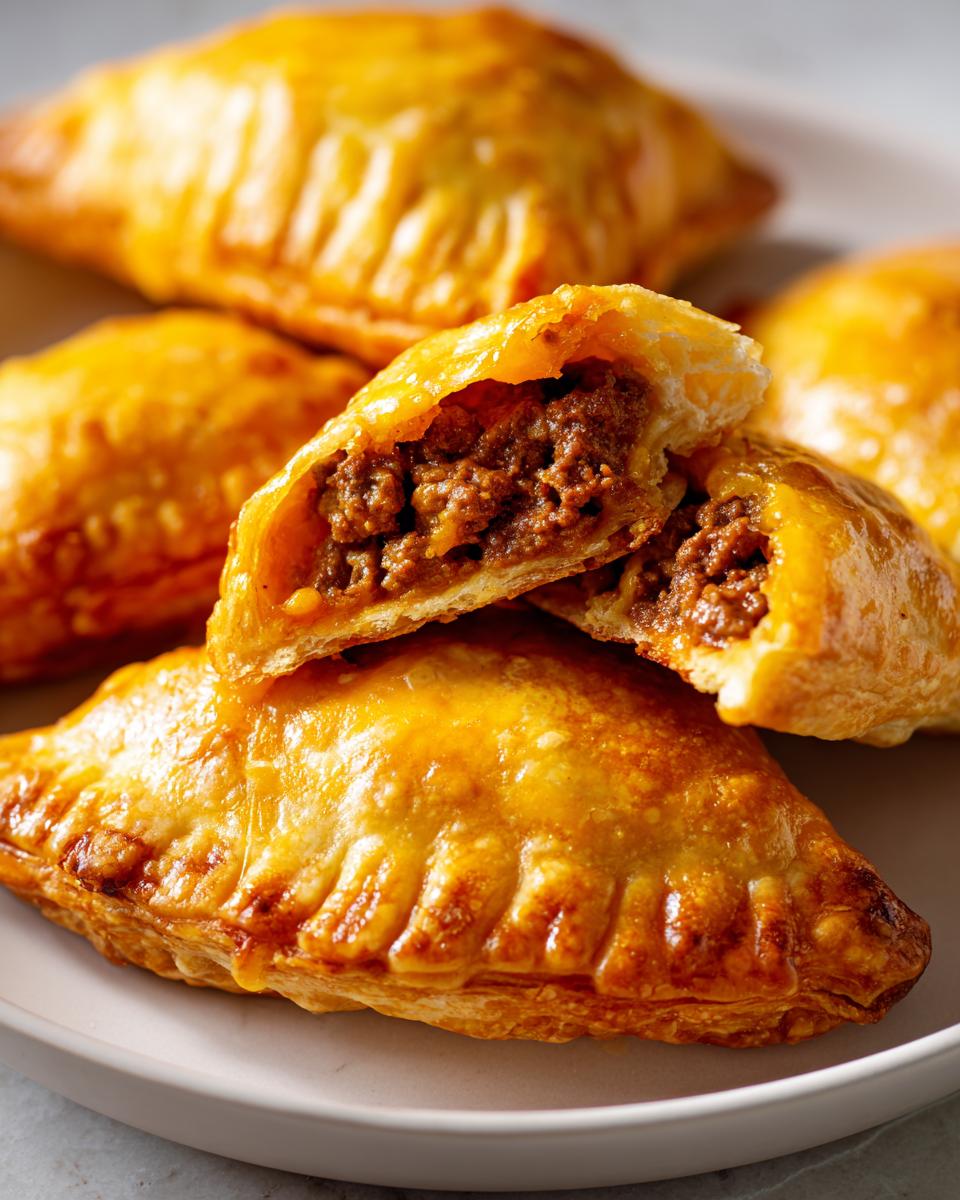
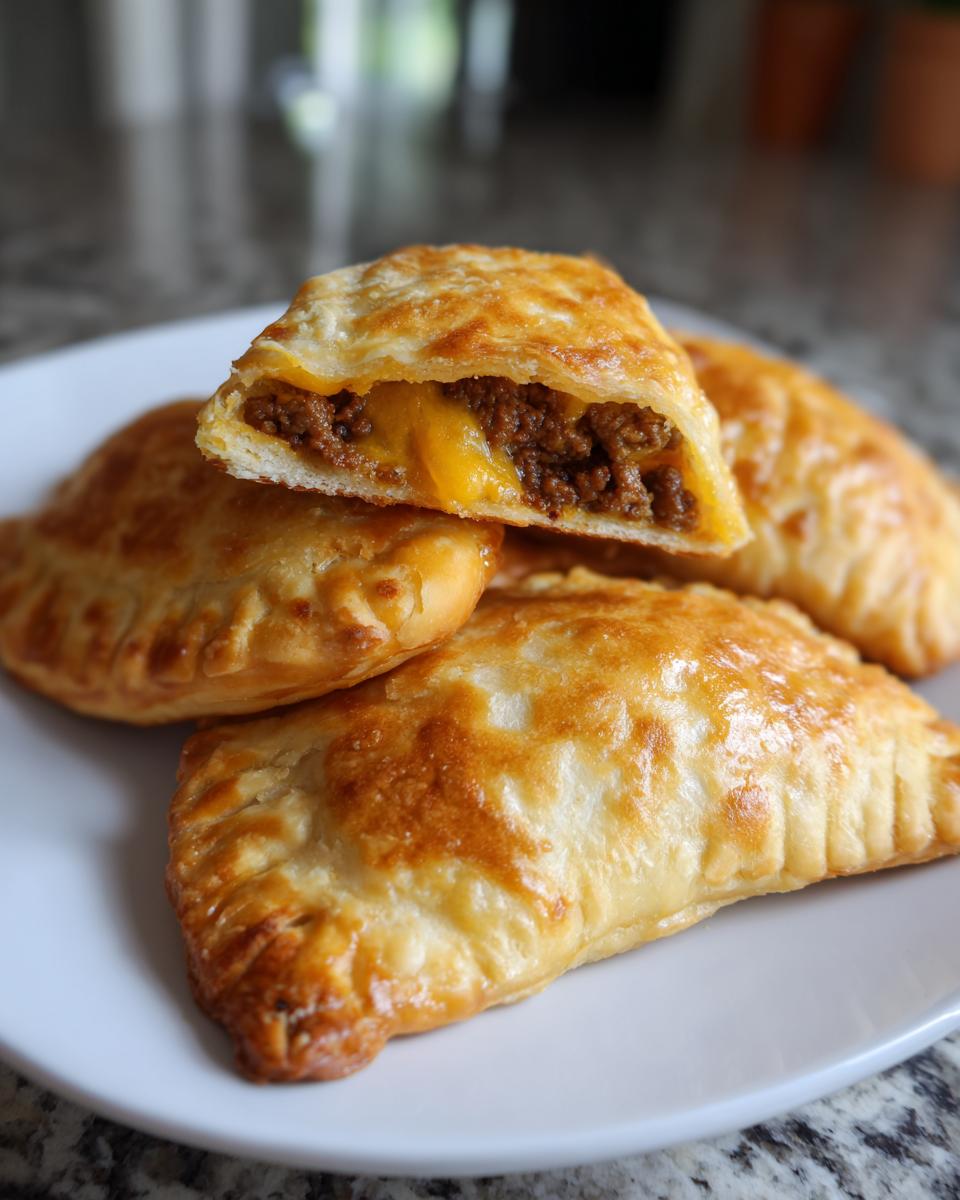
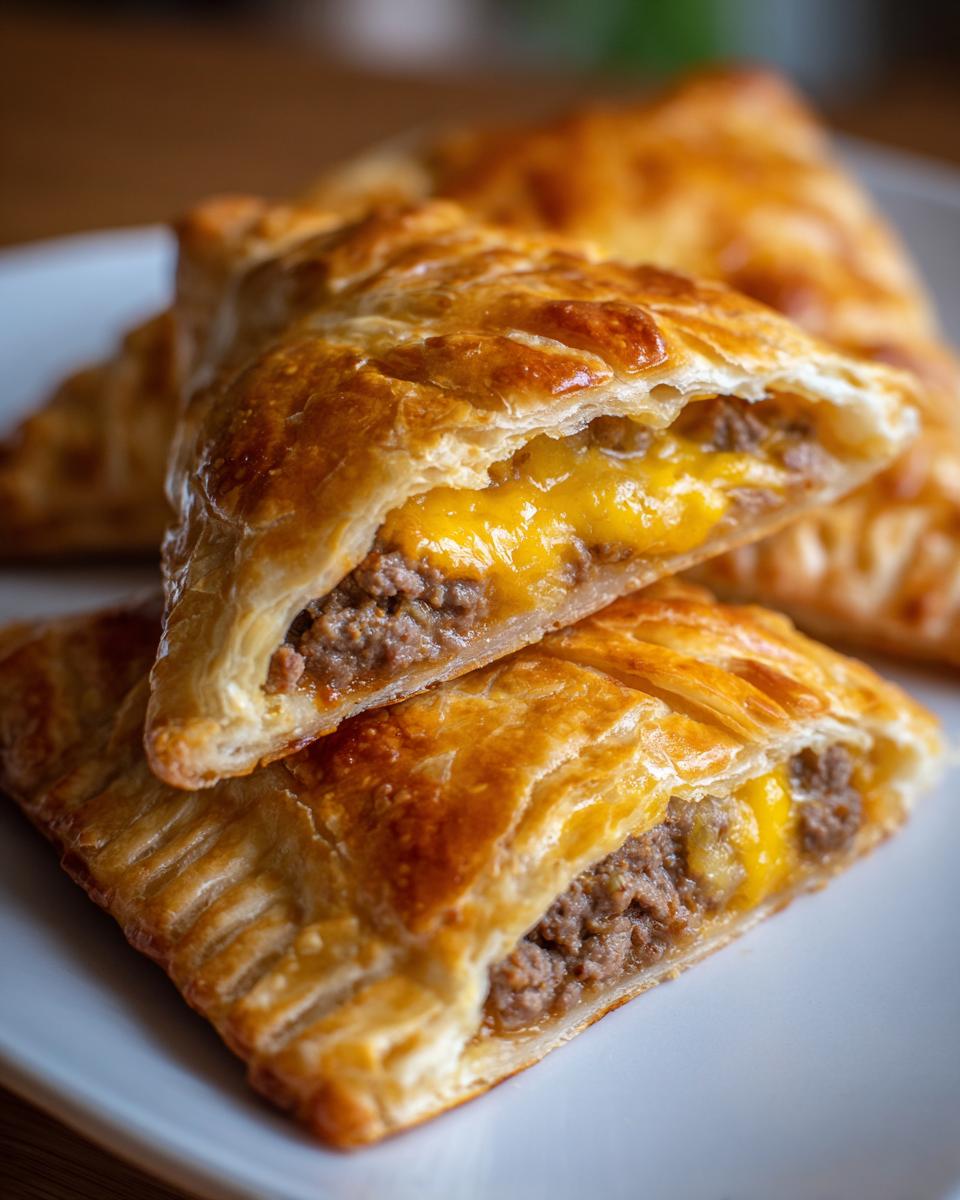
Once the mixture has cooled slightly, unroll your crescent roll dough. You should get 8 nice triangles; separate them gently. Now, place a good dollop—about 2 tablespoons—of your cooled meat mixture onto the wide end of each piece. Sprinkle a little bit of that cheddar cheese right on top of the beef. This is where you need to be deliberate: fold that narrow tip over the filling and roll it up tightly toward the wider base. You must pinch those seams together very firmly! When you seal the edges tight, you are stopping any delicious juices from escaping when these **cheeseburger pockets crescent rolls** bake.
Baking and Finishing the Cheeseburger Pockets Crescent Rolls
Place your sealed pockets seam-side down onto that prepared baking sheet. Now for the glossy finish: mix that one beaten egg with the tablespoon of water—that’s your egg wash. Brush this lightly over the tops of every pocket; this gives them that beautiful, rich golden color. Bake them for about 14 to 16 minutes until the crescent dough is fully puffed and golden brown. If you want a real treat, sprinkle just a few sesame seeds on top *after* the egg wash for that classic look! Serve them warm, maybe with some ketchup and mustard ready for dipping.
Carla’s Expert Tips for Perfect Cheeseburger Pockets Crescent Rolls
Even the best recipe needs a little elbow grease and intuition to make it truly great. These tips come straight from years of whipping up quick dinners when I was juggling teaching and raising my own family. We want these pockets to be flaky and flavorful all the way through, not doughy at the bottom. We’ll focus on flavor and making sure your cheeseburger pockets crescent rolls bake up beautifully. If you are looking for a fantastic dipping sauce to go alongside these, you should certainly check out my guide for the best burger sauce recipe.
Flavor Boosts for Your Crescent Roll Cheeseburger Pockets Recipe
While the basic filling is already delicious, sometimes you just need a little extra zip! If you want those pockets to taste exactly like a classic diner burger, try stirring 1 tablespoon of ketchup and about 1 teaspoon of yellow mustard right into your cooked ground beef mixture before you start filling the dough. It blends right in and gives it that familiar tang. And don’t forget that tip about the sesame seeds! Brushing the egg wash on top and giving them a light dusting before they bake makes them look so professional.
Preventing Soggy Dough in Your Cheeseburger Pockets Crescent Rolls
Listen closely here, because this is the secret weapon against soggy bottoms: the filling must not be hot when it touches the dough. When you put hot meat onto the cold crescent dough, the heat starts poaching that section of the dough immediately, causing it to steam instead of bake. Always take your beef mixture off the heat and let it cool for at least ten minutes before you even touch the dough. This small wait ensures your **cheeseburger pockets crescent rolls** bake evenly and come out perfectly golden and crisp, giving you that lovely crunch you expect.
Variations for Cheesy Beef Crescent Roll Ups
Now that you’ve mastered the tried-and-true recipe, I want to encourage you to have a little fun with it! Once you master the basic assembly, these make fantastic **cheesy beef crescent roll ups** that feel brand new every time. The beauty of using a sturdy dough wrap like this is that it holds up well to extra fillings.
If you want a richer flavor, skip the cheddar and try using Monterey Jack or even a spicy Pepper Jack cheese. For something really special, especially if you’re making these for a weekend meal, dice up some cooked bacon very finely and mix that in with your ground beef. You could also sauté some finely diced mushrooms with the onion; they add a wonderful earthy depth that pairs so nicely with the beef and cheese.
These kinds of variations make planning dinner feel less repetitive. If you’re looking for a warming side dish to go alongside these savory pockets, you might want to check out my recipe for creamy cheddar potato cheese soup. It’s the ultimate comfort combination!
Serving Suggestions for Your Quick Crescent Roll Lunch Ideas
These delicious pockets are great on their own, but like any good cheeseburger, they beg for a classic accompaniment! Since we’ve already packed in the main flavor elements, you only need something simple on the side to round out the plate. I always have my homemade burger sauce ready when I make these, just perfect for dipping those flaky edges. You can find the recipe for that at my guide on the best burger sauce recipe.
For sides, keep it light. A crisp, vinegar-based coleslaw or some quick-pickled cucumbers cut through the richness perfectly. If the kids aren’t thrilled with slaw, even carrot sticks dipped in ranch dressing make a fine, quick addition to make this a complete family-friendly meal.
Storage and Reheating Cheeseburger Pockets Crescent Rolls
Don’t you just hate when you have leftovers and you worry they’ll turn into mush overnight? Luckily, these pockets hold up really well! If you have any delicious **cheeseburger pockets crescent rolls** leftover from dinner, let them cool completely first. Then, store them in an airtight container in the refrigerator. They are perfectly fine to eat for up to three days, which is great for quick lunch packing the next morning. You can reheat these, and I always recommend using the oven if you can.
Popping them back into a 350-degree oven for about 8 minutes—or until the pastry is warm and flaky again—is the best way to bring that crispness back. The microwave works in a pinch if you’re really short on time, but it tends to soften the dough too much. For more great meals that reheat well, take a look at my ideas for easy sheet pan mini meatloaf muffins!
Frequently Asked Questions About Cheeseburger Pockets Crescent Rolls
It’s natural to have questions bubbling up when you try a new recipe, especially something as fun as these flaky pockets! When I was first developing these **cheeseburger pockets crescent rolls**, I learned a few things the hard way, so I wanted to share some answers to help you skip the trial and error. If you want to dig deeper into the technique of using this type of dough, I wrote a whole piece on how to make crescent roll pastry pockets.
Can I use pre-cooked ground beef for these cheeseburger pockets crescent rolls?
You certainly can! If you’ve already cooked a batch of ground beef earlier in the week, that works beautifully for this recipe. However, you must make sure the meat is completely cool before you start wrapping it in the dough. And critically—you have to drain off every bit of excess fat. Warm or greasy filling is the number one enemy of a crisp crescent roll, guaranteeing you a soggy bottom!
What is the best way to seal the edges for these Easy Crescent Roll Appetizers?
Sealing is everything here; no one wants a cheesy explosion in their oven! After you fold the dough over the filling, pinch those two seams together as firmly as you can with your fingers. Then, I always go over the entire sealed edge with the tines of a fork. That crimping action is like an insurance policy; pressing the fork tines down really locks everything in place before you set them seam-side down on the baking sheet.
Can I use different cheese besides cheddar in the crescent roll cheeseburger pockets recipe?
Oh, absolutely! While that sharp cheddar melts so wonderfully and offers great color, feel free to customize! Monterey Jack is a fantastic choice because it gets wonderfully gooey without being oily. I also find that good old American cheese, even though some people turn their nose up at it, melts better than almost anything for these types of baked pockets. If you want a tiny bit of spice, Pepper Jack is a bold option!
Nutritional Estimate for Cheeseburger Pockets Crescent Rolls
When you are cooking at home, you are in charge of what goes onto the plate, and that’s a wonderful thing! Since we are making these **cheeseburger pockets crescent rolls** right here in our own kitchens, we control the ingredients. Please remember that the numbers below are just estimates based on the main recipe ingredients, like the specific fat content in the ground beef and the brand of crescent dough.
For one pocket, here is what we are generally looking at:
- Calories: 310
- Fat: 18g (including 7g saturated fat)
- Protein: 17g
- Carbohydrates: 19g
- Sodium: 550mg
That is a solid, satisfying meal packed into one flaky package! If you are looking for other reliable, estimated dishes, you might find my recipe for easy chicken enchiladas helpful for comparison.
PrintCheeseburger Pockets with Crescent Rolls

Make satisfying, portable cheeseburger pockets using refrigerated crescent roll dough. This recipe delivers classic cheeseburger flavor baked inside a flaky pastry shell, perfect for a quick dinner or lunch.
- Prep Time: 15 min
- Cook Time: 16 min
- Total Time: 31 min
- Yield: 8 pockets 1x
- Category: Dinner
- Method: Baking
- Cuisine: American
- Diet: Low Fat
Ingredients
- 1 pound ground beef
- 1 small onion, finely chopped
- 1 teaspoon Worcestershire sauce
- 1/2 teaspoon garlic powder
- 1/4 teaspoon salt
- 1/4 teaspoon black pepper
- 1 cup shredded cheddar cheese
- 1 (8 ounce) package refrigerated crescent roll dough
- 1 egg, beaten (for egg wash)
- 1 tablespoon water (for egg wash)
- Optional toppings: ketchup, mustard, pickle slices
Instructions
- Preheat your oven to 375 degrees Fahrenheit. Line a baking sheet with parchment paper.
- In a large skillet over medium heat, cook the ground beef and chopped onion until the beef is browned and the onion is soft. Drain off any excess grease.
- Stir in the Worcestershire sauce, garlic powder, salt, and pepper. Cook for one minute more. Remove from heat and let the mixture cool slightly.
- Unroll the crescent roll dough onto a clean surface. Separate the dough into 8 triangles.
- Place about 2 tablespoons of the cooled beef mixture onto the wide end of each dough triangle. Top the beef mixture with a small sprinkle of shredded cheddar cheese.
- Fold the narrow tip of the dough over the filling and roll up tightly toward the wide end, sealing the edges completely. Pinch the seams together firmly to prevent leakage during baking.
- Place the sealed pockets seam-side down on the prepared baking sheet.
- In a small bowl, whisk together the beaten egg and 1 tablespoon of water to create an egg wash. Brush the tops of the pockets lightly with the egg wash.
- Bake for 14 to 16 minutes, or until the crescent dough is golden brown and cooked through.
- Serve warm with your favorite cheeseburger condiments like ketchup, mustard, or pickle slices on the side for dipping.
Notes
- For extra flavor, mix 1 tablespoon of ketchup and 1 teaspoon of yellow mustard directly into the cooked ground beef mixture before filling the pockets.
- If you want a crispier crust, sprinkle a little sesame seed seasoning on top of the egg wash before baking.
- Make sure the meat filling is not too hot when you assemble the pockets; hot filling can melt the cheese prematurely and make the dough soggy.
Nutrition
- Serving Size: 1 pocket
- Calories: 310
- Sugar: 2
- Sodium: 550
- Fat: 18
- Saturated Fat: 7
- Unsaturated Fat: 11
- Trans Fat: 0.5
- Carbohydrates: 19
- Fiber: 1
- Protein: 17
- Cholesterol: 60