
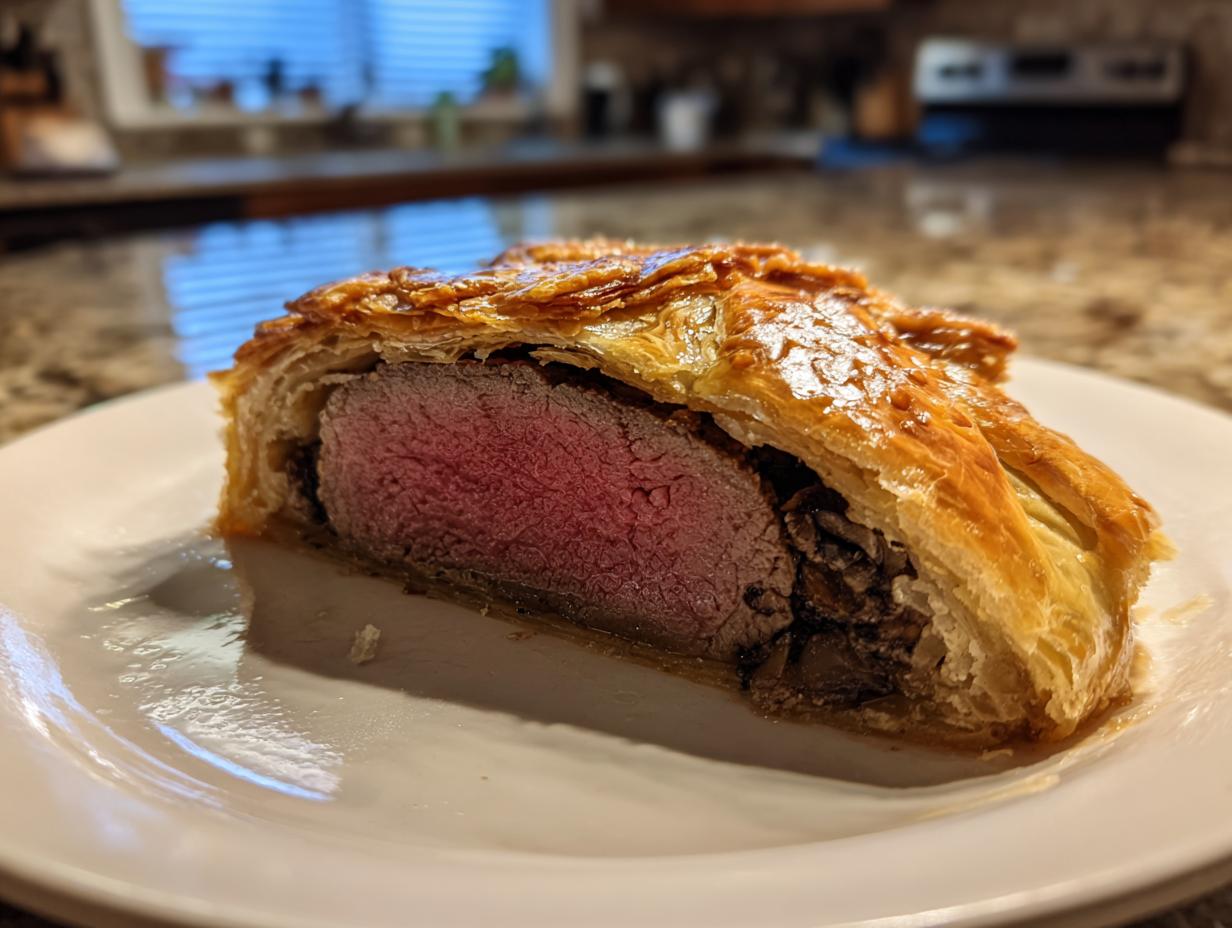
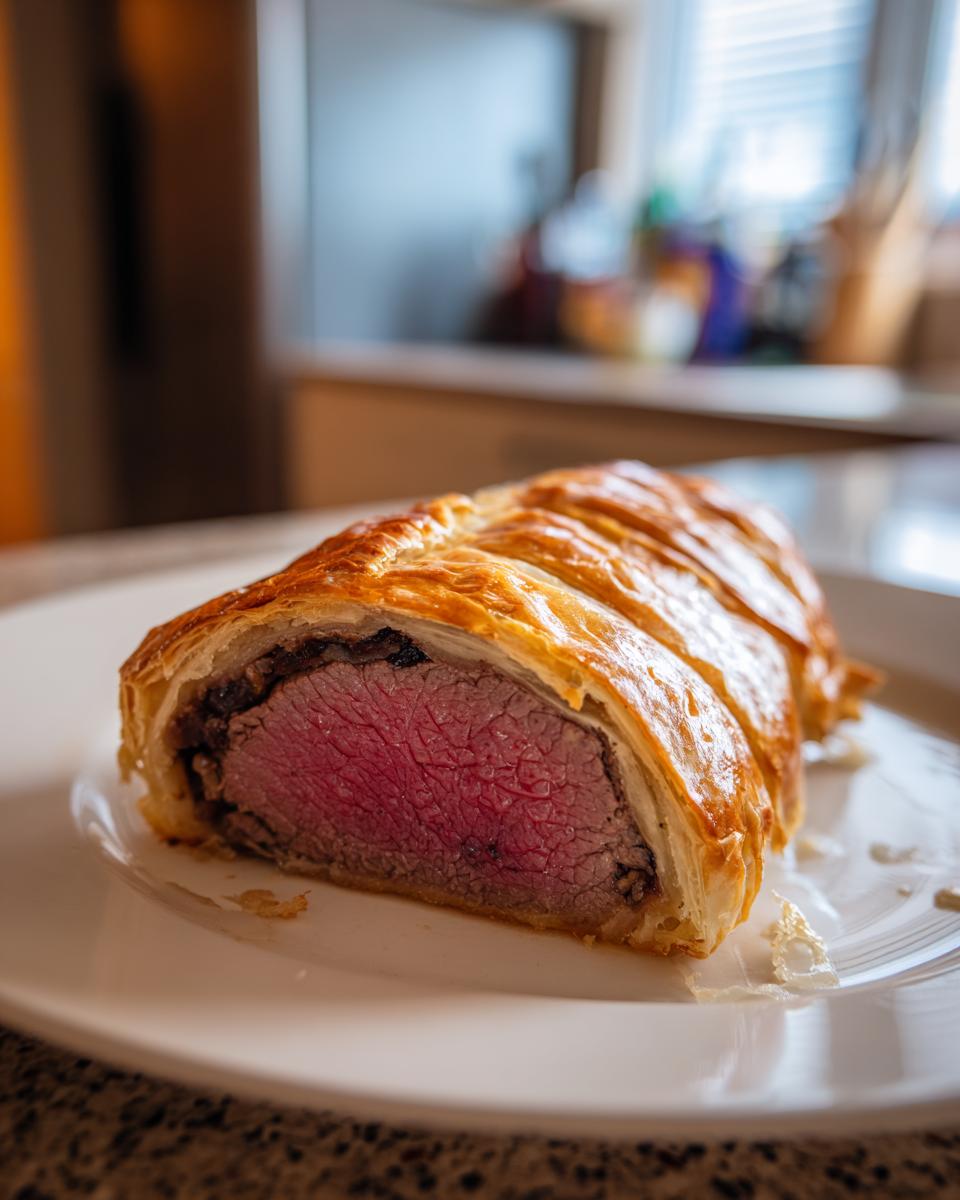
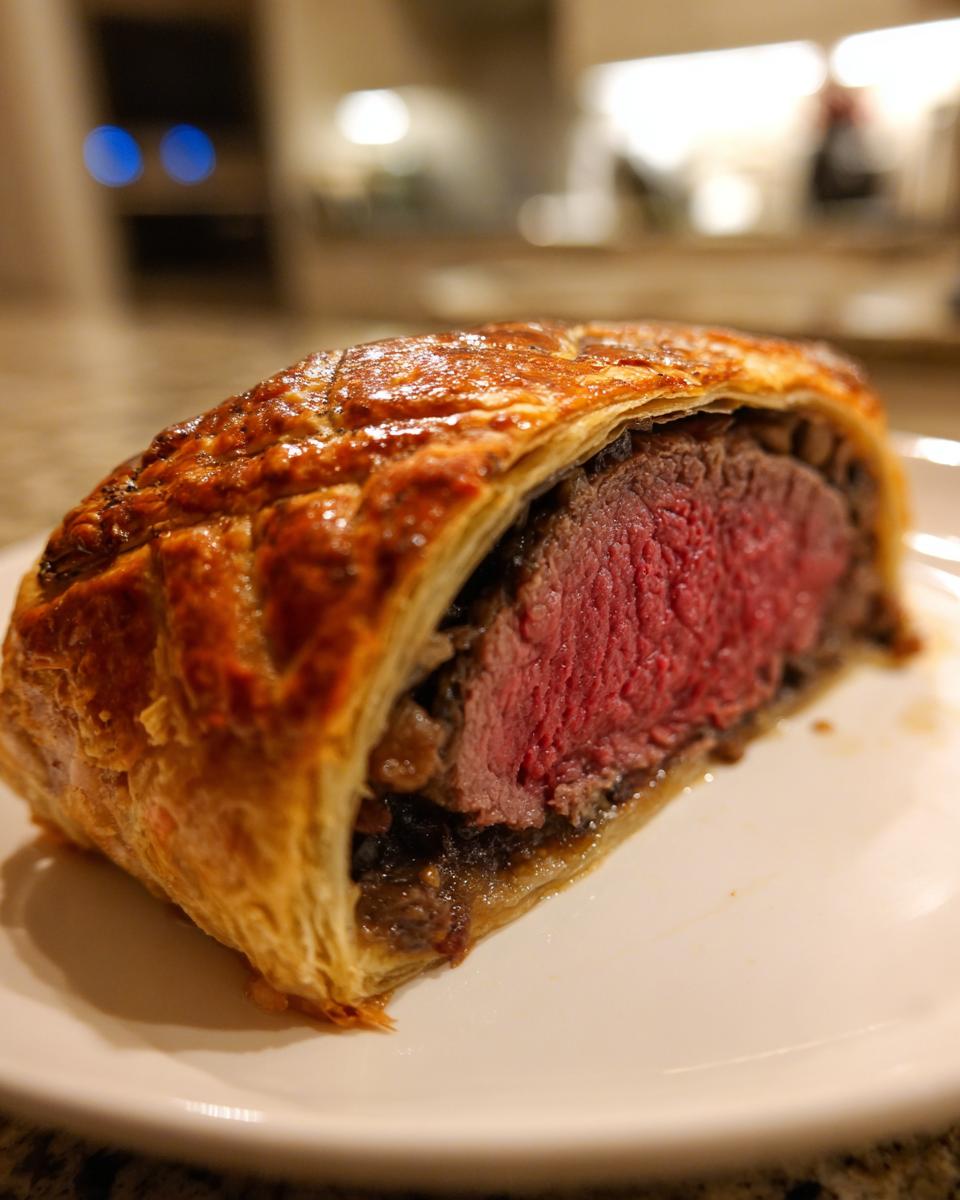
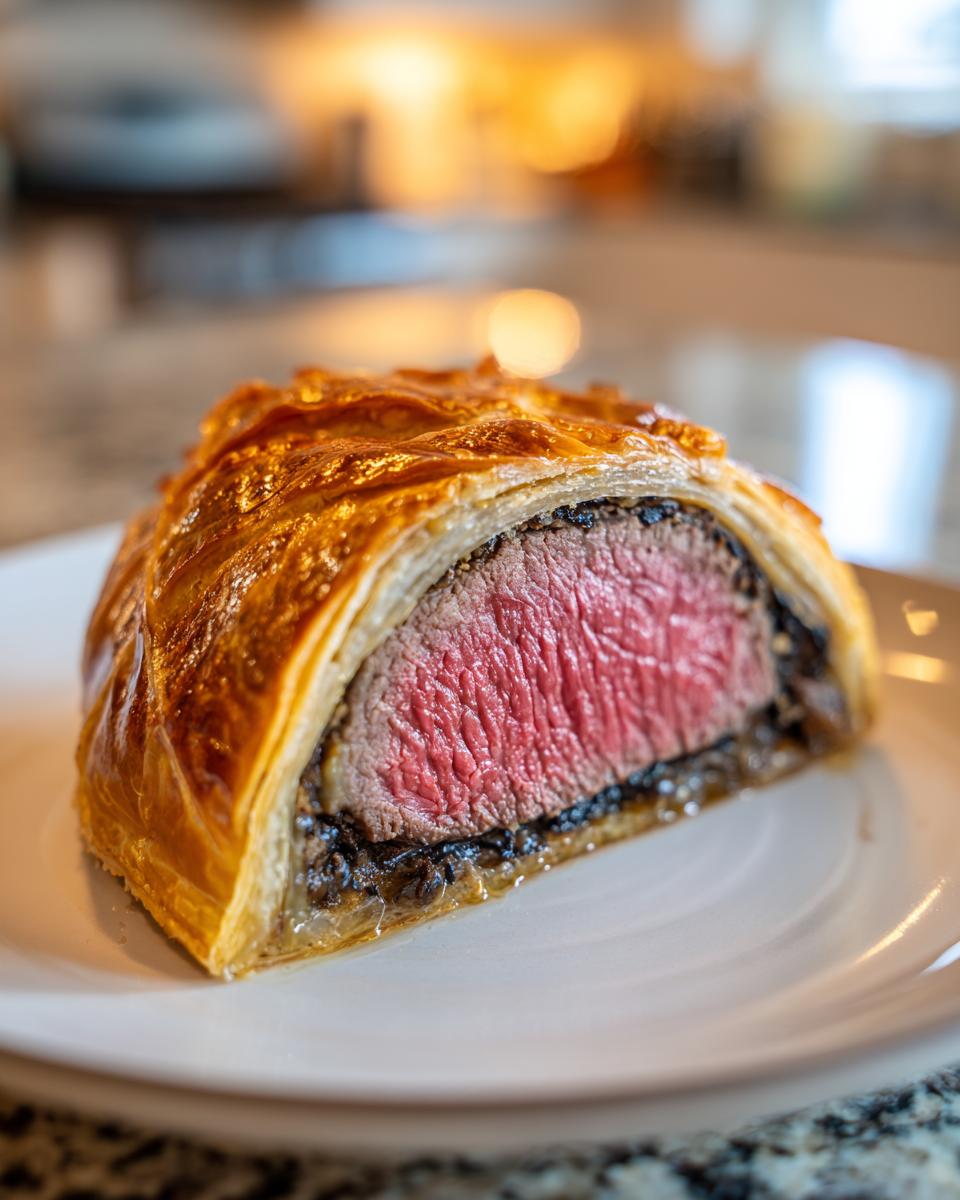
Oh, friends, there are some dishes that just make the whole room stop and gasp when they come out of the oven, and making a Classic Beef Wellington Recipe is absolutely one of them! I know, I know—it sounds impossibly fancy, like something only chefs attempt on TV. But I promise you, what I have written down here for you today is an elegant beef recipe that strips away the fear. This is achievable, dependable, and truly the perfect show-stopping holiday dinner centerpiece. There is nothing quite like seeing everyone gather around, knowing you created that gorgeous, golden crown. It brings me so much joy to share this success!
- Why This Beef Wellington Recipe Stands Out for Home Cooks
- Gathering Your Ingredients for the Best Beef Wellington Recipe
- Step-by-Step Instructions: How to Make Beef Wellington
- Tips for a Flaky Pastry Main Course
- Elevating Your Beef Wellington Recipe: Variations
- Serving Suggestions for Your Elegant Beef Recipe
- Storage and Reheating Instructions for Beef Wellington Recipe Leftovers
- Frequently Asked Questions About This Beef Wellington Recipe
- Estimated Nutritional Data for This Beef Wellington Recipe
- Share Your Holiday Dinner Centerpiece Success
Why This Beef Wellington Recipe Stands Out for Home Cooks
I truly believe that mastering a showstopper like this doesn’t require culinary school. Lots of recipes out there make the Easy Beef Wellington seem impossible, but we’re going to skip all that drama. This specific beef wellington recipe is built on solid steps that guarantee success, making it the perfect choice when you want to truly impress your guests dinner party. We focus on what matters: flavor and structure, not fussy extras. Trust me, you’ll be amazed how straightforward this elegant meal preparation can be.
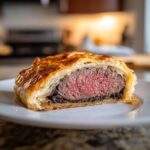
Achieving the Perfect Medium-Rare Center
The biggest fear people have is turning that gorgeous beef tenderloin into shoe leather! Don’t worry, that won’t happen here. We properly sear the beef on high heat first—that cooks the outside quickly to seal in all the juicy flavor. Then, we chill it completely before wrapping it up. Chilling is not optional here; it keeps the beef cold while the pastry bakes, ensuring you get that lovely pink center every time in this beef wellington recipe.
The Role of Mushroom Duxelles Recipe in Flavor
Now, let’s talk about the flavor base: the mushroom duxelles. This simple mixture of mushrooms and shallots is where all the deep, earthy notes come from. My biggest tip for the Mushroom Duxelles Recipe, and this is vital, is cooking out every single drop of moisture. If your duxelles are wet, they steam the bottom of your pastry, and nobody wants a soggy bottom! We cook it low and slow until it’s almost like a paste.
Gathering Your Ingredients for the Best Beef Wellington Recipe
For a show-stopping dish like this, we can’t cut corners on quality. You’ll need to shop for the best components you can find, especially the meat. This recipe truly highlights why using the Best Beef Tenderloin Recipe cuts is crucial for amazing results. When you see the whole list, it looks impressive—beef, mushrooms, ham, and pastry—but trust me, each ingredient has a specific, necessary job to do to make this Beef Wellington Recipe perfect. We want that gorgeous golden crown, and good ingredients are the foundation for that success.
Take a good look at the amounts listed in the recipe card. Everything needs to be prepped and ready before we start searing, because once that tenderloin hits the heat, things move fast! Like when I make a big lasagna, having all the components ready makes the assembly phase so much calmer. You can check out my recipe for easy homemade lasagna with ricotta if you need some comfort food inspiration later!
Ingredient Notes and Substitution Guidance
Let’s talk specifics about sourcing, because this is where a few simple choices make huge differences in your final Wellington. When you buy your beef, make sure it is center-cut tenderloin; that’s the part that stays wonderfully uniform in thickness, which helps it cook evenly wrapped in the Puff Pastry Beef Fillet. Also, please grab all-butter puff pastry if you can. Margarine just doesn’t give you that light, distinctively flaky texture we are aiming for. The Parma ham, or prosciutto if that’s what you find, isn’t there just to taste salty and delicious; it’s your essential protective raincoat for the beef, sealing in all that mushroom flavor and keeping the moisture away from the pastry base.
Step-by-Step Instructions: How to Make Beef Wellington
Alright, my wonderful cooks, this is where we bring it all together! Don’t be intimidated by the number of steps; think of it like building a delicious, edible gift. We move fast in the beginning because searing is crucial. First things first: season that beautiful beef tenderloin generously with salt and pepper. Get your skillet screaming hot with olive oil, and sear that meat on every single side until it’s deeply brown. We aren’t cooking it through, just giving it a nice crust. After about 8 minutes total, pull it out, let it cool just a tiny bit, and brush the whole thing with Dijon mustard. That mustard adds such a fantastic tang later!

- Make the Duxelles (The Flavor Layer): In that same pan (don’t clean out those meaty bits!), toss in your chopped mushrooms and shallots. Cook them down, low and slow, until absolutely all the water has boiled off—this takes patience, often 10 to 15 minutes. Add your thyme and white wine, then cook until dry again. Spread this mixture out to cool completely.
- The Ham Wrap: Lay out a big sheet of plastic wrap and arrange your Parma ham slices, overlapping them just enough so you can completely cover the beef log. Spread that cooled duxelles evenly over the ham. Place the mustard-coated beef on one edge and use that plastic wrap to roll everything up super tightly. Twist those ends tight, like a giant sausage wrapper! Stick this whole thing in the fridge for at least 30 minutes to firm up. This chilling is essential!
- Pastry Time: Roll out your puff pastry. Remember, we want enough to completely encase the beef log. Take the beef out of the plastic wrap, brush the edges of the pastry with your egg wash—that’s what seals it shut—then wrap the beef snugly inside. Just like you learned when making quick sheet pan shrimp fajitas, tuck everything in neatly.
- The Final Chill and Bake: Place the Wellington, seam-side down, on parchment paper and chill it for *another* 20 minutes. This second chill is the real secret weapon! Then, brush the top with more egg wash, score it lightly for decoration (don’t cut deep!), and sprinkle with salt. Bake at 400°F (200°C) for 30 to 35 minutes. You are looking for an internal temperature of 125°F to 130°F for that perfect medium-rare.
- Don’t Forget to Rest! This is the hardest part, but you must let your beautiful Beef Wellington Recipe rest for a full 10 minutes before slicing. This lets the juices settle back into the meat. Then, slice thick and prepare for applause!
Tips for a Flaky Pastry Main Course
Achieving that stunning, golden, flaky pastry on the outside while keeping the inside perfectly pink is the whole goal, isn’t it? The biggest challenge everyone talks about is avoiding a soggy bottom on your Flaky Pastry Main Course, and I have two non-negotiable rules for keeping that pastry dry and crisp. Remember everything we did before wrapping? Searing the beef quickly and drying the duxelles completely? That preps the stage, but the chilling is what saves the show!
Rule number one is the double chill. Giving the wrapped log 30 minutes after the ham/duxelles wrap adds structure, but that final 20 minutes after you’ve wrapped it totally in pastry is crucial. Cold pastry hits a hot oven and puffs up beautifully before the heat has time to make the bottom soggy. Rule number two: don’t skimp on the egg wash! Brushing the exterior liberally with that beaten egg gives you that deep, shiny, professional brown color. While you are waiting for that pastry to bake perfectly, I always sneak off to bake something simple, like my classic butter cookie melt in your mouth recipe, just to keep my hands busy!
Elevating Your Beef Wellington Recipe: Variations
This beef wellington recipe is fantastic as a large showstopper, but sometimes you have a smaller gathering, or maybe you just want appetizers that feel incredibly sophisticated. The beauty of this technique is that it scales down really well! When I need slightly different presentation options, I usually turn to these simple adjustments. You might have seen Ina Garten make her individual versions—that is a wonderful route to take when you want perfect plating for everyone. Don’t be afraid to adjust the size based on who you are feeding; it’s all about getting that rich, cozy flavor into every bite.
Making Individual Beef Wellington Portions
If you decide to make that stunning Individual Beef Wellington, remember the core principles still apply: sear, chill, duxelles, ham, and pastry! The main difference is the cooking time. Because the beef pieces are smaller, they will bake much faster. You should check the temperature earlier than the 30-minute mark, aiming for that 125°F internal reading in each piece. Serving them individually means you get to present each guest with their own perfect little golden package!
Creating Mini Beef Wellington Bites Appetizers
For parties where people are grazing, turning this into Mini Beef Wellington Bites is a winner—people love finger food! For this, you might use smaller cuts of beef or even just thick rounds cut from a larger seared fillet. You’ll use smaller squares of puff pastry and wrap them up quickly. Since they are smaller, they bake much faster, usually around 18 to 22 minutes. They look so elegant on a platter, don’t they?
Serving Suggestions for Your Elegant Beef Recipe
Now that you’ve mastered the showstopper, the next question is always: what goes on the plate beside it? Since this Elegant Beef Recipe is so rich and savory, we want sides that complement it without fighting it. I always lean toward simple, beautiful vegetables. Roasted asparagus or perhaps some simple, buttery green beans work wonderfully. They add a nice pop of fresh color against that golden pastry.
If you want something truly classic, you can whip up a quick pan sauce from the drippings—nothing fancy needed! Or, for a little zip, my recipe for best creamy horseradish sauce recipe is just the ticket to cut through the richness of the beef. Conversely, if you’re looking for a comforting starter, a light soup, like my roasted butternut squash soup, is a lovely beginning to the meal.
Storage and Reheating Instructions for Beef Wellington Recipe Leftovers
Oh, the agony of having leftover Beef Wellington! You managed to make something so spectacular that you have some the next day—that’s a win! You can certainly keep your leftovers. Cover the slices tightly with plastic wrap or foil and pop them straight into the refrigerator. They are generally good for about three days after baking, as long as they are kept cold. The pastry won’t be quite as flaky the next day, but don’t fret!
When it’s time to reheat your slice of the glorious beef wellington recipe, forget the microwave; that will turn your pastry instantly chewy! Instead, pop the slices onto a baking sheet lined with parchment paper and heat them in a moderate oven—maybe 325°F (160°C). Give it about 10 to 15 minutes. This gentle heat allows the pastry to crisp up again without overcooking the beef inside. If you’re looking for a sweet end to the meal later in the week, my recipe for easy homemade chocolate pudding recipe is always a safe bet!
Frequently Asked Questions About This Beef Wellington Recipe
It’s completely normal to have questions when tackling a big, beautiful dish like this! I get asked the same things over and over again, usually right before someone sticks that beef in the oven. Don’t hesitate; we want you to feel fully prepared before you commit to that gorgeous pastry wrap. We’ve covered the basics, but let’s tackle a few specific uncertainties right here so you can get back to your preparations feeling confident.
Can I make the Gordon Ramsay Beef Wellington ahead of time?
Oh yes, and I highly recommend it, especially if you are hosting! This recipe is wonderful because you can complete the entire wrapping process—searing, duxelles, ham, and pastry wrap included—up to 24 hours ahead of time. Just make sure it’s tightly sealed in plastic wrap and kept very cold in the refrigerator. Do not apply the final egg wash or score the top until about 30 minutes before it goes into the oven. Chilling it solid gives you a much better chance for that flaky finish!
What temperature should the beef be for a Classic Beef Wellington?
If you are aiming for that perfect, rosy pink center, which is the absolute hallmark of a truly Classic Beef Wellington, you need to rely on your meat thermometer, not just the clock! For medium-rare perfection, you are pulling that Wellington out when the center registers between 125°F and 130°F. Remember that delicious resting period we talked about? The temperature will continue to climb 3 to 5 degrees while it rests, giving you the ideal final result. If you are curious about variations, you can see how Chef Ramsay approaches it on MasterClass.
If you still can’t find the answer you need, please don’t hesitate to reach out to me over at my contact page! Happy cooking!
Estimated Nutritional Data for This Beef Wellington Recipe
Now, for those of you who like to keep track, here are the nutrition estimates. Remember, this is a decadent meal, so we aren’t counting calories too closely today!
- Serving Size: 1 slice
- Calories: 550
- Fat: 30g
- Protein: 45g
- Carbohydrates: 25g
These numbers are just estimates based on the standard ingredient amounts listed above, so your homemade version might shift a tiny bit depending on the exact cut of meat you select. Enjoy knowing you made something spectacular!
Share Your Holiday Dinner Centerpiece Success
Oh, I truly hope this recipe helps bring a little magic to your dinner table! If you tackle this Holiday Dinner Centerpiece, please come back and tell me all about it. Did the pastry get golden? Did your guests gasp? Leaving a rating or a note in the comments below means the world to me and helps other home cooks feel confident trying it. You can read about my privacy policy here if you have any concerns about leaving feedback, but mostly, I just can’t wait to hear about your success!
PrintClassic Beef Wellington Recipe
Make this impressive Beef Wellington for your next special occasion. This recipe guides you through searing the beef tenderloin, preparing mushroom duxelles, and wrapping it all in flaky puff pastry for a show-stopping holiday centerpiece.
- Prep Time: 45 min
- Cook Time: 35 min
- Total Time: 1 hour 50 min
- Yield: 4 servings 1x
- Category: Dinner
- Method: Baking
- Cuisine: British
- Diet: Low Fat
Ingredients
- 2 lb center-cut beef tenderloin (chateaubriand)
- 2 tablespoons olive oil
- 1 tablespoon Dijon mustard
- 1 pound cremini mushrooms, finely chopped
- 2 shallots, finely chopped
- 2 sprigs fresh thyme, leaves only
- 1/4 cup dry white wine
- Salt and black pepper to taste
- 12 slices Parma ham or prosciutto
- 1 package (14.1 ounces) all-butter puff pastry, thawed
- 1 large egg, beaten (for egg wash)
- Flour, for dusting
Instructions
- Season the beef tenderloin generously with salt and pepper. Heat the olive oil in a large skillet over high heat. Sear the beef on all sides until deeply browned, about 1 to 2 minutes per side. Remove the beef and let it cool slightly. Brush the entire surface of the cooled beef with Dijon mustard.
- Prepare the duxelles: In the same skillet, add the chopped mushrooms and shallots. Cook over medium heat until all the moisture has evaporated, about 10 to 15 minutes. Add the thyme leaves and white wine. Cook until the wine evaporates and the mixture is dry. Season with salt and pepper. Spread the duxelles mixture onto a plate to cool completely.
- Lay a large sheet of plastic wrap on your work surface. Arrange the Parma ham slices on the plastic wrap, overlapping them slightly to form a rectangle large enough to wrap the entire tenderloin.
- Spread the cooled duxelles evenly over the layer of Parma ham. Place the mustard-coated beef tenderloin at one end of the ham and prosciutto layer.
- Using the plastic wrap to help you, tightly roll the ham and duxelles around the beef. Twist the ends of the plastic wrap tightly to secure the log shape. Refrigerate for at least 30 minutes, or up to 24 hours, to firm up.
- Lightly dust your work surface with flour. Roll out the puff pastry into a rectangle large enough to completely enclose the beef log. Remove the plastic wrap from the beef log.
- Brush the edges of the pastry with the beaten egg wash. Place the beef log onto the pastry. Tightly wrap the pastry around the beef, trimming any excess pastry. Seal the seams well and place the Wellington seam-side down on a baking sheet lined with parchment paper. Chill for another 20 minutes.
- Preheat your oven to 400 degrees Fahrenheit (200 degrees Celsius). Brush the entire surface of the chilled Wellington with the remaining egg wash. Score the top lightly with the back of a knife in a decorative pattern, taking care not to cut all the way through. Sprinkle lightly with sea salt.
- Bake for 30 to 35 minutes for medium-rare (internal temperature of 125°F to 130°F). The pastry should be deep golden brown.
- Let the Beef Wellington rest on a cutting board for 10 minutes before slicing into thick portions. Serve immediately.
Notes
- For a perfect medium-rare center, use a meat thermometer. Cooking time varies based on the thickness of your beef fillet.
- If the pastry starts browning too quickly, loosely tent the Wellington with aluminum foil during the last 10 minutes of baking.
- You can prepare the wrapped Wellington up to the point of baking one day ahead and keep it refrigerated.
Nutrition
- Serving Size: 1 slice
- Calories: 550
- Sugar: 2
- Sodium: 450
- Fat: 30
- Saturated Fat: 14
- Unsaturated Fat: 16
- Trans Fat: 0
- Carbohydrates: 25
- Fiber: 3
- Protein: 45
- Cholesterol: 150