
Oh, my goodness, friends, if you think you’ve had a decadent dessert, wait until you try this! Sometimes you just need something that tastes like pure indulgence but doesn’t require you to stand over a hot oven, right? That’s why I’m thrilled to share my absolute favorite crowd-pleasing treat: the easy, no-bake biscoff cheesecake. Since teaching for all those years, I’ve learned that clarity and simplicity are key, and this recipe is straightforward enough for any home cook. You get that impossibly rich, creamy texture infused with gorgeous spiced cookie butter flavor. Trust me, this recipe stands up beautifully, and you’ll feel like you pulled off something spectacular!
- Why This No Bake Biscoff Cheesecake is Your New Favorite Dessert
- Ingredients for the Perfect No Bake Biscoff Cheesecake
- Essential Equipment for Your Biscoff Cheesecake
- How to Make the Best Biscoff Cheesecake Recipe Step-by-Step
- Tips for Success with Your Cookie Butter Cheesecake
- Make Ahead Dessert Options for Your Biscoff Cheesecake
- Serving Suggestions for Your Decadent Cheesecake Ideas
- Frequently Asked Questions About This Biscoff Cheesecake Recipe
- Nutritional Estimate for Your Biscoff Cheesecake
Why This No Bake Biscoff Cheesecake is Your New Favorite Dessert
There are a few reasons this recipe has earned a permanent spot in my rotation for family gatherings. It checks every box—it’s simple, it tastes like a million bucks, and best of all, it doesn’t require turning on the oven in the summer! We can rely on this for any big event.
- It’s the perfect Make Ahead Dessert—it actually tastes better after a full night in the fridge!
- You get that incredible spiced cookie flavor in every single bite.
- It results in a genuinely Rich Creamy Dessert that rivals any baked version.
- If you follow my simple directions below, cleanup is minimal, which I know you all appreciate! These easy dessert recipes really save the day.
The Ultimate Creamy Biscoff Dessert Experience
The goal here is pure, smooth luxury. Because we aren’t baking anything, we preserve all the richness from the cream cheese and the heavy cream. Folding everything together gently creates that velvety texture that melts in your mouth. It’s truly the ultimate Creamy Biscoff Dessert experience, packed with those wonderful spiced cookie notes.
Simple Steps for an Easy Cheesecake
I love that this is a No Oven Cheesecake. If you can crush cookies and use an electric mixer, you can make this! The crust goes right into the freezer, and the filling just needs time to set up in the refrigerator. It’s the definition of an Easy Cheesecake for a truly impressive finish.
Ingredients for the Perfect No Bake Biscoff Cheesecake
Gathering your ingredients is the first, most important step, just like planning a good lesson! For this Biscoff Cheesecake Recipe, quality matters, especially the cookie butter itself. Make sure your cream cheese is actually soft—pull it out about an hour before you plan to start mixing. I’ve organized everything simply below so you can easily check off your list before we get started!
- 1 1/2 cups crushed Lotus Biscoff cookies
- 6 tablespoons unsalted butter, melted
- 16 ounces cream cheese, softened to room temperature
- 1 cup powdered sugar (confectioners’ sugar)
- 1 teaspoon vanilla extract
- 1 cup heavy whipping cream, very cold
- 1 cup Lotus Biscoff spread (cookie butter), slightly warmed
- 1/4 cup Biscoff spread, reserved for topping (optional)
Having everything ready means you can move quickly while mixing, which helps keep the textures just right. If you need more inspiration for sweet treats, check out my Sugar Cookie Cheesecake Recipe too!
Essential Equipment for Your Biscoff Cheesecake
Now, every great baking project, even a No Bake Biscoff Cheesecake like this one, requires the right tools. I learned early on that when you have the proper equipment, your work flows so much better. You don’t need fancy gadgets here, but having the basics ready ensures everything mixes up beautifully and nothing sticks!
Here is what I always pull out for this recipe. It’s pretty simple, which is part of why I love it so much for busy weekends:
- A 9-inch springform pan. This is absolutely essential for a no-bake dessert so you can easily release the sides without damaging the crust or filling.
- An electric mixer (handheld or stand mixer). While you *could* do it all by hand, beating that heavy cream to stiff peaks takes some muscle, and we want smooth cream cheese!
- A large mixing bowl for the cream cheese base, and a separate, very clean, medium bowl for whipping the heavy cream.
- A sturdy rubber spatula. This is what we’ll use later for gently folding, which is key to keeping the mixture airy!
- A measuring cup set and spoons. Precision helps, even in easy recipes!
- A food processor, or just a sturdy Ziploc bag and rolling pin, for crushing those precious Biscoff cookies.
Having these gathered up before you melt your butter means you can transition smoothly from the crust preparation right into mixing the filling. That quick movement helps keep your ingredients at the right temperature!
How to Make the Best Biscoff Cheesecake Recipe Step-by-Step
Alright, it’s time to put our ingredients to work! Even though this is a No Bake Biscoff Cheesecake, the technique matters just as much as if we were using the oven. My goal, just like when I taught third grade, is to give you clear, sequential steps so you don’t get lost. We are moving from a crumbly base to a dreamily smooth filling. Remember, patience during the chilling time is mandatory!
Preparing the Crunchy Cookie Crust for Your Biscoff Cheesecake
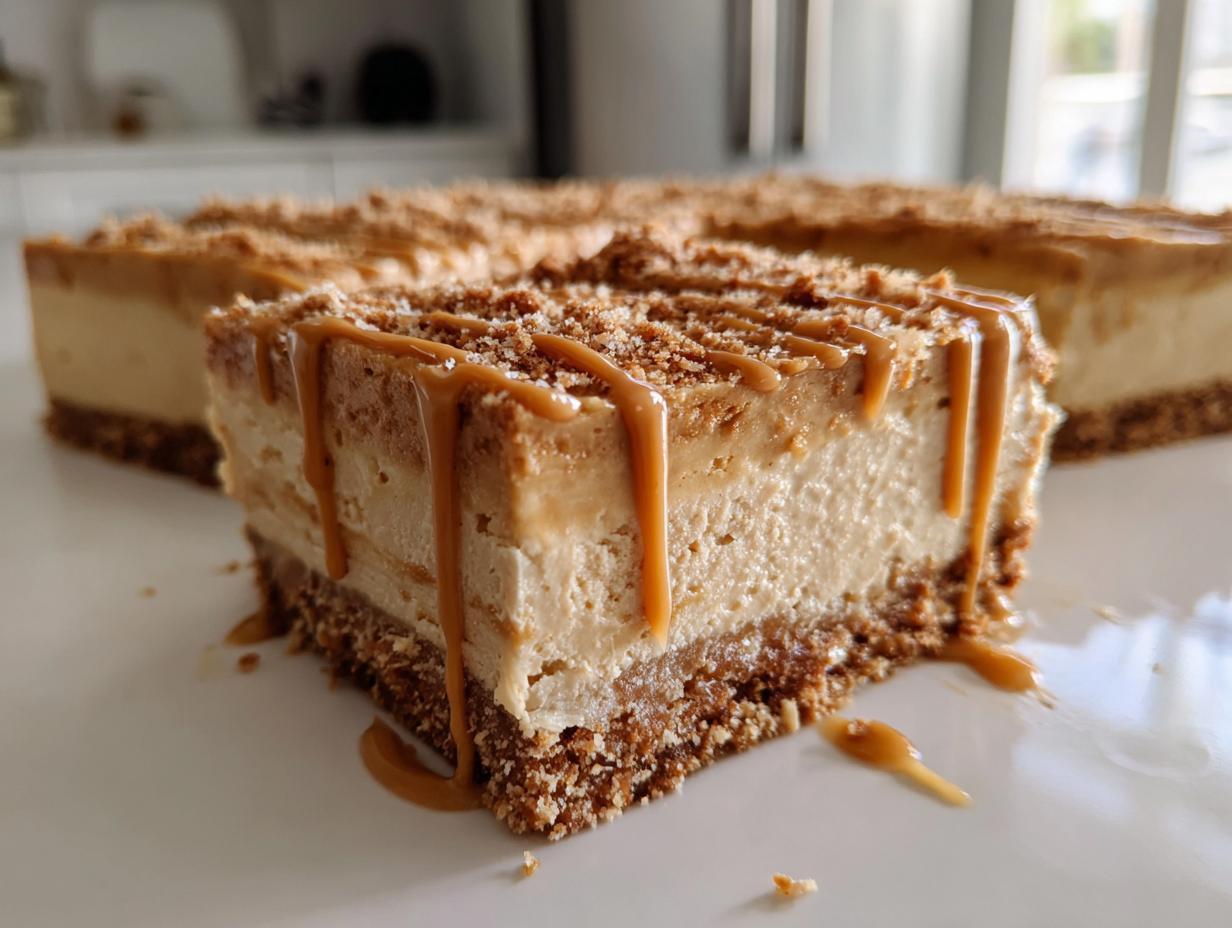
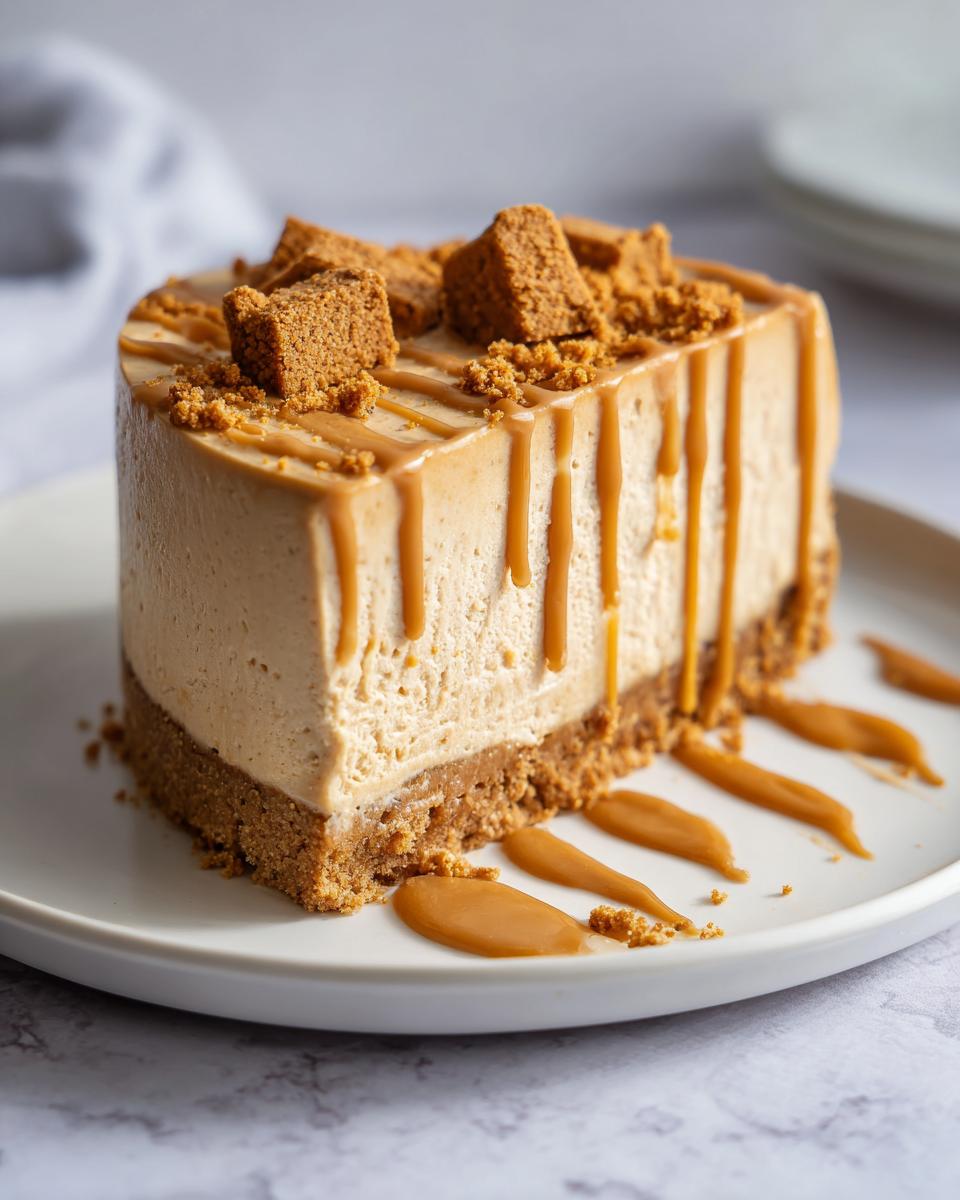
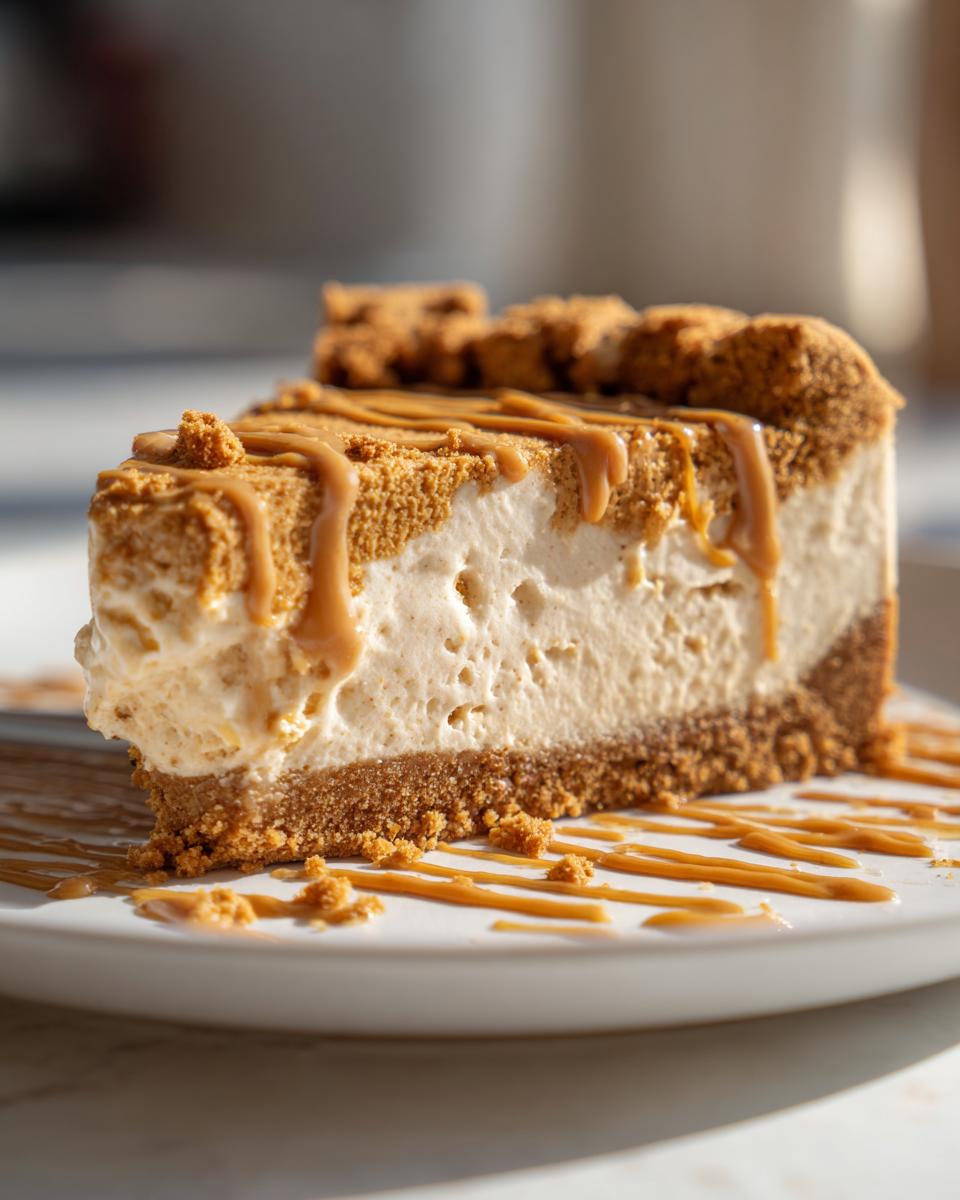
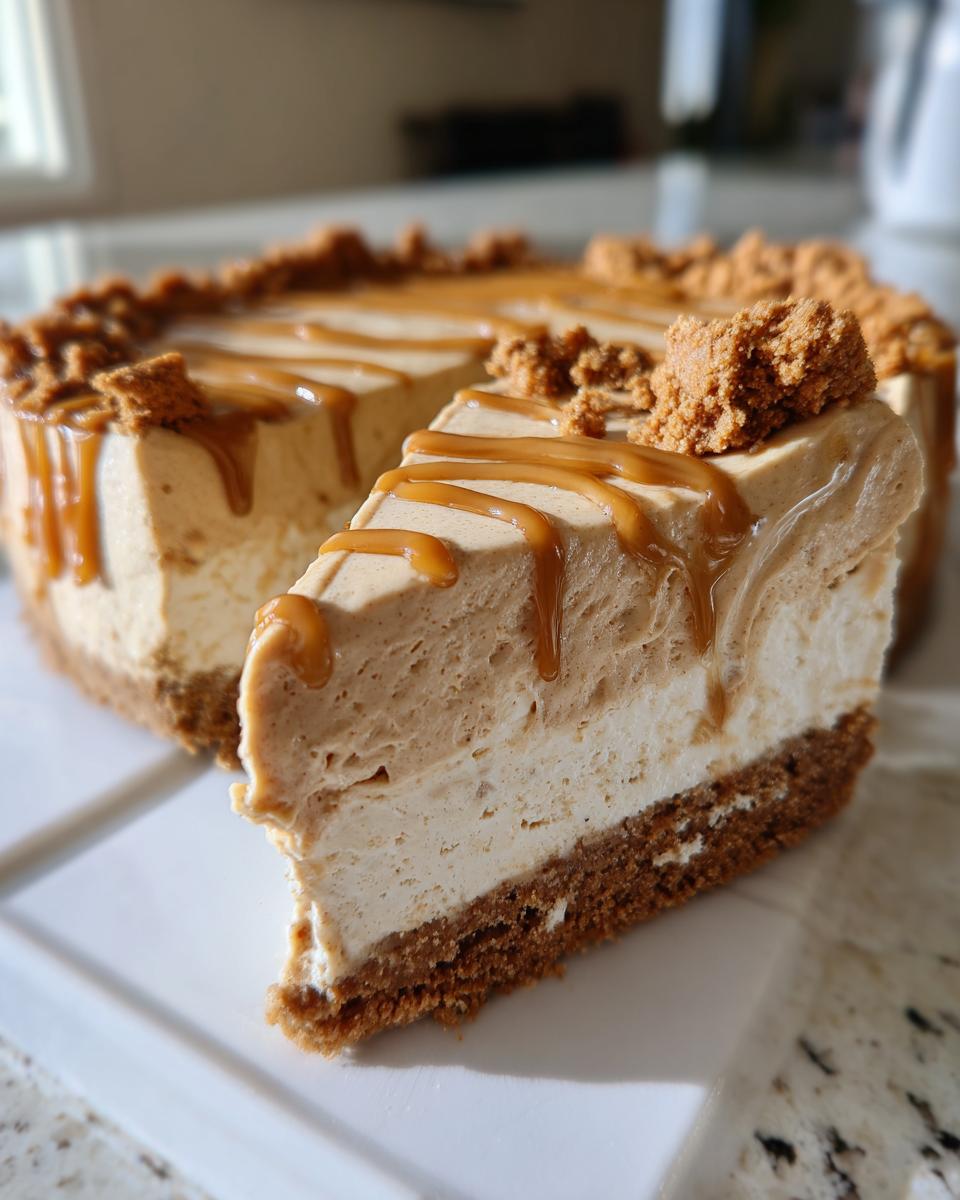
First thing’s first: we need that sturdy base for our Biscoff Cheesecake. Take your crushed cookies and mix them really well with that melted butter. You want every single crumb moistened—it should look like wet sand when you squeeze a bit in your hand. Press this mixture firmly into the bottom of your 9-inch springform pan. I mean *firmly*! Use the bottom of a flat measuring cup to really pack it down tight. Once it’s perfectly flat, pop that pan into the freezer while you get the filling ready. Chilling this crust helps it set up hard so it won’t crumble when we slice it later.
Creating the Creamy Filling for the No Bake Biscoff Cheesecake
Time to make the magic happen! Start by beating your soft cream cheese until it’s totally smooth—no lumps allowed in this house! Then, mix in the powdered sugar and vanilla until they disappear. Now, here’s the critical part: we need to whip that cold heavy cream in a separate bowl until it holds stiff peaks. See those peaks? That air is what keeps our No Bake Biscoff Cheesecake light! You must gently fold that whipped cream into the cream cheese mixture. Think slow, gentle scoops! After that, fold in that cup of slightly warmed cookie butter. Warming it just a touch makes it fold in without forcing the air out of your cream. Pour the whole gorgeous, spiced filling right over that frozen crust, smooth the top, cover it loosely, and let it chill for at least six hours. Overnight is truly best, just as I noted in my quick tips!

If you’re looking for other great no-bake ideas, check out my Oreo Cheesecake Easy No-Bake Recipe—it uses the same layering philosophy!
Tips for Success with Your Cookie Butter Cheesecake
Even though this is a wonderfully easy recipe, those little tricks make all the difference between a good dessert and a spectacular one! Remember, I spent years explaining processes clearly to my students, and I bring that same clarity here for our Cookie Butter Cheesecake. Don’t skip these checkpoints!
First, let’s talk about temperature. Your cream cheese *must* be fully softened. If it’s still cool to the touch, you’re going to end up with lumps, and nobody wants a lumpy cheesecake filling! I usually let mine sit on the counter for a full hour, sometimes longer in the winter.
Next, when you bring out that Biscoff spread for the filling, warm it *just* a little bit—I microwave mine for about 15 seconds. This seems small, but it helps it blend seamlessly without forcing you to overmix the whipped cream, keeping that air in there.
Finally, for those picture-perfect slices when serving, dip your sharp knife in hot water and wipe it dry before every single cut. It sounds fussy, but it stops the knife from dragging the filling and gives you those clean edges. For more reliability in all my classic recipes, take a peek at my Easy Homemade Cheesecake Recipe.
Make Ahead Dessert Options for Your Biscoff Cheesecake
This is one of my favorite qualities of this recipe, truly! In my house, special occasions usually involve a lot of moving parts, so anything that lets me get ahead is a winner. This is the perfect Make Ahead Dessert because, honestly, it needs that time in the refrigerator to perform its best magic.
For the absolute firmest, creamiest, most sliceable result—the kind that really earns compliments—you must chill it for a full eight hours. I know the recipe says six, and six is fine if you’re in a genuine pinch, but overnight is where it really sets beautifully. When it chills overnight, the flavors have time to meld, and the filling becomes perfectly dense without becoming grainy or weeping.
Cover it loosely with plastic wrap before it goes into the fridge. You don’t want the plastic sticking directly to the top of the filling, especially if you haven’t added the optional drizzle yet. You can easily keep this ready in the fridge for up to two days before serving! Knowing that dessert is handled days before a party has always brought me a little extra peace of mind—it’s just one less thing to worry about on the day of the event! If you’re planning lots of food for your gathering, don’t forget to check out my favorites for Easy Appetizers and Snacks, too!
Serving Suggestions for Your Decadent Cheesecake Ideas
Once this gorgeous Biscoff Cheesecake is finally set, the fun part—the styling!—comes next. Because the flavor of the cookie butter is quite rich and spiced, you want pairings that enhance that warmth without overpowering it. I always think simplicity wins here.
For a classic finish, a light dusting of powdered sugar or a sprinkle of finely crushed Biscoff crumbs is just perfect. If you want a little color, fresh raspberries or thin slices of banana look beautiful alongside the pale filling. And, honestly, nothing beats a hot cup of black coffee next to a slice of something this rich! If you’re serving this at a big holiday meal, make sure you review my Best Dessert Recipes list for other comforting ideas!
Frequently Asked Questions About This Biscoff Cheesecake Recipe
When I first started sharing recipes online, I got so many questions about substitutions and timing! It’s normal when trying out a new favorite like this Biscoff Cheesecake for the first time. I’ve gathered a few of the most common things folks ask me when they are getting ready to make this dessert. Hopefully, this helps you feel confident as you pull this stunning treat together!
Can I use a baked crust instead of the no-bake crust for this biscoff cheesecake?
That’s a good question for those who are more comfortable with an oven! This recipe is crafted specifically as a No Bake Biscoff Cheesecake, and that chilling process is what locks in the creamy texture of the filling. If you pre-bake the crust, you’ll need to let it cool completely before adding the filling, and honestly, the final texture of the whole dessert will change a bit—it might feel slightly less rich. For the absolute luscious, melt-in-your-mouth result I promise you, stick to the freezer method for that crust!
What is the best way to store leftovers of this creamy Biscoff dessert?
The great news is that leftovers of this creamy Biscoff dessert are usually plentiful because it’s such a crowd-pleaser! Since there’s no baking involved, we don’t have to worry about the texture degrading as much as a baked version might. Keep any leftovers stored in the refrigerator, making sure they are wrapped up tightly in plastic wrap or placed in an airtight container. I find that the texture stays wonderfully set and flavorful for up to four days. It’s truly the perfect Make Ahead Dessert!
Where can I find Lotus Biscoff spread if I cannot find it locally?
I understand that sometimes specialty ingredients can be tricky to track down! If you’ve checked the peanut butter aisle or the international foods section of your regular grocery store to no avail, don’t worry. You can almost always find jars of Lotus Biscoff spread online through major retailers. It’s worth hunting for because that specific caramelized, spiced flavor is what makes this cheesecake shine. If you can’t find the jarred spread, you can sometimes crush the actual cookies into a finer dust and use them as a substitute swirl, but the spread texture is definitely superior for the filling!
Nutritional Estimate for Your Biscoff Cheesecake
Now, I’m not a nutritionist, so please take these numbers as a rough guide rather than a guarantee! I always pull this sort of data for my own planning, and it’s just based on the standard brand-name ingredients I use in my kitchen for one slice of this wonderfully rich Biscoff Cheesecake. Since this is an indulgent treat, it’s higher in fat and sugar, as you might expect from something so delicious, but isn’t that what special occasions are for?
We calculated this estimate based on 10 servings from the full recipe:
- Serving Size: 1 slice
- Calories: Approximately 450
- Fat: Around 30g
- Saturated Fat: About 18g
- Carbohydrates: Near 40g
- Sugar: Roughly 35g
- Protein: About 5g
If you’re watching sugar intake, remember that you can sometimes cut back slightly on the powdered sugar in the filling without ruining the texture too much, but please don’t touch the Biscoff spread amounts—that’s where all the flavor lives!
PrintEasy No-Bake Biscoff Cheesecake

Make this creamy, rich No-Bake Biscoff Cheesecake. It features a simple crushed cookie crust and a luscious filling flavored with Lotus Biscoff cookie butter. This dessert is simple to prepare and great for making ahead.
- Prep Time: 20 min
- Cook Time: 0 min
- Total Time: 6 hr 20 min
- Yield: 10 servings 1x
- Category: Dessert
- Method: No-Bake
- Cuisine: American
- Diet: Vegetarian
Ingredients
- 1 1/2 cups crushed Lotus Biscoff cookies
- 6 tablespoons unsalted butter, melted
- 16 ounces cream cheese, softened
- 1 cup powdered sugar
- 1 teaspoon vanilla extract
- 1 cup heavy whipping cream, cold
- 1 cup Lotus Biscoff spread (cookie butter), slightly warmed
- 1/4 cup Biscoff spread, for topping (optional)
Instructions
- Prepare the crust: Mix the crushed Biscoff cookies and melted butter in a bowl until the crumbs are evenly moistened. Press this mixture firmly into the bottom of a 9-inch springform pan. Place the crust in the freezer while you prepare the filling.
- Beat the cream cheese: In a large bowl, use an electric mixer to beat the softened cream cheese until it is smooth and creamy, about 2 minutes. Scrape down the sides of the bowl.
- Add dry ingredients: Gradually beat in the powdered sugar and vanilla extract until just combined. Do not overmix.
- Whip the cream: In a separate, clean bowl, whip the cold heavy whipping cream until stiff peaks form. Gently fold the whipped cream into the cream cheese mixture until no streaks remain.
- Incorporate cookie butter: Gently fold in the 1 cup of slightly warmed Biscoff spread until the filling is uniform in color and texture.
- Assemble the cheesecake: Pour the filling over the chilled crust and spread it evenly.
- Chill: Cover the pan loosely with plastic wrap and refrigerate for at least 6 hours, or preferably overnight, until the cheesecake is firm.
- Serve: Before serving, drizzle the remaining 1/4 cup of Biscoff spread over the top, or garnish with extra cookie crumbs. Carefully release the springform side before slicing.
Notes
- Slightly warming the Biscoff spread makes it easier to mix into the cream cheese filling without deflating the whipped cream.
- For a cleaner slice, dip your knife in hot water and wipe it dry between each cut.
- This dessert is perfect for making one day ahead of your gathering.
Nutrition
- Serving Size: 1 slice
- Calories: 450
- Sugar: 35g
- Sodium: 250mg
- Fat: 30g
- Saturated Fat: 18g
- Unsaturated Fat: 12g
- Trans Fat: 0.5g
- Carbohydrates: 40g
- Fiber: 1g
- Protein: 5g
- Cholesterol: 95mg