
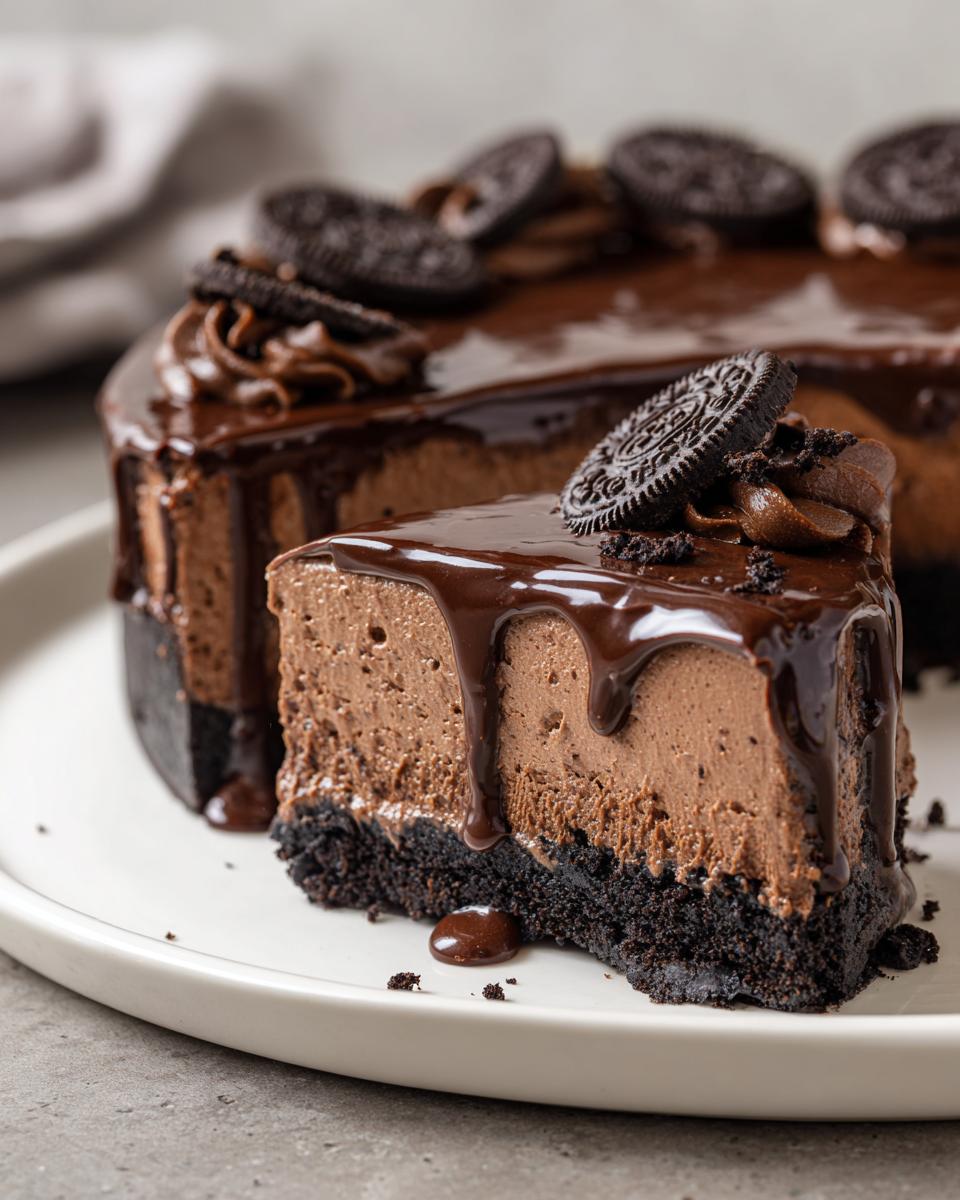
Sometimes you just need a dessert that screams decadent indulgence but whispers, “I took zero effort.” That’s exactly what we’ve got today! Forget fussy baking; we are diving headfirst into the Easy No-Bake Chocolate Mousse Pie, built on a spectacular Oreo crust, of course. If you’re looking for a reliable, straightforward treat that handles family gatherings or those moments when you badly need chocolate, this is it. Just like Carla always taught us, wonderful food doesn’t need complicated steps. Trust me, this primary recipe for chocolate mousse pie is my go-to when I need something impressive fast. If you want the details on how to build that perfect, crunchy base, check out my recipe for a creamy Oreo pie.
- Why This Easy Chocolate Mousse Pie is a Must-Make
- Ingredients for Your Decadent Chocolate Mousse Pie
- How to Prepare This Simple Mousse Pie
- Expert Tips for the Best Chocolate Mousse Pie
- Make Ahead Dessert and Storage for Your Chocolate Mousse Pie
- Variations on the Classic Chocolate Mousse Pie Recipe
- Serving Suggestions for This Indulgent Desserts
- Frequently Asked Questions About This Chocolate Mousse Pie
- Estimated Nutritional Data for Chocolate Mousse Pie
Why This Easy Chocolate Mousse Pie is a Must-Make
I honestly don’t know why anyone bothers with the oven when you can get this level of glorious chocolate satisfaction without turning on a single burner! This pie hits all the necessary notes. It’s rich, it’s incredibly creamy, and honestly, it just looks fancy, even though it’s secretly so simple.
- No Oven Required: Perfect for summer or those days when the oven is already packed.
- Maximum Flavor, Minimum Work: It tastes intensely chocolatey, exactly how a good dessert should.
- Fluffy and Light: The texture is divine—it melts right away!
The Appeal of a No Bake Chocolate Mousse Pie
Seriously, the best part about making a No Bake Chocolate Mousse Pie is skipping the preheating and cooling times. If you need a party dessert idea last minute, or if it’s eighty degrees outside, this is your lifeline. You mix it, you chill it, and you feed your guests something truly spectacular. It means less stress for me, which means more time enjoying the party!
Achieving That Silky Smooth Mousse Texture
We are relying on two kitchen heroes here to get that perfect Silky Smooth Mousse: the instant pudding mix and the thawed whipped topping. They do all the heavy lifting! You don’t need to whip egg whites or fold in heavy cream until it breaks. Just mixing and folding creates that perfectly light and fluffy texture every single time. It’s foolproof, which is what every home cook dreams about!
Ingredients for Your Decadent Chocolate Mousse Pie
Okay, gathering the supplies is the least fun part, but I promise, these are all simple things you probably have on hand or can grab easily. Keeping things organized by component—crust, filling, and topping—is my little trick to make sure nothing gets forgotten during assembly! If you want to see other reliable desserts that use simple pantry goods, you can peek at my collection of best dessert recipes.
For the Oreo Crust Pie Base
- 1 package (14.3 ounces) chocolate sandwich cookies (you know, the whole thing!), crushed fine
- 6 tablespoons unsalted butter, melted
For the Creamy Chocolate Pie Filling
This section is what delivers that beautiful Creamy Chocolate Pie texture we are after!
- 1 package (3.4 ounces) instant chocolate pudding mix
- 1 cup milk, ice cold!
- 1 teaspoon vanilla extract
- 1 container (8 ounces) frozen whipped topping (like Cool Whip), thawed, with half reserved for later
For the Rich Chocolate Dessert Ganache Topping
This top layer is pure decadence; don’t skip this if you love a Rich Chocolate Dessert!
- 4 ounces semi-sweet chocolate, chopped up or in chip form
- 1/4 cup heavy cream
How to Prepare This Simple Mousse Pie
I’ve broken this down into the three manageable phases: crust, filling, and topping. Since nothing goes in the oven, you just need patience for the chilling phases. If you want to see how I handle a different kind of chocolate treat, check out my easy chocolate cupcakes recipe too! Follow these steps, and you’ll nail this pie every time.
Making and Chilling the Oreo Crust Pie
First, we build the foundation for our Oreo Crust Pie. Blitz those cookies in your food processor until they are fine crumbs—no big chunks allowed! Mix those crumbs thoroughly with your melted butter until it truly looks like wet sand. Then, take that mixture and really press it into the 9-inch pie plate. I mean really press it in firmly on the bottom and up the sides so it holds its shape. Pop that into the freezer for just 10 quick minutes while you move along to the delicious part.
Assembling the Fluffy Chocolate Pie Filling
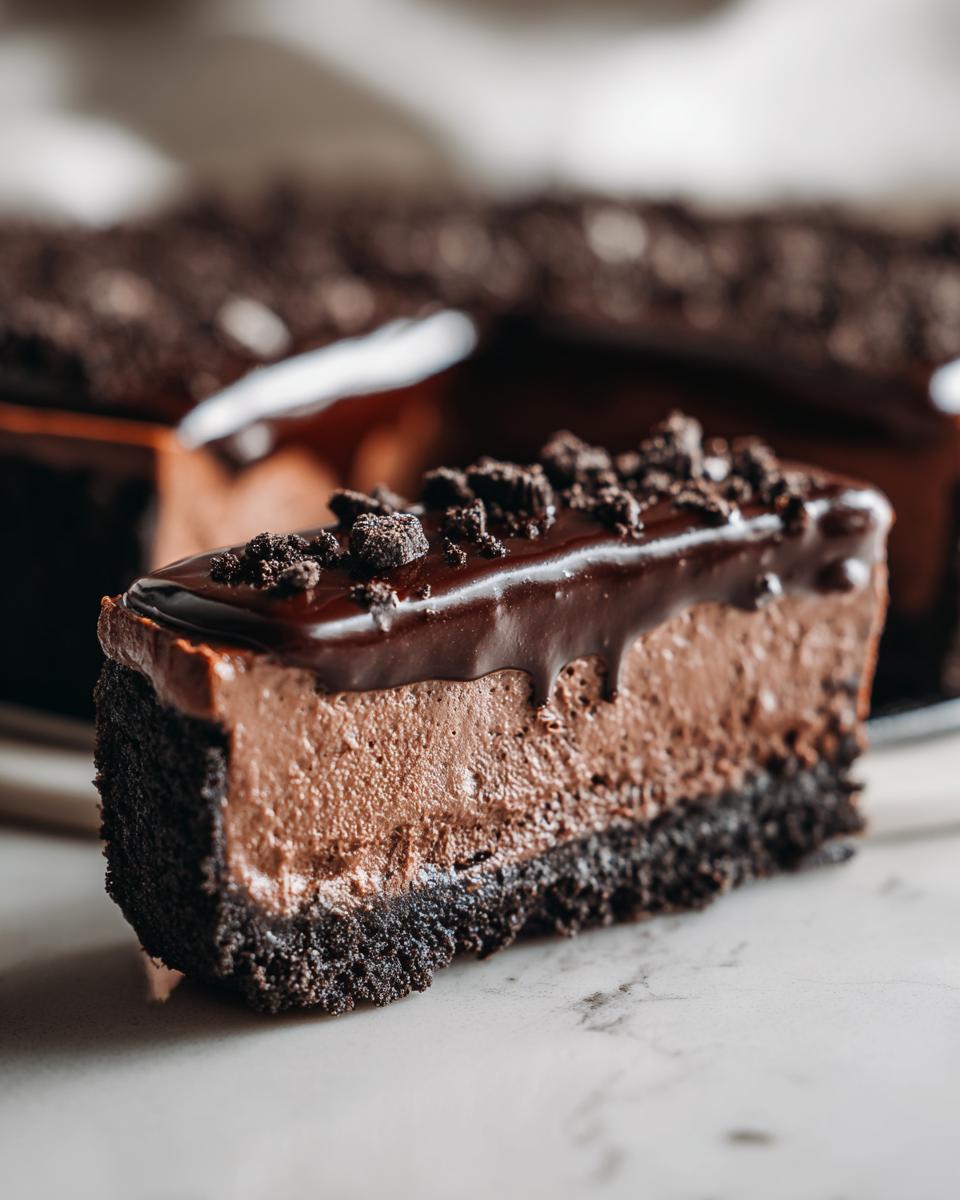
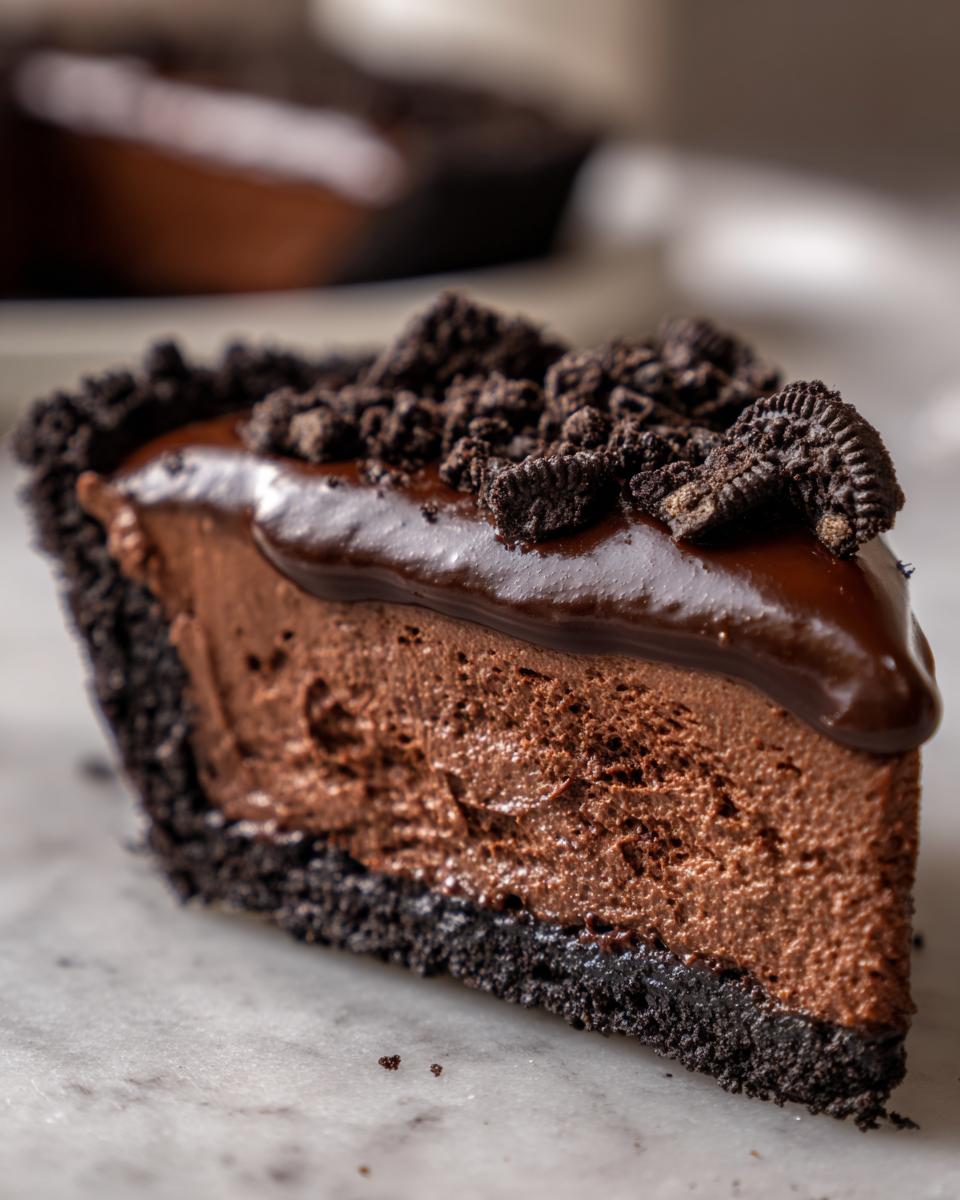
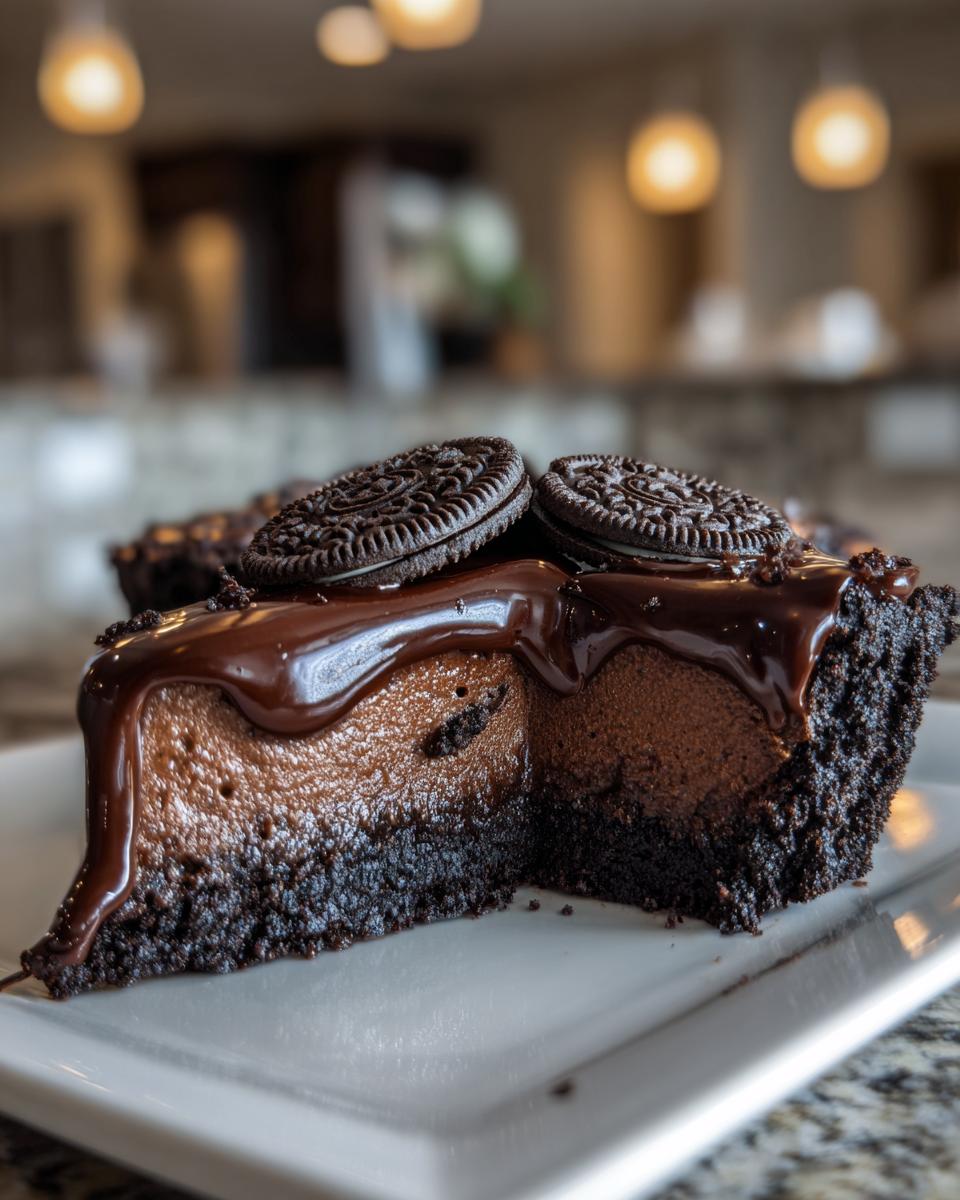
Now we make the magic happen! Whisk your instant chocolate pudding mix with the *cold* milk for a solid two minutes until it starts to thicken up. Then, gently fold in half of your thawed whipped topping. This is key for that Fluffy Chocolate Pie volume! Fold the rest of the topping in carefully until everything is just one smooth, pale color—don’t overmix or you’ll deflate the air. Spoon this glorious mousse into your chilled crust. Cover it loosely and let it sit in the fridge for a minimum of 4 hours to set up nice and firm.
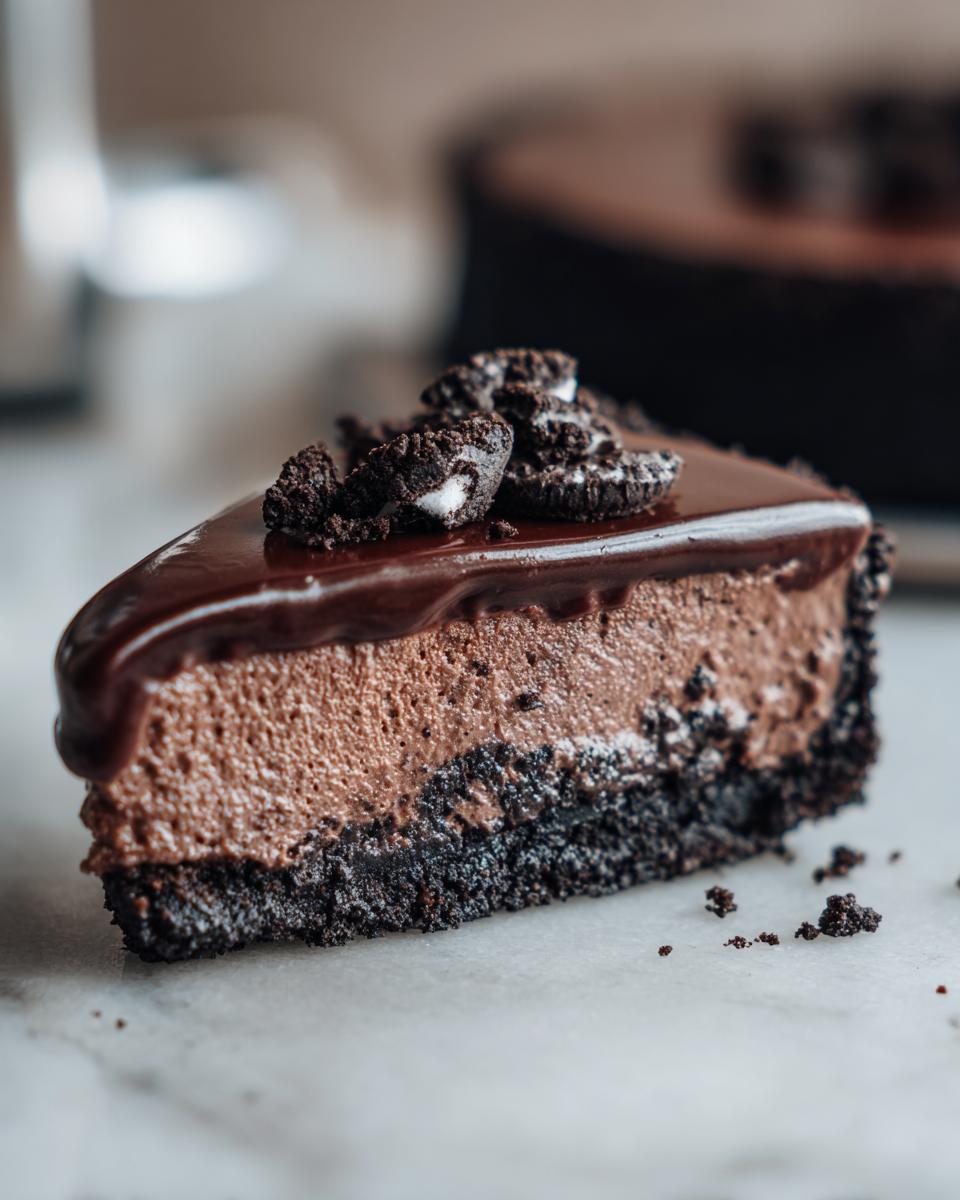
Finishing Your Chocolate Mousse Pie with Ganache
Once the mousse is set, it’s time for the glossy finish! Put your chopped chocolate in a heatproof bowl. Heat the heavy cream in a little saucepan until it’s just simmering around the edges—don’t let it boil, please! Pour that hot cream over the chocolate and just leave it alone for five full minutes. Then, whisk slowly until it’s glossy and perfect. Let that ganache cool for about 10 minutes—this keeps it from melting the mousse underneath. Pour it evenly over the set filling! Back into the fridge for one final hour until that top layer is firm before slicing.
Expert Tips for the Best Chocolate Mousse Pie
Listen, just following the steps gets you a good pie, but knowing *why* the steps work—that’s what makes you a great baker! Since this is a no-bake recipe, temperature control is actually even more important than when you use an oven. These little secrets are how I guarantee this chocolate mousse pie comes out dreamy every single time. If you run into any trouble, don’t hesitate to reach out through my contact page!
Ingredient Temperature Matters for this Chocolate Mousse Pie
The first rule for the filling is that your milk has to be absolutely ice cold when you mix it with the pudding powder. Seriously cold! If the milk is lukewarm, the pudding won’t get that initial set we need. Also, make sure that container of whipped topping is fully thawed but still feels very cold when you start folding it in. We need that cold temperature to keep the mousse light and fluffy, not soupy!
Achieving a Beautiful Ganache Finish
When you make that silky ganache topping, please resist pouring it on immediately! If it’s too hot, it will slide right down and perhaps even melt the beautiful soft mousse layer you worked so hard to chill. Let it sit on the counter for about 10 minutes after whisking. When you gently pour it on, it should be warm, glossy, but definitely thicker—that’s how you get that perfect, intact layer for your Rich Chocolate Dessert.
Make Ahead Dessert and Storage for Your Chocolate Mousse Pie
This is fantastic news for anyone who hates scrambling right before company arrives! This chocolate mousse pie is secretly the ultimate make ahead dessert. You can totally prepare the whole thing, ganache topping and all, a full day ahead of time. Covering it tightly with plastic wrap keeps everything fresh and stops that mousse top from drying out.
When it comes to leftovers—and you might have some, although I doubt it—keep the pie covered in the fridge. It tastes best served cold, straight from that chilling time. If you’re looking for ideas for what to eat the next morning, check out my easy breakfast recipes!
Variations on the Classic Chocolate Mousse Pie Recipe
While this chocolate mousse pie is perfect as written, it’s so much fun to tweak recipes for different parties or moods! Since we’re keeping it no-bake, the swaps are super easy so you can make this a truly personalized Chocolate Lovers Dessert. Don’t worry about messing up the texture; these changes are mostly flavor boosts!
If you aren’t feeling the Oreo vibe, swap out the crust cookies for graham crackers or even crushed shortbread cookies. For an extra kick, try adding a teaspoon of peppermint extract right into the mousse filling—that becomes a wonderful mint-chocolate treat!
You can also change up that ganache topping. Instead of semi-sweet chocolate, grab some milk chocolate for a sweeter top, or go dark for an intense, bitter finish. If you’re feeling adventurous, try folding a half cup of mini chocolate chips into the mousse right at the end before the final fold. If you love chocolate as much as I do, I bet you’ll adore my thoughts on chocolate macarons too!
Serving Suggestions for This Indulgent Desserts
Now that you have this gorgeous, rich pie ready, presentation is everything, right? Since this chocolate mousse pie is so dark and intensely flavored, it pairs wonderfully with something bright and fresh to cut through that richness. If you want simple ideas, I highly recommend keeping a bowl of fresh raspberries nearby. A few berries arranged on the side of each slice are stunning!
You could also take a tiny sifter and just dust the top lightly with unsweetened cocoa powder right before serving. That little bit of bitterness wakes up the palate. For a more elegant look, maybe a tiny dollop of fresh whipped cream on top works too. And if you’re looking for another amazing pie that relies on pairing flavors, you have to try my pecan cream pie recipe!
Frequently Asked Questions About This Chocolate Mousse Pie
I know when you try a new chocolate mousse pie recipe, a few little questions always pop up! That’s totally normal. Don’t worry; I’ve gathered the ones I hear most often to make sure your pie turns out absolutely perfect. We want reliable results, right? If you’ve got more questions after checking these, feel free to visit my About Page and send me a note!
Can I use a different crust instead of the Oreo Crust Pie?
Oh, yes, you certainly can! If you don’t have Oreos or just want a change of pace, graham crackers work perfectly fine, or even a crushed vanilla wafer crust. However, I have to tell you, I really recommend the Oreo crust for this specific chocolate mousse pie. The slightly bitter, dark chocolate crust really plays off the light, airy mousse filling so beautifully. It gives you that contrast you need!
What if my mousse filling isn’t thickening for my Simple Mousse Pie?
This happens sometimes if the milk isn’t cold enough, or maybe you got distracted while whisking! For this Simple Mousse Pie, you absolutely need to whisk that instant pudding mix with the cold milk for the full two minutes until it’s thick. If after folding in the whipped topping it still seems a little loose, don’t panic! Just pop the whole bowl back into the fridge for 15 minutes. That chill will often help it firm up right before you pour it into the crust.
Is this the Best Chocolate Pie if I don’t like instant pudding?
That is a great question! While using the instant pudding mix is what makes this pie so wonderfully easy and contributes to that light, airy quality we love in a Fluffy Chocolate Pie, you can certainly make substitutions. You could swap it out for a homemade, cooked chocolate custard base. Just know that the homemade version will result in a denser texture—it won’t be quite as cloud-like as this specific recipe aims to be. For the absolute *best* results matching the online excitement, like what you see on the Foodie Moms recipe, stick to the pudding mix!
Estimated Nutritional Data for Chocolate Mousse Pie
When you’re making a marvelous, decadent chocolate dessert like this, sometimes you just want a general idea of what you’re serving up! Remember, these numbers are estimates because home ingredients vary so much. If you use extra dark chocolate or a different brand of cookies, those numbers might shift a little bit. But this gives you a solid baseline for your wonderful chocolate mousse pie!
- Serving Size: 1 slice
- Calories: About 450
- Total Fat: 30g
- Carbohydrates: 45g
- Protein: 5g
Since this is an indulgent treat, the sugar content is present, but wow, is it worth it! Enjoy every single slice without worrying too much about the exact details!
PrintEasy No-Bake Oreo Chocolate Mousse Pie

Make this rich, creamy, and fluffy chocolate mousse pie using a simple Oreo crust. This no-bake dessert is easy to prepare and perfect for any occasion.
- Prep Time: 25 min
- Cook Time: 0 min
- Total Time: 4 hours 35 min
- Yield: 8 servings 1x
- Category: Dessert
- Method: No-Bake
- Cuisine: American
- Diet: Vegetarian
Ingredients
- 1 package (14.3 ounces) chocolate sandwich cookies (like Oreos)
- 6 tablespoons unsalted butter, melted
- 1 package (3.4 ounces) instant chocolate pudding mix
- 1 cup cold milk
- 1 teaspoon vanilla extract
- 1 container (8 ounces) frozen whipped topping (like Cool Whip), thawed, divided
- 4 ounces semi-sweet chocolate, chopped or chips
- 1/4 cup heavy cream
Instructions
- Prepare the crust: Place the chocolate sandwich cookies in a food processor and pulse until you have fine crumbs.
- Mix the crumbs with the melted butter until the mixture resembles wet sand.
- Press the crumb mixture firmly and evenly into the bottom and up the sides of a 9-inch pie plate. Chill the crust in the freezer for 10 minutes while you prepare the filling.
- Make the mousse filling: In a medium bowl, whisk together the instant chocolate pudding mix and cold milk for 2 minutes until the mixture thickens slightly.
- Stir in the vanilla extract and half (about 1/2 cup) of the thawed whipped topping until just combined and smooth.
- Gently fold in the remaining whipped topping until no white streaks remain, creating a light, fluffy mousse.
- Spoon the chocolate mousse filling evenly into the chilled Oreo crust. Cover the pie loosely with plastic wrap and refrigerate for at least 4 hours, or until the mousse is firm.
- Make the ganache topping: Place the chopped chocolate in a small, heatproof bowl.
- Heat the heavy cream in a small saucepan over medium heat until it just begins to simmer around the edges. Do not boil.
- Pour the hot cream over the chocolate. Let it sit undisturbed for 5 minutes.
- Whisk the mixture slowly until the chocolate is completely melted and the ganache is smooth and glossy. Let the ganache cool slightly, about 10 minutes.
- Pour the slightly cooled ganache evenly over the set mousse filling.
- Return the pie to the refrigerator to allow the ganache to set, about 1 hour. Slice and serve cold.
Notes
- For an even richer flavor, use dark chocolate instead of semi-sweet in the ganache.
- You can use a pre-made graham cracker crust if you prefer a different base, but the Oreo crust pairs well with the chocolate mousse.
- This pie tastes best when served directly from the refrigerator.
Nutrition
- Serving Size: 1 slice
- Calories: 450
- Sugar: 35g
- Sodium: 320mg
- Fat: 30g
- Saturated Fat: 15g
- Unsaturated Fat: 15g
- Trans Fat: 0.5g
- Carbohydrates: 45g
- Fiber: 2g
- Protein: 5g
- Cholesterol: 30mg