

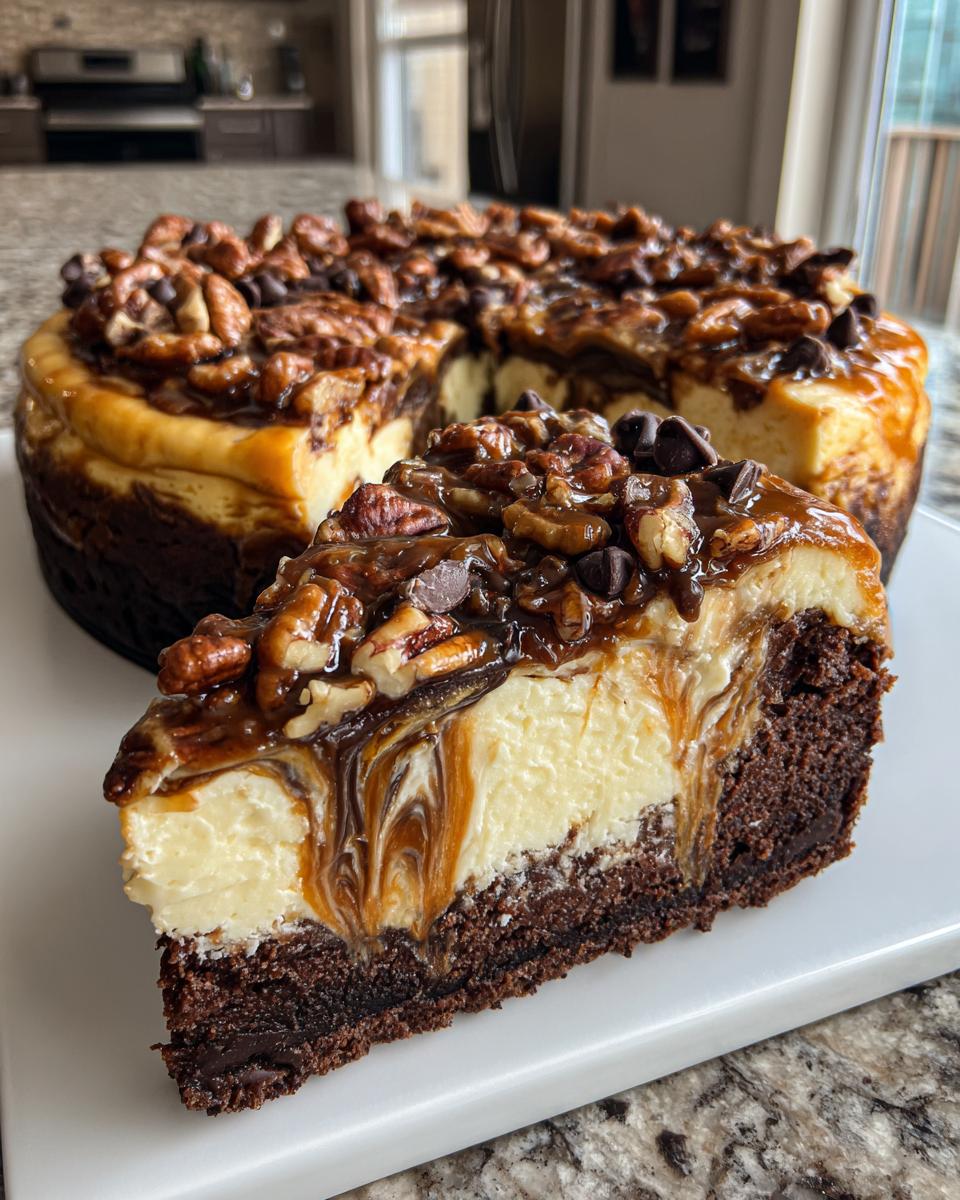
Oh, friends, if you’re looking for a dessert that truly stops people in their tracks—the one that makes everyone ask for the recipe before they’ve even finished their first bite—then I have one for you. We are talking about pure indulgence today: the Decadent Baked Turtle Cheesecake with Caramel-Brownie Crust. This isn’t just any dessert; this turtle cheesecake is built in layers of absolute bliss. As someone who believes that good food should be dependable and comforting, I spent time perfecting this recipe so you don’t have to worry about cracks or flops. If you love reaching for reliable, comforting American home cooking favorites, you will adore this. You can find more of my best dessert recipes here: my favorite baked recipes.
- Why This Decadent Turtle Cheesecake Recipe is a Showstopper
- Gathering Ingredients for Your Turtle Cheesecake Recipe
- Step-by-Step Instructions for Baked Turtle Cheesecake
- Tips for the Best Turtle Cheesecake Success
- Variations: Making Your Own Signature Turtle Cheesecake
- Serving Suggestions for Your Chocolate Caramel Pecan Dessert
- Storage and Reheating Instructions for Turtle Cheesecake
- Frequently Asked Questions About Turtle Cheesecake
- Sharing Your Homemade Turtle Cheesecake Experience
- Estimated Nutritional Information for This Indulgent Sweet Treat
Why This Decadent Turtle Cheesecake Recipe is a Showstopper
When you’re aiming for a truly memorable ending to a special dinner, you need something that pulls out all the stops. This dessert isn’t just a nice treat; it’s one of my favorite showstopper desserts because it brings together three incredible textures and flavors you usually only find separately. Trust me, once you serve this, you’ll know why it’s worth the effort!
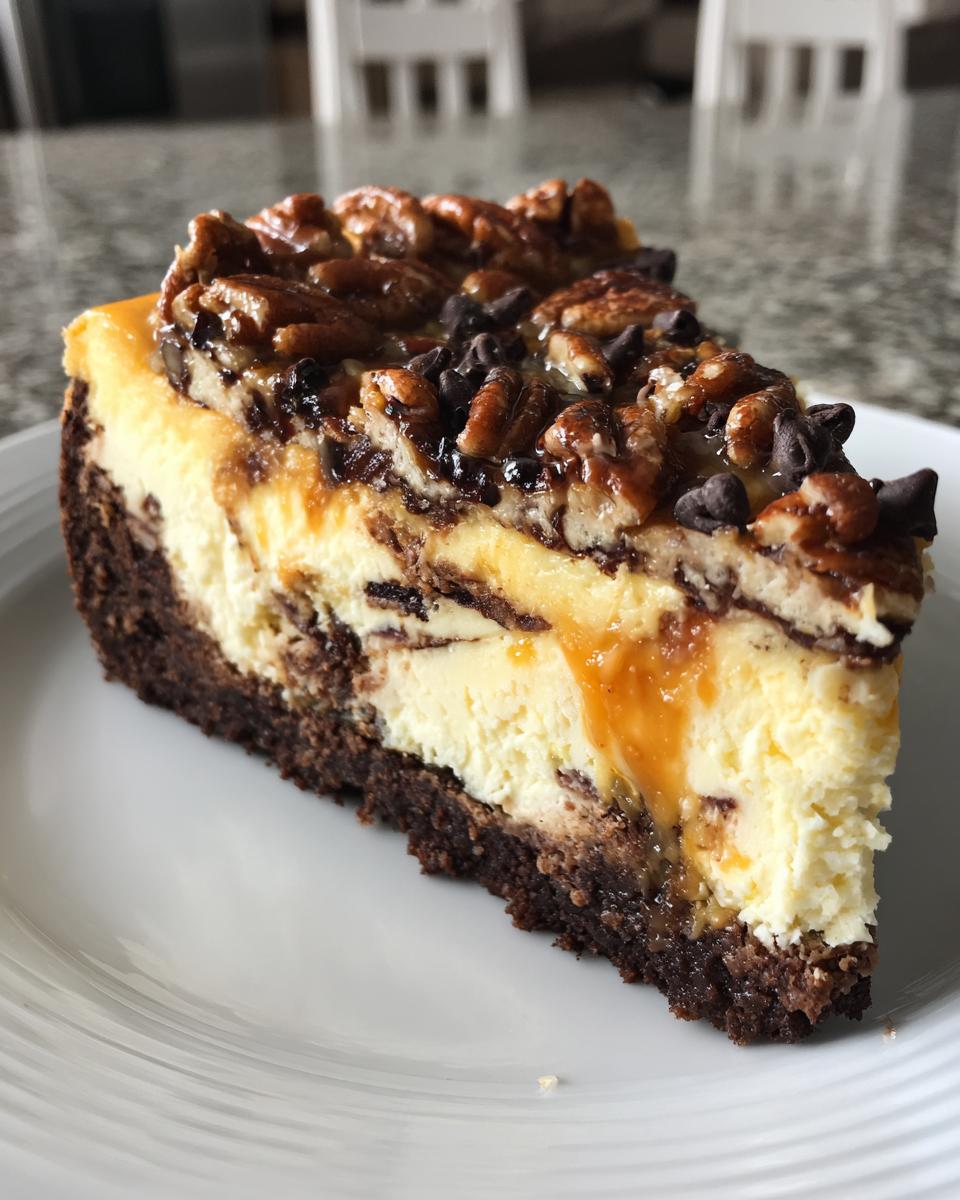
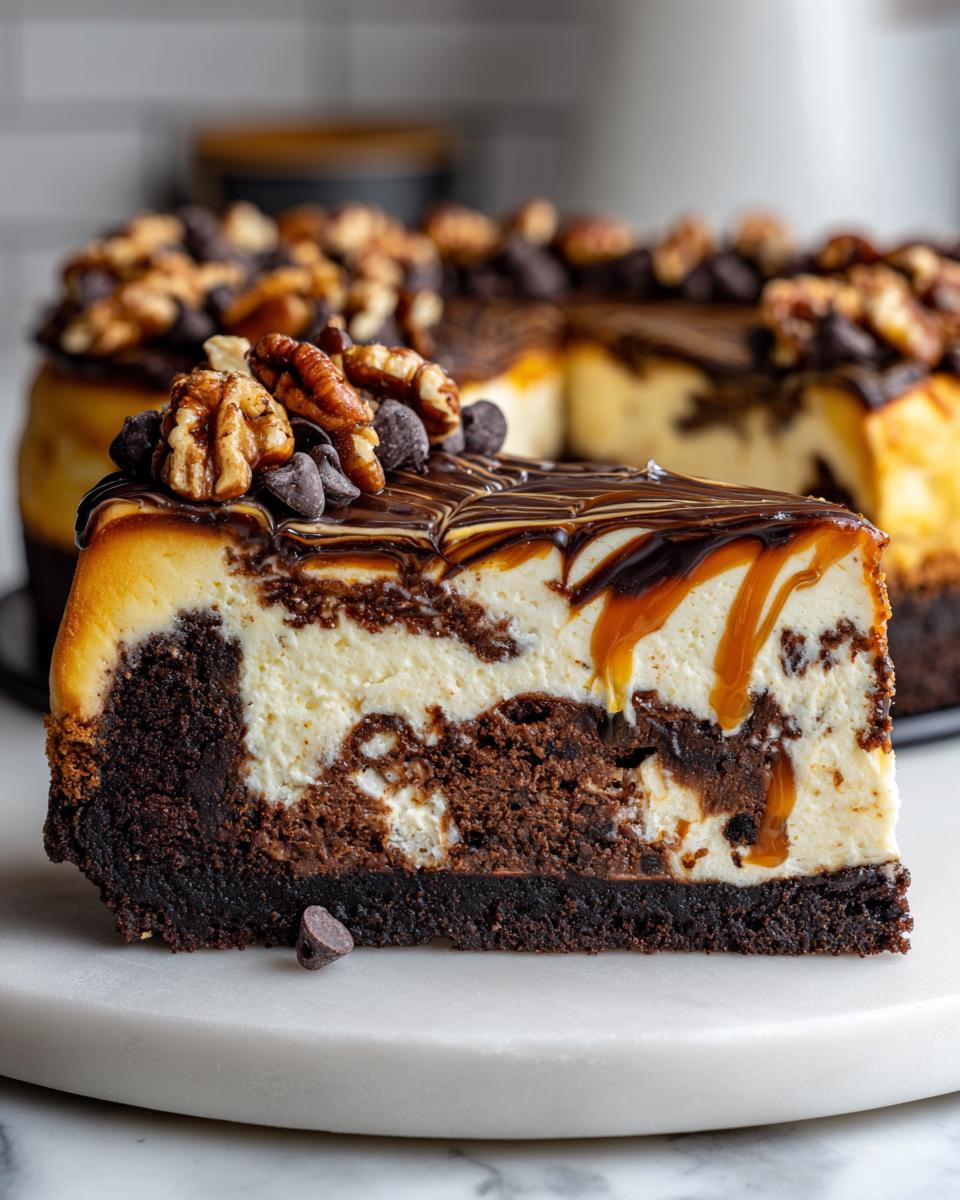
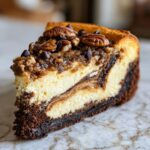
- The Triple Layer Magic: We start with a rich, fudgy brownie base that gives it substance—not just a simple wafer crust. Then comes the unbelievably creamy cheesecake filling, and finally, we load it up with all the gooey essentials.
- Ultimate Flavor Combination: It perfectly nails that classic chocolate caramel pecan dessert profile. The balance between the slight bitterness of the dark chocolate element and the sweet, salty caramel swirl is just divine.
- Gourmet Look, Home Cook Ease: While this looks like something you’d order at a fancy restaurant, I designed every step to be manageable in a standard home kitchen. It’s my promise to you that you can achieve those gourmet results without a professional oven!
- Perfect for Special Occasions: Whether it’s a major holiday, a birthday, or just a weekend when you deserve something special, this recipe truly elevates the table. You can read more about how I approach big-day baking here: my holiday cheesecake ideas.
Gathering Ingredients for Your Turtle Cheesecake Recipe
When we make a Turtle Cheesecake Recipe this decadent, we can’t skimp on quality! Getting your ingredients prepared correctly—especially making sure that cream cheese is truly soft—is half the battle won. Don’t worry, I’ve broken down everything you need so you can get organized before mixing starts.
For the Brownie Bottom and Crust
- 1 1/2 cups chocolate wafer crumbs (get the good stuff!)
- 1/2 cup unsalted butter, melted until it’s perfectly liquid
- 1/4 cup granulated sugar
- 1 box (18.3 ounces) fudge brownie mix—make it according to the package directions, but aim for fudgy, not cakey!
For the Creamy Cheesecake Filling
This is where the magic happens, so make sure your cream cheese has been sitting out for at least an hour—it prevents those awful lumps in your wonderfully
creamy cheesecake filling. Room temperature is key, my friends, it really helps everything blend without over-beating the eggs!
- 3 (8 ounce) packages cream cheese, softened completely
- 1 1/2 cups granulated sugar
- 1 teaspoon vanilla extract (use the real stuff!)
- 1/4 teaspoon salt
- 4 large eggs (make sure they are room temperature too!)
- 1 cup heavy cream
For the Turtle Toppings and Swirls
These are the jewels of the whole dessert! Don’t forget to get those pecans toasted ahead of time; it brings out a gorgeous nutty flavor we absolutely need.
- 1 cup homemade caramel sauce, divided (about half for the swirl, half for drizzling later)
- 1 cup chopped pecans, toasted until fragrant
- 1/2 cup semi-sweet chocolate chips
Step-by-Step Instructions for Baked Turtle Cheesecake
Alright, deep breath! While this is a showstopper dessert, we’re going to take it one simple step at a time. If you follow these instructions exactly, especially around the cooling, you’ll get a flawless finish. Remember how important those soft ingredients were? That pays off right now in how easily everything mixes together. Getting a crack-free surface is my number one goal for you, and I have a wonderful resource for general tips on achieving that easy, homemade, crack-free cheesecake here.
Preparing the Brownie Base and Crust
First things first, get that 350°F (175°C) oven warmed up for us. Prepare that fudge brownie mix following the box directions for a nice, fudgy texture—we want dense, not light and airy! Pour that batter right into your 9-inch springform pan that you lined carefully with parchment paper on the bottom. Bake it for about 20 to 25 minutes. Don’t worry if the middle seems a little soft when you pull it out; we are intentionally underbaking it slightly so it finishes cooking perfectly with the cheesecake layer on top. Once it’s cooled down, it’s time to make the crust. Mix those chocolate wafer crumbs and the little bit of sugar, then pour in that melted butter and stir until it looks like wet sand. Press this crust firmly right over your cooled brownie layer. Pop the whole pan into the freezer while we get the filling ready. This chilling step is vital!
Mixing the Smooth Creamy Cheesecake Filling
Now, we reset the oven down to 325°F (160°C). This lower temperature is our secret weapon for the creamy cheesecake filling. Grab your biggest bowl and beat that softened cream cheese until it’s perfectly smooth—no lumps allowed! Add your sugar, vanilla, and salt, and mix until soft. Here’s the key: add your four large eggs very slowly, one at a time, mixing only until you see the yolk disappear after each one. Do not over-mix once the eggs are in! Finally, gently fold in the heavy cream. We want everything incorporated, but we don’t want to beat extra air into the batter at this stage.
Assembling, Baking, and Water Bath Technique
Time to put the layers together! Pour half of that beautiful filling over your chilled crust and brownie layer. Take half of your amazing caramel sauce and drizzle it right over the top. Then, gently spoon the rest of the filling right over that caramel swirl layer. Use a knife or skewer to gently swirl the remaining caramel into the top layer if you want extra ribbons of flavor, just don’t drag it down into the brownie! Now, wrap the outside bottom of your springform pan very tightly with heavy-duty foil—we are using a water bath to keep things gentle and prevent cracking. Place the wrapped pan inside a larger roasting pan and carefully pour hot water into the roasting pan until it comes halfway up the sides of your springform pan. Bake for 60 to 75 minutes. You’ll know it’s done when the edges look set but the very center still has a tiny, almost imperceptible jiggle when you nudge the pan.
The Essential Cooling and Chilling Process
This might be the most important part for any turtle cheesecake baker! Don’t rush it, please! Turn off that oven, open the door just a crack—maybe prop it with a wooden spoon—and leave the cheesecake inside for a full hour. This gradual temperature drop is what prevents that heartbreaking crack from forming on the surface. After that hour of resting, take it out of the oven setup, let it cool completely on the counter, and then wrap it up tight and refrigerate it for a minimum of six hours, but honestly, overnight is always even better. That chilling time lets the structure truly set up beautifully.
Tips for the Best Turtle Cheesecake Success
Making a Best Cheesecake Recipe like this one should be fun, not stressful, even with all those decadent layers! I’ve learned a few tricks over the years to make sure your gorgeous creation comes out perfect every single time, keeping that creamy texture intact and the flavors popping. Think of these as the little secrets I pass along to my own grandchildren before they start baking!
- Don’t Skip the Pecan Toasting: Seriously, don’t use raw pecans! They need a little bake time themselves. I spread them on a sheet pan and bake them at 350°F (175°C) for about 5 to 8 minutes. You’ll know they are ready when your whole kitchen smells wonderfully nutty. This step wakes up their flavor so they shine through those sweet layers.
- Caramel Quality Matters: While you can certainly use store-bought caramel if you’re in a major pinch, this is where a little extra effort pays off huge. My homemade caramel sauce recipe is simple and tastes worlds better than the jarred stuff. Plus, you control the saltiness!
- Mind the Brownie Swap: If you are looking to simplify things, you absolutely can skip making that middle brownie layer. It adds amazing fudginess, but if time is tight, just use the chocolate wafer crust and leave the brownie mix out—it’s still a fantastic indulgent sweet treat.
- The Power of the Tools: Make sure that springform pan is wrapped super securely if you use the water bath method. I use two thick layers of heavy-duty foil, pressing it firmly against the base and up the sides. A leak ruins the crust, and we don’t want any watery bottoms on our masterpiece.
- Rest is Best: I know waiting is the hardest part of baking, but you really must let this cheesecake chill for those six hours, or preferably overnight. This isn’t just for safety; it allows the structure to firm up so when you slice it, you get those clean, beautiful layers we saw in the photos!
Variations: Making Your Own Signature Turtle Cheesecake
Now, I absolutely love this baked version—it’s my ultimate comfort flavor profile—but sometimes you need something fast, or maybe you just don’t want to turn the oven on. That’s when we get creative! The beauty of a flavor profile like Turtle is how easily it translates across different dessert formats. Don’t feel pressured to stick to this exact foundation!
If you need a speedy version for a last-minute gathering, you could certainly pivot to a No Bake Turtle Cheesecake. For that, you’d skip the oven entirely! You’d ditch the eggs and adjust the heavy cream measurement, likely bringing in some whipped topping or gelatin to help it set up firm in the fridge instead of baking.
Another fun idea, especially if you want serving to be a breeze, is breaking this down into Mini Cheesecake Bites. You can use a muffin tin lined with baking cups. Just press a small amount of the crust mixture into the bottom of each liner and pipe the filling right on top. They cook quicker, too! If you’re looking for creative crust ideas in general, I have a fascinating recipe using sugar cookie dough instead of chocolate wafers in this post.
And remember what I mentioned in the tips? If the brownie layer feels like too much effort for your weeknight, you can always simplify the base completely. Just omit the brownie mix in step one and use only the chocolate wafer crumb mixture for your crust. It’s less decadent, perhaps, but still yields a wonderfully rich slice of indulgent sweet treat!
Serving Suggestions for Your Chocolate Caramel Pecan Dessert
Goodness, I love standing back after making this gorgeous Chocolate Caramel Pecan Dessert and realizing I get to eat it! It’s so rich and loaded with flavor that you really don’t need much alongside it, but sometimes a little something extra just makes the experience perfect for guests. Since this turtle cheesecake stands so strongly on its own, we want accompaniments that just complement it, not compete with it.
Here are a few of my go-to ways to serve it when company is over:
- A Tiny Dollop of Whipped Cream: Keep it light! A small, unsweetened cloud of fresh whipped cream on the side of the slice cuts through the richness of the caramel and chocolate just beautifully. It resets your palate between bites.
- A Glass of Milk or Coffee: Honestly, sometimes the best pairing is just a tall, cold glass of milk. It’s nostalgic and takes you right back to childhood comfort. If it’s an adult dinner party, a strong, hot cup of coffee is a necessary anchor against this level of sweetness.
- Simple Fresh Raspberries: If you want a pop of color and needed acidity, stick to tart, fresh berries. A few raspberries scattered on the plate provide that bright contrast that really makes the chocolate flavor pop. Please skip the sugary sauces; we have enough going on here!
- A Side of Chocolate Sauce: If you want to lean into the decadence even further—and who am I to stop you?—a small drizzle of really dark, slightly bitter chocolate sauce on the plate is gorgeous. I actually have a recipe for a basic, non-too-sweet chocolate sauce that works wonderfully here if you want to whip up something extra special.

Storage and Reheating Instructions for Turtle Cheesecake
Now that you’ve put all that wonderful effort into making this gorgeous turtle cheesecake, we need to make sure it stays perfect for leftovers! Cheesecake, especially one loaded with caramel and pecans, is best when kept cool and undisturbed. The good news is that chilling actually helps this dessert firm up even more, perfecting those layers you worked so hard to create.
For simple storage, you need to keep this covered tightly. Air is the enemy here, as it can dry out the edges or pick up any funny smells from the fridge. I take a large piece of plastic wrap and carefully lay it directly over the surface of the cheesecake before loosely covering the whole pan with foil. This double layer helps maintain moisture!
- Refrigeration is Key: Keep the cheesecake chilled in the refrigerator for up to four days. Truly, it often tastes even better on day two once all those flavors have really settled into each other! Make sure you take it out about 20 minutes before you plan to slice and serve so it softens just slightly at the edges.
- Freezing Caution: While some folks freeze cheesecake, I generally advise against it for this specific recipe. The swirls of caramel and the creamy filling don’t always freeze and thaw perfectly—you often end up with a slightly gritty texture once thawed, and those beautiful pecans can get soggy. It’s best to enjoy it within four days.
- Regarding Reheating: Honey, this is a cold dessert! Cheesecake should never be reheated. If you try warming up a slice, you’ll just end up with melted cream cheese goo, and that completely ruins the dense, creamy structure we aimed for. Stick to letting cold slices sit out for about 15 minutes before eating.
Frequently Asked Questions About Turtle Cheesecake
I know you’re going to absolutely love making this dessert, but sometimes questions pop up once you start gathering those ingredients. That’s perfectly normal when tackling a big, layered bake like a Decadent Cheesecake! Don’t worry, I’ve gathered the most common things folks ask me about this turtle cheesecake to help you feel confident heading into the kitchen. If you have any questions about the basic steps for a simple cheesecake, check out my guide to an easy cheesecake here.
Can I skip the brownie layer and just use a cookie crust for my turtle cheesecake?
You absolutely can! That brownie bottom is my favorite way to make this a true showstopper dessert; it adds such a wonderful, fudgy texture underneath the creaminess. However, if you’re short on time or just prefer a lighter base, you can certainly skip step one entirely and just use the chocolate wafer crumb mixture pressed into the pan. It still qualifies as a delicious indulgent sweet treat, just lighter on the chocolate front!
What is the secret to achieving a perfectly creamy cheesecake filling?
Ah, the quest for that smooth, lump-free texture! The single biggest thing you can do is ensure your cream cheese and eggs are at true room temperature. I mean it—let them sit out for at least an hour before you start. When beating the cream cheese, mix it until it’s visibly silky before you even think about adding sugar. Most importantly, when you add the eggs, mix them in one at a time and stop mixing the second the yolk disappears into the batter. Over-mixing eggs introduces too much air, which leads to spreading and then cracking when it cools. We want smooth, not airy!
How do I prevent my baked turtle cheesecake from cracking?
This is the eternal fear of every baker, isn’t it? For this recipe, there are two critical fail-safes we use to make sure you get that picture-perfect top for your Chocolate Caramel Pecan Dessert. First is the water bath, or *bain-marie*. It creates steam around the pan, keeping the baking temperature gentle and even throughout. Make sure that foil wrapping is *super* secure so no water seeps in! Second is the slow cool-down. Once the baking time is up, we turn the oven off, crack the door, and let the cake rest inside for a full hour. That slow transition from baking heat to room temperature is what locks in that smooth surface. Don’t skip either of those steps if you want the best cheesecake recipe finish!
Sharing Your Homemade Turtle Cheesecake Experience
Oh, I truly hope you enjoyed the process of building this incredible turtle cheesecake layer by layer! From that fudgy brownie base to those salty pecan crunches, making something this rich and decadent is just a joy, isn’t it? In my kitchen, sharing food means sharing a piece of my heart, and I dearly hope this recipe has found a warm welcome at your family table too.
Now that you’ve had a chance to let it chill—the hardest part, I know!—I would just love to hear all about it. Baking is a conversation, and I learn so much from seeing how you all take my tried-and-true recipes and make them your own.
Please, when you have a moment, come back and drop me a note in the comments below. Tell me how it came out! Did you stick closely to my instructions, or did you tweak the caramel ratio? Did your family devour it as fast as mine does?
If you took a picture of that beautiful slice—especially showcasing those swirls and the pecan topping—I would be honored if you shared it! Tag me on social media so I can see your work, or just let me know here in the comments how the kids reacted to this showstopper dessert. For any other baking questions or recipe requests, you can always reach out to me directly on my contact page.
Thank you for letting me share this special chocolate caramel pecan dessert with you today. Happy baking, dear friends!
Estimated Nutritional Information for This Indulgent Sweet Treat
This turtle cheesecake is certainly one of the most indulgent sweet treats you can bake—it’s rich, complex, and loaded with flavor combinations that truly satisfy a sweet craving! Because it has so many components—the brownie, the crust, the cream cheese, and all that caramel—the nutritional values are estimates. Please remember that as Carla, I always tell folks that what you use matters!
If you use store-bought caramel versus my homemade version, or if your portion sizes are generous (and I won’t judge if they are!), these numbers will shift a bit. Think of this data as a helpful ballpark guide for when you’re planning your special occasion menu.
Here are the approximate nutritional details for one generous slice of this Chocolate Caramel Pecan Dessert:
- Serving Size: 1 slice
- Calories: 550
- Sugar: 45g
- Sodium: 350mg
- Fat: 35g
- Saturated Fat: 18g
- Unsaturated Fat: 17g
- Trans Fat: 0.5g
- Carbohydrates: 55g
- Fiber: 2g
- Protein: 10g
- Cholesterol: 110mg
Take a look at the whole breakdown—we know this is a treat meant for celebrations, not everyday eating! The good news is that every single one of those 550 calories is delivering on that incredible, comforting flavor that makes this Decadent Cheesecake so worth it. Enjoy every bite, dear friend!
PrintDecadent Baked Turtle Cheesecake with Caramel-Brownie Crust
Make this show-stopping Turtle Cheesecake featuring a rich, fudgy brownie bottom, creamy cheesecake filling, homemade caramel swirls, and toasted pecans. This recipe delivers a gourmet dessert perfect for special occasions.
- Prep Time: 30 min
- Cook Time: 75 min
- Total Time: 105 min
- Yield: 12 servings 1x
- Category: Dessert
- Method: Baking
- Cuisine: American
- Diet: Vegetarian
Ingredients
- 1 1/2 cups chocolate wafer crumbs
- 1/2 cup unsalted butter, melted
- 1/4 cup granulated sugar
- 1 box (18.3 ounces) fudge brownie mix (prepared according to package directions for a fudgy texture)
- 3 (8 ounce) packages cream cheese, softened
- 1 1/2 cups granulated sugar
- 1 teaspoon vanilla extract
- 1/4 teaspoon salt
- 4 large eggs
- 1 cup heavy cream
- 1 cup homemade caramel sauce, divided
- 1 cup chopped pecans, toasted
- 1/2 cup semi-sweet chocolate chips
Instructions
- Prepare the brownie layer: Preheat your oven to 350°F (175°C). Prepare the brownie mix according to package directions for a fudgy result. Pour the batter into a 9-inch springform pan lined with parchment paper on the bottom. Bake according to package directions for a slightly underdone center, about 20-25 minutes. Let cool completely.
- Make the crust: In a small bowl, combine the chocolate wafer crumbs and 1/4 cup sugar. Pour the melted butter over the crumb mixture and mix until evenly moistened. Press this mixture firmly over the cooled brownie layer. Place the pan in the freezer while you prepare the filling.
- Prepare the cheesecake filling: Reduce the oven temperature to 325°F (160°C). In a large bowl, beat the softened cream cheese, 1 1/2 cups sugar, vanilla extract, and salt until smooth. Beat in the eggs one at a time, mixing just until combined after each addition. Gently stir in the heavy cream.
- Assemble and bake: Pour half of the cheesecake filling over the crust. Drizzle half of the caramel sauce (1/2 cup) over the filling. Gently pour the remaining cheesecake filling on top. Swirl the remaining caramel sauce into the top layer using a knife.
- Create a water bath: Wrap the outside bottom of the springform pan tightly with heavy-duty aluminum foil. Place the wrapped pan into a larger roasting pan. Carefully pour hot water into the roasting pan until the water reaches halfway up the sides of the springform pan.
- Bake the cheesecake for 60 to 75 minutes, or until the edges are set but the center still has a slight jiggle.
- Cool the cheesecake: Turn off the oven, crack the door open slightly, and let the cheesecake cool inside the oven for 1 hour. Remove the cheesecake from the water bath and let it cool completely on a wire rack.
- Chill: Once cool, cover the cheesecake loosely and refrigerate for at least 6 hours, or preferably overnight.
- Finish and serve: Before serving, sprinkle the toasted pecans and chocolate chips over the top. Drizzle with the remaining 1/2 cup of caramel sauce. Carefully release the springform side and slice to serve this rich dessert.
Notes
- To toast pecans, spread them on a baking sheet and bake at 350°F (175°C) for 5-8 minutes, watching closely to prevent burning.
- For a truly show-stopping dessert, use a high-quality homemade caramel sauce.
- If you prefer a simpler crust, skip the brownie layer and use only the chocolate wafer crumb crust.
Nutrition
- Serving Size: 1 slice
- Calories: 550
- Sugar: 45g
- Sodium: 350mg
- Fat: 35g
- Saturated Fat: 18g
- Unsaturated Fat: 17g
- Trans Fat: 0.5g
- Carbohydrates: 55g
- Fiber: 2g
- Protein: 10g
- Cholesterol: 110mg