
Oh, the party food dilemma! You need something that feeds a hungry crowd, disappears almost instantly, and still looks festive sitting out on the table. That’s where my foolproof **seven layer dip** recipe comes in. Honestly, setting up layers might sound tricky, but trust me, it’s simpler than making cookies.
This isn’t some fancy, complicated appetizer. It’s the classic, reliable Tex-Mex spread that everyone craves. Because I spent thirty years teaching kids how to follow steps clearly, I’ve broken down assembly so you can’t mess it up. This dependable recipe guarantees your **seven layer dip** will be the first thing gone at any gathering, tasting just like home!
- Why This Seven Layer Dip is the Ultimate Party Layered Dip
- Assembling Your Perfect Seven Layer Dip Ingredients
- Step-by-Step Guide: How to Make Seven Layer Dip
- Expert Tips for the Best 7-Layer Dip Presentation
- Making Ahead and Storing Your Seven Layer Dip
- Serving Suggestions for This Tex-Mex Appetizer
- Frequently Asked Questions About the Seven Layer Dip
- Estimated Nutritional Snapshot of This Seven Layer Dip
- Share Your Seven Layer Dip Success
Why This Seven Layer Dip is the Ultimate Party Layered Dip
You want a dip that works hard so you don’t have to, right? This **seven layer dip** is absolutely my go-to for game days, holidays, or just when unexpected company drops by. It’s dependable, colorful, and just screams fun Tex-Mex appetizer!
- It’s packed with texture—creamy beans, cool sour cream, and crunchy tomatoes.
- It holds up well, even after sitting out next to the chips for a while.
- Almost no actual cooking is involved, which is the best part!
Quick Prep for the Easy Seven Layer Dip
You really can’t beat the timing on this. We’re looking at about twenty minutes total assembly time, and zero minutes of actual oven time. If you need an **easy seven layer dip**—one that comes together while the chips are warming—this is your winner. No complex stove-top cooking required!
Visual Appeal of the Best 7-Layer Dip
Guests eat with their eyes first, especially with layered dishes! I always tell people to borrow or buy a clear, shallow serving dish. Seeing those distinct, colorful stripes of beans, sour cream, and salsa makes this the **best 7-layer dip** on the table. It just looks inviting and special.
Assembling Your Perfect Seven Layer Dip Ingredients
Getting the ingredients ready is half the battle for this **seven layer dip**. Remember what I learned from my parents—good food starts with good planning! While I have lots of dependable recipes up on the site, like those I shared when I was teaching, the success of a layered dip really comes down to how you prep these simple components. Don’t skimp on quality here; it makes a difference!
I always make sure to have my ingredients measured out near the serving dish before I start layering. You can take a look at my general approach to reliable home cooking on my About Page, but for this dip, precision matters!
Layer Components: Beans, Guacamole, and Seasoned Cream
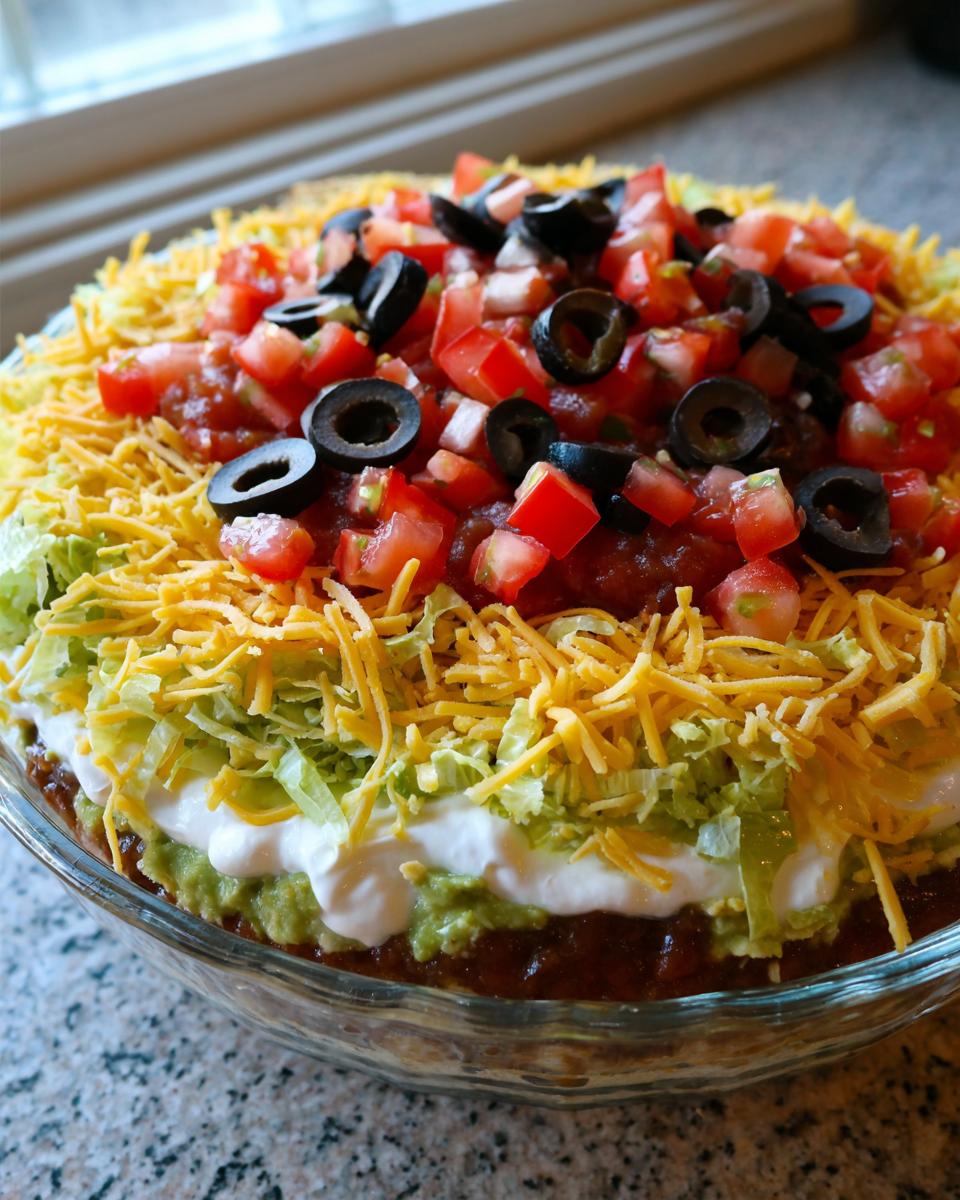
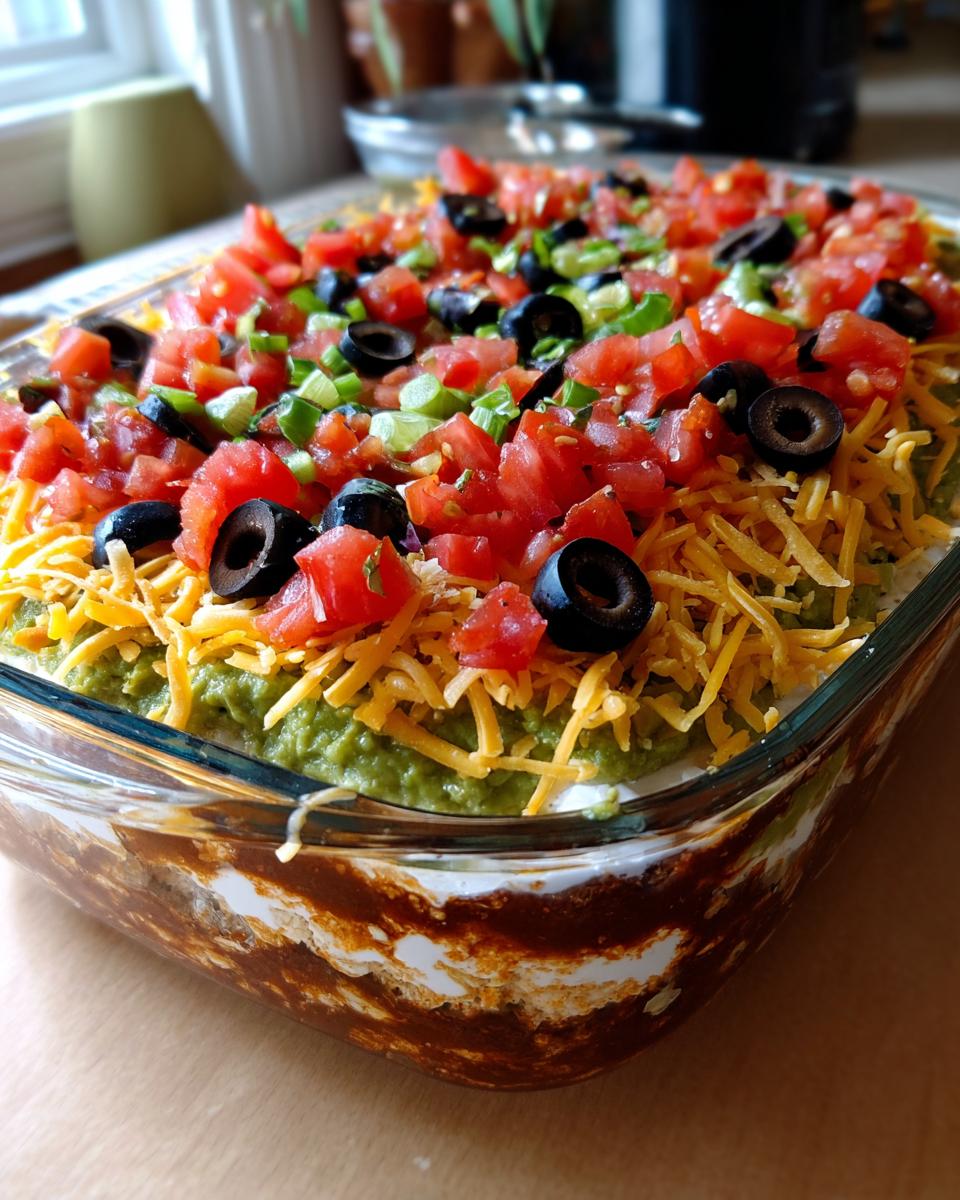
First up, we need the base and the flavor punch. You’ll use the whole can of refried beans spread across the bottom—that’s our sturdy foundation. Next, get your 1 cup of prepared guacamole ready. My big tip for layer three is mixing 1 cup of sour cream with the entire packet of taco seasoning right in a small bowl first. It gives that creamy layer so much more flavor than just plain sour cream!
Toppings for the Seven Layer Dip: Salsa, Cheese, and Olives
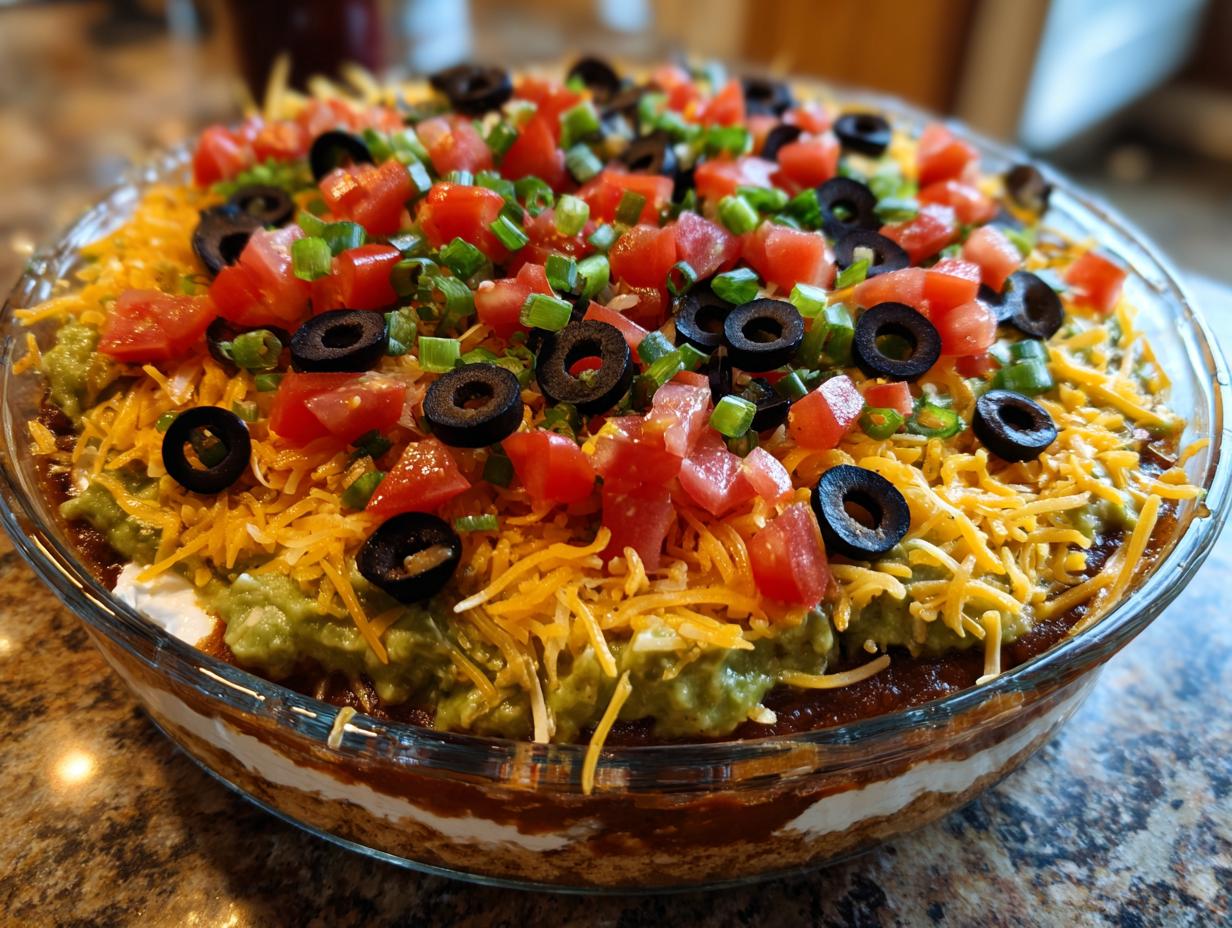
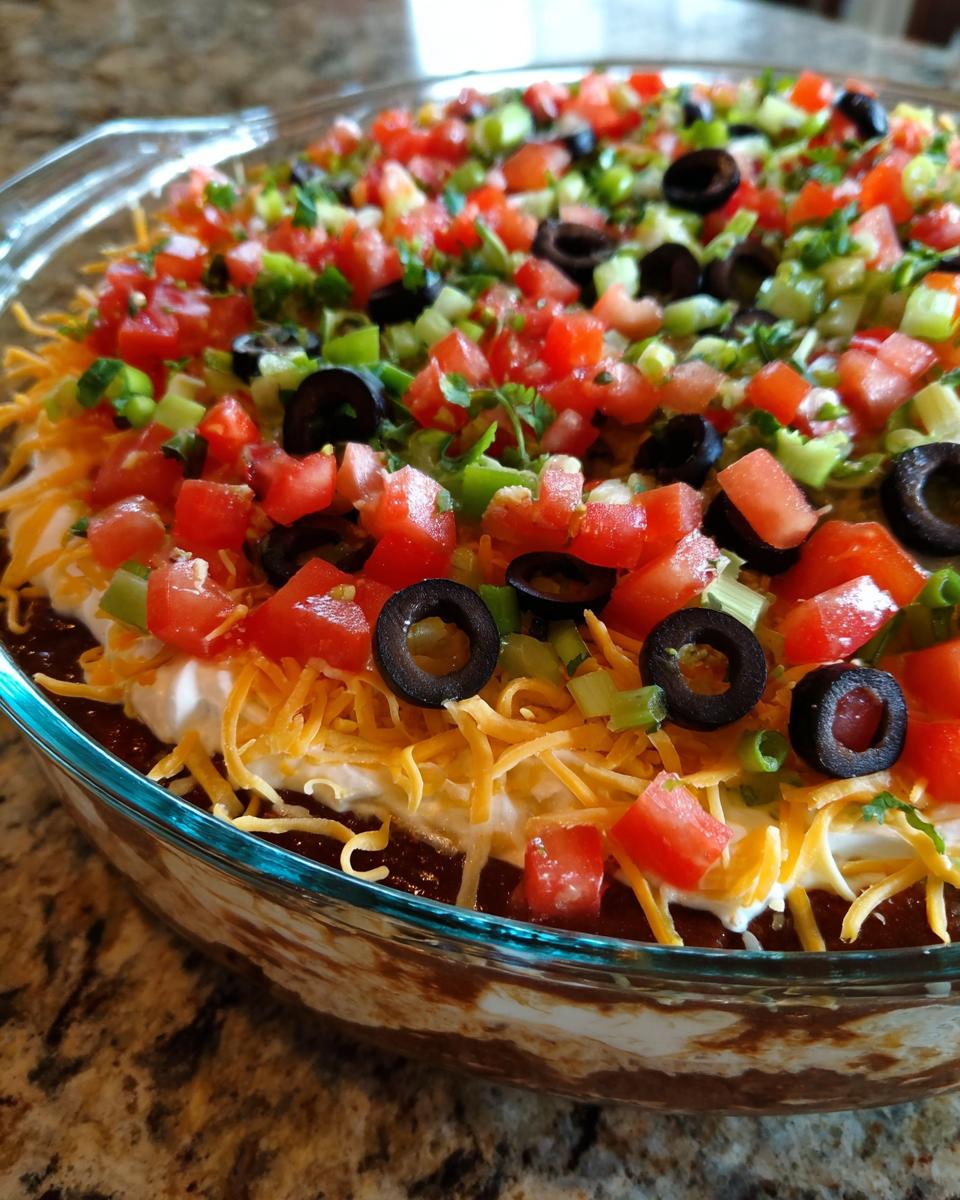
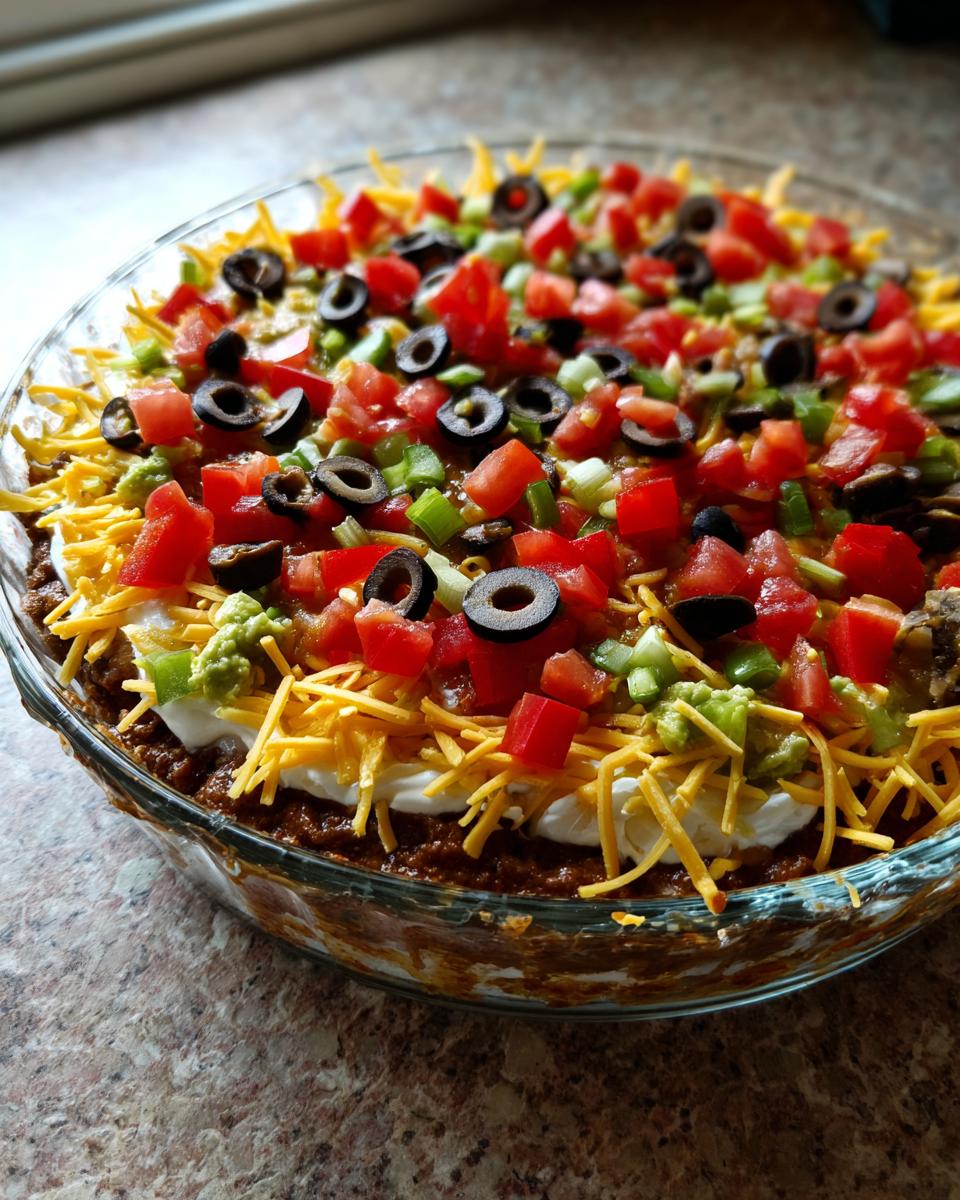
For the top half, make sure that 1 cup of salsa is drained really, really well—I mean it! Excess liquid turns this into soup instead of a structured **party layered dip**. After the salsa, you’ll sprinkle on 1 cup of shredded cheese, then your diced tomato, and finally crown the whole thing with those sliced, drained black olives. That finishes the seven!
Step-by-Step Guide: How to Make Seven Layer Dip
Now that everything is prepped, let’s build this thing! Since I spent a chunk of my life teaching kids how to follow instructions clearly, I promise this step-by-step breakdown for **how to make seven layer dip** is foolproof. Take your time with the spreading so those layers stay distinct. This is where the magic happens!
Preparing the Base Layers for Your Seven Layer Dip
We already mixed that taco seasoning into the sour cream—do that first! Now grab your clear dish. Spread all of your refried beans evenly across the very bottom. That’s layer one, nice and thick. Next, gently spread that guacamole right over the beans. Don’t press too hard here; we don’t want the beans pushing up into the green layer!
Building the Middle Layers of the Tex-Mex Appetizer
Layer three is that beautiful seasoned sour cream—spread it out carefully across the guacamole. For layer four, spoon your *well-drained* salsa on top. Try to keep the salsa centered so it doesn’t run over the edges onto the cream layer. Then, sprinkle your shredded cheese evenly over the salsa. That’s five layers down, and we aren’t using any heat at all!
Finishing the Top Layers of the Party Layered Dip
We’re almost there! Distribute your diced tomatoes for layer six. They add such a fresh pop of color. Finally, top everything with the sliced black olives. These are layer seven. Once you’re happy with how it looks, cover the whole dish tightly. Honestly, covering it and letting it chill for at least an hour is crucial. This lets those structural layers firm up so you get that perfect scoop every time from your finished **seven layer dip**.
Expert Tips for the Best 7-Layer Dip Presentation
Look, anyone can slap seven things in a dish, but when Carla makes this, it looks like it came straight from a magazine, even though it’s simple home cooking. Because this **seven layer dip** is meant to sit out while everyone is chatting and snacking, we need to make sure it stays pretty and doesn’t turn into a soupy mess halfway through the party. These little checks are what separate a good dip from the best 7-layer dip!
Preventing Guacamole Browning in Your Seven Layer Dip
This is the secret weapon, seriously. Guacamole browns faster than anything else! You’ve got your beans down, you just spread that gorgeous green layer, and before you put the seasoned sour cream on? Stop! Take a piece of plastic wrap—the cheap stuff works fine—and press it *directly* onto the surface of the guacamole layer. I mean really push it down so there’s no air trapped underneath. That air is what makes it turn that nasty brownish-green, and we don’t want that in our beautiful **seven layer dip**!
Managing Moisture for a Solid Party Layered Dip
Water is the enemy here. I mentioned draining the salsa, but I can’t stress that enough. If your salsa is watery, it will seep down into that sour cream layer and ruin the definition we worked so hard to create. If your diced tomatoes look shiny with extra juice, just take a paper towel and gently pat them dry before sprinkling them on top of the cheese. Keeping things relatively dry is how you ensure every scoop pulls up that beautiful, distinct row of layers.
Making Ahead and Storing Your Seven Layer Dip
One of the best things about this **easy seven layer dip** is that you absolutely can—and maybe should—make it ahead of time! Giving those layers time to chill and set up is really helpful for serving later. I find that if I assemble it the night before, the flavors meld together wonderfully, and everything stays nice and firm.
You need to store it covered tightly in the refrigerator. It stays great for usually up to two days. Now, that guacamole layer is the only worry, if you didn’t use the plastic wrap trick perfectly, right? But generally, this dip is fine sitting in the fridge overnight.
Since this is an assembled dip with dairy, you absolutely do not reheat it. We want it perfectly cold on a hot summer day or pulled straight from the fridge for a cozy evening. Just pull it out about 15 minutes before you plan to serve so it’s not *ice* cold.
Serving Suggestions for This Tex-Mex Appetizer
You have built the perfect **seven layer dip**—now you need the right vehicle to get it from the dish to your mouth! Naturally, tortilla chips are the number one choice around here. Grab the sturdy ones because you need a chip that can handle digging all the way down to the bean layer without snapping off.
But don’t limit yourself! If you’re watching the carbs or just want some variety for your guests, sturdy vegetable sticks are wonderful. Think crisp bell pepper strips, carrot sticks, or even some romaine lettuce cups if you want something lighter. Whatever you choose, know that this amazing **party layered dip** will be the star!
Frequently Asked Questions About the Seven Layer Dip
It’s funny how many small questions pop up once you get into the assembly phase! I want to make sure your **party layered dip** turns out exactly right for your big day. Over the years, I’ve collected the most common concerns home cooks have when they decide to tackle this classic appetizer. I love sharing what I’ve learned so you have absolute confidence in the final result.
Can I substitute ingredients in this easy seven layer dip?
Of course! Home cooking is about making things work for your family. You can definitely use black beans instead of refried—just mash them up really well so they spread nicely. As for cheese, if you aren’t sold on cheddar, a Monterey Jack or a pre-shredded Mexican blend works perfectly fine. Just watch out for watery ingredients!
What is the best dish size for this seven layer dip?
I really recommend using a shallow, rectangular dish, like a 9×13 inch pan, just like I used in the instructions. Why shallow? Because we want to see all seven layers! If your dish is too deep, the chips just won’t be able to scoop properly down to the bottom layer without breaking everything up immediately. Shallow shows off the layers!
How long can the best 7-layer dip sit out at a party?
This is important, especially since this **easy seven layer dip** has layers of dairy like sour cream. For food safety, you really shouldn’t have any dip with dairy or mayonnaise products sitting out at room temperature for more than two hours total. If your party is going long, keep the dip covered and chilled until people are ready to start grazing. I try to be transparent in all my guidelines, and you can see more about how I approach recipe clarity in my safety guidelines found on my Policy Page.
Estimated Nutritional Snapshot of This Seven Layer Dip
Because I believe in being fully transparent about the food we share, I wanted to give you a snapshot of what’s in this incredible **seven layer dip**. Now, remember, because this is home cooking, these numbers are estimates based on standard ingredient measures, and they don’t change the fact that this is the best comfort food!
- Serving Size: 1/10 of dip
- Calories: About 180
- Fat: Roughly 12 grams
- Protein: Around 7 grams
- Carbohydrates: About 12 grams
- Sodium: Near 450 milligrams
Share Your Seven Layer Dip Success
Well, that’s it! You’ve mastered **how to make seven layer dip**, and I just know it’s going to steal the show at your next get-together. I poured all my best teaching tricks into those assembly steps to make sure you have the prettiest, most flavorful dip possible.
Now, my favorite part starts! I absolutely love hearing how my straightforward recipes work for you in your own kitchens. Did the layers hold up perfectly? Did the chips survive the trip to the bottom bean layer? Don’t be shy!
Please take a moment and leave a star rating below. Even better, drop a comment telling me what you thought after your guests dove in. If you snapped a picture of your gorgeous **seven layer dip**, I’d be thrilled if you shared it with me! You can always reach out if you have lingering questions via my Contact Page. Happy snacking!
PrintClassic Seven Layer Dip

Make this easy seven layer dip for your next gathering. This Tex-Mex appetizer layers refried beans, guacamole, sour cream, salsa, cheese, tomatoes, and olives for a crowd-pleasing dish.
- Prep Time: 20 min
- Cook Time: 0 min
- Total Time: 20 min
- Yield: 10 servings 1x
- Category: Appetizer
- Method: Assembly
- Cuisine: Tex-Mex
- Diet: Vegetarian
Ingredients
- 1 (16 ounce) can refried beans
- 1 cup prepared guacamole
- 1 cup sour cream
- 1 packet (1 ounce) taco seasoning mix
- 1 cup salsa, drained well
- 1 cup shredded cheddar or Mexican blend cheese
- 1 large tomato, diced
- 1/2 cup sliced black olives, drained
Instructions
- In a small bowl, mix the sour cream and taco seasoning until combined. This is your seasoned sour cream layer.
- Select a clear, shallow serving dish, about 9×13 inches, to show the layers.
- Spread the refried beans evenly over the bottom of the dish. This is layer one.
- Gently spread the guacamole over the beans. This is layer two.
- Spread the seasoned sour cream mixture evenly over the guacamole. This is layer three.
- Spoon the drained salsa over the sour cream layer. This is layer four.
- Sprinkle the shredded cheese evenly over the salsa. This is layer five.
- Distribute the diced tomato over the cheese layer. This is layer six.
- Top with the sliced black olives. This is layer seven.
- Cover the dip and chill in the refrigerator for at least one hour before serving to allow the layers to set.
Notes
- To keep the guacamole from browning, press plastic wrap directly onto the surface of the guacamole before adding the next layer.
- Drain your salsa thoroughly; excess liquid will make the dip watery.
- Serve this party layered dip with tortilla chips or vegetable sticks.
Nutrition
- Serving Size: 1/10 of dip
- Calories: 180
- Sugar: 4
- Sodium: 450
- Fat: 12
- Saturated Fat: 5
- Unsaturated Fat: 7
- Trans Fat: 0
- Carbohydrates: 12
- Fiber: 3
- Protein: 7
- Cholesterol: 25