
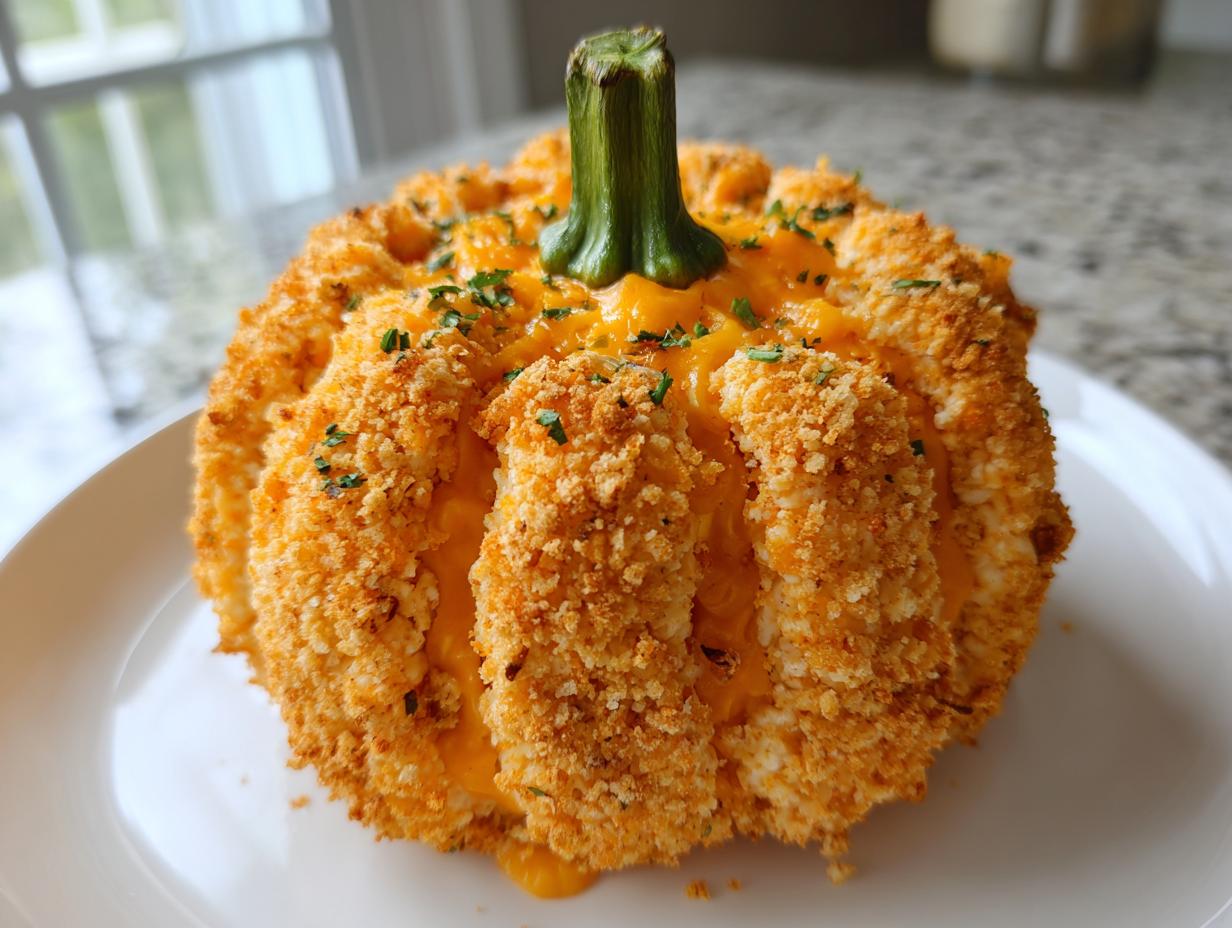
Oh, those beautiful, busy fall gatherings! Whether you’re hosting a big crowd for Thanksgiving or just having friends over for a cozy Halloween movie night, you need snacks that look festive without demanding your whole afternoon. That’s where my treasured easy appetizers come in, and nothing gets more compliments than this pumpkin cheese ball.
I’ve spent thirty years teaching kids how to follow instructions clearly, and that patience translates right into the kitchen. I promise you, this recipe is dependable. It turns simple cream cheese and sharp cheddar into the most adorable, edible centerpiece you’ve ever set out. It’s the perfect, visually appealing, and incredibly simple Fall Appetizer Recipe. You get that ‘wow’ factor with almost no real cooking time!
- Why This Easy Make-Ahead Pumpkin Cheese Ball Recipe Works for Autumn Entertaining Ideas
- Gathering the Ingredients for Your Pumpkin Cheese Ball
- Step-by-Step Instructions for the Perfect Pumpkin Cheese Ball
- Making Your Pumpkin Cheese Ball Ahead of Time: Tips for Make Ahead Appetizers
- Serving Suggestions for This Crowd Pleasing Cheese Dip
- Storage and Reheating Instructions for Your Pumpkin Cheese Ball
- Frequently Asked Questions About the Easy Cheese Ball Recipe
- Estimated Nutritional Snapshot for This Pumpkin Cheese Ball
- Share Your Success with This Simple Holiday Appetizer
Why This Easy Make-Ahead Pumpkin Cheese Ball Recipe Works for Autumn Entertaining Ideas
When the fall schedule gets packed, I lean hard on recipes that save me stress, and this is definitely one of them. Because this is a total no bake party food, the active time is a breeze—maybe fifteen minutes tops! The best part, truly, is that you can get this ready in the morning, or even the day before, making it perfect for those busy days leading up to a big dinner. It’s a fantastic option when you need reliable, impressive make ahead appetizers.
For my family, this has become our go-to starter when we’re carving pumpkins or setting up the Thanksgiving table. It just feels right.
The Appeal of a Savory Pumpkin Snacks Centerpiece
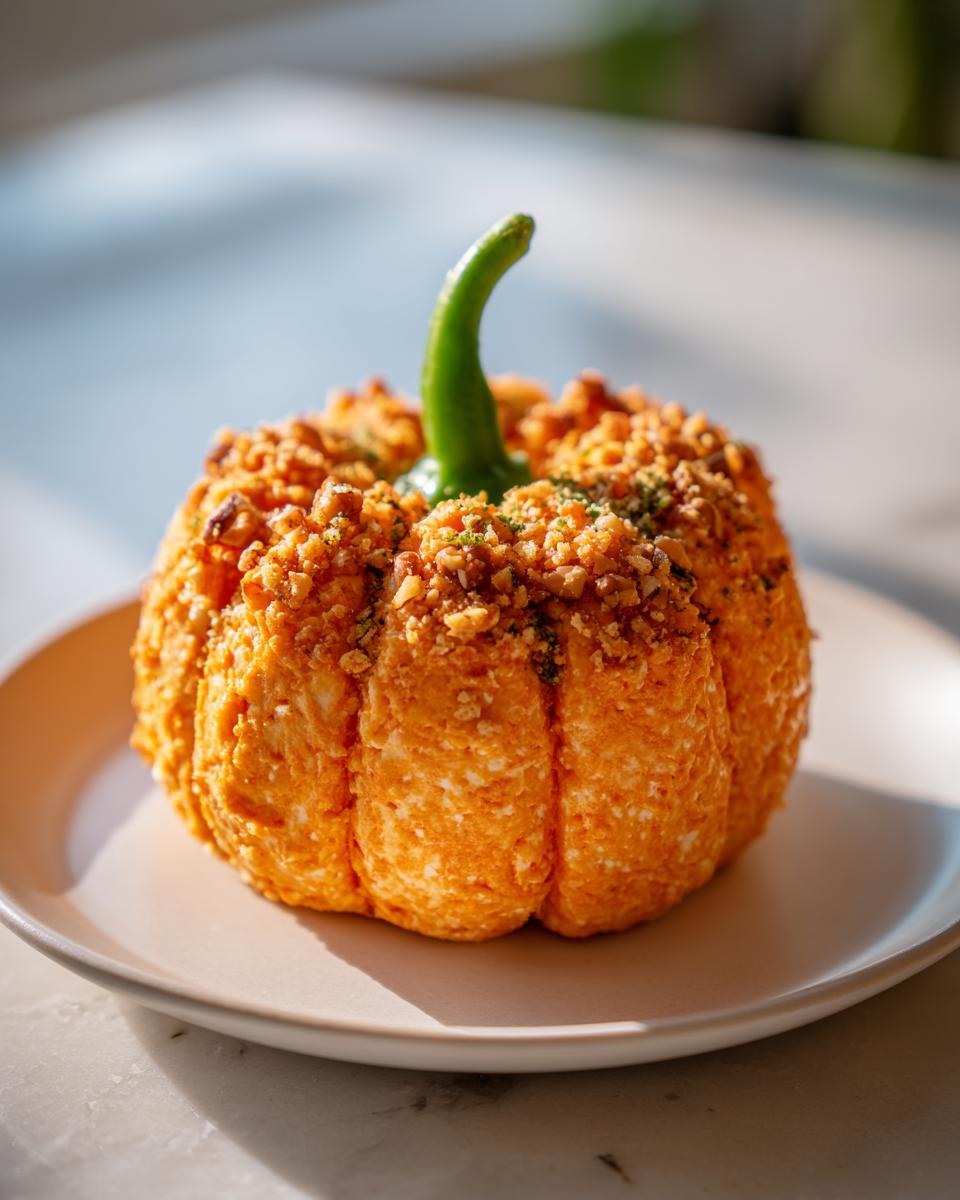
Let’s be honest, most cheese balls are just a tasty mound on a platter. This one, though? It’s pure presentation magic! Shaping it like a pumpkin with that little bell pepper stem instantly elevates it. It stops being just a dip and becomes a beautiful piece of your décor. Whether you call it a Thanksgiving Cheese Ball or the star of your Halloween Party Snacks lineup, that Pumpkin Shaped Food is what everyone remembers.
Gathering the Ingredients for Your Pumpkin Cheese Ball
When you are teaching people how to make something reliable, the ingredient list has to be straightforward—no surprises! For this Cheddar Cheese Ball, we are keeping it minimal but flavorful. Make sure your cream cheese is truly softened; that’s key to getting a smooth base. And please, take note of the cheese: we need sharp cheddar, and it needs to be finely shredded. Pre-shredded stuff often has additives that keep it from blending right, so using a good quality block of cheese makes all the difference here.
- Two 8 ounce blocks cream cheese, softened
- 3 cups sharp cheddar cheese, finely shredded, divided
- 1/2 cup green onion, chopped
- 1 teaspoon ranch seasoning mix
- 1/4 teaspoon garlic powder
- 1/4 teaspoon onion powder
- 1/4 teaspoon smoked paprika
- Pinch of salt
- Pinch of black pepper
- Twine or kitchen string
- 1 small green bell pepper (for the stem)
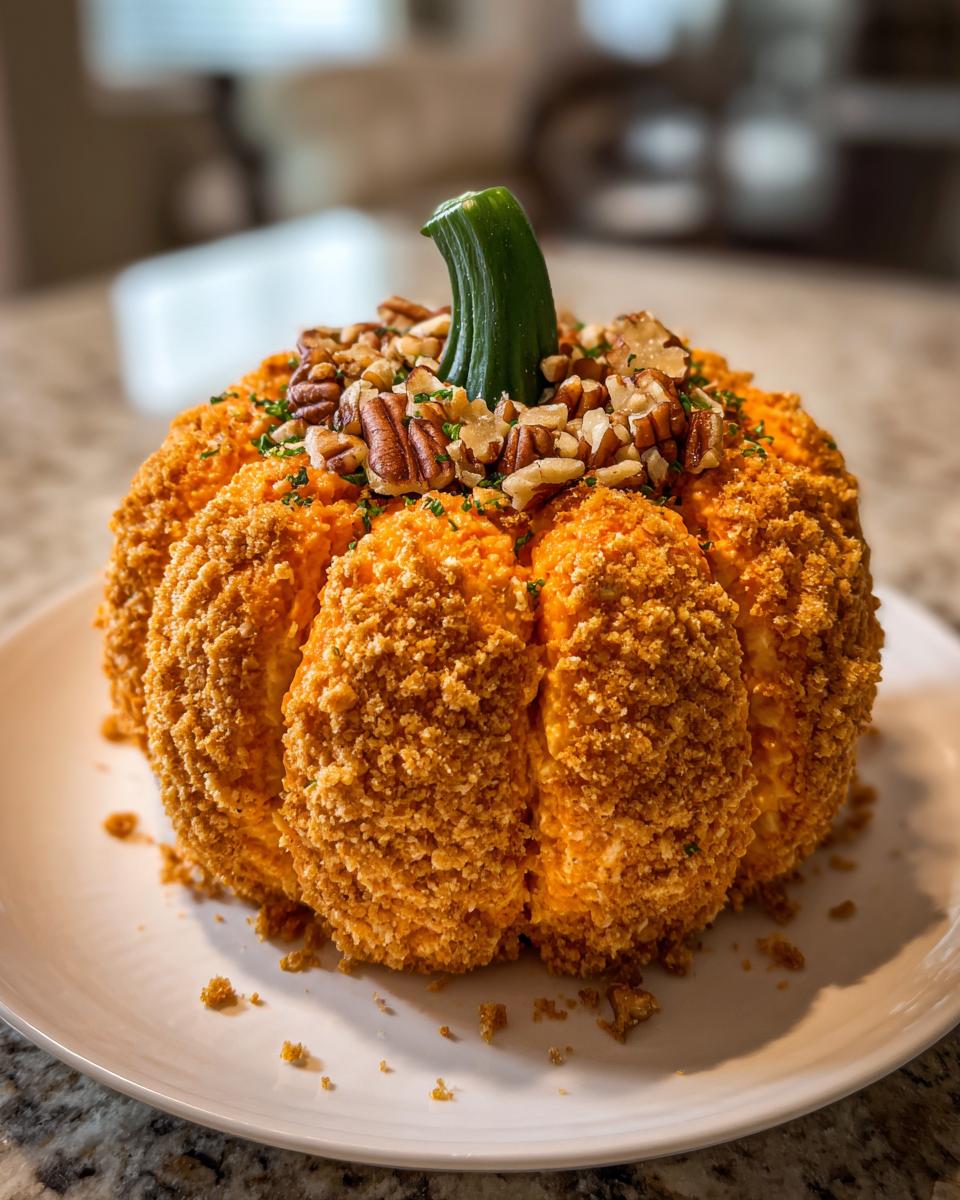
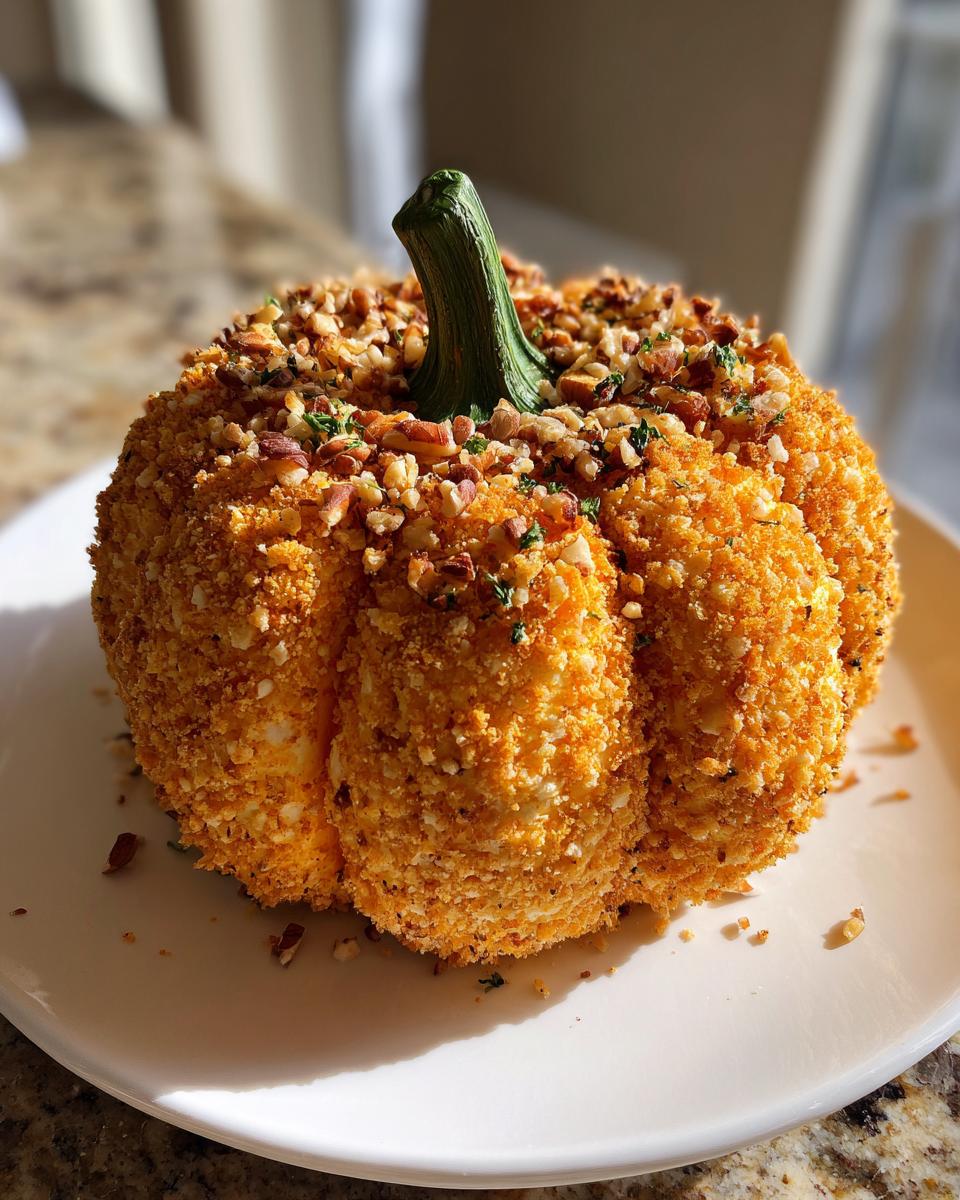
- Optional Coating: Chopped pecans, extra shredded cheese, or paprika
Ingredient Notes and Substitution Tips for Your Cheddar Cheese Ball
The flavor really hinges on that sharp cheddar. If you want a truly amazing taste, don’t swap it out for mild cheddar; the sharpness cuts through the richness of the cream cheese beautifully. Remember, we aren’t adding any actual pumpkin flavor here—the shape is just for fun! If you absolutely cannot find a green bell pepper for the stem, don’t fret. You can easily trim a small piece of carrot or even use a dried stem from a mushroom cap if you prefer. The goal is just to give it that little bit of contrasting green color at the top.
Step-by-Step Instructions for the Perfect Pumpkin Cheese Ball
Now for the fun part! Remember, clear instructions were always my specialty as a teacher, and these steps for our pumpkin cheese ball are no-fuss. We’re using a standard method, but the shaping is what makes this special. First, make sure everything is mixed until it is absolutely, gloriously uniform. No streaks of plain cream cheese should remain in that bowl! If you need more ideas on easy appetizers, I have a whole section dedicated to simple spreads like this one over on my site right here.
You’ll combine the softened cream cheese, half of your shredded cheddar (that’s 1 1/2 cups for the base), all your seasonings—the ranch mix, onion, garlic, and paprika—and those green onions. Mix it until it all looks like one big, beautiful, creamy base. Then, shape it into a nice, tight round ball right there on your plastic wrap.
After shaping, we chill it for at least an hour. This time is really important! It lets the cheese firm up so the twine doesn’t just smoosh the whole thing flat. If you’re heading to a party, chill it up to two days, but keep it wrapped securely.
Once it’s firm, you’ll unwrap it, snip off that twine, and get ready for the final visual trick! For more detailed visuals on how others have tackled this, you can peek at guides like the one over at Savory Orchard.
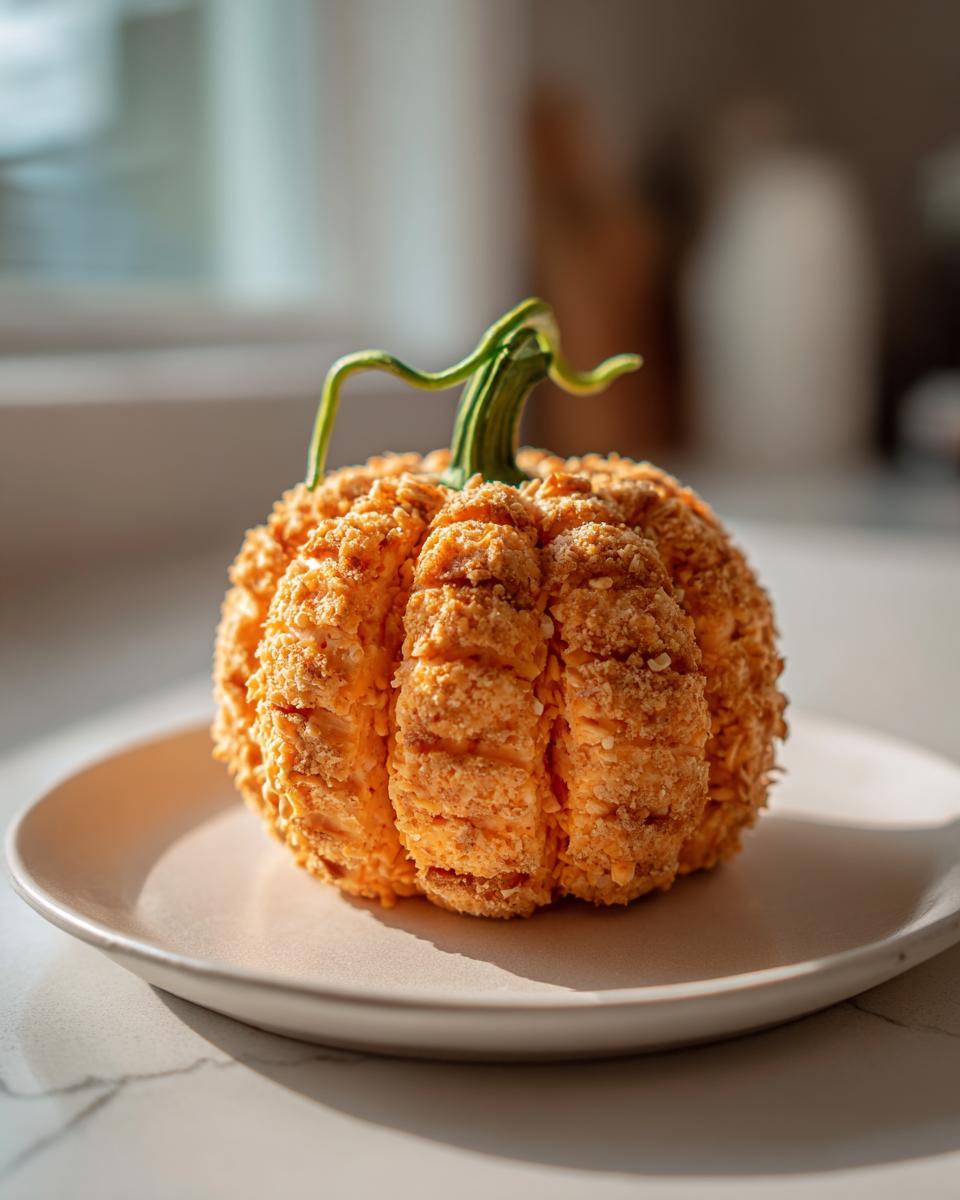
The Twine Trick: Creating the Pumpkin Shape on Your Cheese Ball
This is the actual secret weapon for making this a true Pumpkin Shaped Food. Once your ball is shaped on the plastic wrap, you take your twine—I use four pieces, crisscrossing them to make halves and quarters. You gently wrap these pieces around the ball, creating those deep valleys that make it look like a real pumpkin. Now, here’s what I stress: don’t tie the twine so tightly that you can’t gently pull it off later! The cheese needs just a little room to breathe and set firm around those tensions. If you over-tighten, you’ll have a mess when you pull the strings off later.
Coating Options for Your Festive Cream Cheese Dip
After the chilling and cutting away the twine, it’s time to dress up our star. You need to set out a shallow dish with whatever coating you picked. I often use the extra cheddar for a nice finish, but chopped pecans add a wonderful crunch! You simply roll the cheese ball gently over the coating until every inch is covered for a truly professional look on this Festive Cream Cheese Dip. Don’t press too hard, or you’ll squash those lovely pumpkin ribs you just made. Just a nice, even coating!
Making Your Pumpkin Cheese Ball Ahead of Time: Tips for Make Ahead Appetizers
One of the best things about any no bake party food like this is how much time it saves on party day! You can fully prepare this lovely centerpiece right up to the point where you cut off the twine. I find that making it a day ahead is ideal because it gives the flavors time to truly meld together. You can safely wrap this up tightly in plastic wrap—just like in the instructions—and keep it tucked away in the fridge for up to two full days. When you’re ready to serve your guests at your next gathering, pull it out, snip that twine, add your final coat, and pop that bell pepper stem in. It makes those busy autumn entertaining ideas feel so much calmer! Many folks find success preparing this showstopper in advance; you can see great tips on making stress-free make ahead appetizers like this over at Viral Cooking.
Serving Suggestions for This Crowd Pleasing Cheese Dip
A great dip deserves great dippers, and planning what to serve alongside your pumpkin cheese ball is just as important as making the dip itself! Since this spread is rich and savory—that sharp cheddar combined with the ranch seasoning is just wonderful—you need things to scoop it up that offer a good, sturdy crunch. I find that a variety is always best for my guests, covering everyone’s favorite nibblers.
For the crunch factor, you can’t go wrong with a sturdy pretzel. They hold up wonderfully against the creamy texture. If you are looking for something heartier than a standard cracker, try using rye chips or even bagel chips; they are great for sweeping up every lovely bit of the coating you added.
When I set out my appetizer spread for our autumn entertaining ideas, I always make sure to include some fresh vegetables too. Think crisp carrot sticks, celery, and maybe some slices of colorful bell pepper—it adds a lovely, fresh contrast to the richness. Honestly, the very best pairing in my opinion, which I always make sure to have ready, is my homemade rosemary crackers. I keep the recipe simple over on my easy appetizers page, and they disappear first every single time!
Storage and Reheating Instructions for Your Pumpkin Cheese Ball
Even though this appetizer is usually the first thing to vanish at any party—it’s just too good to stay around!—you might end up with a little bit left over. Since this is a wonderful, no bake party food, storage is pretty simple, but we do need to be mindful of the texture. If you happen to have leftovers, the key is keeping it covered and cold.
Make sure to re-wrap any uneaten portion tightly in plastic wrap. It has to be sealed well so it doesn’t absorb any funny smells from the fridge. Since we are dealing with fresh dairy products like cream cheese and cheddar, this pumpkin cheese ball is best enjoyed within four to five days of making it. Frankly, I’ve never kept one longer than that!
The texture will remain fantastic as long as it stays wrapped up. When you bring it out to serve again, just let it sit on the counter for about ten or maybe fifteen minutes before serving. Bringing that chill off just slightly makes it easier for people to scoop onto their crackers, and it brings back some of that wonderful creaminess we aimed for when we first mixed it all together.
Frequently Asked Questions About the Easy Cheese Ball Recipe
Whenever I share a recipe that looks complicated but is secretly simple, folks always have great questions! As your guide here, I want to make sure your experience making this easy cheese ball recipe is perfect for your party planning schedule, whether it’s for a small gathering or a big feast like Thanksgiving. Here are a few things people ask me most often about this fun, savory snack. If you need more reliable recipes for your table, you can always check out my collection of easy appetizers.
Can I use pumpkin pie spice instead of savory spices in this pumpkin cheese ball?
That’s a fun thought, but no, you really shouldn’t! I appreciate the desire to lean into the pumpkin theme with that lovely spice blend, but this specific recipe is designed to be a savory centerpiece for your Fall Appetizer Recipes lineup. Pumpkin pie spice has cinnamon, nutmeg, and cloves, which really clash with the sharp cheddar and the ranch seasoning we use. Mixing those sweet spices in would create a very confusing flavor profile for your guests! Stick to the paprika, garlic, and onion powder for that savory, salty punch we want.
What is the best way to remove the twine without ruining the pumpkin shape?
This is the part where people worry most, but I can promise you it comes off cleanly if you follow the simple steps! When you are ready to serve and have taken the plastic wrap off, grab a pair of sharp, clean kitchen scissors. You want to cut the twine vertically first, right down the middle of one of the valleys. Once those vertical strings are cut, go around and snip the horizontal pieces. The tension releases immediately, and you can gently pull the pieces away. If you tug on a piece without cutting it first, trust me, you’ll just pull a chunk of cheese right off with it!
Can I freeze this festive cream cheese dip?
Because this mixture relies heavily on cream cheese and shredded cheddar, I strongly advise against freezing it, even though it’s a lovely idea for future simple holiday appetizers. When cheese balls thaw after being frozen, the texture often separates. The high moisture content in the cream cheese can turn grainy or watery, and you lose that perfectly smooth, spreadable texture we worked so hard to achieve. Since this particular Thanksgiving Cheese Ball is so easy to make ahead, just plan to mix it up no more than two days before you need it. That gives you the very best texture guaranteed!
Estimated Nutritional Snapshot for This Pumpkin Cheese Ball
As a home cook, I focus mostly on flavor and fun, not too much on calorie counting—especially when we are celebrating! But I know many of you like to know what sort of snack you are serving, so I’ve worked up a rough estimate for this pumpkin cheese ball based on the ingredients listed above. Remember, this is an estimate, and the final count will depend on how thickly you spread it onto those crackers!
This snapshot is based on the recipe yielding 12 average servings. Since this is a rich, savory cheese dip, moderation is always a good idea when you’re planning out your snacks for the party!
- Serving Size: 1/12 of ball
- Calories: 180
- Fat: 16g
- Saturated Fat: 10g
- Protein: 8g
- Carbohydrates: 2g
- Sugar: 1g
- Sodium: 350mg
It’s certainly decadent, but that’s the joy of a classic Cheddar Cheese Ball! It delivers a satisfying, cheesy bite that’s perfect for keeping everyone happy while waiting for the main meal this fall.
Share Your Success with This Simple Holiday Appetizer
Well, we’ve made it through the mixing, the shaping, and the chilling! I truly hope you feel a little burst of pride when your guests see this stunning pumpkin cheese ball sitting on your snack table. I always tell my grandkids that cooking is about sharing love, and when you make something beautiful like this, you’re sharing a little piece of that joy with everyone who enjoys it.
My whole goal here at Cooking by Carla is to help you build a community around tried-and-true recipes that just work, year after year. This simple holiday appetizer is certainly one of them! I’d be so delighted if you’d take a moment to let me know how it turned out for you.
Did you try the pecan coating or go with extra cheddar? Did your twine trick work smoothly? Please leave a rating for the recipe right here on the page, and pop a comment below telling me all about your fall entertaining success! If you snap a photo of your beautiful, perfectly shaped centerpiece, I encourage you to tag me on social media—seeing your creations really makes my day. Happy hosting!
If you want to learn more about my philosophy on simple, dependable home cooking, you can always visit my About Page. Happy baking, and happy hosting!
PrintEasy Make-Ahead Pumpkin Shaped Cheese Ball Recipe

Create a festive and crowd-pleasing appetizer for your fall gatherings with this simple, no-bake pumpkin cheese ball recipe. It looks impressive but requires minimal effort.
- Prep Time: 15 min
- Cook Time: 0 min
- Total Time: 1 hour 15 min
- Yield: 12 servings 1x
- Category: Appetizer
- Method: No Bake
- Cuisine: American
- Diet: Vegetarian
Ingredients
- 2 (8 ounce) blocks cream cheese, softened
- 3 cups sharp cheddar cheese, finely shredded, divided
- 1/2 cup green onion, chopped
- 1 teaspoon ranch seasoning mix
- 1/4 teaspoon garlic powder
- 1/4 teaspoon onion powder
- 1/4 teaspoon smoked paprika
- Pinch of salt
- Pinch of black pepper
- Twine or kitchen string
- 1 small green bell pepper (for the stem)
- Optional Coating: Chopped pecans, extra shredded cheese, or paprika
Instructions
- In a medium bowl, combine the softened cream cheese, 1 1/2 cups of the shredded cheddar cheese, green onion, ranch seasoning, garlic powder, onion powder, smoked paprika, salt, and pepper. Mix until completely smooth and well combined.
- Shape the cheese mixture into a round ball. Place the ball on a sheet of plastic wrap.
- Wrap the cheese ball tightly in the plastic wrap. Use four pieces of twine or kitchen string to tie around the ball vertically and horizontally, creating deep grooves that resemble the ribs of a pumpkin. Do not tie too tightly, as the cheese may expand slightly.
- Refrigerate the cheese ball for at least 1 hour, or up to 2 days, to allow it to firm up.
- When ready to serve, remove the plastic wrap and carefully cut the twine away from the cheese ball.
- In a shallow dish, spread your desired coating (pecans, remaining cheddar, or paprika). Roll the cheese ball in the coating until it is fully covered.
- Cut a small piece from the green bell pepper to create a short stem shape. Insert the pepper piece into the top center of the cheese ball to resemble a pumpkin stem.
- Serve immediately with crackers, pretzels, or fresh vegetables.
Notes
- You can make this **make ahead appetizer** up to two days in advance. Keep it wrapped tightly in the refrigerator.
- For a different flavor, substitute the ranch seasoning with 1/4 cup of cream cheese spread or a dash of Worcestershire sauce.
- This recipe is a great **no bake party food** option when you need quick holiday snacks.
Nutrition
- Serving Size: 1/12 of ball
- Calories: 180
- Sugar: 1
- Sodium: 350
- Fat: 16
- Saturated Fat: 10
- Unsaturated Fat: 6
- Trans Fat: 0.3
- Carbohydrates: 2
- Fiber: 0
- Protein: 8
- Cholesterol: 45