
Oh, honey, if you’re looking for the pinnacle of chocolate indulgence, you’ve found it. Forget everything else and let’s talk about making the absolute best, definitively velvety smooth French Silk Pie. When I teach this recipe, the first thing I tell my grandchildren is that this isn’t just a dessert; it’s an experience! I’m Carla, and after thirty years of teaching kids how to read and write, I promise you I know how to explain baking clearly. This recipe guarantees that signature, cloud-like, mousse-like texture without any drama. It’s quickly becoming my favorite among all my best dessert recipes. Trust me, once you get this down, you won’t look back!
- Why This Classic French Silk Pie Recipe Works for You
- Gathering Ingredients for Your Decadent Chocolate Filling
- How to Make French Silk Pie: Step-by-Step Instructions
- Tips for the Perfect Silky Smooth Pie Texture
- Variations on the Classic French Silk Pie
- Storing and Serving Your Homemade French Silk Pie
- Frequently Asked Questions About Making French Silk Pie
- Serving Suggestions for Your Showstopper Dessert
- Estimating Nutritional Information for Your Indulgent Dessert Ideas
- Share Your Perfect French Silk Pie Experience
Why This Classic French Silk Pie Recipe Works for You
As a former elementary school teacher, my whole goal is clarity and consistency. I want you to finish this recipe feeling successful, not frustrated! This isn’t just some fancy spread from a gourmet magazine; this is dependable, tried-and-true home cooking that works every single time for my family.
- That Unforgettable Texture: We are achieving that melt-in-your-mouth, mousse-like filling that makes this the best chocolate pie. It’s airy, deeply creamy, and pure silkiness—never dense or grainy.
- Deep, Genuine Chocolate Flavor: I insist on using bittersweet chocolate here. It cuts through the sweetness from the butter and sugar beautifully, giving you that rich, decadent chocolate flavor you crave.
- My Tried-and-True Method: Because I have been making this for decades for large family gatherings, I’ve simplified the steps, ensuring you get the perfect result whether you’re making your first pie or your fiftieth. You can read more about my philosophy on reliable cooking over at my About Page.
- Addressing Your Worries: I know many people worry about using raw egg yolks in dessert recipes. I’ve made sure this recipe offers simple solutions, like suggesting pasteurized eggs, so you can bake with confidence.
Gathering Ingredients for Your Decadent Chocolate Filling
Now listen close, because the quality of your ingredients determines how truly indulgent this dessert turns out. To get that deep, beautiful color and profound flavor in your French Silk Pie, you absolutely must use good chocolate. I don’t mean the waxy stuff for melting; I mean quality bittersweet or semisweet chocolate that you actually enjoy eating on its own. That’s where the richness comes from!
We need to pay special attention to the butter and the egg yolks, too. The butter needs to be room temperature soft—think easily spreadable, but definitely not greasy or melty. If your butter melts, you lose your structure! And about those yolks? Since this is a recipe folks use often, especially around the holidays, I always recommend using pasteurized egg yolks if you have any reservations about using them raw. It gives everyone peace of mind for a wonderful, creamy outcome. If you want some other ideas for rich chocolate bases, you can check out my homemade chocolate pudding recipe, which also uses high-quality cocoa.
Ingredients for the Silky Smooth Pie
Grab your apron, because here is exactly what you need assembled on your counter. Precision helps everything go smoothly:
- 1 (9-inch) unbaked, fully baked pie crust (This needs to be cool as a cucumber before we fill it!)
- 8 ounces bittersweet or semisweet chocolate, finely chopped
- 1/2 cup unsalted butter, softened, but still slightly cool to the touch
- 1 cup granulated sugar, measured out
- 4 large egg yolks (remember, pasteurized is great if you’re feeling nervous!)
- 1 teaspoon vanilla extract
- 1/4 teaspoon salt
- 1 cup heavy whipping cream, poured from a container that has been chilling in the coldest part of your fridge
- 1/4 cup powdered sugar, sifted for the topping cream
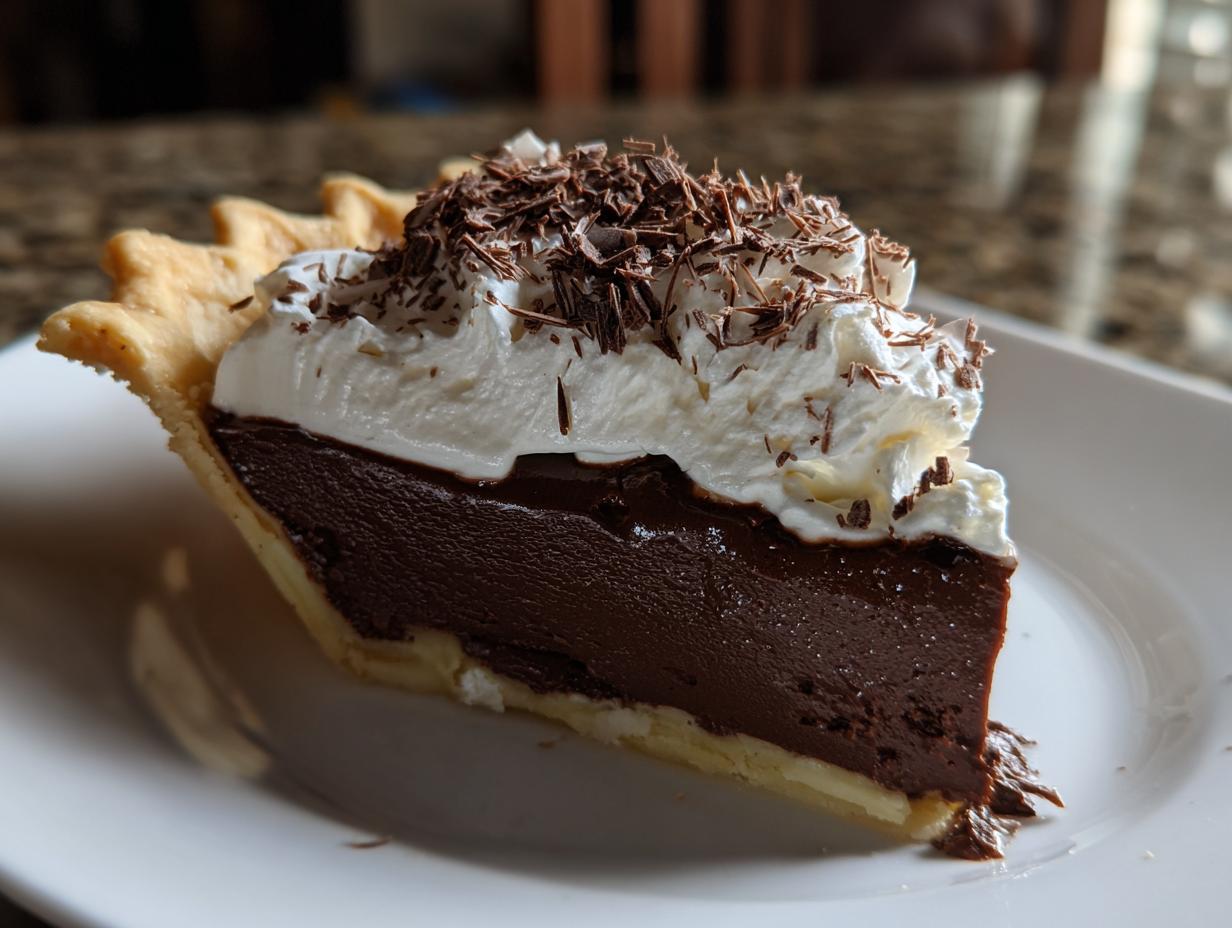
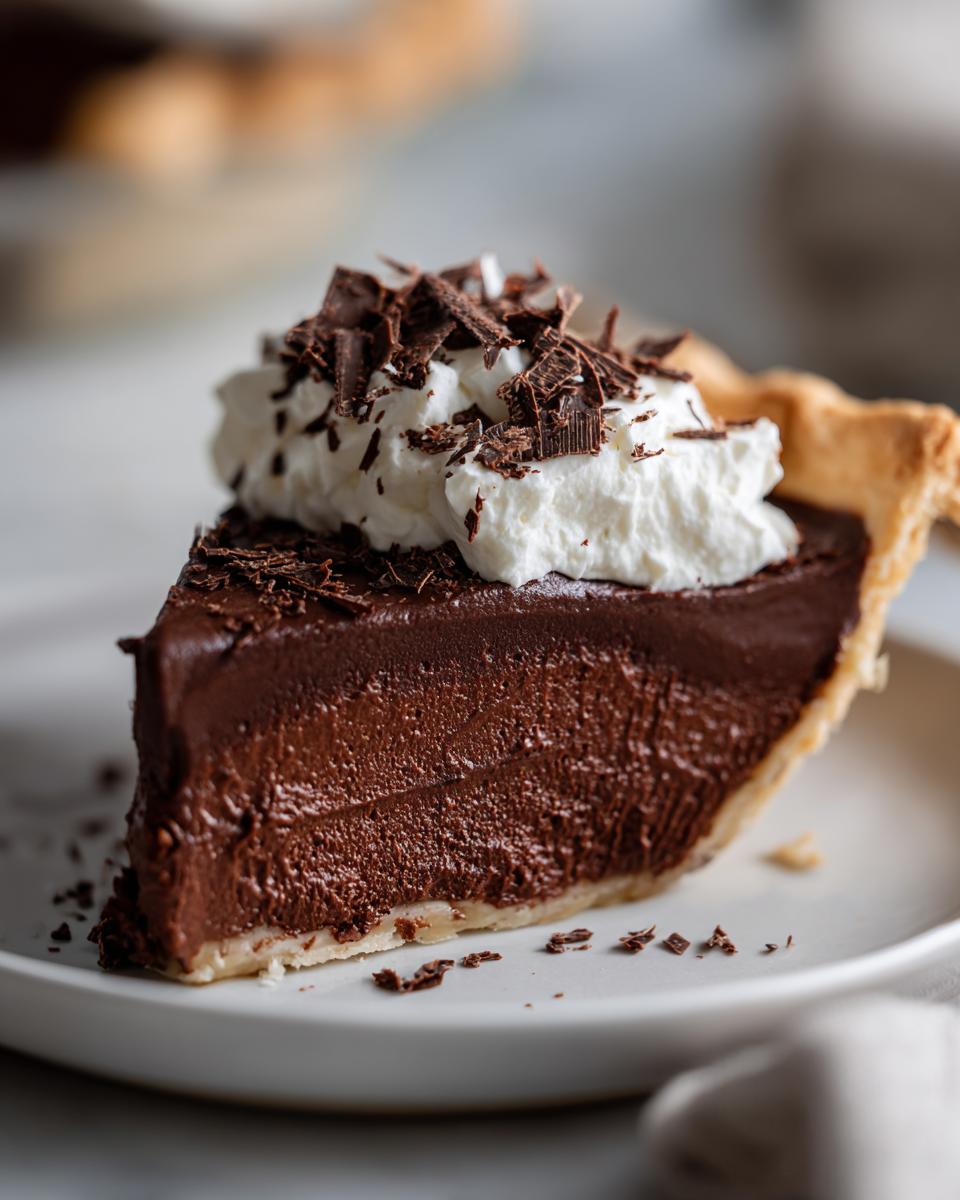
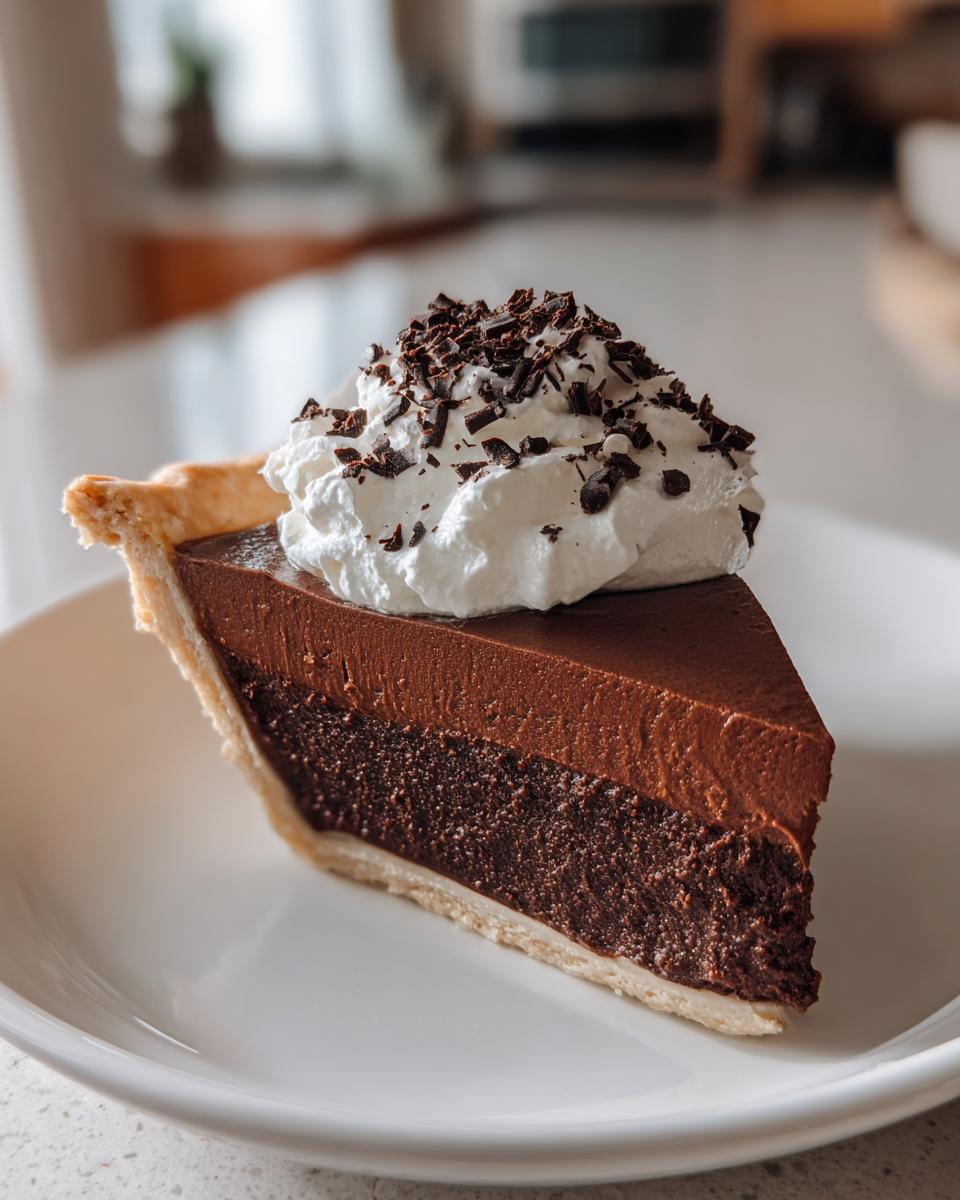
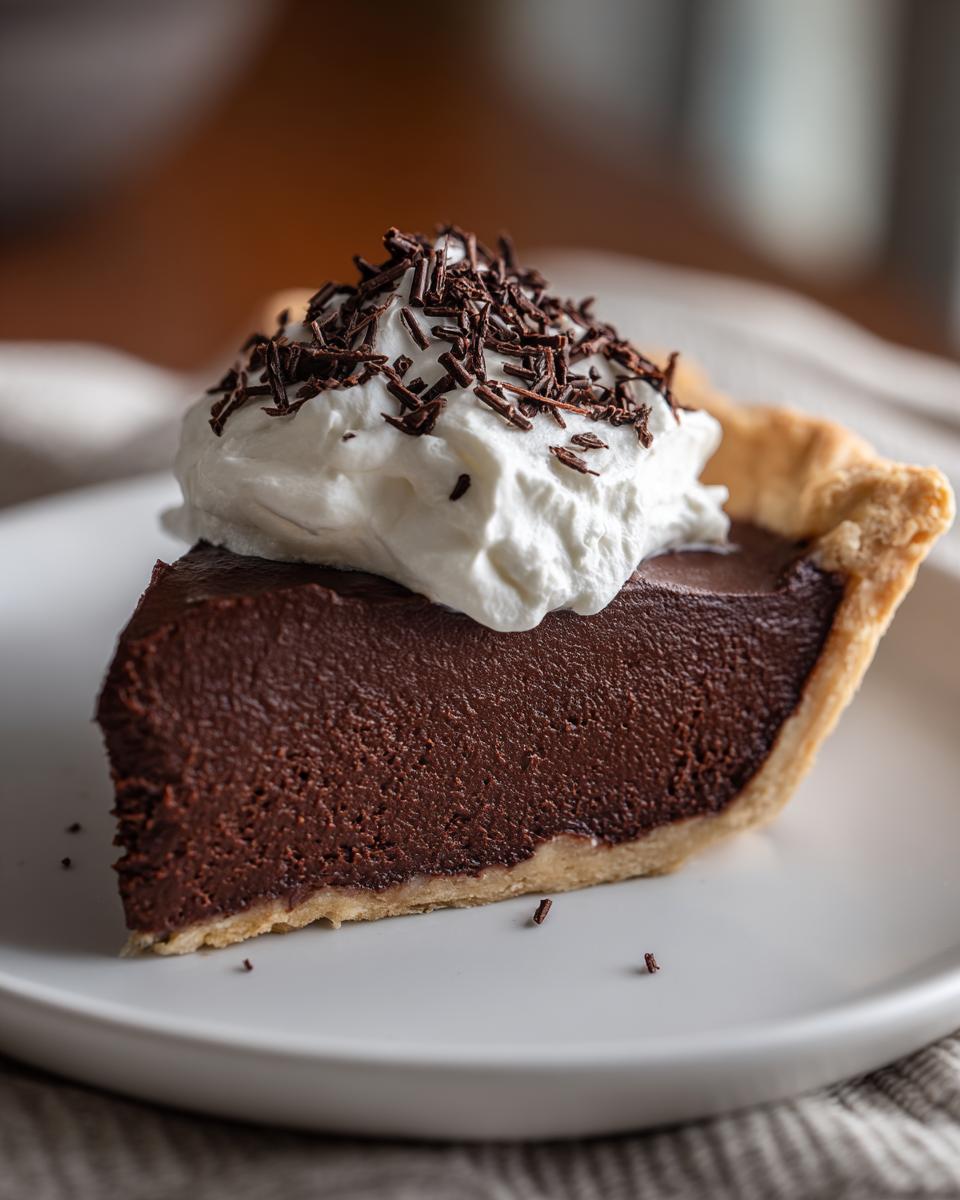
- Chocolate shavings, for a lovely final presentation
How to Make French Silk Pie: Step-by-Step Instructions
This is where the magic happens, folks! Making a proper French Silk Pie isn’t just about mixing things in a bowl; it’s about layering textures so you get that signature velvety smooth result. We’re going to take this slow, just like I taught my students when we learned cursive—patience pays off big time when it comes to this decadent chocolate dessert.
Preparing the Crust and Melting the Chocolate
First things first, your foundation has to be perfect. Make sure that pie crust is complete! Whether you used my favorite recipe or grabbed one from the store, it needs to be fully baked (par-baked or fully baked, depending on what the recipe calls for) and completely cool. I mean stone cold! If you try pouring warm filling into a crumbly, warm crust, you’ll have a soggy mess, and we don’t do soggy messes here at Carla’s kitchen.
While that crust is cooling down, let’s melt our chocolate. The best way to do this, so we don’t burn a single bit of it, is using a double boiler setup. Just bring a little water to a simmer in a saucepan, pop a heatproof bowl on top—make sure the bottom of the bowl isn’t touching the water—and toss in that chopped chocolate. Stir it gently until it’s smooth as glass, then take it off the heat. Let it sit for about five minutes while you start on the butter base. That small cool-down time prevents the hot chocolate from scrambling those beautiful egg yolks later on.
Building the Rich and Creamy Chocolate Filling
Now, grab your mixer for this part! You want your butter to be softened. Beat that butter on medium speed until it looks light and fluffy. This might take a minute, but stick with it. Then, slowly, slowly start adding that granulated sugar. Keep beating until the mixture looks pale yellow and creamy. I always tell people, “When this part looks fluffy, like whipped sunshine, you’ve done it right!”
Next, we carefully add those four egg yolks, one at a time. You need to mix well after each one goes in. Once they are incorporated, stir in your vanilla and salt. Now, stream in that slightly cooled melted chocolate. Keep the mixer speed low on this step! You’re combining rich ingredients, and we don’t want it splattering everywhere. Scrape down the sides of the bowl really well so every last bit of richness gets mixed in. This combination is the heart of your amazing French Silk Pie.
Folding in the Whipped Cream for Mousse-like Texture
This next part is the secret sauce for getting that airy, mousse-like texture so people aren’t wondering if they’re eating fudge! While you were working on the chocolate base, you should have whipped your heavy cream with the powdered sugar until you have stiff peaks. If you need a refresher on whipping cream, that’s something I cover in my easy chocolate croissant recipe notes too, since that usually needs stiff peaks!
The key here is gentle folding. Don’t just dump the whipped cream in! Take about one-third of that fluffy cream and fold it right into the heavy chocolate base. This lightens the whole mixture up so it marries nicely with the rest. Then, gently fold in the remaining two-thirds. Use a big spatula and cut down the middle, sweeping up the sides. Stop folding the second you see no more white streaks. Overmixing deflates all that wonderful air we worked so hard to get in there.
Chilling and Garnishing Your French Silk Pie
Spoon that velvety filling right into your completely cooled crust. Use an offset spatula—they are lifesavers—to smooth the top out nicely. You want it looking beautiful before it sets!
Now for the hardest part: waiting! Cover the pie loosely with plastic wrap—and I mean loosely, make sure it doesn’t stick to the filling surface, or you’ll ruin that smooth top. This glorious French Silk Pie needs to chill in the refrigerator for a minimum of 6 hours, but honestly, overnight is always better. Chilling is what sets the filling firm, turning it from a thick mousse into a sliceable, decadent treat.
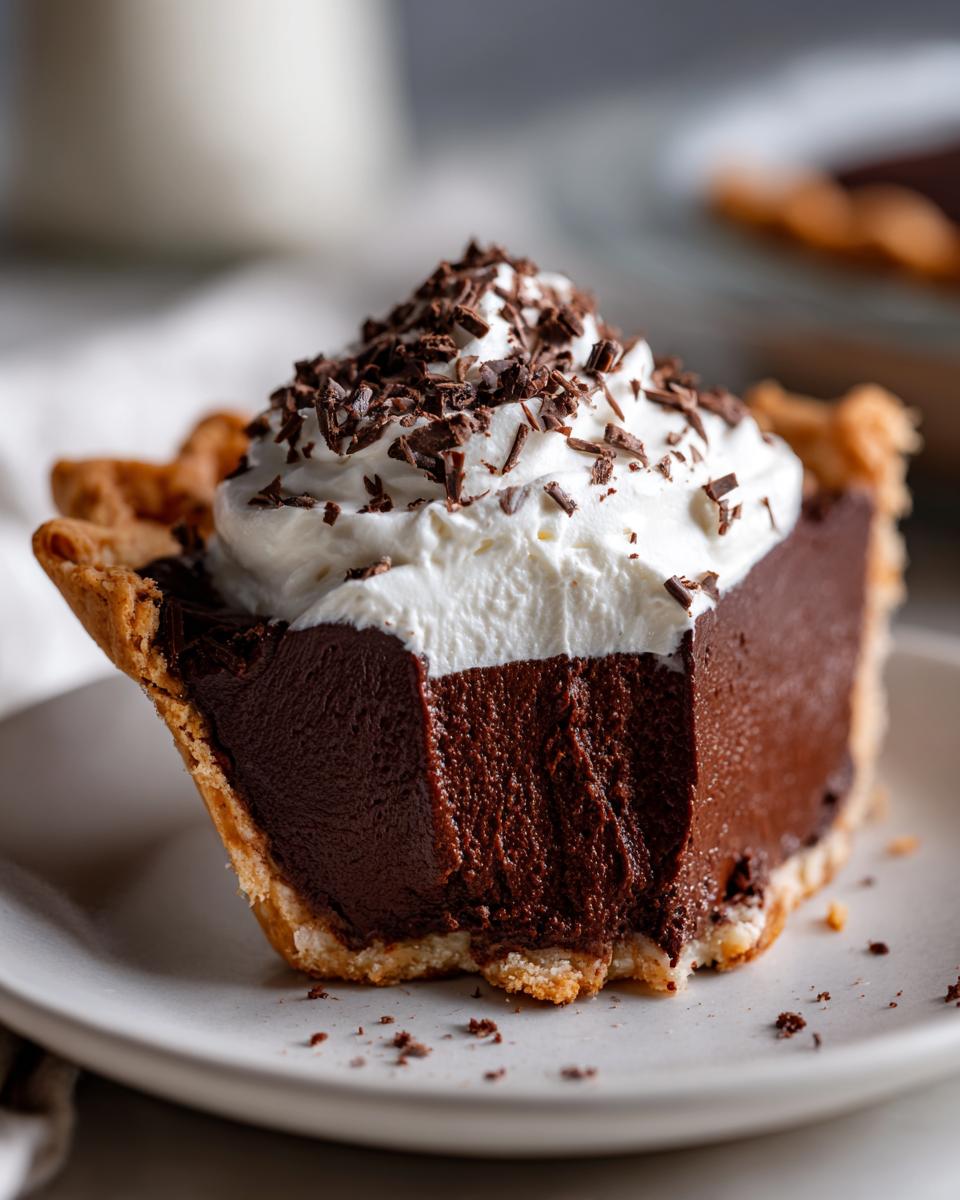
Once it’s totally firm, it’s time to dress it up! Top it with more homemade whipped cream—because more cream never hurt anyone—and shower the edges with those beautiful chocolate shavings. Slice it thin, because trust me, even a thin slice of this richness packs a punch!
Tips for the Perfect Silky Smooth Pie Texture
Achieving that famous, velvety smooth texture in your French Silk Pie is truly what separates a good pie from a showstopper. I learned early on that consistency in temperature and mixing speed are just as important as the ingredients themselves. If your filling turns out slightly grainy or too dense, don’t worry about it; chances are, one of these little tweaks will fix it next time!
First up, let’s talk about temperature when you’re beating the cream and the butter mixture. For the filling base, the butter needs to be perfectly soft, but your heavy cream for the topping absolutely must be ice cold. A warm cream never gets those stiff, tall peaks we need for structure! When that whipped cream is too warm or limp, it gets absorbed into the chocolate mixture instead of sitting beautifully on top, leading to a flatter, denser pie.
Another big trick is how you handle the chocolate after melting. Never pour hot melted chocolate right into your creamed butter and yolks! It will seize up or, worse, cook your yolks slightly, leading to a gritty texture instead of that lovely mousse-like quality. Let that melted chocolate cool down for a solid five minutes off the heat. It should feel warm to the touch, but not hot.
Now, if you’ve heard people talking about the Joanna Gaines method, a big part of that involves mixing time. Some recipes call for whipping the butter and sugar for up to 20 minutes! While that sounds tiring, the idea is to incorporate as much air as possible into that base before adding the yolks and chocolate. If you find your texture is just a hair too heavy, try beating your butter/sugar for an extra minute or two longer than you think you need to. Air is your friend in this recipe!
Finally, when you fold in the whipped cream, remember what I said before: be gentle! My philosophy on baking is always to mix until combined and then stop. You can always mix more, but you can’t un-mix the air out once it’s gone. If you ever feel like your fillings are too heavy, I have some great foundational tips on batter mixing over in my flourless chocolate torte recipe post that applies here, too. It’s all about how you incorporate air!
If you are curious about how other folks tackle this dessert, I came across the Joanna Gaines French Silk Pie Recipe and noticed they also emphasize the whipping of that base layer—it really shows how important that initial creaming step is!
Variations on the Classic French Silk Pie
While I stand firm that the classic, deeply chocolatey version with a flaky pastry crust is perfection, I absolutely love seeing how home cooks make a recipe their own! Think of this recipe as a wonderful base for your own creativity. Don’t feel tied down to just one presentation—this indulgent dessert is flexible!
One of the easiest ways to switch things up is by changing up that foundational crust. If you’re short on time or just want a different texture that complements the creamy filling, skip the regular pastry! An Oreo cookie crust is just fantastic here. Just crush up those sandwich cookies and mix them with a little melted butter. You press it into the pan and, boom! Instant, rich chocolate foundation. Graham cracker crusts work beautifully too, especially if you’re aiming for a slightly less chocolate-forward base.
If you want to play with the flavor profile inside that silky filling, there are a couple of lovely additions you can try. A teaspoon of instant espresso powder mixed right in with your melted chocolate deepens that chocolate flavor dramatically without making it taste like coffee. It’s a secret many bakers use for intense flavor! Alternatively, a tiny splash—maybe half a teaspoon—of pure mint extract can turn this into a refreshing mint-chocolate dream.
Now, I know some folks are always on the hunt for a truly no bake French silk pie. For this specific recipe, since we are using egg yolks that benefit from a quick melt with the chocolate, the crust truly needs to be pre-baked. However, many modern recipes achieve a similar effect by using cream cheese or even avocado as a base instead of yolks, allowing the whole thing to just chill and set. If you’re looking for that completely oven-free approach, I recommend searching specifically for those adapted recipes, though for my money, this baked-crust version is the superior classic experience!
Storing and Serving Your Homemade French Silk Pie
You have successfully crafted a masterpiece! Now, the important part is making sure this glorious French Silk Pie lasts long enough for everyone to enjoy it, and that you serve it looking just as beautiful as when it came out of the fridge. Since this pie is rich, you actually don’t need a huge slice, so proper storage helps us keep those leftovers special!
The absolute best way to serve this pie is straight from the refrigerator. That gorgeous, creamy filling needs that chill to hold its shape. If you try to serve it even slightly warm, it will turn back into a wonderful, soft pudding instead of a clean sliceable dessert. So keep it cold right up until serving time.
If you must transport it, or you’re worried about fingerprints smudging that lovely top layer, follow this trick I use when taking desserts to church potlucks. You need to protect that whipped cream and those chocolate shavings! Place the pie in the fridge first, let it firm up for about an hour. Then, carefully cover it with plastic wrap. The trick here is to use toothpicks poked into the filling around the edges to create little tent poles so the plastic wrap never actually touches the whipped cream topping. This stops the topping from getting sticky or deflated.
How long does it stick around? Well, if you keep it tightly covered in the fridge, it should stay perfectly delicious for about 3 to 4 days. The structure holds quite well because of the high fat and sugar content. If you find you have leftovers nearing the end of the week and you aren’t sure you’ll finish them, you can actually freeze this pie! Yes, you heard me right.
When freezing, skip the whipped cream topping for now; that doesn’t fare well under frost. Just generously cover the plain, set pie with a double layer of plastic wrap and then cover that tightly with aluminum foil. Freeze it flat for up to a month. When you’re ready to eat it, transfer it to the refrigerator overnight—do not try to thaw it on the counter! Once it’s fully thawed in the fridge, then you can top it with a fresh batch of whipped cream and shavings. It tastes just as good.
If you ever need tips on how to keep other homemade delights fresh, like my recipe for easy homemade mayonnaise recipe, remember that air is always the enemy of freshness. Keep things sealed up tight, and your French Silk Pie will be ready for its encore performance!
Frequently Asked Questions About Making French Silk Pie
Oh, I just love questions! As a former teacher, I love clarifying these details for you because baking should never be a mystery. Getting that perfect result means understanding the ‘why’ behind the steps. Here are some common things folks ask me about this rich, **Chocolate Silk Pie**.
Is the egg yolk safe in this Creamy Chocolate Pie?
That is a wonderful and very important question! My recipe comes from an older tradition, and we use raw egg yolks because they contribute so much to that incredibly rich and smooth texture we are aiming for. If you are concerned about using raw eggs in your Creamy Chocolate Pie, I have two main assurances for you. First, if you source pasteurized egg yolks at the store, you eliminate that concern entirely while keeping the texture true to the original recipe. Second, the process of melting the egg yolks into the slightly warm chocolate helps temper them, as we discussed earlier. If you want absolutely zero worry about raw eggs, your best bet is to search specifically for a recipe variation that uses a cooked custard base or a cream cheese stabilizer instead of relying on the yolks for structure.
Can I make a No Bake French Silk Pie using this recipe?
This particular classic recipe really shines because we start with a fully baked crust. That buttery pastry needs that oven time to set up properly so it can hold the dense filling. So, for *this* recipe, no, you can’t skip baking the crust! However, the beauty of a French Silk Pie is that the filling itself requires no further baking—it sets entirely in the fridge, which always feels a bit like magic!
If you are dead set on a completely oven-free approach, you can easily pivot by using a ready-made pre-baked shell or swapping in a crumb crust, like an Oreo or graham cracker crust, which only requires chilling to set. That skips the baking step entirely and gives you something very close to a No Bake French Silk Pie experience!
What is the secret to a truly Velvety Dessert Recipe?
It always comes down to air incorporation and gentle handling! If you want that truly Velvety Dessert Recipe outcome, you need two main things. First, you must beat your butter and sugar until it is pale, fluffy, and looks whipped, not just combined. That air is what prevents density later on. Second, and this is crucial, when you add that gorgeous whipped cream, you have to fold it in lightly. You should only mix until there are no white streaks left. If you mix too long, you press the air out, and suddenly your mousse-like pie becomes a very good, but much denser, chocolate pudding pie. Gentle folding equals ultimate silkiness!
Feel free to reach out through my contact page if you run into any trouble while trying to master that folding technique!
Serving Suggestions for Your Showstopper Dessert
Now that you have made this truly magnificent, deep chocolate French Silk Pie, it’s time to put it on display! This is a showstopper dessert, certainly, and it deserves the right fanfare. You don’t want to serve something this decadent with just plain milk, do you? We need accompaniments that enhance that rich flavor without competing with the silky smooth texture we worked so hard for.
For me, nothing beats the brightness of fresh fruit. The slight tartness of raspberries or strawberries cuts through the richness of the dark chocolate perfectly. Just a few fresh berries scattered around the plate, or even piled lightly on top of that whipped cream garnish, just makes the whole thing pop visually and cuts the richness beautifully for your guests. It’s simple elegance!
If you are planning a dinner party or serving this after a big holiday meal, think about your beverage pairings, too. A strong, hot cup of coffee is a marvelous partner for this pie. If you have time to whip up a homemade liqueur, a little raspberry cordial drizzled on the plate elevates it immediately. Or, if you have any sweet red wine on hand, a small pour alongside a slice of this pie is pure heaven. See, who needs fancy restaurant plating when you have a perfect slice of homemade chocolate pie?
This recipe, whether you use the classic crust or decide to try an Oreo base, is always the star of any dessert table. If you’re looking for some other grand ideas to pair with your lavish desserts, maybe look over some of my favorite easy appetizers and snacks for the rest of the party menu!
Estimating Nutritional Information for Your Indulgent Dessert Ideas
I know some of my friends who come to this site are keeping track of what everyone eats, which is totally fine! While I’m more of a ‘taste with love’ kind of cook, I believe in giving you the best information available so you know exactly what you’re sharing. Since every brand of chocolate or butter is a little different, these numbers are a very close estimate based on the standard ingredients list we used to make this amazing French Silk Pie.
Remember, because this is such a rich and decadent dessert, these are for a generous slice, so a little piece goes a long way! I always tell folks to look them over just as a guide, since real-world results depend on how much sugar you sprinkle on top!
Here is the estimated breakdown per slice based on 8 servings:
- Serving Size: 1 slice
- Calories: 450
- Sugar: 35g
- Sodium: 150mg
- Fat: 32g
- Saturated Fat: 18g
- Unsaturated Fat: 14g
- Trans Fat: 0.5g
- Carbohydrates: 38g
- Fiber: 3g
- Protein: 5g
- Cholesterol: 120mg
Since we use so much good butter and rich chocolate in this Rich and Creamy Dessert, you can see the fat content is higher, but oh my goodness, it’s worth every single bite! If you are looking for more information on how I handle data and privacy here on the site, you can certainly check out my Privacy Policy. Happy tasting, everyone!
Share Your Perfect French Silk Pie Experience
Well, we did it! We took humble ingredients and turned them into the most decadent, velvety smooth French Silk Pie imaginable. I truly hope you enjoyed making this rich chocolate dessert as much as my family has enjoyed it over the years. Now, this is where I need your help, because I learn just as much from you all as I hope you learn from me!
I absolutely love hearing back from folks who tried one of my time-honored recipes. Did the filling turn out airy and mousse-like? Did you manage to keep the plastic wrap from touching the surface during that long chill time? Those are the little details that make all the difference, and I want to hear about your triumphs!
Please, don’t be shy! Take a moment and leave a comment down below. If you rate this recipe, give it a good five stars if you loved how rich and creamy it was! If you took a beautiful picture of your finished pie—perhaps garnished with extra chocolate shavings or fresh raspberries—I’d be thrilled if you shared it on social media and tagged me. It warms this grandmother’s heart to see my recipes showing up at your dinner parties and celebrations.
Baking should be joyful, and seeing your success makes my day brighter. You can always reach out with specific questions using my contact page, too. Happy baking, friends, and enjoy every last, silky, chocolaty bite!
Warmly,
Carla Peterson
Classic French Silk Pie: Rich and Velvety Homemade Dessert

Make this classic French Silk Pie for a rich, creamy, and indulgent dessert. This recipe delivers a velvety smooth chocolate filling in a buttery crust, perfect for any special occasion.
- Prep Time: 30 min
- Cook Time: 15 min
- Total Time: 6 hours 45 min
- Yield: 8 servings 1x
- Category: Dessert
- Method: Chilling
- Cuisine: American
- Diet: Vegetarian
Ingredients
- 1 (9-inch) unbaked, fully baked pie crust (use your favorite homemade pie crust recipe or a store-bought shell)
- 8 ounces bittersweet or semisweet chocolate, chopped
- 1/2 cup unsalted butter, softened
- 1 cup granulated sugar
- 4 large egg yolks (pasteurized if you have concerns about raw eggs)
- 1 teaspoon vanilla extract
- 1/4 teaspoon salt
- 1 cup heavy whipping cream
- 1/4 cup powdered sugar
- Chocolate shavings, for garnish
Instructions
- Prepare your pie crust. If using a homemade crust, bake it according to your recipe until golden brown and let it cool completely on a wire rack.
- Melt the chopped chocolate in a heatproof bowl set over a saucepan of simmering water (a double boiler), stirring until smooth. Remove from heat and let it cool slightly, about 5 minutes.
- In a large bowl, beat the softened butter with an electric mixer until light and fluffy. Gradually add the granulated sugar and beat until the mixture is pale and creamy.
- Beat in the egg yolks one at a time, mixing well after each addition. Mix in the vanilla extract and salt.
- Slowly pour the slightly cooled melted chocolate into the butter mixture, beating on low speed until just combined. Scrape down the sides of the bowl.
- In a separate, clean bowl, whip the heavy cream and powdered sugar until stiff peaks form.
- Gently fold about one-third of the whipped cream into the chocolate mixture to lighten it. Then, fold in the remaining whipped cream until no white streaks remain. Do not overmix; you want to keep the filling light and airy.
- Spoon the velvety chocolate filling evenly into the cooled pie crust. Smooth the top with an offset spatula.
- Cover the pie loosely with plastic wrap, making sure the plastic does not touch the surface of the filling. Refrigerate for at least 6 hours, or preferably overnight, until the filling is firm.
- Before serving, top the chilled pie with additional whipped cream and a generous sprinkle of chocolate shavings. Slice and serve cold.
Notes
- To address concerns about raw eggs, use pasteurized eggs, or look for a recipe variation that uses a cooked custard base or cream cheese instead of raw eggs.
- For the silkiest texture, ensure your butter is truly softened but not melted, and beat the filling mixture thoroughly before folding in the whipped cream.
- If you prefer a different base, an Oreo cookie crust works well as an alternative to a traditional pastry crust.
Nutrition
- Serving Size: 1 slice
- Calories: 450
- Sugar: 35g
- Sodium: 150mg
- Fat: 32g
- Saturated Fat: 18g
- Unsaturated Fat: 14g
- Trans Fat: 0.5g
- Carbohydrates: 38g
- Fiber: 3g
- Protein: 5g
- Cholesterol: 120mg