
You know, I hear from so many of you, especially as we look forward to big parties like National Pizza Party Day, that you’re tired of the same old thin crust. Everyone is talking about that wonderful 2026 crunch trend—that perfect bite where the inside is soft, but the edges shatter just a little bit. Well, darling, if you want that signature airy crust and deeply caramelized, crispy edge pizza texture, you need to move beyond your delivery menus and into the deep dish world. This authentic Detroit style pizza recipe is the only guide you’ll ever need. My philosophy is simple: if I can teach a classroom full of third graders to share, I can certainly teach you how to get that perfect, cheesy crust right here in your own kitchen. Trust me, this is dependable, delicious, and tastes exactly like the best slice you’ve ever had.
- Why This Detroit Style Pizza Recipe is Your New Favorite
- Gathering Ingredients for Authentic Detroit Pizza
- Preparing the Dough for Your Detroit Style Pizza
- Pan Preparation and Pressing the Detroit Style Pizza Dough
- Assembling the Layers for Maximum Cheesy Crust Pizza Flavor
- Baking Techniques for Crispy Edge Pizza Success
- Tips for a Perfect Homemade Pizza Party Detroit Style Pizza
- Serving Suggestions for Your Detroit Style Pizza
- Frequently Asked Questions About Deep Dish Pizza
Why This Detroit Style Pizza Recipe is Your New Favorite
What truly sets this pizza apart from everything else on delivery night is all about the texture. Honestly, it’s magnificent. When you see people raving online about its unique crunch, they are dreaming about the characteristics we build right into this detroit deep dish recipe.
- That glorious, pillowy interior that’s almost focaccia-like.
- The intense, almost caramelized cheese that runs right up the sides.
- A base that’s sturdy enough to hold all those toppings but not tough.
If you’ve been searching for that perfect bite, I promise you’ve found it. It’s all about the technique we use under high heat.
The Signature Crispy Edge Pizza Texture
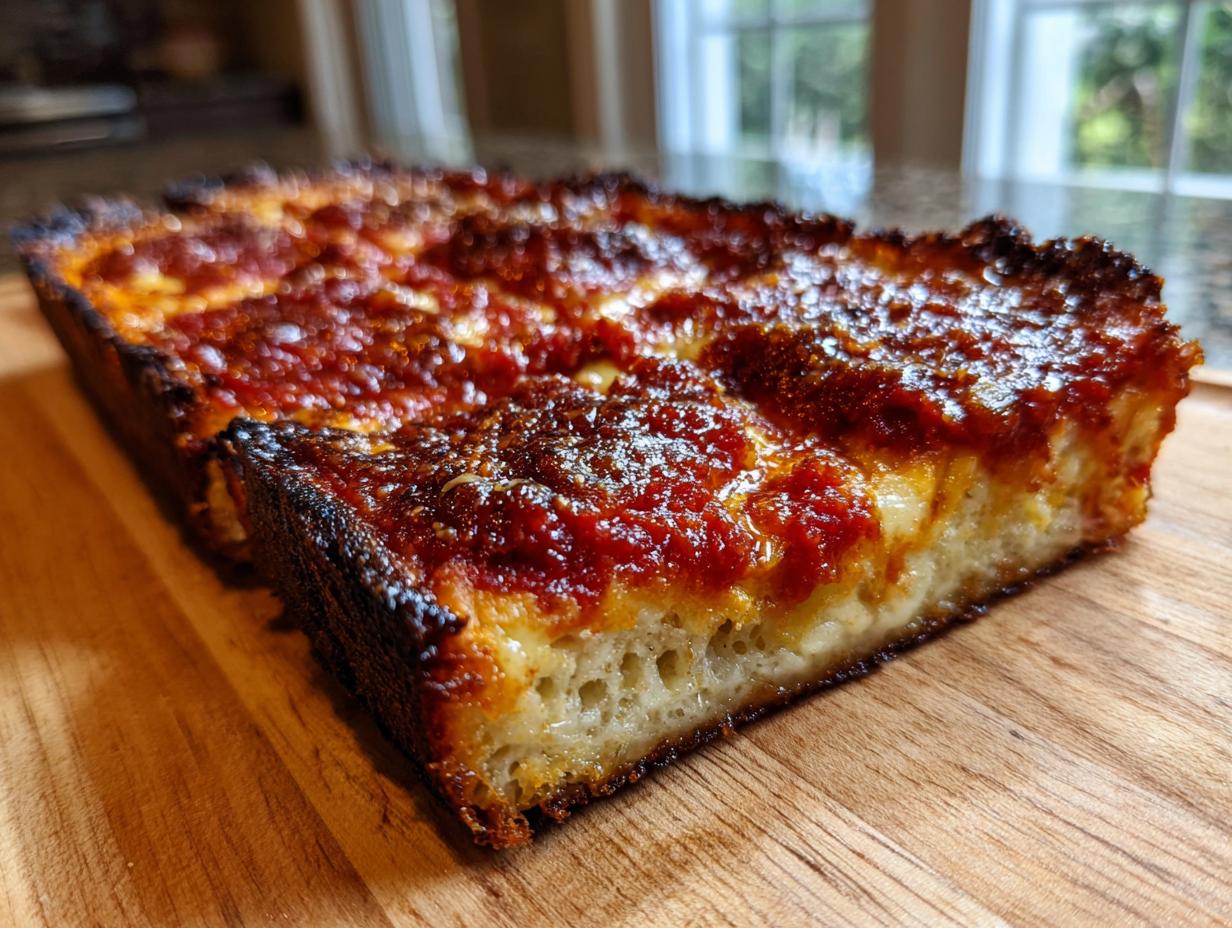
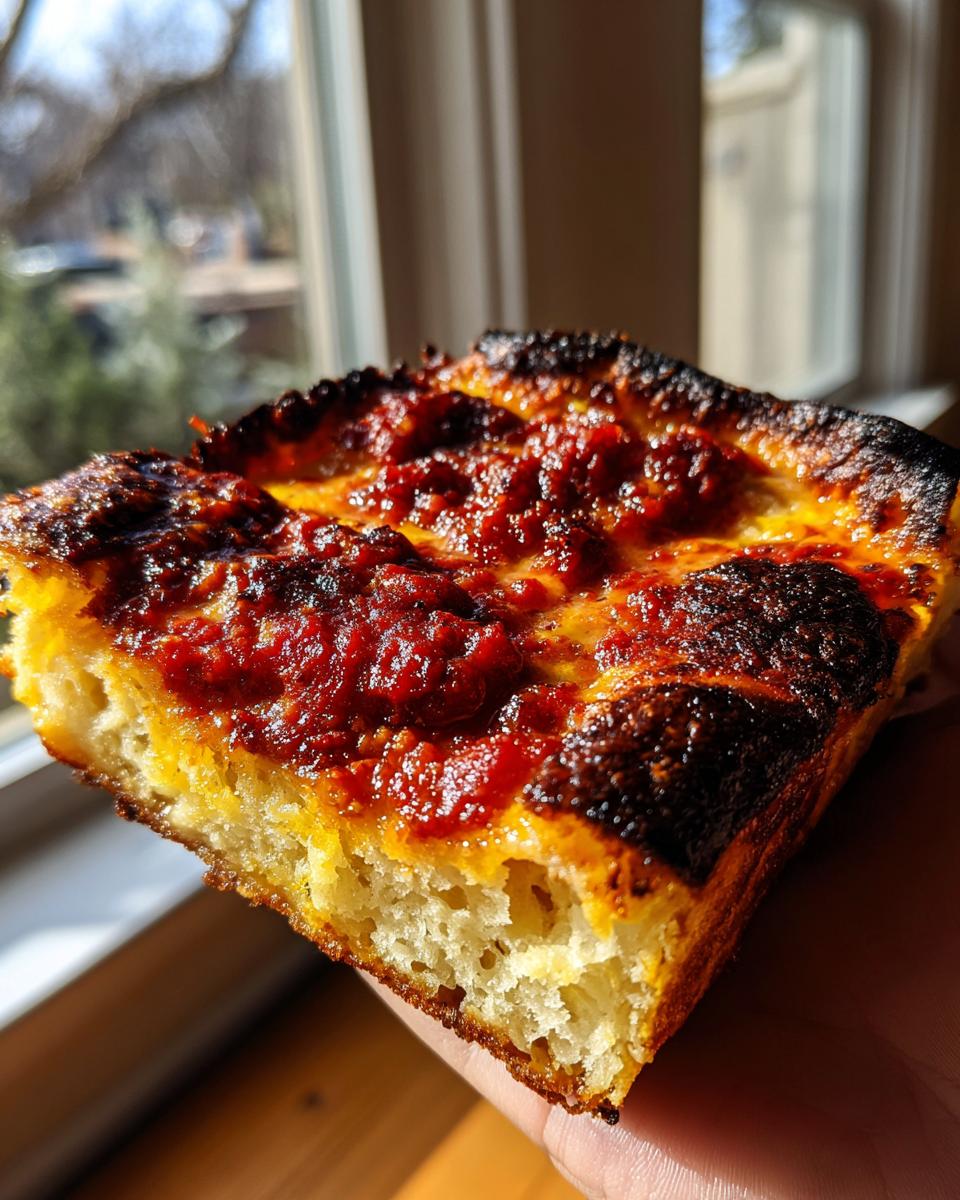
This flavor isn’t created by accident, sweetie. It comes from two things: that heavy, rectangular steel pan and the way we use the cheese in the last few minutes. We’re not just baking a pizza; we’re creating a deep, buttery, cheesy moat around the whole thing. When that cheese hits the hot, oiled sides of the pan, it creates that signature crunchy, crispy edge pizza perfection you can’t get with regular pans. Don’t skip oiling that pan generously!
Simple Steps for Perfect Detroit Deep Dish Recipe Dough
Now, you might think this complex texture requires a complicated dough, but it’s surprisingly easy. We use bread flour for the strength it needs, but the mixing and rising are very hands-off. This lovely, soft dough is the foundation for that airy middle layer. Once you nail the first rise, the rest of your detroit deep dish recipe is smooth sailing. If you’re looking for even more ideas to serve alongside this masterpiece, check out my list of easy appetizers and snacks!
Gathering Ingredients for Authentic Detroit Pizza
Getting this right means getting the ingredients right, and when we talk about authentic Detroit pizza, we have to talk about cheese. This isn’t the time to use that pre-shredded bag, honey! For the true flavor and melt, you absolutely need Wisconsin brick cheese. I specify using it in two different forms: cubed for the base layer, and shredded for the top layer later on. If you absolutely cannot find it—and I know it happens—my reliable backup is a rough mix of whole milk mozzarella and a mild cheddar; it gets us close!
Essential Cheese: Brick Cheese Clarity
Remember what I said: cubed brick cheese goes down first, directly onto the dough, leaving about a centimeter border around the edges. Then you sprinkle the shredded cheese blend right over that. This layering separates the moisture of the tomato sauce from the dough while ensuring those edges get that rich, buttery brown crust we are craving. It’s that cheese border that defines the whole look of this pizza.
Flour and Yeast: The Base of Your Detroit Style Pizza Crust
For the dough itself, we rely on bread flour. It has a higher protein content than regular AP flour, and that extra strength is exactly what we need to support the toppings and create that beautiful, airy lift during the long bake time. Don’t skimp on making sure your water is the right temperature either—about 110°F is perfect for waking up that active dry yeast. If the water’s too hot, you’ll kill it, and if it’s too cold, nothing happens! We need that nice, bubbly foam!
Preparing the Dough for Your Detroit Style Pizza
Alright, let’s talk about that dough. A good Detroit style pizza starts with patience, but the actual hands-on time isn’t bad at all. First things first: we wake up that yeast. I just mix the warm water—and please, check that temperature, you want it comfortably warm, not scorching—with a tiny pinch of sugar, then sprinkle the yeast right on top. If you see foam bubbling up after about ten minutes, give yourself a pat on the back; your yeast is happy and ready to work!
Activating the Yeast and Mixing the Dough
Once you have that lovely foam, we combine it with your bread flour and salt. Then, you add that olive oil. When you first mix it all together, don’t panic! It’s going to look rough and shaggy, almost like a messy pile of rags. That’s exactly what we want. We knead it only until it comes together smoothly, which usually takes about seven minutes by hand. Overmixing is death for this light crust, so stop when it stops sticking horribly to your hands.
The First Rise: Patience for an Airy Detroit Style Pizza
Now, we give it space to breathe in a slightly oiled bowl. Cover it up tightly and let it sit somewhere warm. I often use the oven that’s turned off, just letting the residual heat do the work. This generous rising time—one to an hour and a half—is crucial because it’s what creates the internal structure needed for that famously airy body. If you want a truly professional result, you have to let your dough proof properly. If you’re interested in diving deeper into dough science in general, I have some thoughts for you over here!
Pan Preparation and Pressing the Detroit Style Pizza Dough
This next step is where we start building that famous crunch, so please pay close attention! You need a sturdy, rectangular pan—I use a 10×14 inch steel pan, and only steel or heavy aluminum will do the trick for this kind of heat transfer. Take a generous amount of olive oil—and I mean generous, don’t be shy!—and coat the entire bottom and up the sides of that pan. This oil is the frying agent for your crust.
Once your dough has doubled nicely, gently ease it into that oiled pan. You’re not tossing this pizza; you’re pressing it out. Use your fingertips and work slowly, pushing the dough out evenly until it reaches all the corners. Because the dough is soft, it will try to spring back on you. That’s okay! Just let it rest right there in the pan for 30 minutes. This final short rest lets the gluten relax, making it easier to stretch if needed, but mostly, it builds up the body for that lovely thick base. You can find my recipe for making homemade bread bowls if you want another deep-dish project!
Assembling the Layers for Maximum Cheesy Crust Pizza Flavor
The way we build this pizza is entirely different from your typical delivery order, and honestly, that’s why it’s so fabulous. We are building a masterpiece here for that famous cheesy crust pizza experience! First, you need to crank that oven up—we’re going to 475°F. That high heat is mandatory to get that wonderfully airy interior while simultaneously crisping the bottom and those edges.
Layering Cheese for the Perfect Detroit Style Pizza Base
Take that cubed brick cheese and spread it directly onto the rested dough. Make sure you cover the bulk of the surface, but here’s a tiny trick from me: leave a small gap—about a centimeter—between the cheese and the edge of the pan. Now, follow that immediately with your shredded cheese blend. This double layer of cheese acts as a shield and starts melting down into that oiled edge right away!
Sauce Application: Keeping it Light
If you’re used to being heavy with the sauce, you need to ease up now. We pour the quality crushed tomatoes right over the cheese layer. You don’t want to smother everything; you just want thin, lovely stripes or a gentle coating across the top. It cooks quickly up there! And before it goes in, a little sprinkle of oregano just awakens all those bright tomato flavors. If you’ve ever made my gooey cheese fondue, you know how much I appreciate a good melt, and this layering guarantees it!
Baking Techniques for Crispy Edge Pizza Success
Now, the moment of truth! Your oven needs to be blazing hot—475°F is the minimum setting for any proper deep dish. This intense heat is what gives you that light, airy rise in the middle while forcing the bottom crust to get beautifully crisp against the hot metal pan. We’re looking for about 12 to 15 minutes for the initial bake, just until the crust looks golden and the sauce is bubbling happily away.
The Final Five Minutes: Creating the Crispy Edge
Don’t walk away from the oven during the last few minutes, because that’s when we earn that legendary crunch! When you see the pizza is almost done—maybe five minutes left on the timer—carefully pull the rack out just enough so you can work. Now, take whatever shredded cheese you have left and sprinkle it right up to the very edge of the pan. I mean right against the metal sides!
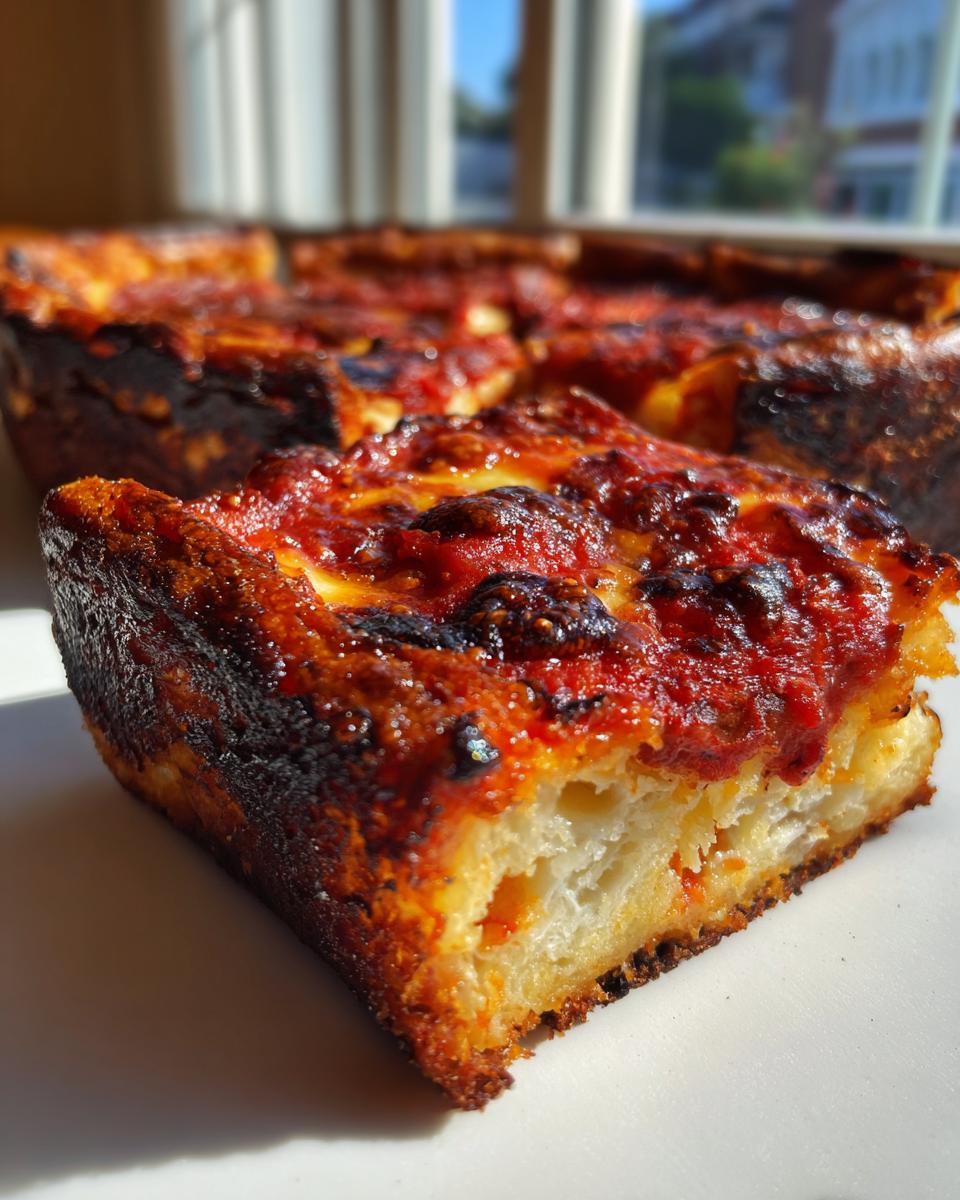
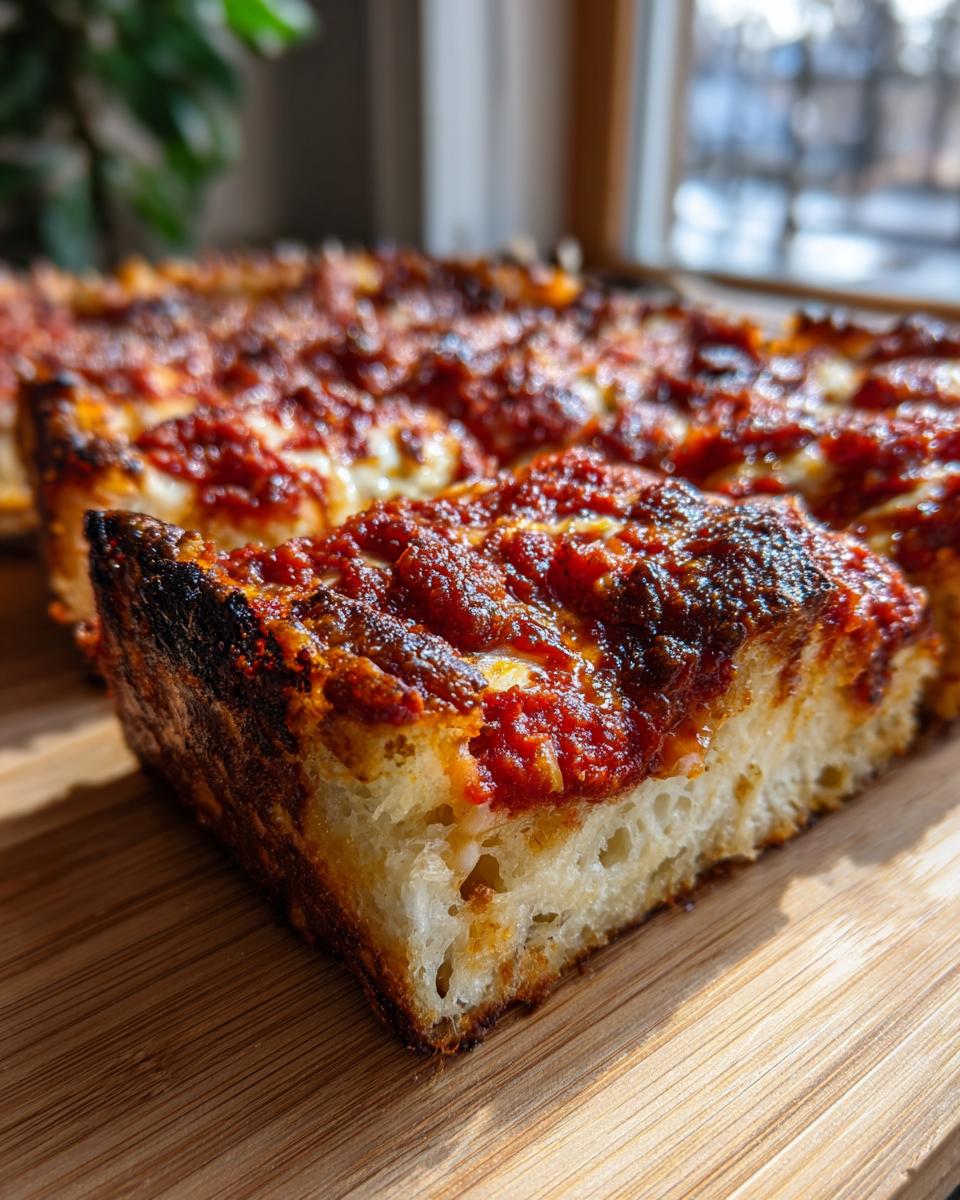
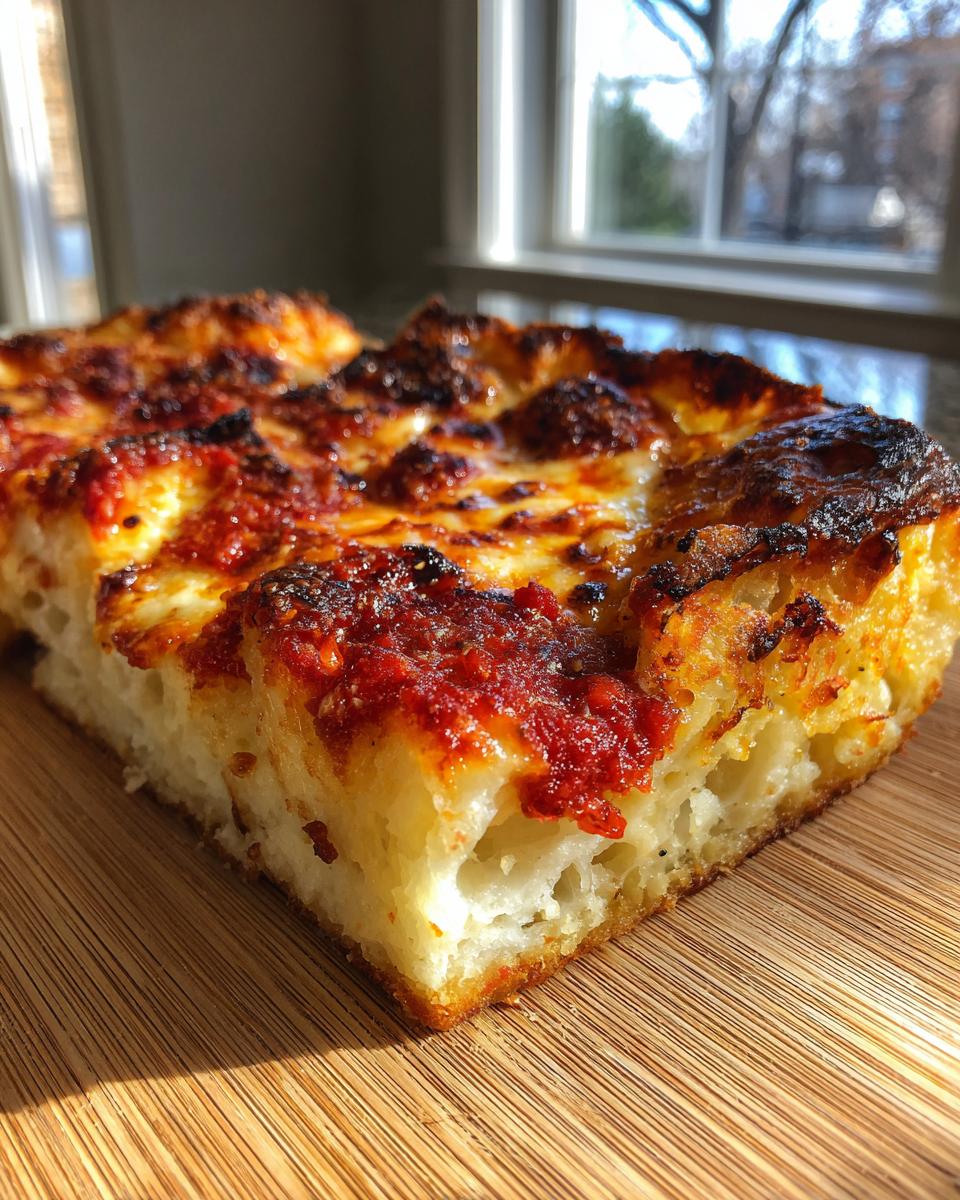
As that cheese melts and hits the hot, oiled steel, it fries and caramelizes into that deep, dark brown, crunchy ring that people fight over. It’s an absolute game-changer! You must let it bake for those final five minutes with that cheese hugging the sides. When you pull it out, the aroma is just incredible—it smells buttery and slightly nutty. That’s the sign of true success for a crispy edge pizza!
Tips for a Perfect Homemade Pizza Party Detroit Style Pizza
Baking a great pizza is one thing, but serving it perfectly for your homemade pizza party is the final step! I’ve learned a few things over the years about getting these deep dishes out of the pan in one beautiful piece. The biggest mistake people make is slicing immediately. Trust me, you must let it rest! Five minutes after it comes out of that scorching oven, just let the pan sit right on top of the cooling rack.
Resting Time After Baking
That time allows the cheese and the hot crust to set up just a touch. If you try to cut into it right away, all that lovely melted cheese and tomato will run right out onto your cutting board. Letting it rest just gives the structure a chance to firm up a tiny bit. After those five minutes are up, you can easily slide a thin spatula underneath to loosen the sides before cutting it into those classic squares. You can serve this right away, or if you need more party food ideas, I’ve got some quick appetizers listed on my site!
Serving Suggestions for Your Detroit Style Pizza
Now, I know this Detroit style pizza is hearty enough to be a meal all on its own, but for a real homemade pizza party centerpiece, you need a couple of lighter sides to balance out that rich, cheesy crust. Since we have so much fantastic flavor going on already, I like to keep the accompaniments simple!
Honestly, a crisp, bright green salad is perfect—maybe with a simple red wine vinaigrette to cut through the richness. If you are looking for something a little more substantial, some simple garlic knots are always a hit. If you need some quick inspiration for those sides that disappear first, I put together a very dependable list of easy appetizers and snacks you can whip up while the pizza bakes! Enjoy every square!
Frequently Asked Questions About Deep Dish Pizza
It’s natural to have questions when you are tackling a new style of pizza, especially one as special as this! I get asked the same things over and over again in my comments section, so let’s clear a few things up right now to ensure your detroit deep dish recipe turns out perfectly.
Can I use a standard round pizza pan for this recipe?
Oh, honey, please don’t try that! The rectangular pan is absolutely essential for making true Detroit style pizza. It’s not just about the shape; it’s about how the dough spreads to the four sharp corners. Those corners are where the cheese meets the hot metal sides to form that signature caramelized, crunchy crust. A round pan won’t give you the right thickness or the proper crispy edge pizza texture we’re aiming for. Stick to a 10×14 inch in steel or heavy-duty aluminum!
What is the best way to reheat leftover Detroit style pizza?
This pizza is fantastic the next day, but reheating is key. Never, ever reach for the microwave! The microwave makes that beautiful airy crust soggy. The trick is to crisp it back up. I prefer putting a slice right into a dry, non-stick skillet over medium heat for about five minutes to re-crisp the bottom. Then, sometimes, I’ll pop the lid on for the last minute just to melt the cheese again. If you have a lot of leftovers, the oven at 350°F on a baking sheet works beautifully too. If you need some quick companion ideas for reheating nights, check out my thoughts on simple weeknight dinners!
Why is the sauce put on top of the cheese?
This is one of the best traditions of this style! Putting the sauce on top shields the airy dough underneath from getting too soggy during that long bake time. The cheese melts underneath, forming a wonderful barrier, and then the sauce sits up top where it can concentrate in flavor without steaming the bread. It ensures the crust stays light and airy while the toppings are perfectly cooked. It’s a little bit of kitchen magic, really!
PrintAuthentic Detroit Deep Dish Pizza with Crispy Edge

Make the trendy Detroit style pizza at home. This recipe delivers the signature airy crust and deeply caramelized, cheesy edges that make this deep dish famous.
- Prep Time: 45 min
- Cook Time: 15 min
- Total Time: 140 min
- Yield: 8 servings 1x
- Category: Dinner
- Method: Baking
- Cuisine: American
- Diet: Vegetarian
Ingredients
- 1 1/2 cups warm water (about 105-115°F)
- 1 teaspoon sugar
- 2 1/4 teaspoons active dry yeast
- 3 1/2 cups bread flour
- 1 teaspoon salt
- 1/4 cup olive oil, plus more for the pan
- 1 cup brick cheese, shredded (or a mix of mozzarella and cheddar)
- 1 cup Wisconsin brick cheese, cubed
- 1 1/2 cups crushed tomatoes (high quality)
- 1 teaspoon dried oregano
Instructions
- Combine the warm water and sugar in a small bowl. Sprinkle the yeast over the top and let it sit for 5 to 10 minutes until foamy.
- In a large bowl, whisk together the bread flour and salt. Pour in the yeast mixture and 1/4 cup of olive oil. Mix until a shaggy dough forms.
- Turn the dough out onto a lightly floured surface and knead for 5 to 7 minutes until smooth. The dough will be soft.
- Lightly coat a large bowl with olive oil. Place the dough in the bowl, turning to coat. Cover the bowl with plastic wrap and let it rise in a warm place for 1 to 1.5 hours, or until doubled in size.
- Generously grease a 10×14 inch rectangular steel or heavy-duty baking pan with olive oil. Press the dough evenly into the bottom of the prepared pan, stretching it to the corners. Let the dough rest in the pan for 30 minutes.
- Preheat your oven to 475°F (245°C).
- Spread the cubed Wisconsin brick cheese evenly over the dough, leaving a small border around the edges. Top this with the shredded brick cheese blend.
- Pour the crushed tomatoes over the cheese layer, spreading them gently to cover the top. Sprinkle with dried oregano.
- Bake for 12 to 15 minutes. The crust should be golden brown.
- For the signature crispy edge, sprinkle the remaining shredded cheese right up to the edges of the pan during the last 5 minutes of baking, allowing it to caramelize against the hot metal.
- Remove from the oven and let the pizza rest in the pan for 5 minutes before slicing into squares. Serve immediately.
Notes
- Using brick cheese is key for the authentic flavor and texture. If you cannot find it, use a mix of whole milk mozzarella and mild cheddar for the best melt.
- The high oven temperature helps create the airy interior and crispy bottom crust.
- This recipe makes a great homemade pizza party centerpiece.
Nutrition
- Serving Size: 1 slice
- Calories: 450
- Sugar: 5
- Sodium: 750
- Fat: 22
- Saturated Fat: 11
- Unsaturated Fat: 8
- Trans Fat: 0
- Carbohydrates: 48
- Fiber: 2
- Protein: 18
- Cholesterol: 45