
When I talk about dessert, I’m not talking about fussy little pastries where you spend more time plating than eating. I’m talking about something truly comforting and deeply flavored, something that hits that sweet spot between a chewy cookie and a fudgy brownie. That’s exactly what we’ve created here! We’re diving into the rich, almost caramel-like magic that happens when you toast butter—that nutty background note is what separates the good from the absolute obsession-worthy. Trust me when I say, once you master the technique for these brown butter ooey gooey bars, you won’t go back to plain blondies again. My decades of baking taught me that the real secret to that decadent texture isn’t luck; it’s preparation, and I’m going to walk you through every simple step to ensure yours are perfectly soft and undeniably rich.
- Why These brown butter ooey gooey bars Are Your New Favorite Treat
- Essential Ingredients for Rich brown butter ooey gooey bars
- Fudgy brown butter squares tutorial: How to Prepare brown butter ooey gooey bars
- Tips for Success with Your chewy brown butter squares with minimal crisp
- Ingredient Substitutions for brown butter dessert bars recipe
- Storage and Reheating Instructions for these Deeply flavored bar cookies
- Serving Suggestions for Nutty brown butter dessert bars
- Frequently Asked Questions About Making brown butter ooey gooey bars
- Share Your Rich brown butter dessert baking Experience
Why These brown butter ooey gooey bars Are Your New Favorite Treat
Why bother with another boring square recipe when you can have pure decadence? These bars deliver on flavor and texture in ways that just feel special, even though they are truly easy to whip up. They’ve quickly become a staple around here because:
- That unbelievably *nutty brown butter dessert bars recipe* flavor. You just can’t fake that toasted richness!
- They deliver that perfect, soft chew—seriously, they are almost underdone in the best possible way.
- Everything comes together fast. We’re talking about an elevated dessert made from scratch without needing specialized equipment.
If you’re looking for the ultimate treat, you can find more of my favorite comforting bakes right here.
Essential Ingredients for Rich brown butter ooey gooey bars
I always tell folks that a great baked good starts with respect for the ingredients. You don’t need a pantry full of fancy stuff for these brown butter ooey gooey bars, but the basics need to be right, especially when we’re dealing with that browned butter! We’re talking quality control at the butter stage. If you stick to the list below and pay attention to those little details about temperature and packaging, you’re already halfway to success. Remember, this recipe is all about depth—you get that from the sugars and the toasted milk solids, not just the flour! Look at these key players:
- 1 cup (2 sticks) unsalted butter (this is non-negotiable!)
- 1 1/2 cups packed light brown sugar
- 1/2 cup granulated sugar
- 2 large eggs, room temperature
- 1 tablespoon vanilla extract
- 1 1/2 cups all-purpose flour
- 1 teaspoon baking powder
- 1/2 teaspoon salt
- 1/2 cup chopped pecans or walnuts (optional—if you skip these, consider folding in chocolate chips instead!)
- 1 teaspoon flaky sea salt, for topping
Ingredient Clarity and Preparation Notes
The real work here is technique, but the ingredients help the texture along. Always use unsalted butter so you can control the final salt level; salted butter can throw off the balance when we add the topping. Your eggs absolutely must be at room temperature; cold eggs shock the warm butter mixture and we don’t want that! The light brown sugar is a champion for moisture and that deep, molasses flavor that complements the nuts we get from browning the butter. Don’t skimp on the finishing flaky sea salt, either—it cuts through all that richness beautifully.
Fudgy brown butter squares tutorial: How to Prepare brown butter ooey gooey bars
Alright, this is where the magic happens! If you’ve rushed the browning process or added your sugar while the butter was still volcanically hot, you might find yourself with flat, less chewy results. We need the butter to cool down just enough so it doesn’t scramble the eggs but stays warm enough to properly melt and integrate with the sugar, creating that chewy foundation. Don’t worry; I’ve taught my grandkids how to do this part perfectly, and you will too! We’re aiming for structure combined with supreme softness. If you’re looking for some other great ideas for treats to pair with these bars, check out my collection of easy snacks!
Step 1: Browning the Butter for Deep Flavor
Get yourself a nice light-colored saucepan—you need to see those milk solids turning brown! Set your heat to medium. Melt the butter slowly, and it’s going to foam up like crazy at first. Keep stirring; don’t walk away! Soon, the foam subsides, and you’ll see tiny brown specks forming at the bottom, and the smell shifts to this incredible nutty aroma, like toasted hazelnuts. That’s your cue! Immediately pour *all* of that goodness—the clear liquid and those dark solids—into a large mixing bowl. Let it sit there for a good 10 minutes. Patience here is key for building the flavor in your brown butter dessert bars recipe, ensuring you don’t scorch the sugar when it goes in next.
Step 2: Creating the Gooey Base Batter
Now that the butter is cool enough for human contact, whisk in both the light brown sugar and the white sugar. You need to beat this for a full minute until it looks lighter and fluffy—we’re re-incorporating some air here. Next, drop those room temperature eggs in, one at a time, beating well after each one. Don’t forget the vanilla! When you add the flour mixture, remember my number one rule for avoiding cakey bars: mix it until *just* combined. If you see those last few streaks of flour, stop stirring. Overmixing develops gluten, and gluten means chewy turns to tough. This gentle hand is how you achieve those beautifully gooey butter bars easy instructions promise.
Step 3: Baking for the Ultimate ooey gooey texture
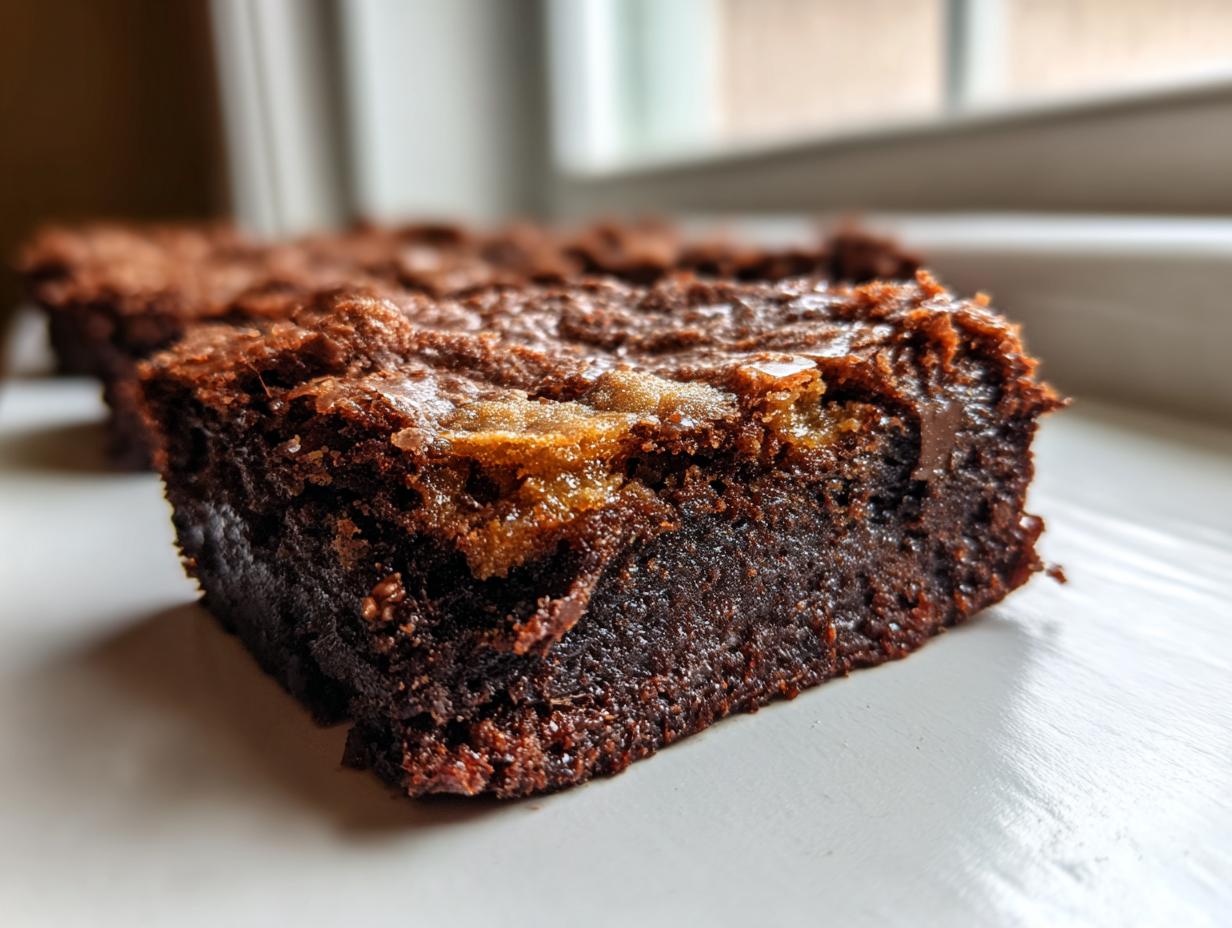
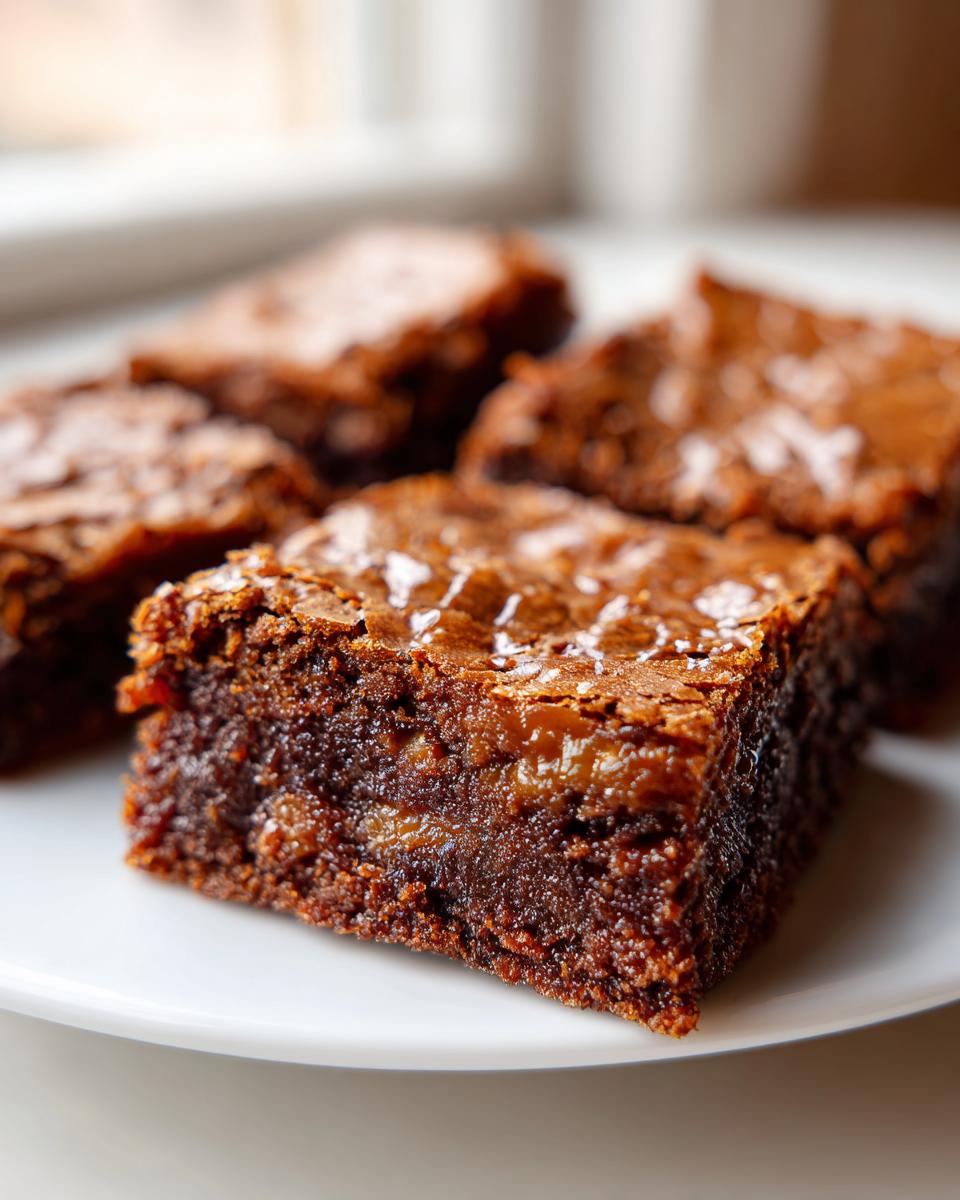
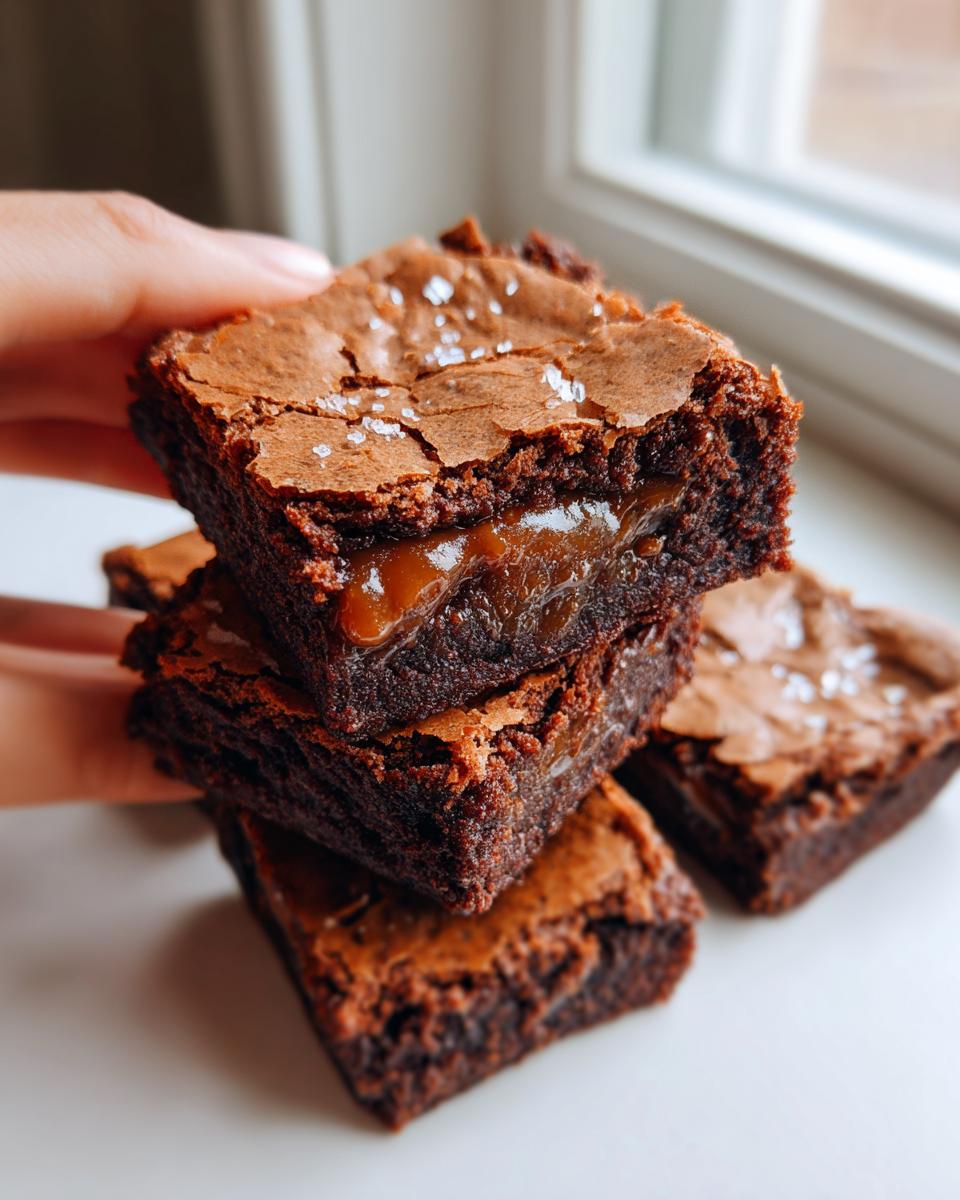
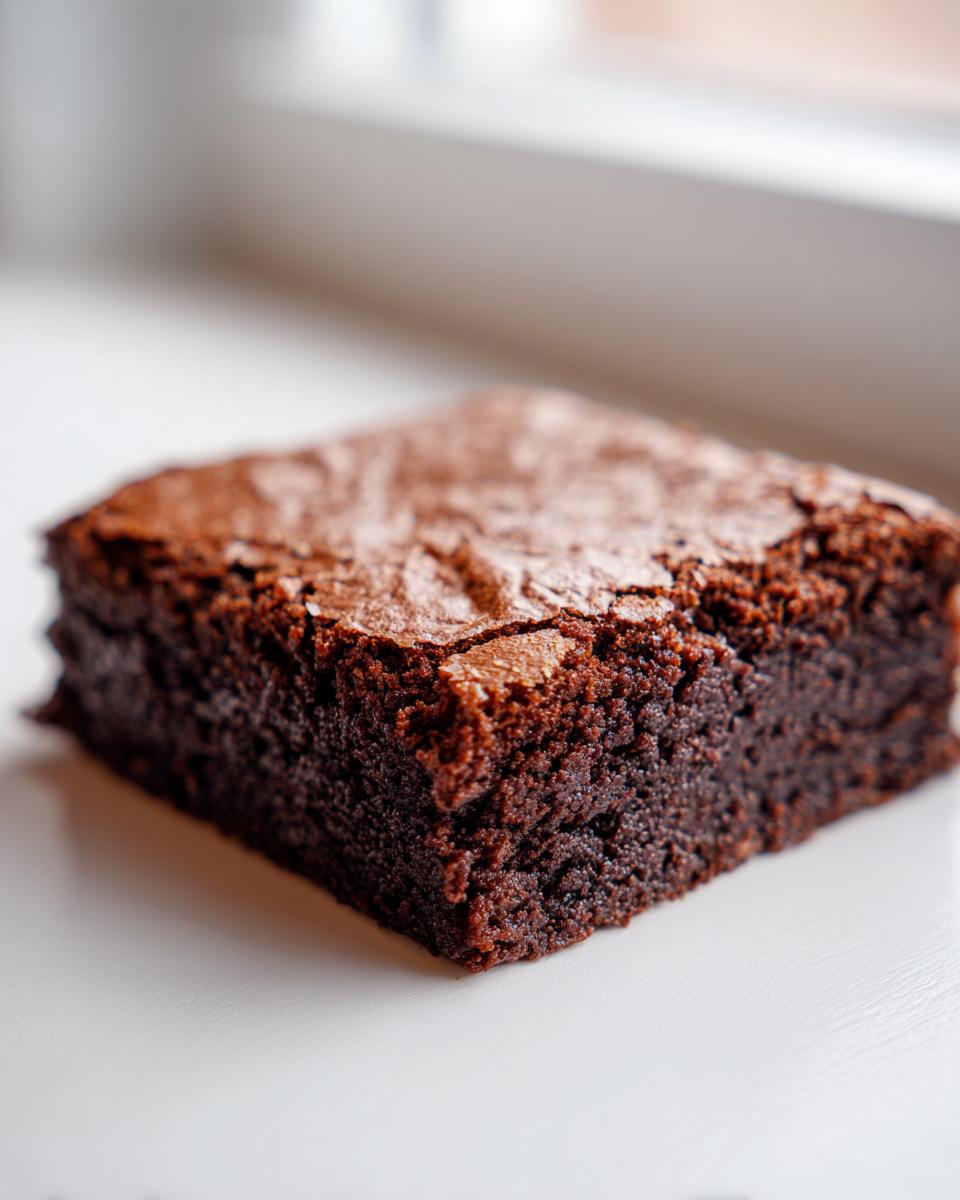
Scrape that thick batter into your prepared pan—remember, parchment sling makes life happier! Spread it out evenly. Now, sprinkle that flaky sea salt right across the top while it’s still raw. This is crucial for balancing that deep brown butter flavor. Pop it into the 350°F oven for about 25 to 30 minutes. Don’t panic later or check it too soon! For the perfect center, you want the edges to look baked and firm, but if you peek into the middle, it should still look slightly soft, maybe even a little glossy or wet. That soft center is going to set up perfectly during the cooling stage, guaranteeing that ultimate ooey gooey texture we are aiming for.
Step 4: The Critical Cooling Period for brown butter ooey gooey bars
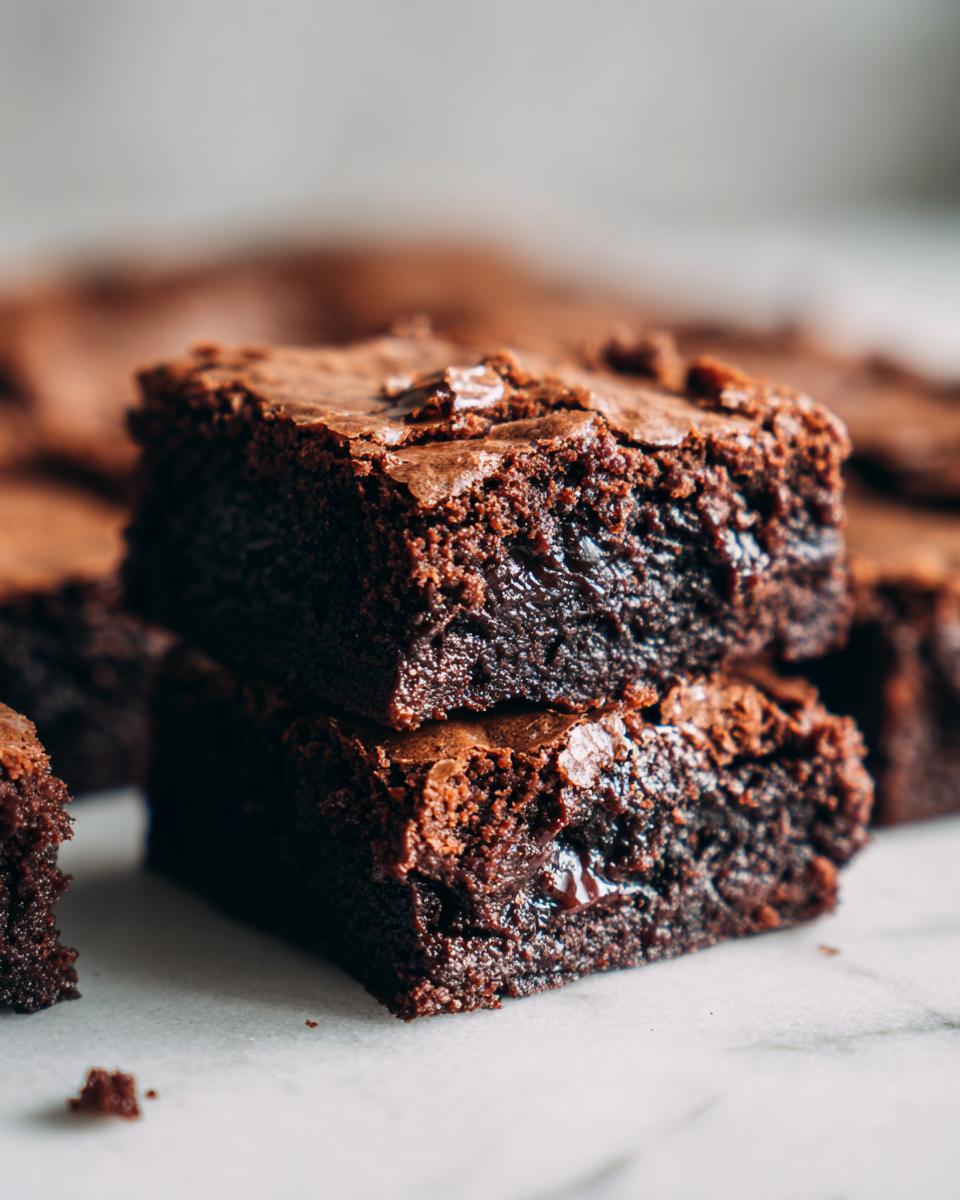
This step is the hardest part of the entire recipe because they smell divine, but you must resist cutting into them! Heat makes fudge soft, and these bars are basically a rich, baked fudge. If you try to slice them while warm, they turn into soup! You need to let them cool on the counter completely—I mean, at least two full hours, maybe longer. Use that parchment overhang to lift the whole slab out onto a cooling rack first. This extended rest allows the sugars and fats to stabilize, solidifying that beautiful fudgy center you worked so hard for. This dedicated cooling time is the secret to a perfect fudgy brown butter squares tutorial result.
Tips for Success with Your chewy brown butter squares with minimal crisp
Making any bar cookie, but especially one aiming for that perfect gooey center, requires a little know-how. I want you to succeed on your first try! So, here are the Carrington family secrets that ensure we get those chewy brown butter squares with minimal crisp edges. First, lining your 9×13 pan with parchment paper, leaving those overhang handles, is non-negotiable! That’s your ticket to lifting the whole slab out cleanly later. Second, I mentioned it before, but it bears repeating: room temperature eggs blend better. Cold eggs make the batter dense before it even hits the oven, and we’re fighting against density here!
If you are looking for more tips on general baking success from my kitchen, you can check out the foundations I use right here.
Ingredient Substitutions for brown butter dessert bars recipe
I know some kitchens have allergies or maybe you just ran out of something important! Don’t panic if you need to tweak these brown butter dessert bars recipe staples. The most common swap is leaving out the nuts. If you skip those pecans or walnuts, just toss in an extra half cup of good quality chocolate chips—milk, semi-sweet, whatever makes your heart sing. This keeps the volume right, too. If you’re looking at flour alternatives, be careful! All-purpose flour is what gives us that classic chewy structure. If you use something like almond flour or a high-protein blend, your bars might end up a little more crumbly than perfectly gooey. For sugar, try to stick to the brown sugar ratio; it holds the moisture in these rich brown butter dessert baking treats better than anything else.
Storage and Reheating Instructions for these Deeply flavored bar cookies
The real beauty of these brown butter ooey gooey bars is that they actually get better once they’ve set up. You don’t need to worry about popping these into the fridge, which is great because cold bars tend to get hard! Just place them in a good airtight container once they are totally cool. They keep perfectly well at room temperature for about four days. If you happen to find any left over after that time, they’ll still taste wonderful, but that signature melt-in-your-mouth gooeyness is at its peak in the first couple of days. No need to reheat, but letting them sit on the counter for 20 minutes if they’ve been stored somewhere cool helps!
Serving Suggestions for Nutty brown butter dessert bars
These nutty brown butter dessert bars are fantastic all on their own, of course, but I love dressing them up a little when company comes over. They pair so perfectly with something simple and cold. Trust me on this: a tiny scoop of vanilla bean ice cream melting right into that warm, gooey center is pure heaven. Otherwise, a simple dusting of powdered sugar is all you need, or just have them ready with a strong mug of black coffee. If you need more ideas for what to serve with your incredible bakes, check out my favorite dessert pairings over here.
Frequently Asked Questions About Making brown butter ooey gooey bars
I know when you’re trying a new recipe, especially one that promises the perfect texture, you’ve got questions rattling around in that baker’s brain! That’s perfectly normal. I’ve compiled some of the most frequent things people ask me about achieving these rich brown butter dessert baking squares.
Can I skip browning the butter in this recipe?
Well, bless your heart, you certainly *can*, but then you wouldn’t really have my brown butter ooey gooey bars, would you? If you skip the browning, you’ll end up with a delicious, very chewy blondie, no question. But you lose that deep, toasty, nutty complexity that only comes from coaxing those little milk solids in the butter to turn brown. It’s the main flavor star!
How do I know if my bars are baked enough for that gooey center?
This is the most important question for getting that perfect texture! You are looking for a visual cue, not a dryness cue. The edges should look firm, maybe just starting to turn golden brown. But the very center? It should look a tiny bit soft and shiny, almost like it hasn’t quite finished cooking. Resist the urge to put it back in! That slight underbake is what guarantees you meet the promise of how to make chewy dessert bars. They finish setting up as they cool down.
Can I make these bars ahead of time?
Oh, I usually insist on it! These are actually much better on day two. When they come out of the oven, they are very soft. During that crucial cooling time—which needs to be at least two full hours—they transform into that *ultimate gooey bake recipe* consistency you’re looking for. Store them airtight at room temperature, and they stay perfect for days.
Share Your Rich brown butter dessert baking Experience
Now that you’ve tried making these incredible brown butter ooey gooey bars, I just have to know what you thought! Did you get that perfect nutty depth in the flavor? And more importantly, did you manage to pull them out when the center was just right—still soft and totally decadent?
Baking is all about sharing recipes and learning together, so please leave a rating using those five stars above and drop a comment below. Tell me if you added any fun substitutions, like a swirl of caramel or if you stuck to the traditional pecan topping. I read every single comment, and I love hearing how these recipes turn out in your own kitchens!
If you’ve shared a picture of your beautiful, chewy squares on social media, please tag me! Seeing your success with this rich brown butter dessert baking truly makes my day. I always love seeing the creations from my little corner of the internet, which you can always find more of right here!
PrintBrown Butter Ooey Gooey Bars
Make rich, deeply flavored dessert bars using the nutty taste of brown butter for an ultimate gooey texture.
- Prep Time: 15 min
- Cook Time: 30 min
- Total Time: 2 hours 45 min
- Yield: 24 squares 1x
- Category: Dessert
- Method: Baking
- Cuisine: American
- Diet: Vegetarian
Ingredients
- 1 cup (2 sticks) unsalted butter
- 1 1/2 cups packed light brown sugar
- 1/2 cup granulated sugar
- 2 large eggs, room temperature
- 1 tablespoon vanilla extract
- 1 1/2 cups all-purpose flour
- 1 teaspoon baking powder
- 1/2 teaspoon salt
- 1/2 cup chopped pecans or walnuts (optional)
- 1 teaspoon flaky sea salt, for topping
Instructions
- Prepare the pan: Preheat your oven to 350°F (175°C). Line a 9×13 inch baking pan with parchment paper, leaving an overhang on the sides for easy removal. Lightly grease the paper.
- Brown the butter: Place the butter in a light-colored saucepan over medium heat. Melt the butter, then continue cooking, stirring frequently. The butter will foam, then subside. Watch carefully as brown bits form at the bottom and the butter smells nutty. This takes about 5 to 8 minutes. Immediately pour the browned butter (including the browned bits) into a large, heat-safe mixing bowl. Let it cool for 10 minutes.
- Mix wet ingredients: Add the brown sugar and granulated sugar to the slightly cooled brown butter. Whisk vigorously for 1 minute until well combined and slightly lighter in color. Add the eggs one at a time, mixing well after each addition. Stir in the vanilla extract.
- Combine dry ingredients: In a separate bowl, whisk together the flour, baking powder, and salt.
- Form the batter: Gradually add the dry ingredients to the wet ingredients, mixing on low speed or by hand until just combined. Do not overmix. Fold in the chopped nuts, if using. The batter will be thick.
- Bake: Spread the batter evenly into the prepared pan. Sprinkle the top lightly with flaky sea salt. Bake for 25 to 30 minutes. For the ooey gooey texture, the edges should look set, but the center should still look slightly soft and underbaked.
- Cool completely: Remove the pan from the oven and let the bars cool completely in the pan on a wire rack. This cooling process is crucial for achieving the fudgy texture. Do not attempt to cut them warm.
- Cut and serve: Once fully cooled (at least 2 hours), use the parchment overhang to lift the slab out of the pan. Cut into 24 squares.
Notes
- To achieve the best nutty flavor, ensure you scrape all the browned milk solids from the bottom of the pan into your mixing bowl when browning the butter.
- For extra decadence, fold in 1/2 cup of chocolate chips or toffee bits with the nuts.
- If you prefer a slightly firmer bar, reduce the bake time by 2 minutes, but remember the goal is a fudgy center.
- Store these rich brown butter dessert bars in an airtight container at room temperature for up to 4 days.
Nutrition
- Serving Size: 1 square
- Calories: 195
- Sugar: 18
- Sodium: 95
- Fat: 11
- Saturated Fat: 7
- Unsaturated Fat: 4
- Trans Fat: 0
- Carbohydrates: 23
- Fiber: 0
- Protein: 2
- Cholesterol: 45