
Oh, my friends, when a craving hits for something truly special—golden, cheesy, and possessing that satisfying elastic pull that just melts in your mouth—there’s nothing quite like it. That’s why I’m sharing my absolute favorite **brazilian cheese bread**, or Pão de Queijo, with you today. This isn’t just another recipe; it’s proof that the best comfort foods are often the simplest. Best of all, it’s naturally gluten free because we rely completely on wonderful tapioca flour. After thirty years of teaching patience in the classroom, I can tell you that reliable, straightforward recipes like this are the heart of my kitchen. These little puffs are quick, dependable, and always bring a wonderful happy chatter to the table.

- Why This Brazilian Cheese Bread Recipe Works So Well
- Gathering Ingredients for Your Brazilian Cheese Bread
- Step-by-Step Instructions: How to Make Brazilian Cheese Bread
- Tips for Perfect Brazilian Cheese Bread Every Time
- Serving Suggestions for Party Appetizers with Cheese Bread
- Storing and Reheating Your Brazilian Cheese Bread
- Frequently Asked Questions About Pão de Queijo
- Nutritional Snapshot for Your Gluten Free Cheese Bread Recipe
- Share Your Experience Making This Brazilian Snack Recipe
Why This Brazilian Cheese Bread Recipe Works So Well
I’ve taught many things over the years, but I’ve learned that understanding the ‘why’ behind a recipe makes you a better baker. With Pão de Queijo, it’s all about coaxing that magnificent texture from simple ingredients. We aren’t using baking powder like you would in a biscuit; we’re using heat and one special flour to do all the heavy lifting!
- That incredibly crispy shell and gooey center aren’t an accident—they are the result of scalding the flour with hot liquid.
- The magic ingredient, tapioca flour, is what makes this an authentic Brazilian Cheese Bread and keeps it naturally gluten free.
Achieving the Signature Chewy Texture with Tapioca Flour Buns
This is the absolute key to a great **gluten free cheese bread recipe**. You see, tapioca starch (which is what this flour is) performs wonderfully when it hits heat. It gelatinizes, which basically means it turns into that wonderful, sticky, stretchy structure that gives your **tapioca flour buns** that amazing elastic pull when you bite into them. My first attempts were flat little hockey pucks, honestly! Until I realized I needed to make sure the milk and oil were truly boiling when I added the flour. Don’t be shy with that stirring!
Gathering Ingredients for Your Brazilian Cheese Bread
Now that you know *why* this recipe succeeds, let’s get your supplies ready. Cooking by Carla is all about using what you have, but for Pão de Queijo, a couple of items really make or break the experience. Don’t skip the tapioca flour, that’s for sure! I’ve listed exactly what you need below to make about twenty of these wonderful **chewy cheesy bread bites**.
We’ll need 1 cup of whole milk, about half a cup of any neutral oil (vegetable works just fine), and a teaspoon of salt to get things going. Then come the stars: two cups of tapioca flour, two large eggs, and the cheese!
Ingredient Notes and Substitutions for Chewy Cheesy Bread Bites
When you buy the tapioca flour, you might see ‘sour’ or ‘sweet’ available. Either works beautifully, though the sour gives a slightly more traditional tang, which I enjoy. For the cheese, I listed Parmesan, but honestly, mixing it up gives you great depth. If you want that famous restaurant flavor, try half Parmesan and half Monterey Jack or Mozzarella. That blend really nails that rich, gooey, **Texas de Brazil cheese bread copycat** profile.

Step-by-Step Instructions: How to Make Brazilian Cheese Bread
Alright, let’s make some magic! These **brazilian cheese bread** come together so quickly—we’re talking about 40 minutes total, from prep to your first warm bite. Remember to get your oven warming up to 375°F (190°C) right away, and lightly grease your pan or lay down some parchment paper. We need everything ready because the dough moves fast once it gets going!
Scalding the Flour: The Secret to Easy Pão de Queijo Recipe
This is where people get nervous, but trust me, this step is the make-or-break for that chewy center. You’ll combine your milk, oil, and salt in a saucepan and bring it right up to a rolling boil. Take it off the heat—and I mean *immediately*—and dump that two cups of tapioca flour in all at once. Grab a sturdy wooden spoon and stir like you mean it! It’s going to look terrible, like a gluey, sticky mess that refuses to mix. That’s exactly what you want! It means the flour has been properly scalded. Let that sit for about ten minutes until it’s just warm enough to touch.
Forming and Baking Your Homemade Brazilian Bread
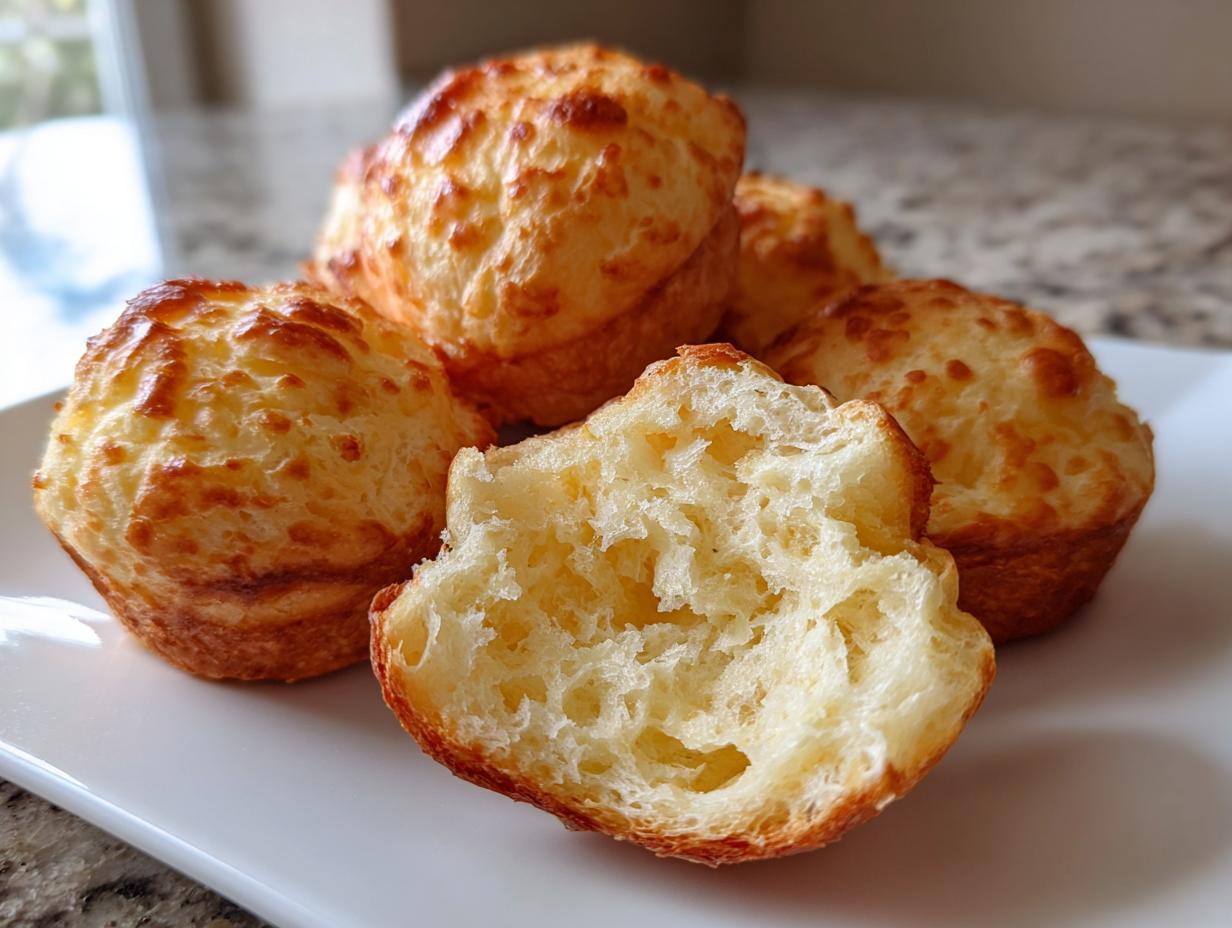
Once it’s warm, it’s time for the eggs! Add them in one at a time, mixing hard after each one. It might look like it’s separating at first, but keep going until it smooths out again. Stir in your cheese until it’s happy and coated. Now, just grab tablespoons of the dough and roll them into balls, about 1 to 1.5 inches wide. Give them a little space—about an inch—on your baking sheet. Pop them in that preheated oven for about 20 to 25 minutes. You’re looking for them to puff up high and turn a lovely golden brown color. If you want to see a fantastic example of the finished product that looks just like the Texas de Brazil cheese bread copycat flavor, these instructions will get you there! It’s wonderful as one of my easy party appetizers with cheese bread.

Tips for Perfect Brazilian Cheese Bread Every Time
Even with dependable recipes like this, sometimes things go a little sideways, don’t they? That’s just home cooking! I remember one holiday when my oven thermostat was acting up, and half my **brazilian cheese bread** came out looking more like flat, hard discs than fluffy Brazilian puffs. My fix? I realized I needed a reliable oven thermometer, not just the knob setting. I’ve found that paying attention to the heat, like in this guide, really helps things turn out right.
Here are a few things I’ve learned over the years:
- Don’t crowd the baking sheet! These puffs need room to breathe and expand. If they touch, they just bake together instead of puffing up right.
- Use room temperature eggs. Cold eggs can shock that warm, scalded dough, which works against getting that airy interior for your **savory gluten free bites**.
- For the best **breakfast cheese bread**, eat them right out of the oven! Reheating them later is fine, but that initial crisp crust fades fast. I recommend a quick blast in a hot oven—never the microwave—if you’re saving them for later. Check out my quick easy breakfast recipes for more ideas!
Serving Suggestions for Party Appetizers with Cheese Bread
Honestly, I never wait for a party to make these! The absolute best way to enjoy this **brazilian cheese bread** is while they are piping hot from the oven. That’s when the outside snaps perfectly, and the inside is just gorgeously stretchy. They make a divine, quick snack anytime of day.
For breakfast, they are wonderful alongside a strong cup of coffee—forget toast! If you are serving them as **party appetizers with cheese bread**, try having a small dish of pesto or even a light, herby sour cream dip nearby. They don’t really need anything, but a little something extra always feels festive. You can find more ideas for simple nibbles in my collection of easy appetizers and snacks. If you want to see how other folks are enjoying these wonderful cheesy tapioca bread bites, take a peek at what others have made!
Storing and Reheating Your Brazilian Cheese Bread
These little gems are best the instant they come out of the oven, but let’s be realistic; sometimes you make a giant batch, or maybe you just couldn’t eat them all in one sitting (though I can often manage it!). The great news about this **homemade brazilian bread** is that it stores better than most yeast breads, especially if you handle the cooling correctly.
If you have leftovers, just let them cool completely on a wire rack first. Don’t trap the steam in a plastic bag, or you’ll undo all that hard work we did scalding the flour! Store cooled puffs in an airtight container at room temperature for up to three days. They might get a little softer inside, but they’ll still taste marvelous.
For longer storage, freezing is your best friend. This is my favorite way to keep them on hand for those sudden cravings for **quick cheese rolls**! You can freeze them either baked or unbaked. For the unbaked dough balls, just place them on a baking sheet, freeze until solid, and then transfer them to a freezer bag. You can bake them right from frozen, but you’ll need to add about 5 to 7 minutes extra to the baking time.
Now, the big question: reheating! If you want that snap back in the crust, you absolutely must avoid the microwave. A microwave warms them up, sure, but it turns the inside gummy and soft in a sad way. Instead, preheat your oven—or even a toaster oven if you just have a few—to about 350°F (175°C). Pop the cooled puffs on a baking sheet for about 5 to 7 minutes. This quick blast of dry heat resets that crispy exterior beautifully. It’s like magic! You’ll have wonderful **brazilian cheese bread** all over again.

Frequently Asked Questions About Pão de Queijo
When you are trying out a new recipe, especially one that relies on a specific texture like this **brazilian cheese bread**, it’s natural to have questions crop up! I certainly did when I was perfecting mine. Don’t worry if things aren’t textbook perfect the first time; we’ll work through the common sticking points right here. Finding the right answers ensures you get those amazing, chewy bites every single time.
Can I use regular wheat flour instead of tapioca flour for brazilian cheese bread?
Oh, I understand why you might ask, but please don’t substitute regular flour here! If you used wheat flour, you would end up with a dense, normal dinner roll rather than the Pão de Queijo we are aiming for. The entire structure of this recipe, what makes it that perfect **savory gluten free bite**, relies on the tapioca flour gelatinizing when scalded. That’s the secret to the chewiness!
What is the best cheese for an authentic Brazilian cheese bread?
For a truly **authentic Brazilian cheese bread**, the original recipe calls for *Queijo Minas* if you can find it, which is a fresh, slightly salty cheese common in Brazil. Since that’s hard to track down sometimes, I lean on Parmesan for that sharp, salty flavor. However, if you are chasing that super stretchy, gooey cheese pull you see in restaurants, try mixing half Parmesan with half Mozzarella or Monterey Jack. That blend gives you great flavor and incredible stretch!
Why did my fluffy Brazilian puffs turn out flat?
Flat puffs break my heart! Since this recipe doesn’t rely on leavening agents like baking powder (the steam does the lifting!), flatness usually comes down to heat or dough consistency. Make sure your oven really is up to 375°F before they go in—too cool, and they won’t puff up instantly. Also, check that you incorporated your eggs fully. If the dough isn’t completely smooth after the eggs are added, they won’t rise properly. If you need a quick dinner idea while these are baking, check out my favorites for quick healthy lunch ideas!
Nutritional Snapshot for Your Gluten Free Cheese Bread Recipe
Now, I always tell folks that cooking is about enjoyment, not counting every little thing, but sometimes it’s nice to have a ballpark idea of what you are eating, especially when you’re making something as delightfully small and portion-controlled as this **gluten free cheese bread recipe**!
These numbers are estimates, mind you. They’re based on standard measurements and the cheese blend I usually use, so treat them as a guide rather than absolute gospel. Making these **savory gluten free bites** at home means you know exactly what’s going into them, which is the best part!
- Serving Size: 1 roll
- Calories: 100
- Fat: 6g
- Saturated Fat: 3g
- Carbohydrates: 8g
- Protein: 3g
- Sugar: 0.5g
See? Not too shabby for such a satisfying, cheesy treat! They are a quick, satisfying bite whenever the craving strikes.
Share Your Experience Making This Brazilian Snack Recipe
Now listen, I’ve given you my very best methods for making truly authentic **brazilian cheese bread**. I’ve taught in classrooms for thirty years, and I know that the best learning happens when you practice and then share what you found out. That’s how we build a kitchen community here at Cooking by Carla!
I truly want to hear from you about these little gems. Did they puff up just right? Did the kids devour them for **breakfast cheese bread**, or were they the hit of your next gathering as **party appetizers with cheese bread**? Please, don’t keep your successes—or even your little oopsies—to yourself!
When you love a recipe and it turns out perfectly dependable, show it some love! I’d be so grateful if you’d leave me a rating right below here—five stars if they gave you that perfect chewy, cheesy bite. If you made them and snapped a photo, please tag me on social media so I can see! Sending photos is the best way I get to see your lovely kitchens and your wonderful families enjoying the food we make together. If you need to reach out directly with questions or ideas, you can always use my contact page. Happy baking, dear friends!
PrintAuthentic Pão de Queijo (Brazilian Cheese Bread)

Make this authentic Pão de Queijo, or Brazilian Cheese Bread, for a naturally gluten-free snack. You will achieve a crispy exterior and a wonderfully chewy, cheesy interior using tapioca flour.
- Prep Time: 15 min
- Cook Time: 25 min
- Total Time: 40 min
- Yield: About 20 small rolls 1x
- Category: Snack
- Method: Baking
- Cuisine: Brazilian
- Diet: Gluten Free
Ingredients
- 1 cup whole milk
- 1/2 cup vegetable oil
- 1 teaspoon salt
- 2 cups tapioca flour (sour or sweet)
- 2 large eggs
- 1 cup shredded Parmesan cheese (or a mix of Parmesan and Mozzarella)
Instructions
- Preheat your oven to 375°F (190°C). Lightly grease a baking sheet or line it with parchment paper.
- In a medium saucepan, combine the milk, oil, and salt. Bring the mixture to a boil over medium heat.
- Remove the saucepan from the heat immediately. Add the tapioca flour all at once and stir vigorously with a wooden spoon until the mixture forms a thick, sticky dough. This step scalds the flour.
- Let the dough cool for about 10 minutes until it is warm enough to handle.
- Add the eggs one at a time, mixing well after each addition until fully incorporated. The dough will look loose at first, but keep mixing until it comes together.
- Stir in the shredded cheese until it is evenly distributed throughout the dough.
- Scoop rounded tablespoons of dough and roll them into small balls, about 1 to 1.5 inches in diameter. Place them on the prepared baking sheet, leaving about 1 inch between each ball.
- Bake for 20 to 25 minutes, or until the cheese bread puffs up and the outside is golden brown.
- Serve warm for the best chewy texture.
Notes
- For the best texture, use tapioca flour (also called tapioca starch). This ingredient makes the bread naturally gluten free.
- If you want a copycat version similar to Texas de Brazil cheese bread, use a blend of cheeses like Parmesan and Monterey Jack.
- Do not overbake; these puffs are best when they are slightly soft inside.
Nutrition
- Serving Size: 1 roll
- Calories: 100
- Sugar: 0.5
- Sodium: 150
- Fat: 6
- Saturated Fat: 3
- Unsaturated Fat: 3
- Trans Fat: 0
- Carbohydrates: 8
- Fiber: 0.2
- Protein: 3
- Cholesterol: 25