
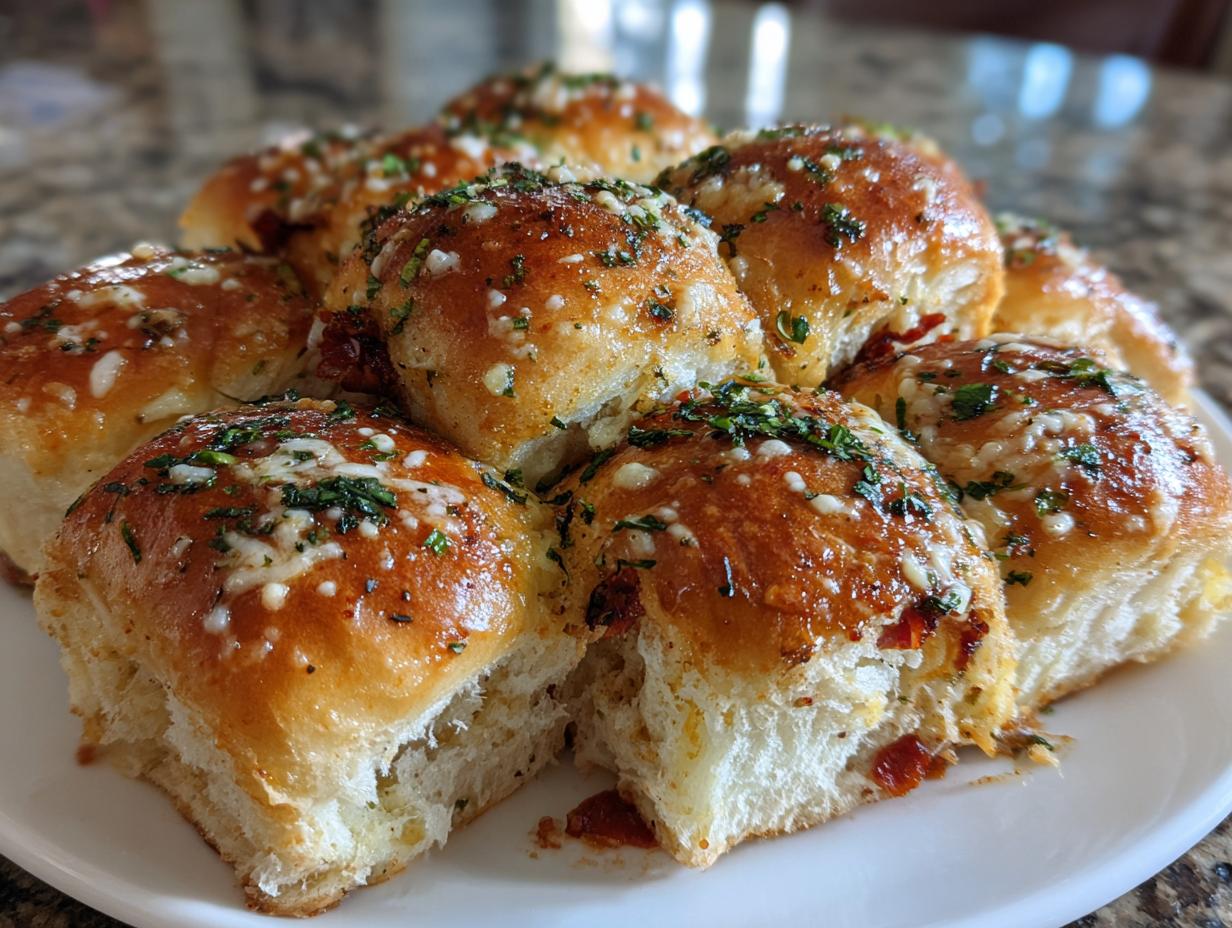
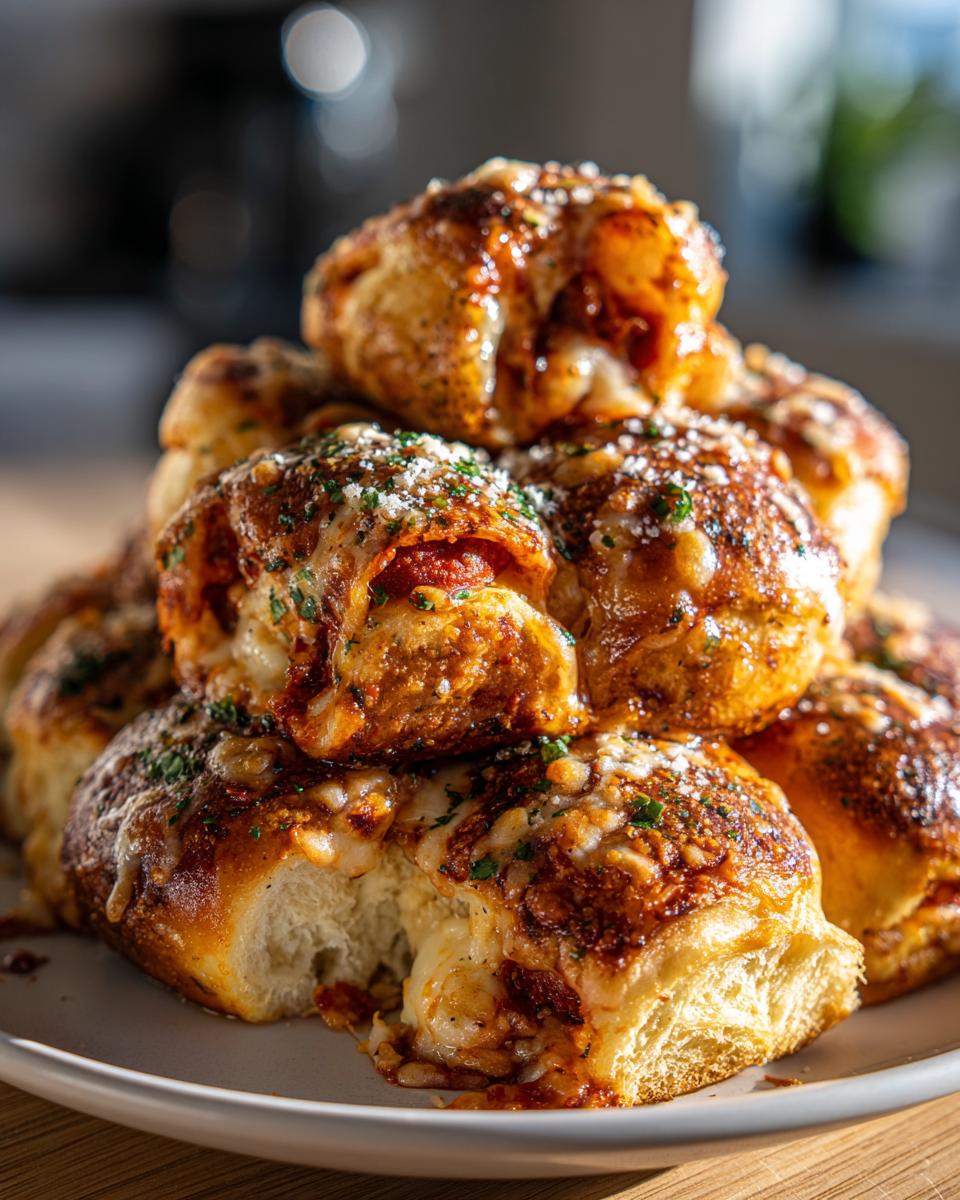
If you are looking for that magical dish that disappears the second it hits the table—the simplest way to feed a crowd that still tastes like you spent hours cooking—then listen up! I’ve found the absolute perfect recipe for you: the glorious **pizza sliders**. These aren’t just little sandwiches; they are cheesy, savory bites baked together until they practically beg to be pulled apart. We use those wonderfully soft Hawaiian rolls, load them up with pepperoni and mozzarella, and then seal the deal with my special garlic butter glaze. After thirty years of teaching children and now cooking for my own grandkids, I know that simple, dependable food like this is what truly brings everyone together. You simply can’t beat these for game day or a fun, quick weeknight meal. Take a look here at how easy it is to make these fantastic easy appetizers and snacks!
- Why These Are the Best Pizza Sliders for Any Gathering
- Gathering Your Ingredients for Hawaiian Roll Pizza Sliders
- Mastering the Garlic Butter Glazed Sliders Topping
- Step-by-Step Instructions for Baked Slider Recipe
- Tips for Success Making Perfect Pizza Sliders
- Storage and Reheating Your Leftover Pizza Sliders
- Serving Suggestions for Pepperoni Pizza Bites
- Frequently Asked Questions About Pizza Sliders
- Sharing Your Homemade Pizza Sliders
Why These Are the Best Pizza Sliders for Any Gathering
When I develop a recipe, I always ask myself: Is this dependable? Will this make my life easier on a busy night? And most importantly, will everyone clean their plates? These pizza sliders tick every single one of those boxes. They are the kind of reliable recipe you can hand to a nervous new cook and know they will succeed.
-
Quick Preparation Time for Easy Pizza Sliders
Honestly, this is where they truly shine. From the moment you decide you want pizza to the moment they go into the oven, you’re looking at maybe ten minutes of work. If you need a wonderful quick dinner idea on a chaotic Tuesday, these are your answer. They are done baking in about 25 minutes, making them a genuine 30-minute meal!
-
The Perfect Pull Apart Pizza Sliders Experience
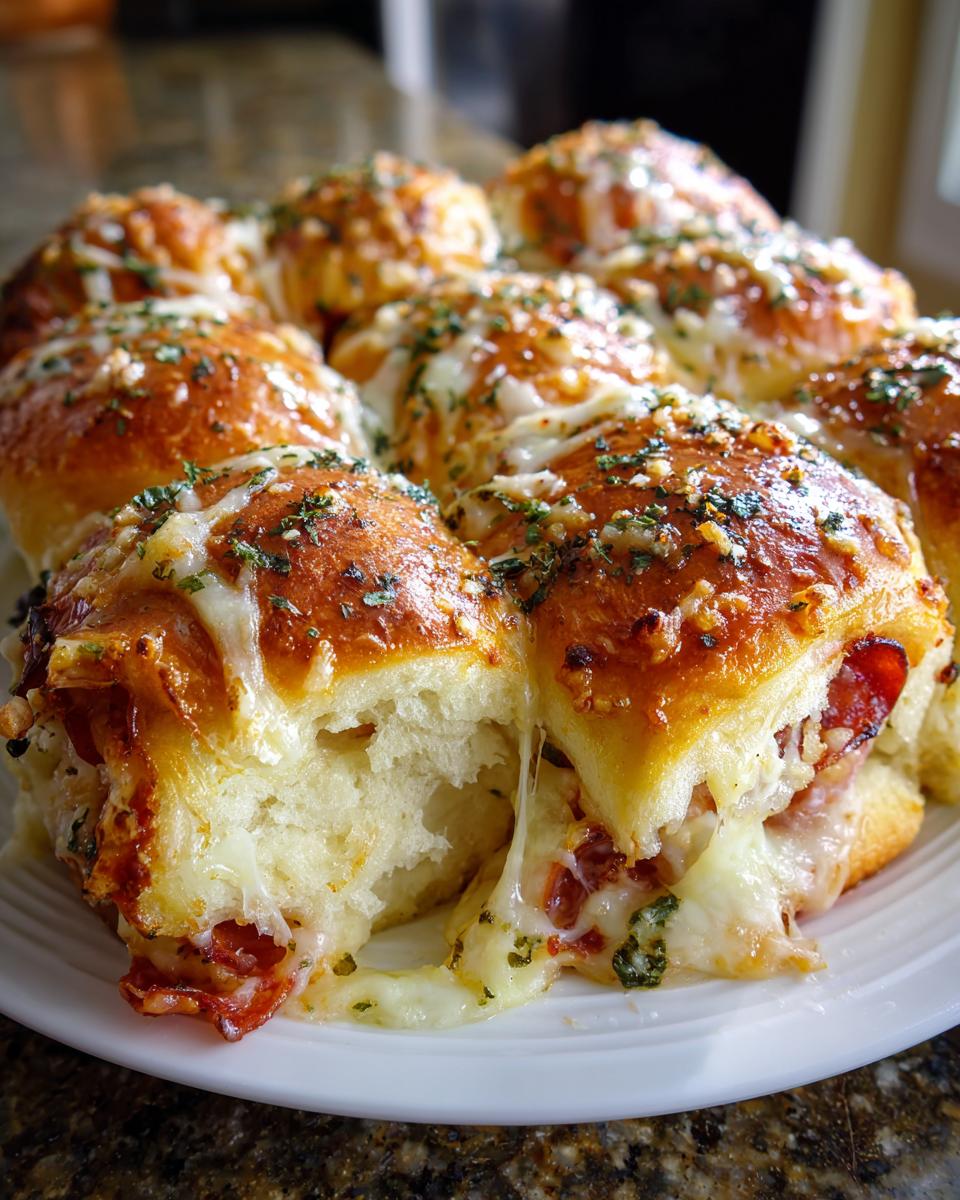
There is something so comforting about serving food that invites people to interact with it. These become the ultimate Pull Apart Pizza Sliders because the rolls are baked pressed up against each other. When you pull one away, the melted mozzarella stretches out, and you get that perfect combination of soft bread, zesty sauce, and savory pepperoni in one bite. It’s an experience!
-
Crowd Pleaser Snacks: A Guaranteed Hit
I’ve served these to my grandchildren and to my bridge club, and they disappear both times! If you are looking for easy crowd pleaser snacks for Super Bowl Sunday, a birthday party, or just Friday night pizza cravings, look no further. They are universally loved, portable, and easy to make in massive quantities!
Gathering Your Ingredients for Hawaiian Roll Pizza Sliders
You know, when a recipe is this simple, the quality of your ingredients really does all the heavy lifting. Don’t stress about complex shopping lists here; these **Hawaiian Roll Pizza Sliders** rely on pantry staples, but treating those staples right makes all the difference. We need the bread, the sauce, the cheese, the pepperoni, and of course, the glorious topping mixture. Everything is listed below, measured out, and ready to go for your quick appetizer setup.
Ingredient Notes and Substitutions for Pizza Sliders
The sweet dinner rolls—the ones that come in that convenient little plastic dome—are non-negotiable for that classic flavor profile. They bake up soft and slightly toasted. If you can’t find the Hawaiian rolls, look for any brand of sweet slider bun. For the cheese, stick to full-fat, pre-shredded mozzarella for maximum meltiness, or grate it fresh if you have the time. And please, use good pepperoni! Since it’s such a strong flavor in these **mini pizza sandwiches**, opting for a higher quality meat really pays off in deliciousness.
Mastering the Garlic Butter Glazed Sliders Topping
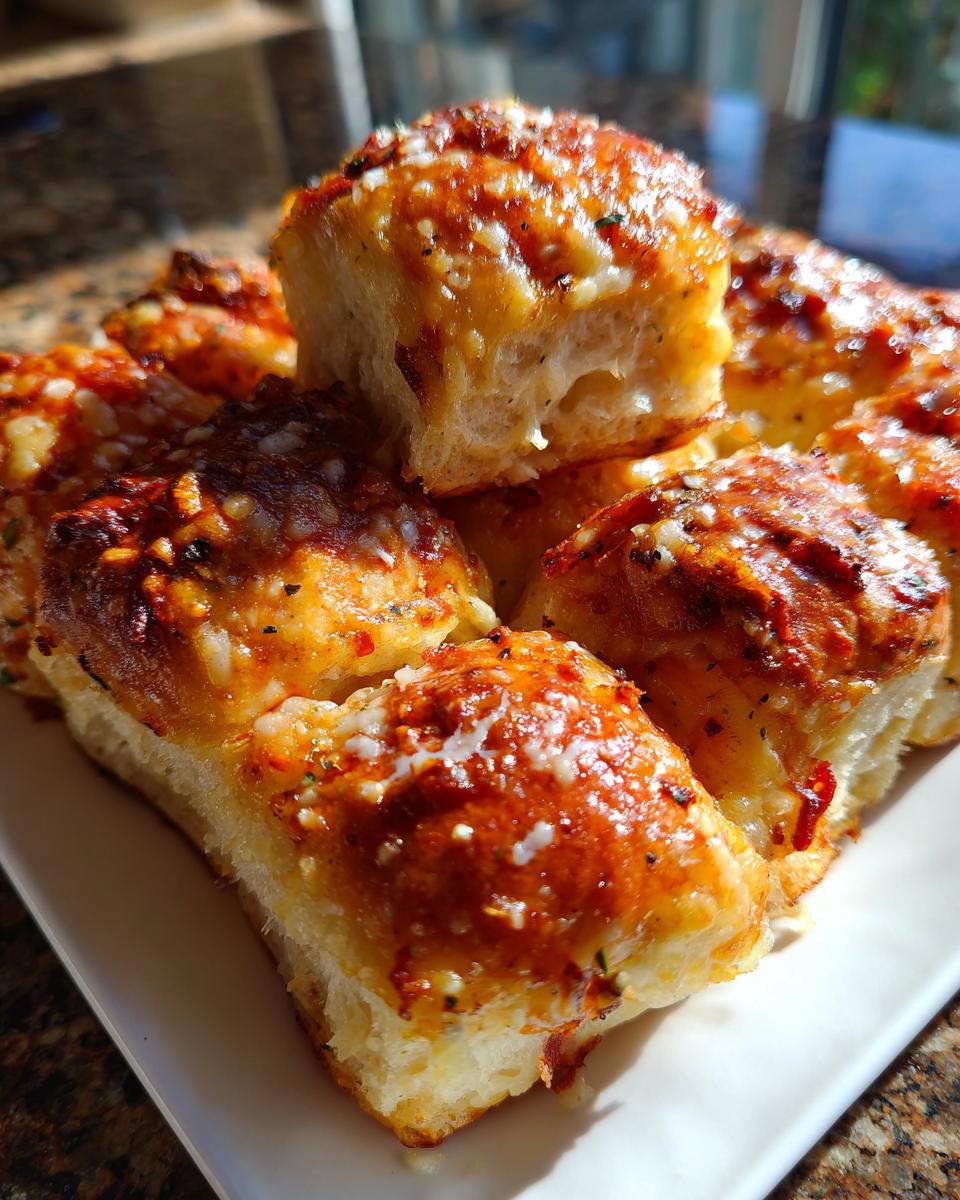
Now, let’s talk about the absolute game-changer here, the thing that elevates these **pizza sliders** from good to *I-need-the-recipe-right-now* famous: the topping!
The secret isn’t in the layers inside; it’s all about what we brush onto that top layer of bread before it ever sees the heat. This melted mixture works magic because it soaks right into the soft tops, gently toasting them while melting the cheese underneath. When I make my artisan garlic bread, I use this same technique because fresh flavor makes such a difference.
You need one stick of good, real butter melted down. While you can certainly use garlic powder in a pinch, trust me: chopping up two cloves of fresh garlic gives you a much brighter, more authentic bite. I mince mine until it’s practically paste.
In a small bowl, combine that melted butter, your fresh minced garlic, and a teaspoon of Italian seasoning. That seasoning is critical—it carries that classic herbaceous pizza flavor we all expect. Whisk it until it’s beautifully combined. This is your **Garlic Butter Glazed Sliders** finish!
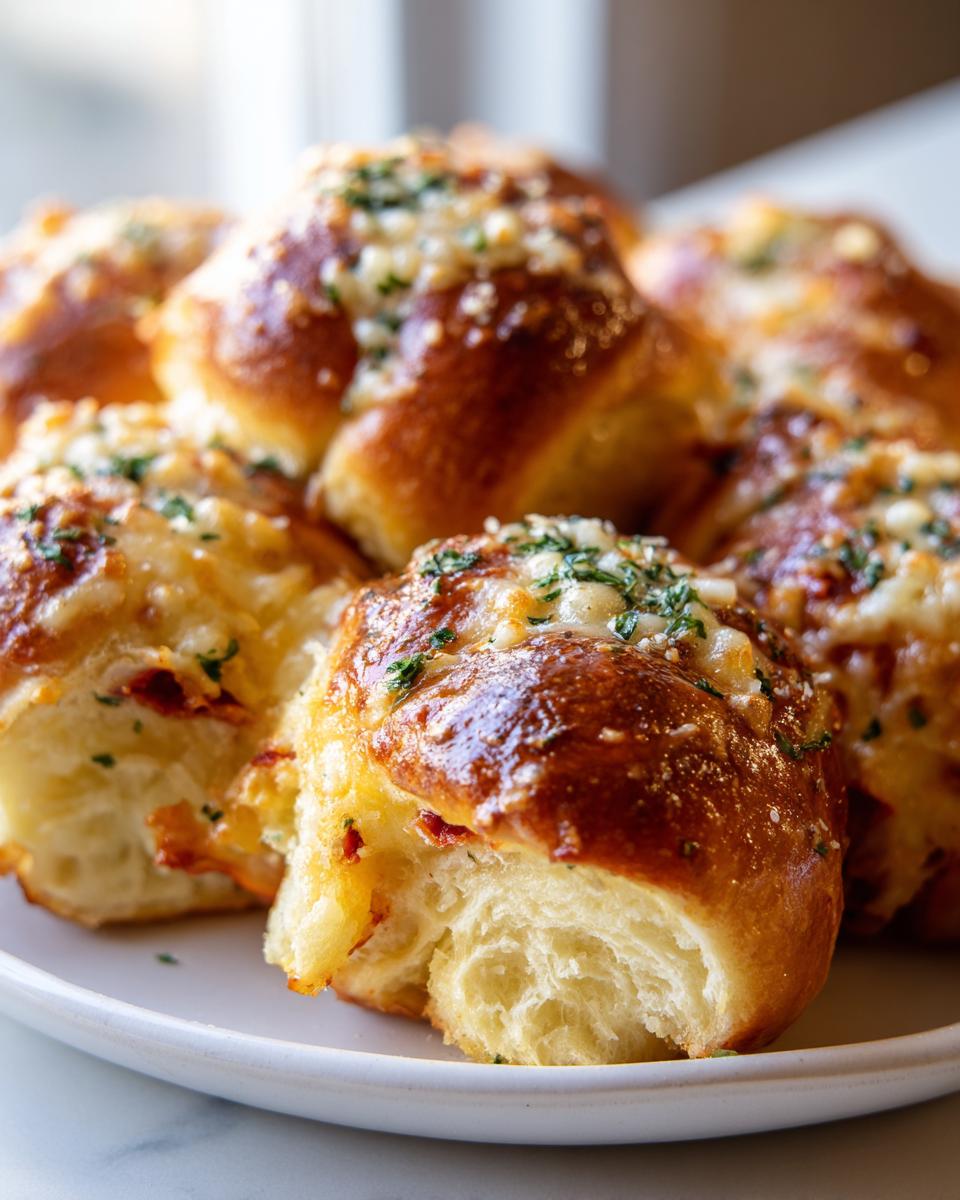
Once the sliders are assembled in the pan, you need to be generous when brushing this mixture over the tops. Don’t be shy! Every little nook and cranny needs some butter. Follow that with a sprinkle of Parmesan cheese for a little salty crispness when they bake. That’s it. That’s the magic that makes these appetizers so unbelievably savory.
Step-by-Step Instructions for Baked Slider Recipe
Now for the fun part! Putting these together is so straightforward, you’ll finish faster than ordering delivery. Remember, the goal here is a super easy simple weeknight dinner that tastes like a treat. Before you even start layering, make sure your oven is set to 350 degrees Fahrenheit. Like any good baked dish, we need that dish prepped—lightly grease a 9×13 pan. Then, take your cluster of rolls and, holding them steady, carefully slice the entire package horizontally right through the middle. The bottoms stay put in your baking dish like a little bread raft!
Assembling Your Cheesy Slider Recipes Layers
First up is the sauce. You want an even coating over all those bottom halves—don’t leave any bread bare because that’s where you get hard, dry edges! After the sauce comes a generous cup of mozzarella cheese. Spread it out evenly edge-to-edge. Then, layer on your pepperoni slices. I like to overlap mine just a little bit, but make sure you get meat and cheese in every single square so you don’t end up with a sad, plain bread spot. Now, gently place the top half of the rolls right back on top. Give it a soft press down all over; you want to squish them together just a touch so they hold their shape.
Baking Times for Perfect Pizza Sliders
This two-stage baking process is crucial for these **Baked Slider Recipe** wonders. First, brush on that amazing garlic butter glaze we talked about and sprinkle on the Parmesan. Then, cover that whole pan tightly with aluminum foil. This traps the steam and makes sure the cheese melts perfectly and the rolls stay soft. Bake covered for 15 minutes.
After 15 minutes, carefully take the foil off. We need that final bit of color! Bake them uncovered for another 5 to 10 minutes. You’re looking for bubbly, golden cheese and those buttered tops turning just slightly brown. Total cook time is right around 25 minutes, but keep an eye on them those last few minutes!
Tips for Success Making Perfect Pizza Sliders
I’ve made these **pizza sliders** enough times that I know exactly what trips people up, usually in the rush of getting party food ready. If you want them to come out perfect every single time—not soggy, not messy, just perfectly contained cheesy goodness—you need to pay attention to three little details right at the very end of the process.
First, remember when you put the top rolls on after layering your cheese and pepperoni? Don’t press down like you’re trying to flatten a pancake! You just need a gentle push, just enough to make sure the top and bottom halves hug each other so the structure holds. If you smash them too hard, you squeeze all the air out of the sweet rolls, and they turn dense underneath that buttery topping.
Second, the baking foil is your friend, but don’t leave it on too long. Those first 15 minutes covered are for internal melting and steaming. If you skip that, your sauce might stay cold while your tops brown too fast. Keep checking after the 15 minutes are up! If your oven runs a little hot, you might only need 5 extra minutes uncovered, while another might need the full 10.
Finally, and this is hard when they smell this good, let them rest! Once they come out golden brown and bubbly, let that whole pan sit on the counter for at least five minutes before you try to separate them. Why? Because that resting time allows the melted mozzarella to firm up just a hair. If you try to pull them apart piping hot, you’ll end up with cheese stretched halfway across the living room floor. A five-minute breather makes slicing them into perfect, individual squares so much easier. You can check out other fun ideas from folks who love these pull-apart pizza sliders, but trust me, the resting step is key!
Storage and Reheating Your Leftover Pizza Sliders
Even though I usually don’t have any leftovers when I make these—they disappear way too fast!—I understand that sometimes you need to plan ahead or you just can’t eat that entire dozen in one sitting. Planning ahead is smart, especially when hosting, and these sliders are actually one of my favorite party appetizer recipes because you can assemble them almost entirely early!
If you want to prep them ahead of time, you can assemble the entire thing—sauce, cheese, pepperoni, tops, butter glaze—and just keep the whole thing covered tightly in the fridge for up to four hours. When company arrives, just pop that cold pan straight into the oven and add about ten minutes to the covered baking time. It warms everything evenly right through!
Now, leftover storage is simple, but reheating requires a little finesse if you want to bring back that tender-yet-toasted texture. If you put these in the microwave, they get steamy and soft all over, and we certainly don’t want soggy pizza bread!
The best way to revive them is back in the oven. Lay any leftovers out on a small baking sheet so air can circulate around them—don’t stack them in a corner of a dish. Pop them into a preheated 325-degree oven for about 8 to 10 minutes. This gives the edges a chance to crisp up slightly again and melts that cheese just the way you like it without burning the topping. Store the cooled leftovers in a genuinely airtight container on the counter for up to two days. Truly, they are just as good the next day for a quick lunch!
Serving Suggestions for Pepperoni Pizza Bites
Even though these **Pepperoni Pizza Bites** are hearty enough to serve as a quick main meal—especially if you’re feeding hungry kids after school—they really shine when paired with a couple of simple sides. When you’re serving rich, cheesy comfort food, a little something bright or fresh on the side cuts through all that wonderful fat and keeps people from feeling overly full too quickly. It’s all about balance in the dining room, just like in the kitchen!
The very first thing I always suggest is a good dipping sauce. While the sliders are already saucy inside, nothing beats a little extra warmth on the side. Of course, a small bowl of warm marinara sauce is classic; it just doubles down on that perfect pizza flavor. You can often buy a good jarred sauce, but if you ever want to try making your own rich sauce, I have a wonderful recipe for that!
But if you want to shake things up, ranch dressing works shockingly well here, especially if you are serving these **easy pizza sliders** to a younger crowd. If you’re feeling adventurous, you can try making your own flavored mayonnaise, which makes an incredible savory dip for almost anything. You can find my recipe for easy homemade mayonnaise, which you can easily stir a bit of garlic and oregano into for a quick party dip!
For something substantial alongside these little sandwiches, you don’t need anything complicated. A simple, crisp side salad is perfect. Think mixed greens with a light vinaigrette dressing. The acidity in the vinegar dressing wakes up the palate after all that savory cheese and pepperoni. If you’re serving these as a main course on a weeknight, pair them with some crisp carrot sticks or celery, maybe even serving those alongside the ranch dip you made earlier!
Frequently Asked Questions About Pizza Sliders
I always get so many wonderful questions when I post this recipe, which tells me just how popular these **pizza sliders** are! It’s wonderful to see so many folks finding a genuinely easy way to serve something delicious. Here are a few things people ask me all the time when they are planning their party food or a quick family meal.
Can I use regular slider buns instead of Hawaiian Rolls for these pizza sliders?
Oh, you absolutely can use regular slider buns if that’s what you have on hand! They make fantastic sliders. My personal preference leans toward the Hawaiian Rolls, though, because that hint of sweetness really plays beautifully against the savory tomato sauce and salty pepperoni. It hits that sweet-and-savory balance that stops people from just eating one. But if all you have are plain white slider buns, go for it! They will still be delicious **cheesy slider recipes**.
What makes these Easy Pizza Sliders a great Kid Friendly Dinner?
This is one of the best answers I get to give! Kids absolutely adore these because they are self-contained, perfectly sized for little hands, and they already love pizza, so there’s no hesitation there. Since they are baked together, the cheese stays warm and gooey without becoming a huge mess like a slice of pizza sometimes is. They are the ultimate vehicle for getting **easy pizza sliders** into small mouths quickly, which is a huge win for any parent looking for a quick weeknight dinner idea.
Can I add different toppings to these Mozzarella Cheese Sliders?
You certainly can! While this recipe is built around that classic deli pepperoni flavor, these are wonderfully adaptable. Just remember the one golden rule of layering anything moist into bread: you have to cook it first! If you want to add mushrooms, green peppers, or cooked Italian sausage, please sauté them first to get rid of as much liquid as possible. Too much moisture in the filling layer is what makes the bread underneath turn a little soggy, and we want to avoid that at all costs when making our **mozzarella cheese sliders**.
Sharing Your Homemade Pizza Sliders
Honestly, once these beautiful **pizza sliders** are out of the oven, the hardest part is waiting long enough to eat them! But I truly hope that after you make this recipe, you’ll take a moment to come back here and let me know how they turned out for you. I learn so much from hearing about your successes and any little adjustments you made for your family gatherings.
Did you use them for game day? Were they a hit at a birthday party? I absolutely adore seeing your photos! If you took a picture of your bubbling, golden-brown masterpieces, please share it with me. You can always send pictures or drop me a line through my contact page. I read every message that comes through, and knowing my simple recipes are on your tables brings me so much joy.
If you loved how easy this was and you’re already planning your next simple yet satisfying dish, tell me which recipe on the site I should tackle next! Your feedback helps me decide what kind of comforting home cooking to share with our community next. Happy cooking, friends, and I hope these sliders bring as much easy, cheesy joy to your home as they do mine!
PrintEasy Pull-Apart Pepperoni Pizza Sliders with Garlic Butter Glaze

Make these easy pizza sliders using Hawaiian rolls for a perfect crowd-pleasing appetizer or quick weeknight dinner. They are cheesy, savory, and topped with a flavorful garlic butter glaze.
- Prep Time: 10 min
- Cook Time: 25 min
- Total Time: 35 min
- Yield: 12 sliders 1x
- Category: Appetizer
- Method: Baking
- Cuisine: American
- Diet: Vegetarian
Ingredients
- 1 (12 count) package sweet dinner rolls (like Hawaiian rolls)
- 1 cup pizza sauce or marinara sauce
- 1 cup shredded mozzarella cheese
- 1 cup sliced pepperoni
- 1/2 cup (1 stick) unsalted butter, melted
- 2 cloves garlic, minced
- 1 teaspoon dried Italian seasoning
- 1/4 cup grated Parmesan cheese
Instructions
- Preheat your oven to 350 degrees Fahrenheit. Lightly grease a 9×13 inch baking dish.
- Carefully slice the entire package of rolls in half horizontally, keeping the bottom halves together in the dish and separating the tops onto a cutting board.
- Spread the pizza sauce evenly over the bottom halves of the rolls in the baking dish.
- Layer the mozzarella cheese over the sauce.
- Arrange the pepperoni slices over the cheese.
- Place the top halves of the rolls over the pepperoni layer. Gently press down.
- In a small bowl, whisk together the melted butter, minced garlic, and Italian seasoning to create the garlic butter glaze.
- Brush the entire top surface of the assembled sliders generously with the garlic butter mixture.
- Sprinkle the grated Parmesan cheese evenly over the buttered tops.
- Cover the baking dish tightly with aluminum foil.
- Bake for 15 minutes covered.
- Remove the foil and bake for an additional 5 to 10 minutes, or until the cheese is melted and bubbly and the tops are lightly golden brown.
- Let the pizza sliders rest for 5 minutes before slicing them apart and serving immediately.
Notes
- For extra flavor, you can add a sprinkle of dried oregano or red pepper flakes to the garlic butter mixture.
- If you want to make these ahead of time, assemble the sliders completely, cover them, and refrigerate for up to 4 hours. Add 10 minutes to the covered baking time if baking straight from the refrigerator.
- Serve these crowd pleaser snacks with a side of warm marinara sauce for dipping.
Nutrition
- Serving Size: 1 slider
- Calories: 280
- Sugar: 6
- Sodium: 650
- Fat: 15
- Saturated Fat: 7
- Unsaturated Fat: 8
- Trans Fat: 0.5
- Carbohydrates: 25
- Fiber: 1
- Protein: 12
- Cholesterol: 35