
When the holidays roll around, every baker wants a dessert that stops people right in their tracks—something that screams, “This is Christmas!” For me, the ultimate holiday centerpiece isn’t a fussy pie or a towering layer cake; it’s the magnificent Christmas tree cheesecake. It’s creamy, it’s beautiful, and because I’m Carla, I always look for ways to bring a little bit of happy nostalgia to the table for my family gatherings. This recipe taps right into that cozy memory lane by using those iconic Little Debbie Christmas Tree Cakes. You can trust me on this; I spent thirty years learning how to explain things clearly, and I promise this process is straightforward enough for anyone wanting to create a showstopper for their family. If you’d like to know more about my baking philosophy, you can always check out what Cooking by Carla is all about!
- Why This Little Debbie Christmas Tree Cheesecake Recipe is Your New Holiday Favorite
- Gathering Ingredients for Your Christmas Tree Cheesecake
- Step-by-Step Instructions for the Baked Christmas Tree Cheesecake
- How to Decorate Your Christmas Tree Cheesecake Like a Tree
- Alternative: Simple No Bake Holiday Cheesecake Option
- Tips for the Best Christmas Tree Cheesecake Results
- Storage and Keeping Your Festive Dessert Fresh
- Common Questions About Themed Holiday Cheesecake Recipe
- Nutrition Information Disclaimer
Why This Little Debbie Christmas Tree Cheesecake Recipe is Your New Holiday Favorite
I know you see a lot of beautiful holiday desserts out there, but this one truly is special because it nails three things busy holiday hosts need: it looks incredible, it’s surprisingly achievable, and it tastes like Christmas morning. We’re talking about creating a genuine showstopper without spending the entire day worrying about perfection. You’ll find tons of festive winter cheesecake ideas out there, but none quite capture the spirit like this one does. People remember snacking on those little tree cakes as kids, and blending that flavor into a smooth, rich cheesecake base just makes sense for a holiday cheesecake for family gathering.
A Showstopping Christmas Tree Cheesecake Centerpiece
When I say this is a showstopper, I mean it! This isn’t just some dessert you put on a platter; it’s an honest-to-goodness easy Christmas dessert centerpiece. Whether you bake it in a standard pan and decorate the top carefully, or if you’re lucky enough to have a tree-shaped pan, it commands attention. The toppings—the white chocolate ganache and the colorful sprinkles—really bring that tree to life. It’s all about creating that visual ‘wow’ moment with minimal extra effort on my part. If you’re looking for more reliable showstoppers, check out my roundup of the best dessert recipes!

Nostalgic Flavor Meets Creamy Perfection
The real secret here is hiding those Little Debbie cakes right in the filling! It’s not just a topping; we are studding the rich, creamy base with chunks of that spongey, vanilla-scented cake. It creates pockets of pure, sweet nostalgia in every slice. It’s the best holiday cheesecake because it delivers that smooth, tangy cheesecake flavor while adding that unique, slightly different texture from the snack cake bits. It turns a classic unique Christmas dessert into something truly memorable.
Gathering Ingredients for Your Christmas Tree Cheesecake
Now that you know this is going to be the highlight of your holiday table, let’s talk about what we need to pull this themed holiday cheesecake recipe together. You don’t need a long list of fancy items for this one, but a few foundational pieces are non-negotiable if you want that truly creamy texture. Remember, a great cheesecake starts with quality components, handled correctly. If you’re looking for tips on making a really dependable crust using butter, my recipe for a flaky butter pie crust might give you some general ideas for working with fats!
For the Buttery Graham Cracker Crust
This forms the foundation, so don’t skimp! We keep this simple and sturdy so it holds up against that rich filling.
- 180 grams graham cracker crumbs (about 1 1/2 cups)
- 85 grams unsalted butter, fully melted
The trick here, which you’ll see in the instructions, is making sure that butter coats every single crumb. No dry spots allowed!
For the Creamy Holiday Cheesecake Filling
This is where we make magic happen, and the most important part? The temperature of your dairy! For the smoothest, most velvety result—the hallmark of a good creamy holiday cheesecake recipe—your cream cheese absolutely must be softened. I mean soft enough that it almost melts when you touch it, but not greasy or oily. Also, make sure your two large eggs aren’t straight from the fridge; room temperature eggs mix in seamlessly.
- 675 grams cream cheese, softened to room temperature (that’s usually three standard blocks)
- 100 grams granulated sugar
- 1 teaspoon vanilla extract
- 2 large eggs, room temperature
- 1 cup (240 ml) sour cream
- 1 package (10.5 oz) Little Debbie Christmas Tree Cakes, roughly chopped
For the Festive Topping and Decoration
We create a simple white chocolate ganache that acts as the glue for our ornaments later on. You’ll need to give this time to cool down so it thickens up properly before we spread it on the chilled cake.
- 1 cup white chocolate chips
- 1/2 cup heavy cream
- Green food coloring (just a drop or two, optional!)
- Holiday sprinkles and small candies for decoration (think mini nonpareils or tiny edible pearls)
If you are going to pipe that green “tree” look, make sure you reserve a bit of the ganache or just use some regular whipped cream tinted green—it spreads so much easier for those leafy branches!
Step-by-Step Instructions for the Baked Christmas Tree Cheesecake
Alright, deep breath! Baking a perfect cheesecake can feel intimidating, but that’s why I’m here. As a former teacher, I know that breaks little by little make the whole process easy to follow. This method results in the creamiest, crack-free baked base for our stunning Christmas Tree Cheesecake. When it comes to cheesecakes, the slow-and-low approach is always the ticket to success. Pay close attention to that water bath—it’s my tried-and-true secret for a flawless finish that makes this a truly dependable Showstopping Christmas baked goods recipe.
Preparing the Crust and Oven Setup
First things first, get your oven preheating to 325°F (160°C). While that’s warming up, you need to prep your 9-inch springform pan. This is critical: wrap the outside of the pan very tightly with heavy-duty aluminum foil. You want at least two layers, running vertically and horizontally, like you’re wrapping a precious gift. This foil shield keeps the hot water from your water bath seeping into the crust. Go ahead and mix your graham crumbs and melted butter until it looks like wet sand, then press it firmly and evenly into the bottom of the pan. Pop that into the oven for 10 minutes just to set the crust, then pull it out to cool while you whip up the filling.
Mixing the Perfect Cheesecake Batter
When mixing cheesecake, the golden rule I always share is: *Do not overmix!* Overmixing whips in air, and that air expands in the oven, leading to unsightly cracks when it cools down. Start slow! Beat your softened cream cheese until it’s silky smooth, then gently stream in the sugar and vanilla. Add your eggs in, one at a time, mixing only until the yolk disappears before adding the next. Finally, stir in the sour cream until it’s just combined. After that, take your spatula and *gently* fold in most of those chopped Little Debbie Christmas Tree Cakes. Fold them in like they are delicate snow—we want them nestled in the batter, not obliterated by the mixer!
Baking with a Water Bath and Cooling Slowly
This water bath, or Bain-Marie, is non-negotiable for truly even cooking. Place your foil-wrapped springform pan inside a larger roasting pan. Pour your smooth filling over the cooled crust. Now, carefully pour hot water into the outer roasting pan until the water comes about halfway up the sides of the springform pan. It looks dramatic, but it creates a steamy, gentle environment. Bake this setup for about 50 to 60 minutes. You’re looking for the edges to be set, but the very center should still wobble a bit, like firm gelatin. When it’s done, turn the oven OFF! Crack the door open an inch or two, and just let the whole thing sit in that warm environment for a full hour. This slow cooling process is the real secret to avoiding those pesky cracks and keeping your cheesecake surface pristine for decorating! If you want to dive deeper into preventing cracks, I’ve got some extra pointers over here on my easy homemade crack-free cheesecake tips.
How to Decorate Your Christmas Tree Cheesecake Like a Tree
Now that your cheesecake has chilled overnight—and trust me, you must let it chill, or decorating is going to be a slippery mess—it’s time for the fun part! This is where we turn a delicious, creamy round into a complete holiday masterpiece. Getting the visual right is key, especially if you want that amazing payoff for your effort. We’re focusing on exactly how to decorate a cheesecake like a tree, so hang onto those sprinkles!
Making and Spreading the White Chocolate Ganache
This ganache is beautiful because it sets up glossy but stays soft enough to bite through easily. You’ll need to heat your heavy cream until it’s just starting to simmer—don’t boil it, please!—and then pour that hot cream over your white chocolate chips in a separate bowl. Resist the urge to stir immediately! Let it sit there quietly for five full minutes. This gives the cream time to melt all those chocolate pieces evenly. After five minutes, grab a whisk and stir gently, starting in the middle and working your way out, until it’s perfectly smooth and shiny. Now, this is crucial: you cannot spread this hot liquid over your cold cheesecake. You need to let it cool down on the counter until it thickens up. I look for the consistency of thick pudding—that way, it won’t run off the sides.
Once the ganache has cooled just enough, gently spread it over the top of the chilled cheesecake using an offset spatula. Try to keep the coating even. If you need some extra insight on getting icings and coatings just right, I’ve written up some tips on making smooth cookie icing that applies perfectly here too.
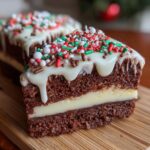
Creating the Tree Effect with Color and Sprinkles
If you baked this in a round pan, we create the illusion of a tree by decorating the top center. Take a small portion of your remaining ganache—or if you prefer, just use some ready-made whipped cream—and add just a tiny drop of green food coloring. Mix it up until you get that perfect, festive evergreen color. Put that green frosting into a piping bag fitted with a star tip (this makes those cute little branch textures!). Starting at a central point, pipe concentric circles or overlapping squiggles that grow wider as you move toward the edge of the cheesecake, mimicking the shape of a cone or a tree.
Don’t worry about making it look professional; homemade charm is what we’re going for! Now, for the ornaments! Take those reserved, chopped Little Debbie cakes, and scatter them artfully across the green frosting. Then, hit the whole thing with a generous handful of your favorite holiday sprinkles and those tiny candies. They look just like little hanging lights and baubles! This final flourish makes the whole Christmas party dessert recipe feel complete.
Alternative: Simple No Bake Holiday Cheesecake Option
Do I love my baked cheesecake? Absolutely! But let’s be honest, around the holidays, the oven is usually working overtime making the main course, right? Sometimes you just need a delicious, creamy dessert that sets up beautifully in the fridge. That’s why I always have a secret little plan for a no bake holiday cheesecake version of this festive theme. Offering this alternative is part of my commitment to making sure you have dependable recipes no matter what your oven situation is!
The changes are pretty minimal, but they save you about an hour of oven time so you can focus on wrapping presents! You’ll want to swap out the traditional graham cracker crust for something that sets up firm when chilled. Usually, this means binding the crumbs with a bit of melted butter and sugar, but skipping that 10-minute bake step.
For the filling, we need something sturdy to hold those Little Debbie chunks. Instead of relying on eggs and baking to set the cream cheese, we need stabilizers. You can make a quick version by using stabilized whipped topping instead of sour cream and adding a little extra powdered sugar for body. Many people substitute the heavy cream used for the ganache (cooled significantly!) into the filling mixture before folding in the chopped cakes. That extra fat helps it firm up nicely in the cold.
The biggest difference is the waiting game. While the baked cake needs an hour in the oven, this chilled version needs patience in the refrigerator. Plan on letting your wonderful no bake holiday cheesecake chill for a full four hours minimum, but ideally, you should let it set up overnight, just like the baked one. Honestly, the chilling time gives the vanilla and the Little Debbie flavors even more time to meld together, making it wonderfully flavorful! If you want to see how I handle a different type of no-bake cheesecake crust, I break down the OREO version over here on my easy no-bake recipe page.
Tips for the Best Christmas Tree Cheesecake Results
I always tell my grandkids that even the best recipe needs a little TLC depending on the day. Cheesecakes are temperamental beauties, aren’t they? They want you to treat them gently! Since we’ve gone through the whole process—from the crust to topping that beautiful Christmas tree cheesecake with sprinkles—here are the few expert little tricks I’ve learned over the years to help you nail that perfect texture and avoid any last-minute holiday stress.
First, temperature is everything. I mentioned it when we were gathering ingredients, but it bears repeating: your cream cheese, eggs, and even the sour cream should all be softened or at room temperature before you even turn the mixer on. Cold ingredients don’t blend smoothly, and that forces you to mix longer, which brings us to tip number two.
Never, ever beat the batter on high speed! When I taught school, I used to tell my class that speed wasn’t always the way to get the result you want—patience is. The same goes for cheesecake batter. Use low speed or just your spatula when folding things in. We want the filling smooth, but we are trying to minimize air bubbles. Air bubbles trapped underneath cause steam pockets, and steam pockets cause cracks when the temperature shifts!
When you’re cooling the cake after taking it out of that hot water bath, don’t rush it right onto the counter to cool completely. That hour sitting in the turned-off, slightly ajar oven is the most important cooling step. It tempers the cake slowly. If you just yank it out, the sudden chill makes the structure shrink too fast, and *crack* goes the top!
Finally, when you decorate, work cold. If you want that ganache to look sharp and hold those little sprinkle ornaments in place, the cheesecake itself needs to be thoroughly chilled—at least six hours, but overnight is my personal favorite. A cold base helps the toppings set up quickly and keeps your decorations looking crisp right up until serving time. For even more reliable holiday baking inspiration, take a peek at my recipe for pecan pie cheesecake; the principles of slow cooling and proper mixing apply there too!
Storage and Keeping Your Festive Dessert Fresh
You went to all this trouble to create the most beautiful Christmas Tree Dessert idea, so naturally, you want it to taste just as amazing the next day, right? The good news is that cheesecake, especially one as rich as this, actually gets even better after a long nap in the fridge! The flavors really settle in and meld together beautifully.
Once you have finished decorating your masterpiece—and I hope you took a few dozen pictures because it’s going to disappear fast once the family dives in—the storage is really straightforward. You need to make sure that beautiful topping stays pristine. Cover the entire cheesecake loosely with plastic wrap or foil. I find loose is better than tight, especially if you used a slightly softer ganache decoration, so you don’t smash your lovely sprinkles.
Keep it snug in the refrigerator. This particular cheesecake is fantastic when served cold, so don’t worry about letting it sit on the counter for too long before serving. I usually take it out about 15 to 20 minutes before serving time. That little bit of warmth on the edges just makes the cream cheese so much silkier when you cut into it. It will hold beautifully in the fridge for up to four days. Honestly, if there’s any left after Christmas Day, it makes for the most decadent little breakfast treat the next morning!
If you happen to have any leftovers after the whole holiday rush, you can also freeze it! Just make sure you use a sturdy container without letting the plastic wrap touch the decorations directly. If you’re worried about the frosting, you might want to chill it firm first, then wrap it well, and save the final sprinkle ornaments until after you thaw it out. Thawing in the refrigerator overnight is the gentlest way to bring it back to life.
Common Questions About Themed Holiday Cheesecake Recipe
It’s natural to have questions when you’re tackling a showstopper dessert like this! When I started Kitchen by Carla, my goal was always to answer the questions I wished someone had answered for me at the time. Don’t fret if things look slightly different from the picture—that’s the beauty of home baking, and that’s why we’re here to chat through the snags! Whether you are planning your menu now or looking for reliable Christmas party dessert recipes, these little tips should make your process smoother.
Can I shape this cheesecake into a tree without a special pan?
Oh, absolutely, honey, you don’t need a specialized star-shaped pan sitting in your cupboard taking up space just for one day of the year! Most of us are reaching for that standard 9-inch springform pan, and that’s perfectly fine. When we decorate, we create the tree shape on top of the round cheesecake. Think of the round cheesecake as the base canvas. We use that lovely green ganache or tinted whipped cream that we made earlier and pipe it concentrically—starting smaller at the very top center and getting wider as you pipe outward toward the edge. If you do that spiraling effect carefully, it tricks the eye beautifully into seeing a triangular tree right there on that round surface! It still ends up looking delightful for any festive cheesecake with sprinkles!
How far in advance can I make this dessert?
This is honestly one of the best parts about making this treat: it’s a wonderful make-ahead dessert! Cheesecakes always benefit from a long, cold chill to allow the flavors to deeply mingle. I always aim to bake the cheesecake completely, let it cool, and then let it set in the refrigerator for a full 24 hours. That gives you a completely firm base to work with.
If you chill it for 24 hours, you can easily apply the white chocolate ganache topping the next day. Then, you can let that set up for another few hours before adding your final dollops of green cream and sprinkles. I find that making it one, maybe even two, days before your party gives you breathing room and guarantees that this best holiday cheesecake is perfectly set and ready to go when your guests arrive. It takes the pressure off Christmas morning, which you should be spending drinking coffee, not baking!
If you are looking for quick culinary fixes for the days leading up to the big event, I’ve compiled a few reliable easy appetizers and snacks that use simple pantry staples.
Nutrition Information Disclaimer
Now, I want to be clear about the numbers you might see listed elsewhere on this page regarding calories or fats. Remember, I’m Carla Mae Peterson; I’m a home cook, not a registered dietitian!
The nutritional data provided for this delicious Christmas Tree Cheesecake is purely an estimate based on the standard ingredients listed here. If you use a different brand of cream cheese, opt for low-fat sour cream, or swap out the Little Debbie cake brands—which I hope you don’t, bless their hearts!—those numbers are going to change.
This recipe is made with love and meant to be enjoyed during the holidays as a special treat for your holiday cheesecake for family gathering. Please use these figures as a general guideline only. If you have very strict dietary concerns, I always recommend plugging the exact products you use into an independent calculator. My focus is making sure it tastes like home, not micromanaging every gram!
PrintLittle Debbie Christmas Tree Cake Cheesecake
Create a show-stopping centerpiece for your holiday table with this creamy Little Debbie Christmas Tree Cake Cheesecake. This recipe combines a rich cheesecake filling with nostalgic snack cakes, resulting in a festive and memorable dessert.
- Prep Time: 30 min
- Cook Time: 60 min
- Total Time: 7 hours 30 min
- Yield: 12 servings 1x
- Category: Dessert
- Method: Baking
- Cuisine: American
- Diet: Vegetarian
Ingredients
- 180 g graham cracker crumbs
- 85 g unsalted butter, melted
- 675 g cream cheese, softened
- 100 g granulated sugar
- 1 teaspoon vanilla extract
- 2 large eggs
- 1 cup (240 ml) sour cream
- 1 package (10.5 oz) Little Debbie Christmas Tree Cakes, roughly chopped
- 1 cup white chocolate chips
- 1/2 cup heavy cream
- Green food coloring (optional, for decoration)
- Holiday sprinkles and small candies for decoration
Instructions
- Preheat your oven to 325°F (160°C). Wrap the outside of a 9-inch springform pan tightly with heavy-duty aluminum foil to prevent water seepage during the water bath.
- Prepare the crust: Mix the graham cracker crumbs and melted butter until combined. Press the mixture evenly into the bottom of the prepared springform pan. Bake for 10 minutes. Let the crust cool while you prepare the filling.
- Prepare the cheesecake filling: In a large bowl, beat the softened cream cheese until smooth. Gradually add the granulated sugar and beat until fully incorporated. Mix in the vanilla extract.
- Beat in the eggs one at a time, mixing just until combined after each addition. Stir in the sour cream until the batter is smooth. Do not overmix.
- Gently fold in most of the chopped Little Debbie Christmas Tree Cakes, reserving some for topping. Pour the filling over the cooled crust.
- Place the springform pan into a larger roasting pan. Carefully pour hot water into the roasting pan until the water reaches halfway up the sides of the springform pan (this is the water bath).
- Bake for 50 to 60 minutes, or until the edges are set but the center still has a slight jiggle.
- Turn off the oven, crack the door open slightly, and let the cheesecake cool inside the oven for 1 hour. This slow cooling prevents cracking.
- Remove the cheesecake from the water bath and allow it to cool completely on a wire rack. Once cool, cover and refrigerate for at least 6 hours, or preferably overnight.
- Prepare the white chocolate ganache: Heat the heavy cream until simmering. Pour the hot cream over the white chocolate chips in a heatproof bowl. Let it sit for 5 minutes, then whisk until smooth. Let cool slightly until it thickens to a spreadable consistency.
- To decorate: Spread the cooled ganache over the top of the cheesecake. If desired, tint a small amount of the remaining ganache or use whipped cream with green food coloring to pipe ‘branches’ or a tree shape onto the top.
- Decorate the surface with the reserved chopped cakes and plenty of holiday sprinkles and small candies to resemble ornaments. Serve chilled.
Notes
- If you prefer a no-bake version, chill the filling mixture for 4 hours instead of baking. Use a no-bake crust recipe (often using cream cheese, powdered sugar, and whipped topping).
- For a stronger tree shape, you can bake the cheesecake in a star-shaped springform pan if you have one available.
- If you do not have a springform pan, you can bake this in a 9×13 inch pan and cut it into squares, decorating each square like a small tree.
Nutrition
- Serving Size: 1 slice
- Calories: 450
- Sugar: 35g
- Sodium: 350mg
- Fat: 30g
- Saturated Fat: 18g
- Unsaturated Fat: 12g
- Trans Fat: 0.5g
- Carbohydrates: 40g
- Fiber: 1g
- Protein: 7g
- Cholesterol: 95mg