

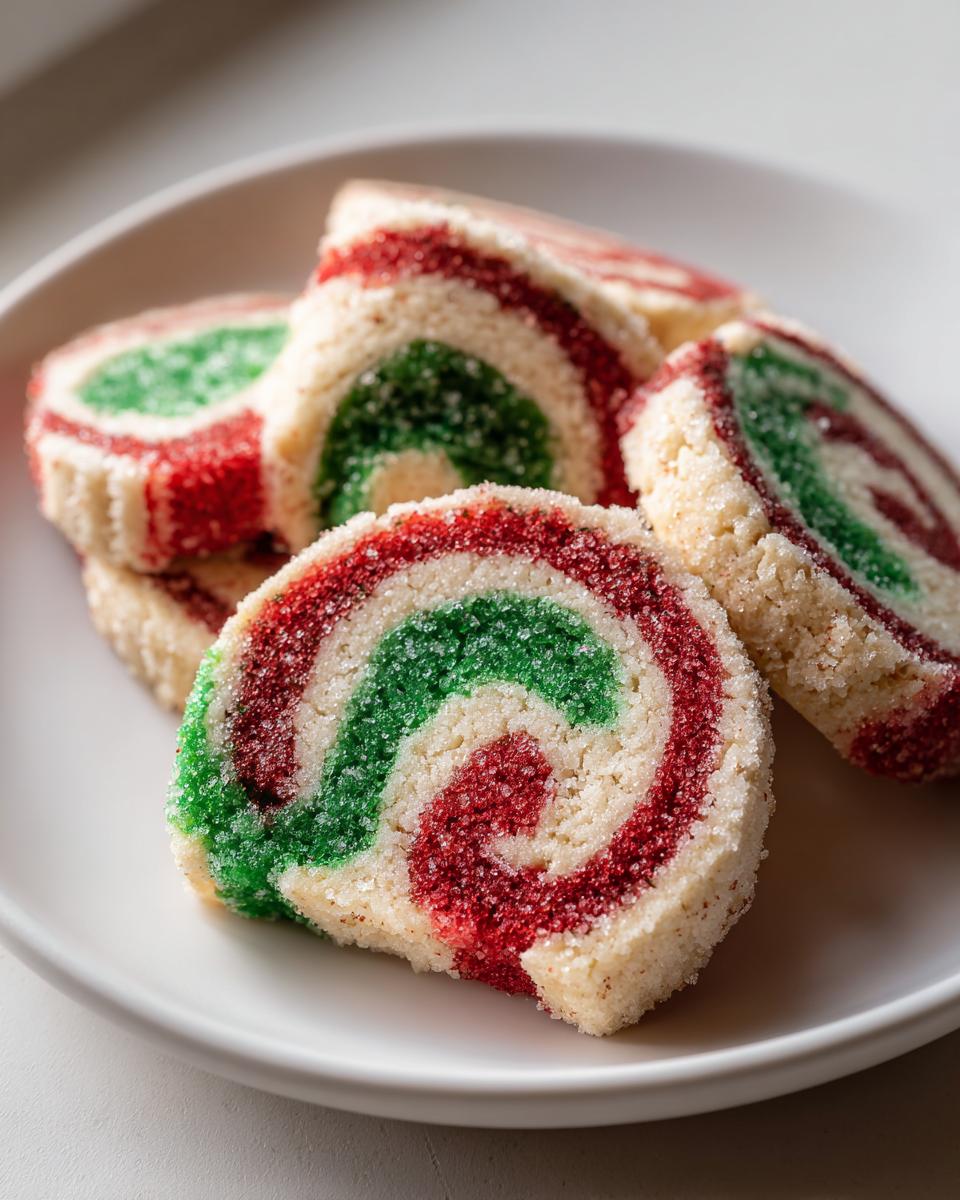
When the holidays roll around, or when you just need a cookie platter that truly stops people in their tracks, you need something visual. Forget dull drop cookies for a minute! What I adore most about these festive treats is that they look like they took hours of fussy rolling and cutting, but they are actually the easiest slice and bake cookies imaginable. Seeing those colorful spirals—red and green, or maybe pink for Valentine’s,—always takes me back to my teaching days. The kids would gasp when I brought these in; they were so much fun! These pinwheel cookies are buttery, hold their shape perfectly, and are a staple at every family gathering. Trust me, you’re going to want this recipe.
- Why Our Classic Holiday pinwheel cookies Recipe Works for Everyone
- Gathering Ingredients for Your pinwheel cookies Recipe
- Step-by-Step Instructions for Making Festive pinwheel cookies
- Tips for Success with Your Buttery pinwheel Recipe
- Make Ahead Christmas Cookies and Freezing Instructions
- Creative Variations for Colorful Spiral Cookies
- Serving Suggestions for Holiday Cookie Exchange Ideas
- Frequently Asked Questions About pinwheel cookies
- Storage and Reheating Instructions for Your Treats
Why Our Classic Holiday pinwheel cookies Recipe Works for Everyone
If you are planning for a big holiday baking session or a cookie exchange, you need reliability, and that’s exactly what this recipe delivers. These buttery pinwheel recipe cookies are famous for a few key reasons that make life easier for us home bakers.
- They are slice and bake cookies! You do the hard work once, chill the dough, and bake what you need when you need it.
- The dough is sturdy—it’s based on a very reliable sugar cookie structure, so your beautiful swirls won’t puff up or spread into greasy puddles. If you need a recipe that truly holds its shape, this is it.
- They look incredibly fancy, which is perfect for making an impression at any holiday cookie exchange idea spread.
The Secret to Perfect Cookie Dough Swirls
The magic is all in the layering. We don’t just mix the colors; we gently stack the colored dough rectangles—white, red, green—right next to each other, almost like edible building blocks. Then, a steady hand is key when you roll that block up tight into a log. Rolling it evenly and firmly keeps those vibrant colors stacked neatly so you get clean, sharp cookie dough swirls when you slice them.
Gathering Ingredients for Your pinwheel cookies Recipe
Getting organized before you start is half the battle, especially when dealing with multiple dough colors! For this classic recipe, which gives you about 3 dozen stunning festive swirl cookies, you’ll want to make sure you have everything measured out and ready to go. When I teach this, I always tell folks to set up their bowls before they even turn on the mixer.
Here is what you need to make a batch of these beautiful cookies:
- 1 cup unsalted butter, softened (This is a rule, folks—no cold butter allowed!)
- 1 cup granulated sugar
- 1 large egg
- 1 teaspoon vanilla extract
- 3 cups all-purpose flour
- 1 teaspoon baking powder
- 1/2 teaspoon salt
- Red food coloring (I strongly suggest gel!)
- Green food coloring (Again, gel is your best friend here)
- Extra granulated sugar or nonpareils for rolling
Ingredient Notes and Substitutions
Now, let’s talk about those colors for a second. Liquid food coloring works, sure, but it adds moisture to the dough, and that extra liquid can make your dough too sticky to roll neatly. That’s why I always stress using gel coloring; it packs a powerful punch of color without messing up the texture of our perfect classic vanilla pinwheel cookies dough. A little tiny bit goes a long way!
If you want to move away from holiday colors and perhaps make some chocolate swirl cookies instead of green, don’t worry! In the instructions, you’ll see a note about swapping out cocoa powder. You can replace about 1/2 cup of the flour in just *one* of your dough portions with 1/2 cup of unsweetened cocoa powder. That gives you a beautiful chocolate and vanilla swirl that’s perfect any time of year!
Step-by-Step Instructions for Making Festive pinwheel cookies
Putting these little works of art together is fun, but you have to be systematic! We are building a dough log here, so precision matters for those gorgeous cookie dough swirls once they bake up. Grab your plastic wrap, because we’re getting organized. Grab the full ingredient list right above this section, but for now, let’s walk through mixing and shaping which will lead us straight to those beautiful red and green cookies.
- First things first, we cream the butter and sugar until it looks fluffy—you know what I mean, pale and airy. Then we mix in the egg and vanilla.
- Next, slowly add your dry ingredients—the flour, baking powder, and salt—until everything just comes together into a soft dough. Don’t overmix here; we want tenderness!
- Now for the fun part! Divide that dough into three equal pieces. Keep one plain (that’s your white layer), mix the red food coloring in one, and the green in the last one until they are perfectly uniform colors.
- Lay out three sheets of plastic wrap. Shape each colored dough portion into a flat rectangle, maybe about half an inch thick. Lay those three colored pieces right next to each other, pressing them gently so they stick together as one big colorful slab.
- This is where you create the spiral! Cover the dough block with another piece of plastic wrap and start rolling it very tightly, like you’re rolling up a sleeping bag, aiming for a log around 2 inches across. Twist those ends securely to keep that beautiful shape.
Time for a little patience! Head over to the fridge and let that dough chill out for at least two hours. Once it’s firm, preheat your oven to 375°F (190°C) and line those baking sheets. After chilling, roll that firm log in extra sugar until it’s fully coated—this adds a lovely sparkle and crunch! Then, slice carefully into about 1/4-inch thick rounds. If you’re keeping things handy for later, you can check out how I make sugar cookie bars, which uses a similar technique!

Chilling the Cookie Dough Swirls
Listen to me when I say: Do not try to skip that two-hour chill time! Honestly, if you try to slice that dough when it’s soft, you won’t get clean circles. You’ll get smears, and your beautiful red, white, and green colors will blend into a muddy brown. The chilling process is what firms up the butter so that when you slice, the colors stay stacked right where you put them. It guarantees you that crisp, sharp swirled sugar cookies pattern we are looking for!
Baking and Cooling Your Swirled Sugar Cookies
When you pop these into the oven, keep a close eye on them. For most ovens, 8 to 10 minutes is exactly right. You want the edges to look just set, but the center should still look soft. That’s our secret to keeping these festive swirl cookies buttery and tender! If you bake them until they are dark brown on the edges, they will be crisp all the way through, and we want that soft center bite.
When the timer goes off, pull them out, but don’t rush them onto the cooling rack immediately. Let them rest right there on the hot baking sheet for a full five minutes. They finish setting up during that time. Then, you can gently move them over to a wire rack to cool completely. Patience pays off!
Tips for Success with Your Buttery pinwheel Recipe
Even with a recipe this dependable, sometimes things shift a little bit in the kitchen, right? If you follow the creaming and chilling steps exactly, you should be golden. But since I’ve made this a million times—both for my classroom parties and now for my grandkids—I picked up a few things to keep your buttery pinwheel recipe looking picture-perfect.
First, about those vibrant colors we talked about: if your red or green dough still looks a little faded after mixing, don’t panic and dump in a ton more color! The colors actually intensify a touch as the dough chills. If they are still too pale after chilling, you can gently knead in one extra drop of gel color. Just be gentle; we don’t want to work the gluten too much.
The biggest potential hurdle is when you are layering the dough. Sometimes the kitchen is just too warm, or maybe you took the dough out a bit too soon. If you find that when you lay your colored dough rectangles next to each other, they are fighting to blend instead of sticking neatly together, stop right there! Take the whole slab and wrap it back up tight. Pop it back in the fridge for another 20 or 30 minutes. It needs to be firm enough to adhere without mushing when you press it.
If you happen to have a batch that starts to soften while you are slicing it, don’t try to force a knife through it. Seriously! That’s how you end up with wonky edges. Just set the log back into the freezer for about 15 minutes. A quick hardening makes slicing so much cleaner. Remember, the cleaner the slice, the sharper those gorgeous spirals will be! It’s just like how chilling dough is essential when making those tender, melt-away tender buttery cookies too.
Make Ahead Christmas Cookies and Freezing Instructions
One of the biggest blessings for anyone baking seriously during the holidays is the ability to prep ahead. That’s why I absolutely love that these pinwheel cookies fall into the make ahead Christmas cookies category. You can do this whole cookie project days, or even weeks, before the big event! It really cuts down on the frantic baking schedule once December hits.
The secret, as you know, is freezing that beautiful colored log we made. Once you’ve shaped the red, white, and green layers together and twisted the ends of the plastic wrap securely, it’s ready for its deep sleep in the freezer. It will keep beautifully for up to three months. Honestly, having ready-to-go cookie dough logs tucked away feels like finding a secret stash of holiday cheer!
If you’re baking straight from frozen, you just need to remember one small adjustment for the oven time. Don’t try to thaw them out first; just take them straight from the freezer, roll them in that finishing sugar coating, and slice them just as you normally would. Because they are rock solid, they will take a little longer to bake through. I generally add about one or two minutes to the baking time I listed in the main instructions. Keep an eye on them, though!
This simple trick allows you to have those impressive, intricate-looking cookies ready instantly whenever you need them. It’s perfect for last-minute party invitations or just when you need a little pick-me-up while wrapping gifts. If you love that planning ahead, you might also enjoy my recipe for easy peppermint bark, which is another staple I always make weeks ahead!
Creative Variations for Colorful Spiral Cookies
Okay, so while the red and green look absolutely perfect for Christmas, one of the best things about this recipe is how adaptable it is. Once you master the technique of layering the dough, you can customize these pinwheel cookies for literally any event! It’s all about creativity with your colors and maybe swapping out a flavor extract.
For instance, if you are heading into the warmer months or just feel like changing things up from the traditional holiday look, try making Valentine’s Day pinwheel cookies. Instead of red and green, just use that basic white dough and dye two portions a vibrant Valentine’s pink. Those pink and white swirls look so sweet dusted with a little extra sugar. People often ask me how to get that beautiful, joyful look, and I always point them back to the layering technique. You can see some other great creative holiday takes, like this one on festive Christmas pinwheel cookies for inspiration!
If you want a flavor injection rather than just a color change during Christmas time, use extracts! Switching the vanilla out for peppermint extract in all three parts of the dough gives you fantastic peppermint pinwheel cookies. That cool mint flavor paired with the buttery cookie is just heavenly.
And we already touched on this briefly, but let’s revisit the chocolate option because it’s a big favorite. To create your own chocolate swirl cookies, you follow the dough mixing exactly as written. Then, when you divide the dough into three parts, leave one white, one dyed a pretty color, and then take the third portion and gently mix in that 1/2 cup of cocoa powder in place of some of the flour we already discussed. Layering that rich brown dough with the vanilla or pink will give you a stunning chocolate spiral that tastes incredible!
Serving Suggestions for Holiday Cookie Exchange Ideas
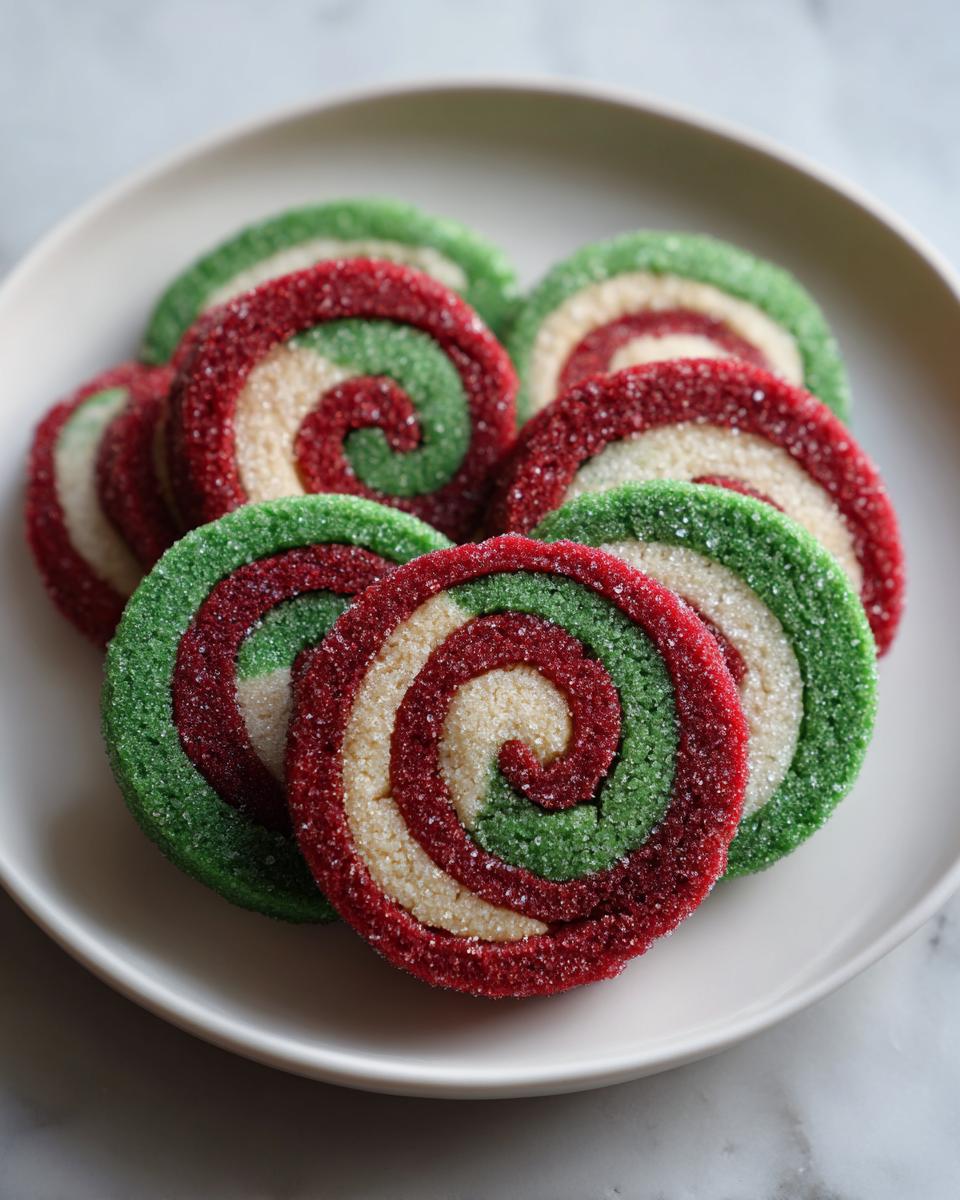
These beautiful pinwheel cookies are just begging to be shown off! When you’re getting ready for those big holiday cookie exchange ideas events, presentation matters almost as much as taste. I always arrange mine so the colorful spirals face up on a simple white or silver platter. That way, everyone can see the gorgeous patterns we worked so hard to create!
They pair perfectly with something warm. Honestly, nothing beats dipping one of these buttery swirls into a mug of my rich, homemade hot chocolate, which you can find the recipe for right here: best homemade rich creamy hot chocolate. Otherwise, a strong cup of coffee cuts through the sweetness just right. They look festive, they taste like home, and they disappear way too fast!
Frequently Asked Questions About pinwheel cookies
Can I skip the chilling step for the dough?
Oh, I really advise against that! While I know waiting two hours feels like forever when you are excited to bake, skipping the chill is the number one reason people end up with a melted, blobby cookie instead of a crisp spiral. The chilling step solidifies the butter in the dough. When the dough is cold, it holds its distinct shape when you slice it and bake it. If it’s warm, the dough spreads out quickly in the oven, and your neat, beautiful swirled sugar cookies turn into flat, indistinct circles.
Why did my colorful swirls spread out in the oven?
If your colorful spiral cookies spread too much, it usually points back to the temperature of the dough when it hits the sheet, or maybe a little too much liquid was added during mixing. Did you use liquid food coloring instead of the gel I recommended? Liquid coloring adds moisture and can soften the dough too much. If you use the right amount of stiff, chilled butter and sugar, and you chill that log until it is firm, spreading shouldn’t be an issue. If the dough is soft when slicing, that’s a guaranteed spread!
Can I use standard liquid food coloring instead of gel?
You can, but you really won’t get the same vibrant results, honey. The beauty of these Christmas pinwheel cookies is the punch of color—the bright red and green really pop! Gel colors are concentrated; they give you deep color saturation without adding unnecessary moisture to the dough. If you use liquid drops, you might need five or six times the amount to get the color you see in pictures, and that extra water content will ruin your dough structure. Stick to gel for the best looking festive swirl cookies!
Can I frost these pinwheel cookies?
Since these are based on a sturdy sugar cookie, yes, you absolutely can! However, most folks who love this buttery pinwheel recipe prefer to leave them plain or just roll them in extra sugar or nonpareils before baking, as the swirl pattern is the star of the show. If you do want frosting, wait until they are completely cool. A thin layer of royal icing, or maybe a simple glaze (I have a great one for smooth icing that hardens), works best so you don’t hide that lovely swirl!
What is the best way to store the baked cookies?
These slice and bake cookies keep wonderfully, which is another reason they are my favorite for big holiday baking projects! Once they are totally cool, just store them in an airtight container at room temperature. Don’t crowd them too much, and keep them away from direct heat or sunlight. Honestly, they stay perfectly fresh and soft for a good week, though I doubt they will last that long on your counter!
Storage and Reheating Instructions for Your Treats
One of my very favorite things about these pinwheel cookies is that they are just as good a week later as they are on baking day. Because they are a sturdy, buttery sugar cookie, they hold up so well! Once your cookies are completely cool—and I mean stone cold, folks—you need to get them into an airtight container. Don’t just leave them on a plate on the counter uncovered, or they’ll dry out and lose that wonderful soft snap we worked so hard for.
Stored properly in that airtight container, they will stay deliciously fresh at room temperature for about seven to ten days. This is why they are such a winner for parties or events you are planning well in advance! You can bake them confidently, store them away, and not worry about quality dipping.
Now, remember how much I stressed making the dough ahead of time? That freezing method is your best friend for the holidays. If you’ve frozen your log and need cookies fast, just pull the log out, roll it, slice it, and bake it for that extra minute or two as directed. No thawing required, which saves so much time!
If you are tired of whipping up toppings and want something simple to go alongside these pinwheels, I often make a big batch of my homemade marshmallows to drop into hot cocoa. You can find my recipe for those easy homemade marshmallows on the site. It’s always nice to have a few easy backup items when things get busy!
PrintClassic Holiday Pinwheel Cookies: Easy Slice and Bake Recipe
Make beautiful, buttery pinwheel cookies with festive red and green swirls. This slice and bake recipe is simple to prepare ahead for your next cookie exchange or holiday platter.
- Prep Time: 30 min
- Cook Time: 10 min
- Total Time: 2 hours 40 min
- Yield: About 3 dozen cookies 1x
- Category: Dessert
- Method: Baking
- Cuisine: American
- Diet: Vegetarian
Ingredients
- 1 cup unsalted butter, softened
- 1 cup granulated sugar
- 1 large egg
- 1 teaspoon vanilla extract
- 3 cups all-purpose flour
- 1 teaspoon baking powder
- 1/2 teaspoon salt
- Red food coloring (gel preferred)
- Green food coloring (gel preferred)
- Extra granulated sugar or nonpareils for rolling
Instructions
- In a large bowl, cream together the softened butter and 1 cup of sugar until light and fluffy. Beat in the egg and vanilla extract.
- In a separate bowl, whisk together the flour, baking powder, and salt. Gradually add the dry ingredients to the wet ingredients, mixing until just combined to form a soft dough.
- Divide the dough evenly into three separate bowls. Leave one bowl plain (this will be white). Add red food coloring to the second bowl and green food coloring to the third bowl. Mix each until the color is uniform.
- On plastic wrap, form each colored dough portion into a rectangle about 1/2 inch thick. Place the three colored dough rectangles side-by-side, pressing them gently together to adhere.
- Place a sheet of plastic wrap over the dough block. Roll the combined dough into a tight log, about 2 inches in diameter. Twist the ends of the plastic wrap to seal and chill the log in the refrigerator for at least 2 hours, or until firm.
- Preheat your oven to 375°F (190°C). Line baking sheets with parchment paper.
- Pour extra sugar or nonpareils onto a plate. Roll the chilled dough log in the sugar until fully coated.
- Slice the log into rounds about 1/4 inch thick. Place the slices onto the prepared baking sheets, leaving about 2 inches between cookies.
- Bake for 8 to 10 minutes, or until the edges are just set. Do not overbake; the centers should remain soft.
- Let the cookies cool on the baking sheet for 5 minutes before transferring them to a wire rack to cool completely.
Notes
- For best color saturation, use gel food coloring instead of liquid drops.
- You can freeze the dough log, wrapped tightly, for up to three months. Slice and bake directly from frozen, adding 1-2 minutes to the baking time.
- For chocolate swirl cookies, replace 1/2 cup of flour in one portion of the dough with 1/2 cup of unsweetened cocoa powder.
- These are excellent for holiday cookie exchanges because they slice and bake easily.
Nutrition
- Serving Size: 1 cookie
- Calories: 135
- Sugar: 10
- Sodium: 75
- Fat: 7
- Saturated Fat: 4
- Unsaturated Fat: 3
- Trans Fat: 0
- Carbohydrates: 17
- Fiber: 0
- Protein: 2
- Cholesterol: 30