
Oh, are you tired of opening a store-bought snack bar and realizing it’s just a brick of sugar held together with chemicals? Me too! That’s why I’m so excited to share my absolute favorite recipe for homemade granola bars with you today. These aren’t those crumbly things that fall apart in your car cup holder. No! We are making the best chewy, naturally sweetened base recipe for homemade granola bars right here in your own kitchen. Trust me, after years of teaching children how to follow directions and raising a big family, I know how to make a reliable recipe that tastes amazing every time. This formula uses simple, whole ingredients that actually taste like real food, and they are perfect for packing up to take anywhere!
- Why This Recipe Makes the Best Homemade Granola Bars (Chewy & Wholesome)
- Gathering Ingredients for Your Homemade Granola Bars
- Step-by-Step Instructions for Baked Homemade Granola Bars
- Customizing Your Homemade Granola Bars: Add-In Ideas
- Quick Energy Bars: Making No Bake Homemade Granola Bars
- Tips for Success with Easy Homemade Granola Bars
- Storing Your Make Ahead Breakfast Bars
- Frequently Asked Questions About Homemade Granola Bars
- Nutritional Estimates for These Wholesome Snack Bars
- Share Your Favorite Homemade Granola Bars Creations
Why This Recipe Makes the Best Homemade Granola Bars (Chewy & Wholesome)
I’ll be honest, I used to buy those packaged snacks for quick energy, but I always felt a little guilty about the ingredients list. It felt false somehow! That’s why developing this recipe for wholesome granola bars became so important to me. We’re ditching the high-fructose corn syrup and making something parents and kids can feel good about. This combination of rolled oats, nuts, and seeds makes for a truly satisfying, healthy snack bar that fuels you up without the crash.
What I love most is that these taste so much better than anything you find on a shelf. They smell incredible when they bake, filling the house with that warm oat and spice aroma. It reminds me of my own childhood when Mom would bake simple things just because we were hungry after school. If you end up needing something sweet and quick later on, you can always try my easy homemade chocolate pudding recipe, but these bars are where it’s at for snacks!
Achieving the Perfect Chewy Granola Bars Recipe Texture
The secret to a truly superb chewy granola bars recipe isn’t just the oats; it’s your binder! We use pure maple syrup and coconut oil, and you shouldn’t skip them. Maple syrup is moisture-rich and doesn’t crystalize like white sugar does when it cools, which keeps these soft. The liquid coconut oil wraps around the oats perfectly. If you bake them too long, they get closer to crispy, but for chewiness, you need that gooey binder to set softly.
Gathering Ingredients for Your Homemade Granola Bars
Now that you know why these turn out better than the stuff in boxes, let’s talk about what you’ll need to gather. I’ve laid out the base recipe using ingredients that give you that perfect, naturally sweetened, chewy result. Remember, Carla’s goal is reliability, so be precise with these items. We aren’t just throwing things in, because that’s how you end up with loose crumbs instead of sturdy bars!
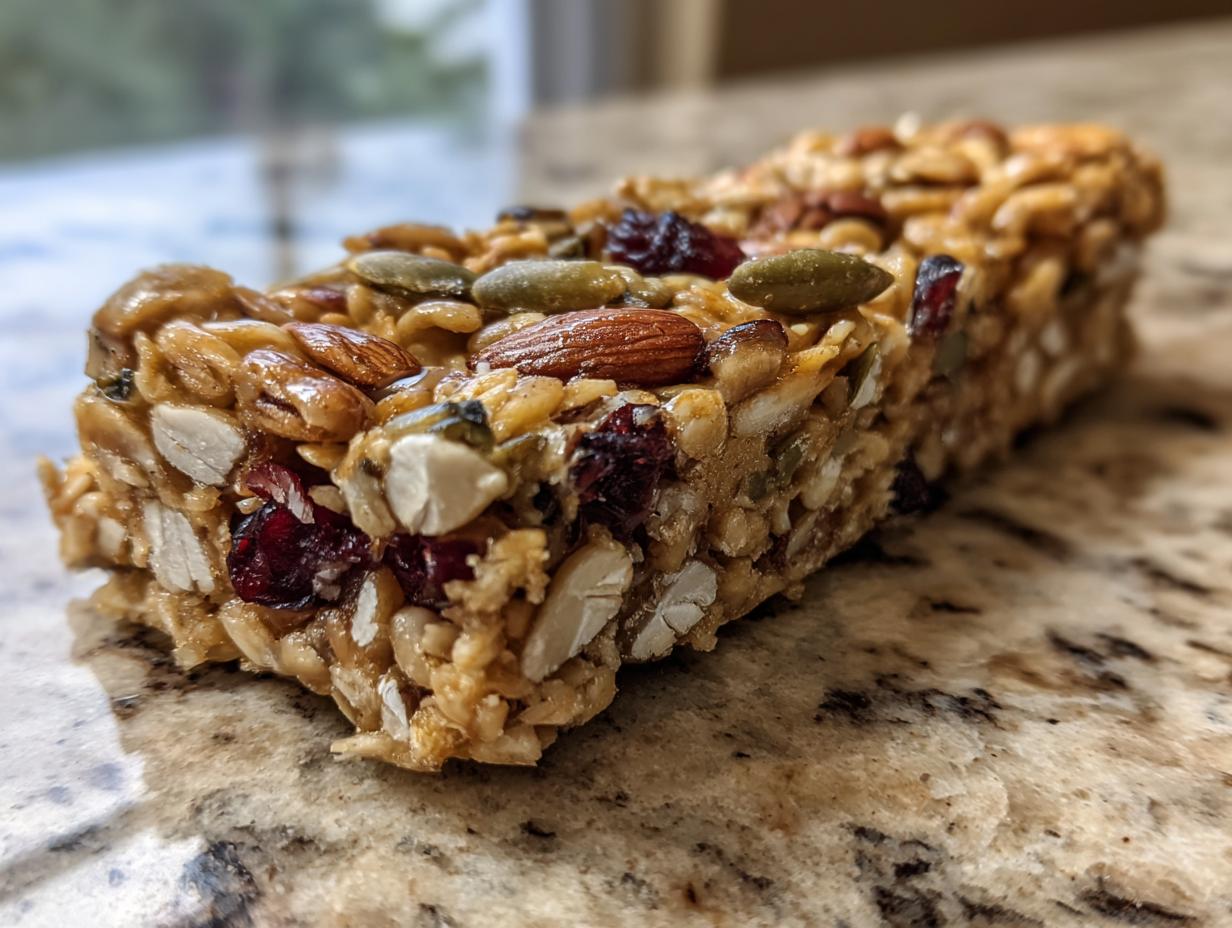
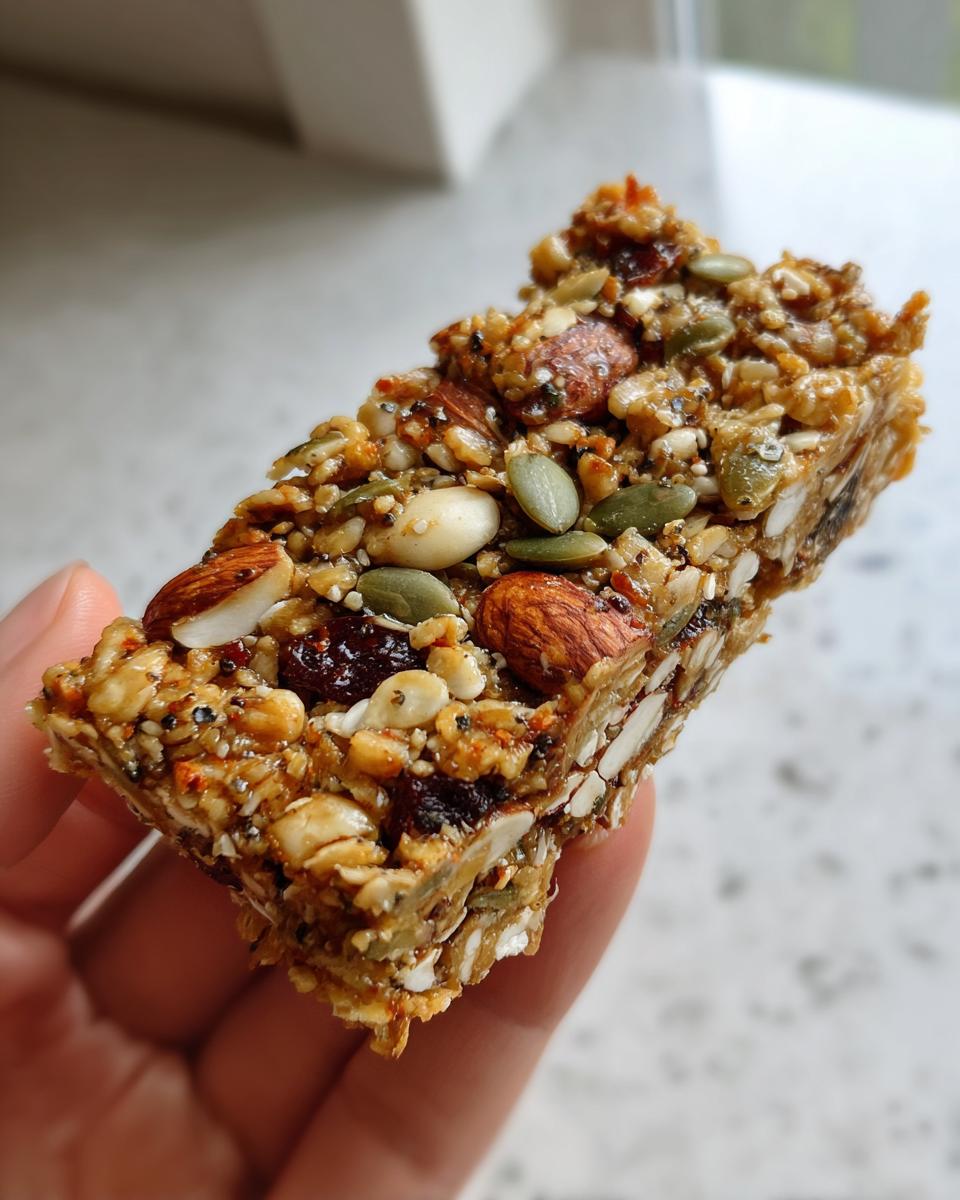
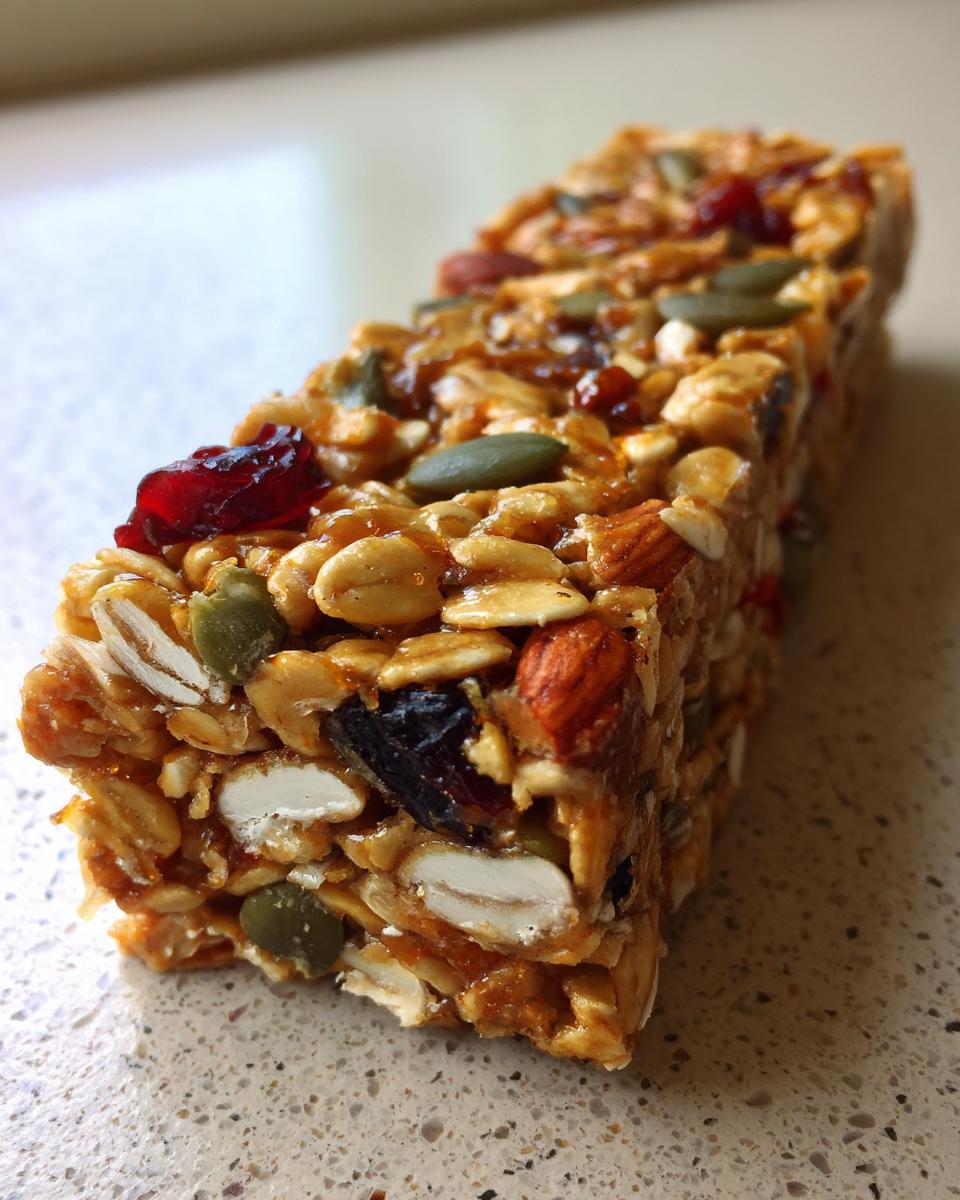
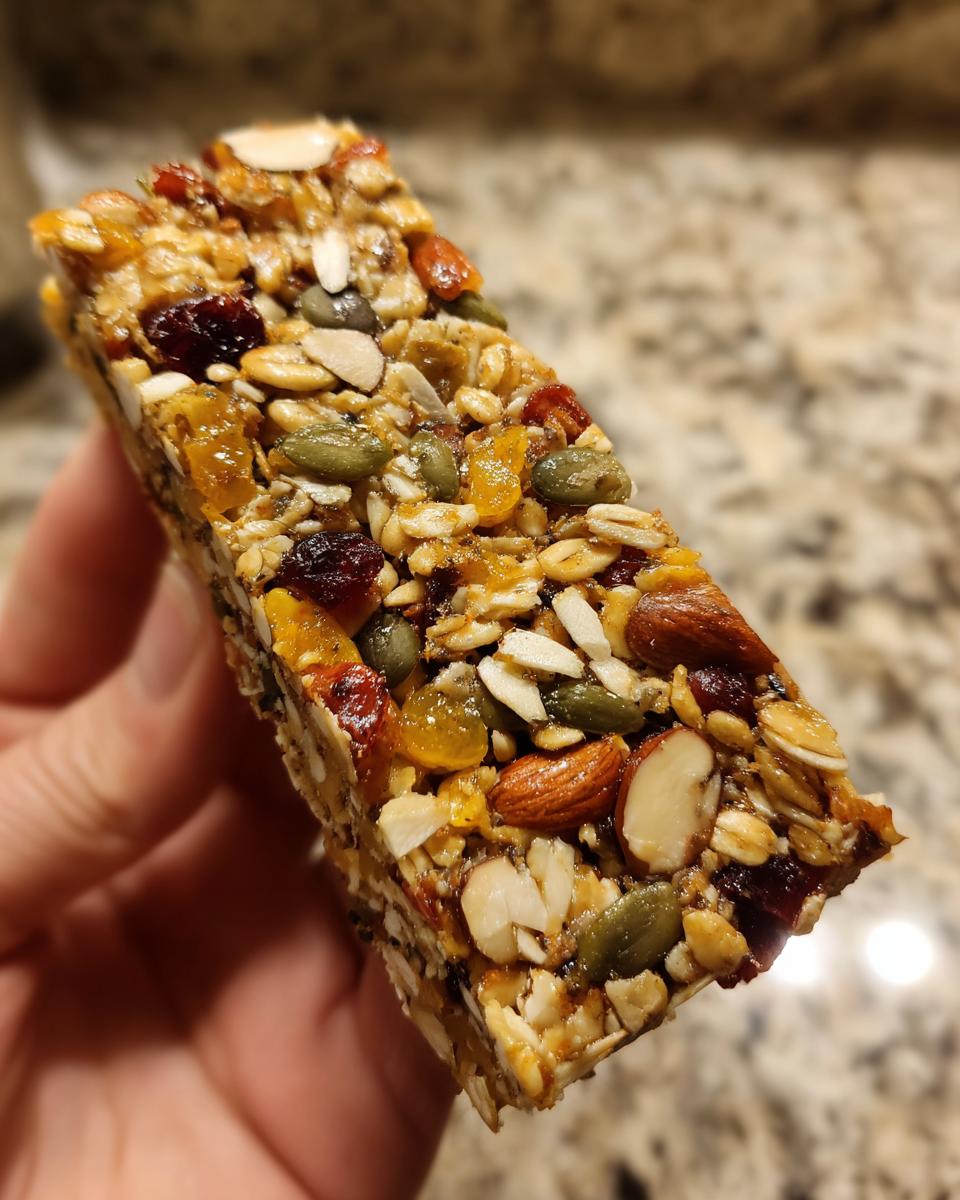
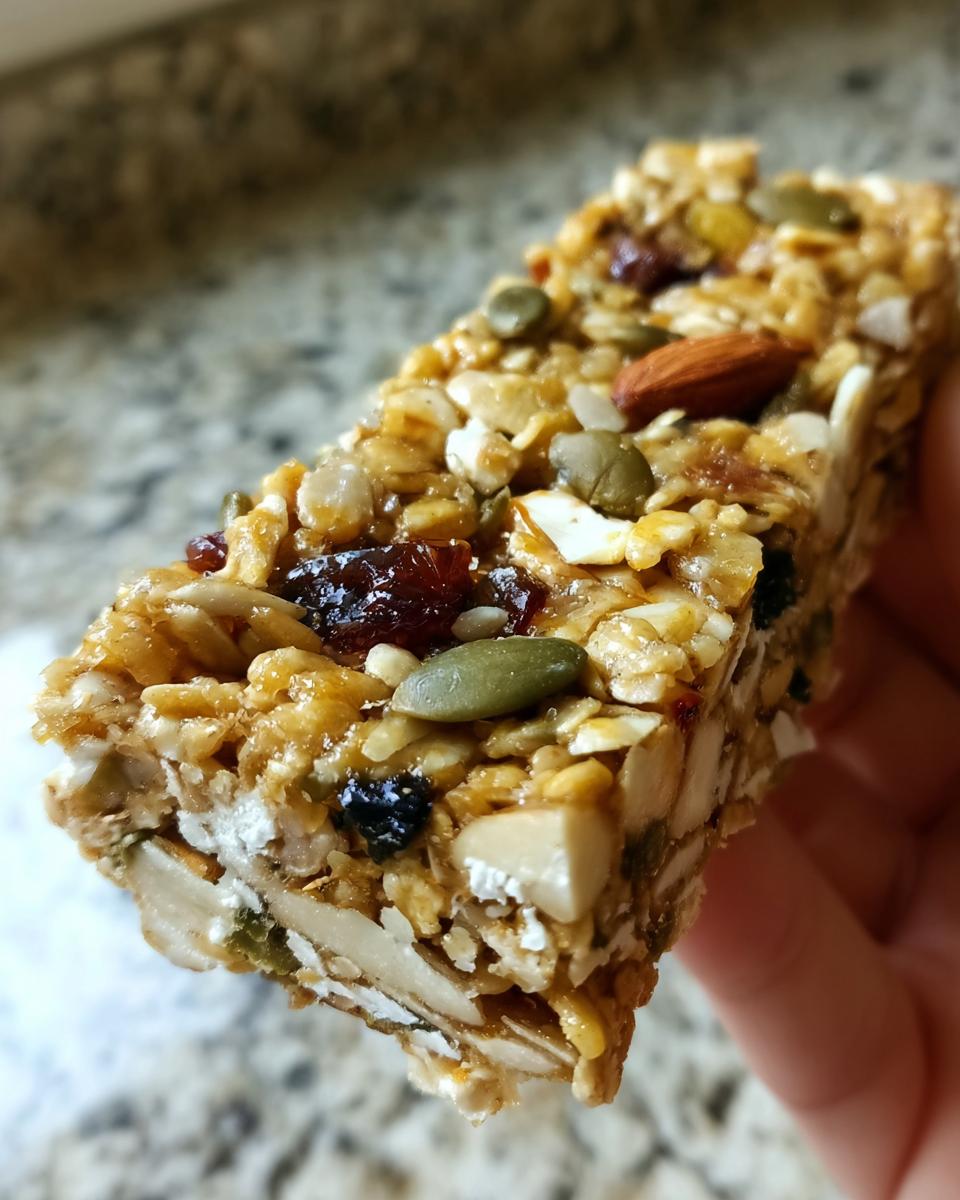
You’ll need 2 cups of good old rolled oats—not the instant kind, we want some structure! Then, we mix in about a cup of chopped nuts and half a cup of seeds for texture and nutrition. For the wet work, make sure your nut butter is smooth—no chunky bits in the binder, please! And please, use pure maple syrup, not pancake syrup; there’s a world of difference in flavor and structure.
Ingredient Notes and Substitutions for Homemade Granola Bars
This is your base, so feel free to customize, but know how changes affect the outcome. If you need this to be a gluten free granola bars recipe, you must switch to certified gluten-free rolled oats. That’s key for safety! For those avoiding nuts, sunflower seed butter works great in place of peanut butter, but it will taste a little different. If you use honey instead of maple syrup, your bars might set up slightly firmer, leaning a bit closer to crispy, so I always stick to maple for the chewiest bars.
Step-by-Step Instructions for Baked Homemade Granola Bars
Okay, let’s get baking! Making these homemade granola bars is really simple once you break it down into the wet and dry steps. I always get a little messy during this part—it’s just how it goes when you’re mixing sticky things, so maybe keep a damp cloth handy! The precision here makes all the difference between a great bar and a crumbly mess, so follow along. If you’re looking for other quick morning ideas, make sure to check out my post on easy French toast!
Preparing the Wet and Dry Mix for Homemade Granola Bars
First things first, we need to get our oven ready at 350°F and prep that 8×8 pan with parchment paper—make sure you leave an overhang! That little flap is your safety handle later, so don’t forget it. In your big bowl, toss together the oats, nuts, and seeds. Just a quick stir to combine those dry components.
Next, grab a small saucepan. We gently warm the maple syrup, nut butter, and coconut oil until they’re smooth and happy together. If it starts bubbling too hard, pull it off the heat right away! You just want it warm enough to mix well, not hot. Stir in your vanilla, and then you pour all that lovely sticky liquid right over your dry ingredients. Fold it well until everything looks evenly coated. Then, toss in any chocolate chips or fruit you’re using!
Baking and Cooling Homemade Granola Bars Properly
When they come out, you’re tempted to cut them immediately, right? DON’T! If you want that beautiful, sturdy, chewy granola bars recipe texture we’re aiming for, they must cool completely in the pan. I usually leave mine alone for at least an hour, sometimes longer if the kitchen is warm. Once they are stone cold, use those parchment handles to lift the whole slab out, and then slice them into bars. You’ll find this cooling time is the secret handshake for perfect texture.
Now for probably the most important step for structure: transfer that whole mixture to your prepared pan. You need to press it down firmly and evenly. Seriously, use the back of a spatula or even press down with another piece of parchment paper. Pack it tight! This keeps your bars together when you cut them later. Bake this for about 20 to 25 minutes, just until you see the edges turning a hint of golden brown.
Customizing Your Homemade Granola Bars: Add-In Ideas
This base recipe is wonderful on its own, but honestly, where the real fun begins with homemade granola bars is when you start adding your favorites! Think of the batter as the foundation of a fantastic house—now it’s time to pick out the perfect furniture. Since we only bake these for a short time, your mix-ins will stay perfectly soft or chewy.
I always keep a big jar of pre-chopped nuts and seeds in the freezer just for this purpose. Try almonds, walnuts, or pepitas for a good crunch. If you like chewy bars, dried fruits are your best friend. Raisins and dried cranberries are classic, but chopped apricots or cherries really wake up the flavor profile!
And who can forget the magic of chocolate? If you are looking for granola bars with chocolate chips, this is your chance. I prefer the miniature chips because they distribute much better throughout the batter than the standard size. You can use milk, dark, or even white chocolate chips, depending on your mood. If you want an extra burst of flavor, maybe swirl in a bit of melted chocolate after they cool, or perhaps try making my easy homemade chocolate pudding recipe sometime soon for a different kind of treat!
The main thing to remember is balance. If you load them up with heavy add-ins, they might be a tiny bit looser when you cut them, but that’s okay—they’ll still taste heavenly. Feel free to experiment with coconut flakes or even a dash of dried lavender if you’re feeling adventurous!
Quick Energy Bars: Making No Bake Homemade Granola Bars
You know those days when you just can’t face turning the oven on? Maybe it’s too hot outside, or maybe you just need a batch of no bake granola bars *right now*! Good news: this base recipe converts beautifully to a no-bake situation. It’s honestly one of the quickest ways to get these treats ready for school lunches or an afternoon boost.
To switch this recipe for a no-bake version, it’s super simple. You follow every single step right up until the baking part. Instead of popping them in the oven, just transfer that tightly packed mixture into your prepared pan. Then, you need patience, not an oven timer! Pop the whole pan into the refrigerator, and let it chill out for at least two long hours. This cold time firms up that maple syrup mixture, locking everything in place.
When they are completely chilled and firm, you can lift them out and slice them just like the baked ones. These versions tend to be just a fraction softer and chewier than the lightly baked ones, which I know some folks absolutely prefer. If you like no-bake desserts in general, you might also enjoy my recipe for a banana cream pie recipe; it uses the same principle of chilling to set!
If you’re curious, I saw a great resource for other chilled treats over at Andi Anne’s site about no bake granola bars that might give you some other fun ideas, too. Either way you make them, these are fantastic quick energy bars!
Tips for Success with Easy Homemade Granola Bars
I know that when you’re first trying out a new recipe, especially one that needs to hold its shape, you want all the help you can get! That’s why I put together a few little tricks I learned over the years that make whipping up these easy homemade granola bars foolproof. These tips focus on making sure your bars actually stick together so nothing goes to waste.
My biggest piece of advice, which I mentioned before but it bears repeating because so many people rush this step, is to press hard! When you transfer that oat mixture into the pan, don’t just spread it around gently. You need to use a sturdy spatula or even the bottom of a straight glass to pack that mixture down as tightly as you possibly can.
If you want them to behave perfectly when cutting later, press them like you mean it! This eliminates air pockets that cause crumbling. It’s the difference between a beautiful bar and a whole lot of loose granola bits in your storage container.
Another critical point for that smooth binder—make sure when you melt your coconut oil and nut butter with the maple syrup, you take it off the heat *before* adding the vanilla. If the liquid is too hot, the vanilla can evaporate too fast and sometimes it doesn’t incorporate as smoothly. After the vanilla goes in, pour it immediately. You want that mixture warm enough to coat everything easily, but not so hot that it burns your nuts or makes the whole thing greasy.
Finally, don’t skimp on the fat, which means the coconut oil! It acts as a crucial setting agent when it cools. I learned that lesson the hard way once when I tried to substitute applesauce for some of the oil to make them “lighter.” They completely fell apart on the counter! Stick to the measured fat for sturdy, chewy results. If you’re looking for another solid, easy-to-make confection, you have to try my easy peanut butter fudge recipe!
Storing Your Make Ahead Breakfast Bars
One of the best things about making a big batch of these homemade granola bars is that they truly are amazing for meal prep. You can make them on a Sunday, and they will happily last you through the week, basically doing the work for you come busy weekday mornings! That’s the beauty of a good make ahead breakfast bar, isn’t it?
For storing, I always recommend keeping them at room temperature first, provided your kitchen isn’t too hot. Just stack them up in an airtight container. If you press them tightly, they should easily last for about a week without getting dry or stinky. It helps if you place a piece of wax paper or parchment between the layers, especially if you added chocolate chips, so they don’t all stick into one giant oat brick!
If, for some reason, you made a huge batch, or maybe your kitchen gets really warm in the summer, you can absolutely pop them into the fridge. They will stay fresh for longer, maybe up to ten days this way. The only thing to note is that the cold will make them feel a little harder than when they were room temperature. So, if you store them in the fridge, just let them sit out on the counter for about ten minutes before you pack them up for your lunch or eat them as a quick energy bar. That little bit of time lets that maple syrup binder soften up just enough to bring back that beautiful chewy texture we worked so hard for! If you end up with leftovers you can’t eat right away, they actually freeze beautifully too, wrapped individually in plastic wrap. It’s like having on-demand snacks ready to go!
Honestly though, they disappear so fast around here, I rarely have to worry about long-term storage. Speaking of handy recipes, if you want a great side dish that holds up well too, you should check out my recipe for easy honey butter skillet corn!
Frequently Asked Questions About Homemade Granola Bars
I always find that once folks try making something at home, they have a million clever little tweaks they want to try next! That’s the best part about a solid base recipe like this—it encourages experimentation. Here are some of the questions I get most often when people are perfecting their homemade granola bars. If you have others, drop them in the comments below—I love helping troubleshoot!
For something totally different later in the week, don’t forget to bookmark my recipe for easy ravioli lasagna casserole, just in case you want a big family dinner after all that snacking!
Can I make these naturally sweetened bars vegan?
Oh, absolutely! Since we are already using maple syrup instead of honey as our main sweetener—which keeps these naturally sweetened bars wonderfully vegan-friendly—you only have two things to check. Make sure any chocolate chips you toss in are marked as vegan, as some brands use dairy. Also, ensure your nut butter doesn’t contain any hidden non-vegan additives, though most pure peanut or almond butters are fine. That’s it! The structure relies on the oats, nuts, and fat, so you’re good to go!
How do I ensure my homemade granola bars are kid friendly?
Making them kid friendly granola bars is all about texture and avoiding surprises! If you have little ones, you must chop your nuts very finely, or even substitute sunflower or pumpkin seeds entirely for those small mouths. Remember how I stressed pressing the mixture tightly? That’s crucial here so they don’t crumble mid-bite. As for flavor, kids usually love the addition of mini chocolate chips, as they melt slightly when baked and create soft pockets of sweetness. Also, if you’re trying to avoid sugar rushes, skip the dried fruits for a couple of batches and stick to oats, seeds, and maybe a sprinkle of cinnamon; they love that simple, comforting flavor!
If you’re looking for a copycat version that kids recognize, I know some people have had great luck adapting this general method to make copycat Quaker Chewy Granola Bars; they usually involve a bit less baking time to keep that signature soft texture.
Nutritional Estimates for These Wholesome Snack Bars
Now, I always encourage everyone to bake with love and not obsess too much over the numbers, because truly, these are made with real ingredients, which beats shelf-stable preservatives any day! However, I know many of you are tracking things, so I worked up the estimates for the base recipe servings—that’s 12 bars.
Keep in mind, this is just a guide! This is for the base recipe of our wholesome granola bars with 1/2 cup of something neutral like sunflower seeds. If you load yours down with lots of higher-sugar dried fruit or use richer nuts, those numbers will shift a little. But this gives you a great starting point for knowing what you’re eating!
Here is the breakdown based on the recipe ingredients listed above:
- Calories: About 250 per bar
- Fat: Around 13g total (most of that is healthy fat from the nuts and oils!)
- Protein: About 7g
- Carbohydrates: Roughly 30g
- Sugar: Around 12g (mostly natural sugars from the maple syrup and dried fruit if you added them)
Remember, sugar is just sugar, but the complexity of maple syrup is much better than refined white sugar, and these bars have fiber to help slow down that absorption. If you want to see what else I’m making that’s packed with good stuff, you should take a peek at my recipe for a veggie lentil salad—that’s another fantastic, fiber-filled snack or light meal!
Share Your Favorite Homemade Granola Bars Creations
Well, we made it! You’ve got a batch of the best, most satisfying homemade granola bars cooling on your counter right now, and I couldn’t be prouder. But the recipe doesn’t end here for me—it’s just the beginning for you!
Since this recipe is designed to be customized, I genuinely want to see what you came up with. Did you go heavy on the dried mango? Did you try a special blend of seeds? Please, please, don’t be shy! Drop a comment right down below and tell me how yours turned out, especially if you tried one of the no-bake variations. Was the texture perfect for you?
If you snap a picture of your beautiful bars—maybe lined up for school lunches or packed into hiking backpacks—tag me on social media! Seeing your family enjoy these wholesome snacks is the absolute best reward for all this hard work. It reminds me why I teach these reliable, comforting American recipes in the first place. If you need to get in touch with me for any specific questions about storage or substitutions, you can always reach out through my contact page!
Rate this recipe with stars if you loved it, too! Happy baking and snacking, friends!
PrintThe Best Chewy, Naturally Sweetened Homemade Granola Bars
Make chewy, wholesome homemade granola bars using natural sweeteners. This easy recipe is perfect for a healthy snack or breakfast on the go and allows for many add-ins.
- Prep Time: 15 min
- Cook Time: 25 min
- Total Time: 40 min
- Yield: 12 bars 1x
- Category: Snack
- Method: Baking
- Cuisine: American
- Diet: Vegetarian
Ingredients
- 2 cups rolled oats
- 1 cup mixed nuts (almonds, pecans), roughly chopped
- 1/2 cup mixed seeds (pumpkin, sunflower)
- 1/2 teaspoon salt
- 1/2 cup smooth nut butter (peanut or almond)
- 1/2 cup pure maple syrup
- 1/4 cup coconut oil, melted
- 1 teaspoon vanilla extract
- 1/2 cup mix-ins (e.g., dried fruit, mini chocolate chips)
Instructions
- Preheat your oven to 350°F (175°C). Line an 8×8 inch baking pan with parchment paper, leaving an overhang for easy removal.
- In a large bowl, combine the rolled oats, chopped nuts, and seeds. Mix these dry ingredients well.
- In a separate, smaller saucepan or microwave-safe bowl, gently warm the maple syrup, nut butter, and melted coconut oil until smooth and easily combined. Do not boil.
- Remove the wet mixture from the heat and stir in the vanilla extract.
- Pour the wet ingredients over the dry ingredients. Stir everything together until the oats and nuts are evenly coated.
- Fold in your chosen mix-ins, such as dried fruit or chocolate chips.
- Transfer the mixture to the prepared baking pan. Press the mixture down firmly and evenly into the pan using the back of a spatula or another piece of parchment paper. Pack it tightly for better bar structure.
- Bake for 20 to 25 minutes, or until the edges are lightly golden brown.
- Remove from the oven and let the bars cool completely in the pan on a wire rack. This cooling step is crucial for chewy texture.
- Once fully cooled, lift the bars out using the parchment overhang and cut them into 12 to 16 bars.
Notes
- For a gluten free granola bars recipe, use certified gluten-free rolled oats.
- To make this a no bake granola bars version, skip the baking step. Press the mixture firmly into the pan and chill in the refrigerator for at least 2 hours before cutting.
- If you want copycat granola bars texture, press the mixture very tightly and consider reducing the maple syrup by one tablespoon.
- These make ahead breakfast bars store well in an airtight container at room temperature for up to one week.
Nutrition
- Serving Size: 1 bar
- Calories: 250
- Sugar: 12g
- Sodium: 95mg
- Fat: 13g
- Saturated Fat: 4g
- Unsaturated Fat: 9g
- Trans Fat: 0g
- Carbohydrates: 30g
- Fiber: 4g
- Protein: 7g
- Cholesterol: 0mg