

If you bake sourdough, you know the challenge: what to do with that tangy overflow that’s waiting to be fed? My kitchen is all about making things simple and dependable, no fuss, just good food. That’s why I couldn’t wait to share this recipe for sourdough discard pizza dough. It takes that leftover starter and transforms it into a beautiful foundation for homemade pizza night, using up what might otherwise go to waste. As a retired teacher, trust me, I’ve broken this down into the clearest steps possible so anyone can achieve that perfect, flavorful crust at home. You can read more about my philosophy on simple, home-focused cooking over at my About Page, but for now, let’s get this dough made!
- Why This Sourdough Discard Pizza Dough Is Your New Weeknight Hero
- Gathering Ingredients for Your Sourdough Discard Pizza Dough
- Step-by-Step Instructions for Easy Pizza Dough
- Expert Tips for Perfect Sourdough Discard Pizza Dough Every Time
- Transforming Leftover Sourdough Discard into Flavorful Pizza Dough
- Storage and Make-Ahead Options for Your Dough
- Frequently Asked Questions About Sourdough Discard Pizza Dough
- Estimated Nutritional Information for This Pizza Dough
- Share Your Homemade Pizza Night Creations
Why This Sourdough Discard Pizza Dough Is Your New Weeknight Hero
I know that when you are planning dinner after a long day, the last thing you want is a recipe that needs ten hours of rising time. That’s the beauty of using discard! This recipe strips away all the waiting while keeping all the flavor. Since I spent thirty years in a classroom, I learned that clarity and speed are essential—and this dough delivers on all fronts. It’s my go-to for simple weeknight dinners.
Zero Waste Baking: Using Sourdough Discard
This is truly where we honor the ingredients we work so hard to maintain. Every bit of sourdough discard heading into the bin is a missed opportunity for something delicious! This recipe makes sure those tangy leftovers don’t go to waste. It’s just good, sensible baking, keeping my kitchen greener.
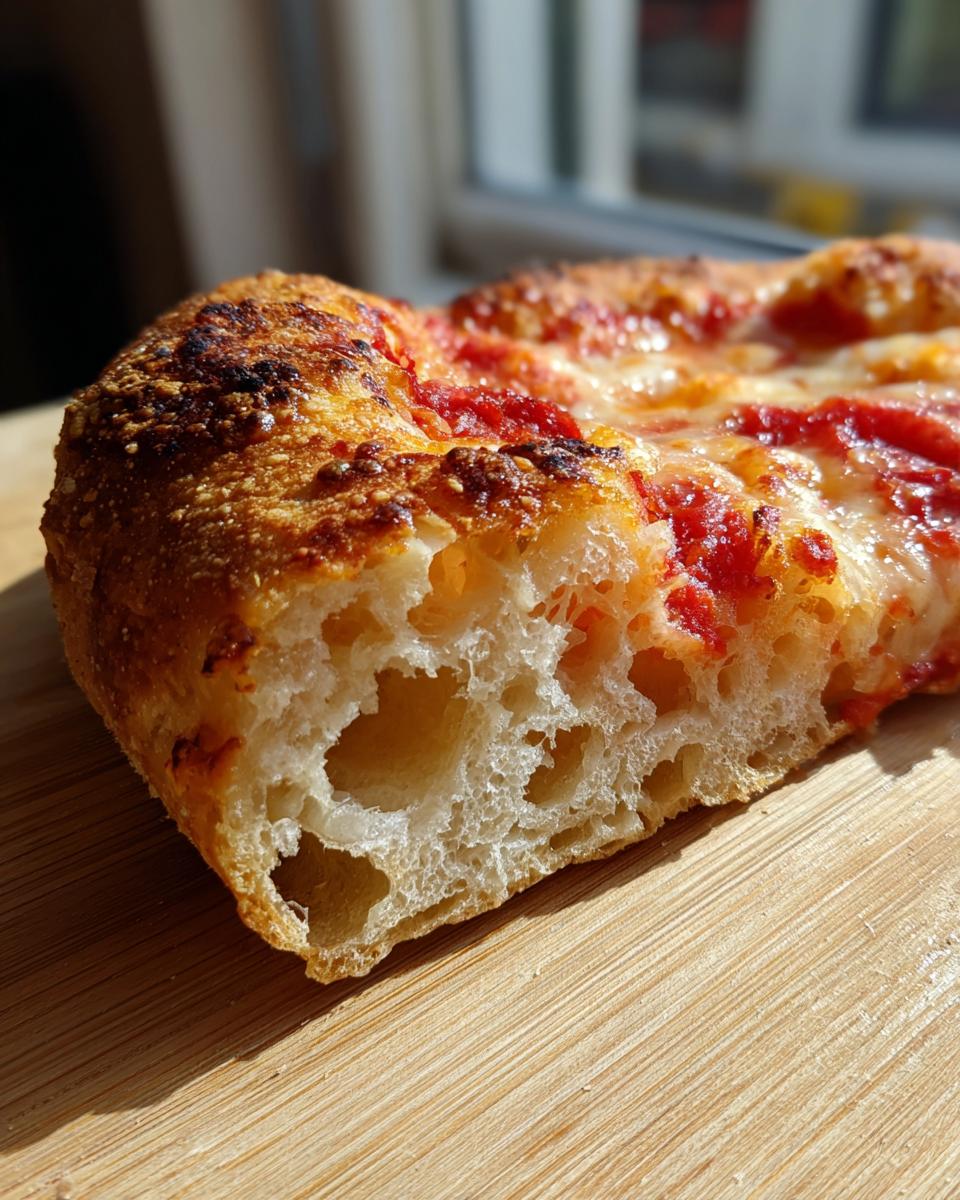
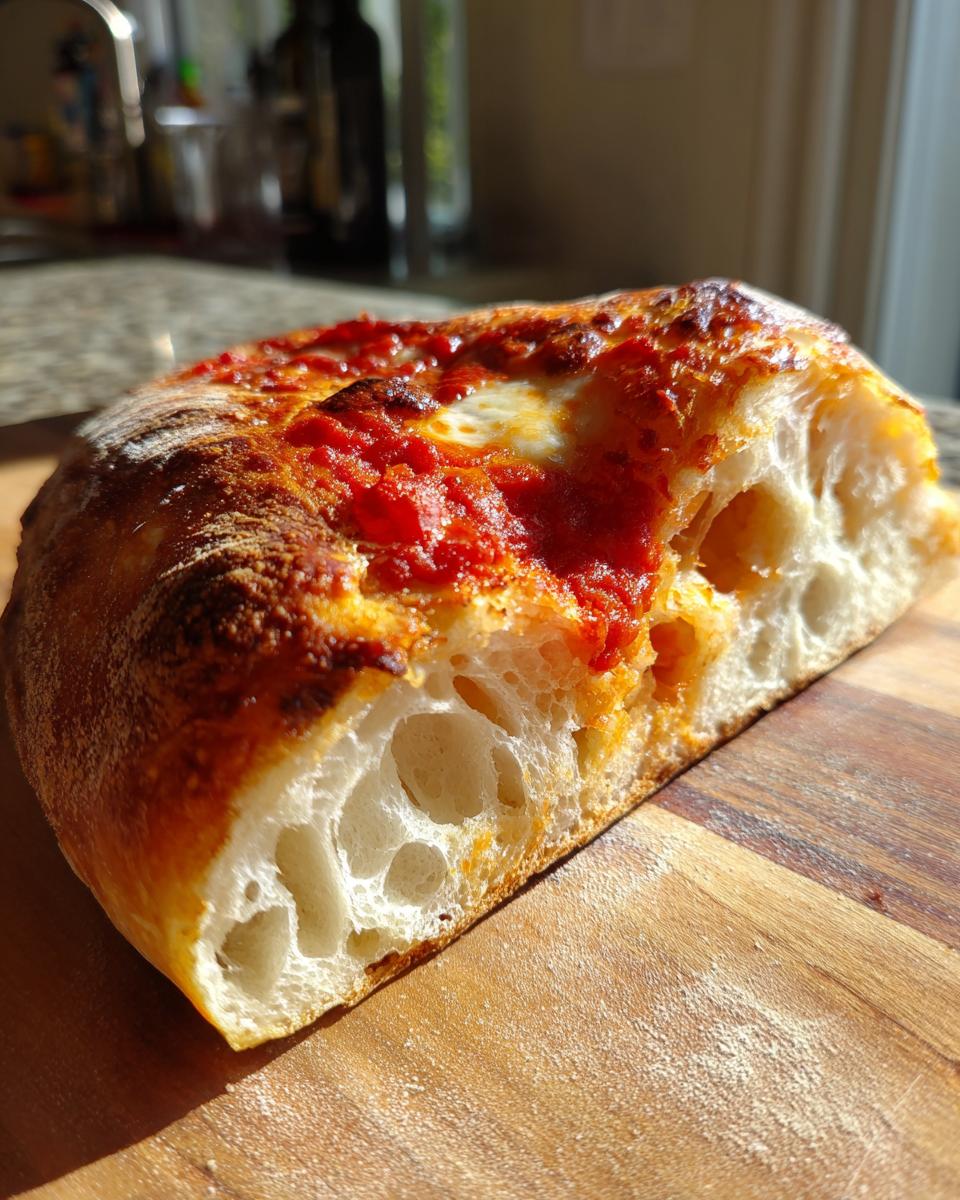
Achieving the Perfect Chewy Pizza Crust Texture
We get the best of both worlds here! That little bit of acidic discard helps tenderize the dough, which lends itself beautifully to a chewy interior, while the high heat you bake it at ensures those edges get delightfully crispy. It’s a texture you just don’t get with standard, quick yeast dough.
Quick Pizza Dough Recipe: Ready Fast
If you’re looking for a Quick Pizza Dough Recipe that works on a Tuesday night, this is it. We include an optional tiny bit of commercial yeast that jumps things along if you’re rushed, meaning you can mix, knead, and bake in under an hour. No need for planning your pizza night the day before!
Gathering Ingredients for Your Sourdough Discard Pizza Dough
Now we get down to brass tacks! Making successful sourdough discard pizza dough is all about treating those simple ingredients right. Don’t worry; you don’t need a pantry full of fancy flours for this one. We’re keeping it straightforward so you can get this dough mixed up fast. Remember, precision matters here, even though the whole process feels relaxed.
Ingredient Clarity and Preparation
For the best flavor and easiest mixing, try to let your unfed sourdough discard sit out on the counter for about 30 minutes before you start. It should be close to room temperature, not icy cold from the back of the fridge. If you are choosing to speed things up, make sure that instant yeast is fresh—there’s nothing worse than activating yeast that’s been hiding too long! Measure everything carefully; even a little too much flour will make your beautiful dough stiff instead of pliable.
Step-by-Step Instructions for Easy Pizza Dough
Alright, let’s get those hands dusty! Now that we’ve got our ingredients together, making the sourdough discard pizza dough itself is simple. I pride myself on making recipes work for real life, and these steps reflect that. We’re aiming for a fantastic flavor base without keeping you in the kitchen all evening. Remember, high heat is your friend for that perfect texture!
Mixing and Kneading the Sourdough Discard Pizza Dough
Grab a nice sturdy bowl. First, mix your wet ingredients—that would be the discard and the olive oil—and then start stirring in the dry stuff: the flour and salt. If you’re adding that tiny bit of yeast for a faster rise, toss it in with the dry ingredients now so it gets evenly distributed. Start mixing it all up until you get what I call a ‘shaggy mass.’ Don’t panic if it looks crumbly; that’s normal when starting out. Now, turn that dough out onto a lightly floured surface. We need to knead this for about 5 to 7 minutes. Kneading develops the gluten, which is the key to that satisfyingly **Chewy Pizza Crust** we talked about. If you used yeast, knead it just until it comes together smoothly.
Resting Times: Yeast vs. No Yeast Pizza Dough
Here is where you make a choice based on your schedule. If you included the instant yeast, cover that smooth dough ball and let it hang out in a lightly oiled bowl for just 30 minutes in a warm spot. It’ll puff up nicely. But if you are sticking strictly to the natural rise to boost that Flavorful Pizza Dough tang, you need a bit more patience—say, 1 to 2 hours on the counter. It won’t double like traditional yeast dough, but it’ll develop so much more flavor, which is what we’re here for!

Preheating and Shaping Your Homemade Pizza Crust
Don’t skimp on the heat here! Get your oven blazing hot—we need 475 degrees Fahrenheit (245 Celsius) minimum, preferably with a pizza stone already inside warming up. Once your dough has rested, split it in half for two medium pies. If you want that super crispy bottom, roll it out thin with a rolling pin. If you are craving that thicker, chewy edge, use your hands to gently stretch it outward. I always transfer mine onto parchment paper before topping it, just to make the launch into the oven less scary! Then, top quickly and slide it right into that hot oven, usually for about 10 to 15 minutes. You can check out some quick breakfast recipes after this, but focus on that pizza for now!
Expert Tips for Perfect Sourdough Discard Pizza Dough Every Time
Making any bread product without the structure of a perfectly fed starter means we have to rely on technique a bit more, and that’s where experience really pays off. I’ve made enough sourdough discard pizza dough to know the little tricks that make the difference between just-okay crust and pizza night magic. These next steps turn a simple dough into something truly special, proving that using up your discard doesn’t mean sacrificing quality. I learned these from years of trial and error in my own kitchen, much like I did when updating those old school recipes for my grandkids! For more on how I approach home cooking and reliability, you can always visit my About Page.
Controlling Crust Texture in Your Sourdough Discard Pizza Dough
If your heart is set on a shatteringly crispy crust, you need to treat that dough gently when you shape it. Don’t use a rolling pin on the edges; gently stretch it by hand and try to keep the center very thin. If you prefer that satisfying chew, allow the dough to rest longer without punching it down too much, and work it just enough to keep some air inside when stretching. For easy transfer, especially in a hot oven, always use parchment paper beneath the shaped dough. It’s my secret weapon for keeping things neat on those busy pizza nights.

Maximizing Tangy Flavor in Your Dough
The flavor of the discard is everything here, right? If you want that beautiful, punchy tanginess that makes sourdough so addictive, try using discard that has been chilling in the fridge for at least three days, rather than the discard you just pulled off the counter this morning. The longer it waits, the more that lactic acid develops. Also, instead of using plain warm water for the mix, try swapping out half of it for lukewarm water that has steeped with a teaspoon of lemon juice for ten minutes. It adds a little extra acidity right at the start to boost that signature sour note as it bakes.
Transforming Leftover Sourdough Discard into Flavorful Pizza Dough
One of the things I love most about being in the kitchen outside of teaching is finding ways to be sensible and avoid waste. When you’re deep into sourdough baking, you end up with a big bowl of what seems like leftovers, but I look at it as pure potential! This whole process of using sourdough discard is just genius, really. It means that instead of pouring that tang down the sink, we are turning it into something wonderful that the family will actually beg for.
I remember when my oldest granddaughter first asked me what I did with the extra starter. I tried to explain it was just “throw-away flour slurry,” and she looked horrified! Kids today are so aware of waste, and they challenged me to make something good from it. This pizza dough was my answer, and it became one of our go-to Sourdough Discard Recipes. Making homemade pizza crust usually feels like a weekend project, but mixing this up takes minutes, and then we get the payoff of that incredible, tangy flavor.
It pairs wonderfully with salty toppings, too. If you’ve made this dough, maybe next time you’re looking for something quick to serve before dinner, check out some of my easy appetizer and snack recipes while the pizza bakes away!
Storage and Make-Ahead Options for Your Dough
I know you won’t want to eat two pizzas in one night—I certainly don’t, even if the dough is amazing! The good news is that this sourdough discard pizza dough is very forgiving of making-ahead plans. I always tell folks that planning saves stress, whether you’re planning a lesson plan or a dinner plan!
You can absolutely refrigerate this dough after the initial kneading stage. Once you’ve kneaded it until it’s smooth and elastic (remember that 5-to-7-minute workout?), lightly oil a bowl, cover it tightly with plastic wrap, and stick it in the fridge. It can happily rest there for up to three days. The cold temperature slows down the fermentation, which actually deepens that lovely sourdough tang we’re aiming for!
If you want to make a big batch for true zero-waste planning, this dough freezes beautifully. Once you’ve kneaded it, divide it into the portions you’ll use for individual pizzas. Wrap each dough ball super tightly in plastic wrap, and then maybe slip that wrapped ball into a Ziploc bag just to be safe from freezer burn. It’ll last for about two months. When you’re ready to use it, just pull it out the night before and let it thaw slowly in the refrigerator. Then, let it warm up on the counter for an hour before shaping. It’s the perfect way to ensure you always have that homemade pizza crust ready to go!
Frequently Asked Questions About Sourdough Discard Pizza Dough
When I first started teaching folks how to make the absolute best sourdough discard pizza dough, there were always a few questions that popped up again and again. It’s completely normal! Baking with discard means you’re working with slightly different materials than a standard recipe. I want you to feel confident trying this out, so let’s clear up a few common hurdles right here. Don’t hesitate to reach out via my Contact Page if you still have a question!
Can I make this sourdough discard pizza dough with no yeast at all?
Absolutely, you can! That’s honestly my preferred way if I’m not in a major rush. If you skip the yeast, you are choosing flavor over speed. When you don’t add that commercial yeast, the dough relies entirely on the wild yeasts and bacteria already in your discard to give it some lift. This means your rest time might stretch to 2 hours instead of 30 minutes to get decent volume, but I promise you, those extra acidity notes make for a much Flavorful Pizza Dough. It’s a trade-off worth making for a really deep tang!
What is the best way to store unfed sourdough discard?
For those Beginner Sourdough Discard bakers out there, storing the leftover starter is easy if you keep it simple. If you know you won’t be baking with it for a few days, pop it straight into an airtight container in the refrigerator. It really doesn’t need much fuss. Just make sure that container has a lid that seals well—you don’t want it drying out! When you’re ready to use it for this pizza crust, just pull it out an hour ahead of time so it’s not rock hard when you start mixing. Easy breezy!
Estimated Nutritional Information for This Pizza Dough
Now, just like when I taught nutrition in the third grade, transparency is important! Before you settle in for that delicious pizza night, I want you to have a general idea of what’s in this wonderful crust. Since this is based on a recipe that might use different brands of flour or how much olive oil clings to your hands during kneading, these numbers are always estimates based on a serving size of half a pizza.
We’re keeping things reasonable here. My goal is always comfort food that fits into a real, balanced life. You’ll see that the fat content is quite low, mostly coming from the little splash of olive oil we put in for richness. Remember, we aren’t adding heavy cheese or cured meats in the dough itself, so that keeps the base nice and light.
Here’s the quick rundown based on the standard recipe measurements:
- Calories: Approximately 350 per serving (half a pizza base).
- Carbohydrates: Around 65 grams.
- Protein: About 12 grams.
- Fat: Roughly 5 grams total.
I always put in a disclaimer: these are my best estimates for the dough alone, not including your sauce, cheese, or toppings! If you are tracking strict macros, you’ll want to calculate those extras separately. But for a dependable, tangy, homemade pizza crust made from simple ingredients, I feel really good about this nutritional profile.
Share Your Homemade Pizza Night Creations
Oh, I do hope you enjoy making—and devouring—this sourdough discard pizza dough! The best part of my job now, especially after leaving the classroom, is hearing from all of you about how a recipe worked in your own busy kitchens. Did you manage to get that crispy bottom, or did you lean into the chewy edge?
I truly want you to rate this recipe down below. It helps other home cooks, just like you, decide if they should give my method a try for their next pizza night at home. And please, if you snapped a picture of that beautiful, tangy homemade pizza crust steaming hot from your oven, I would absolutely love to see it! Tag me or send it through my Contact Page. Sharing these successes—the moments we turned simple leftovers into something spectacular—is what Cooking by Carla is all about. Happy baking, and enjoy that slice!
PrintQuick & Chewy Sourdough Discard Pizza Dough (No Yeast Option)
Use your sourdough discard to make a flavorful, homemade pizza crust. This recipe yields a dough that is both chewy and crispy, perfect for weeknight pizza night, and requires no long fermentation.
- Prep Time: 15 min
- Cook Time: 15 min
- Total Time: 30 min
- Yield: 2 medium pizzas 1x
- Category: Dinner
- Method: Baking
- Cuisine: American
- Diet: Vegetarian
Ingredients
- 1 cup sourdough discard (unfed starter)
- 1 cup all-purpose flour
- 1 teaspoon instant dry yeast (optional, for faster rise)
- 1 teaspoon salt
- 1 tablespoon olive oil
- 1/4 cup warm water (or slightly more, as needed)
Instructions
- In a medium bowl, combine the sourdough discard, flour, salt, and olive oil. If you are using yeast, add it now.
- Gradually add the warm water, mixing until a shaggy dough forms. You may need to add a little more water if the dough seems too dry.
- Turn the dough out onto a lightly floured surface. Knead for 5 to 7 minutes until the dough is smooth and elastic. If you skip the yeast, knead for 2 minutes longer.
- If using yeast, let the dough rest in a lightly oiled bowl, covered, for 30 minutes in a warm spot. If you are not using yeast, proceed directly to shaping or allow a 1 to 2 hour rest for better flavor development.
- Preheat your oven and pizza stone or baking sheet to 475 degrees Fahrenheit (245 degrees Celsius).
- Divide the dough in half for two medium pizzas or use the whole batch for one large pizza.
- Shape the dough to your desired thickness. For a crispier crust, roll it thin. For a chewier crust, gently stretch it by hand.
- Transfer the dough to parchment paper or a lightly floured pizza peel. Top as desired.
- Bake for 10 to 15 minutes, or until the crust is golden brown and the cheese is bubbly.
Notes
- For the best flavor, use discard that has been refrigerated for at least 24 hours.
- If you want a crispier crust, bake the dough plain for 5 minutes before adding toppings.
- This dough freezes well after the initial kneading stage; wrap tightly in plastic wrap.
Nutrition
- Serving Size: 1/2 pizza
- Calories: 350
- Sugar: 1
- Sodium: 450
- Fat: 5
- Saturated Fat: 1
- Unsaturated Fat: 4
- Trans Fat: 0
- Carbohydrates: 65
- Fiber: 2
- Protein: 12
- Cholesterol: 0