
Entertaining guests, especially these days when everyone seems to drop by unexpectedly on a Saturday afternoon, can feel a little overwhelming if you haven’t planned ahead. But that’s where the magic of a good make-ahead recipe comes in—it lets you relax instead of frantically slicing things in the kitchen! I’m Carla, and after thirty years of teaching classrooms full of hungry kids, I know a thing or two about feeding a crowd quickly and deliciously. These baked ham and cheese sliders are my ultimate secret weapon.
They are pure comfort food wrapped up in soft Hawaiian rolls, topped with that savory, slightly tangy poppy seed butter glaze. You assemble them entirely the day before, pop them in the fridge, and when your guests arrive, all you have to do is slide the dish into the oven. They bake up golden, cheesy, and irresistible. Honestly, these are the quintessential warm party appetizers that taste just like home, and they require almost no effort when it matters most.

- Why You Will Love These Ham and Cheese Sliders
- Ingredients for the Best Ham and Cheese Sliders
- Essential Equipment for Baked Sliders Recipe
- How to Assemble and Bake Ham and Cheese Sliders
- Tips for Perfect Make-Ahead Ham and Cheese Sliders
- Serving Suggestions for These Party Appetizers
- Storage and Reheating Instructions for Ham and Cheese Sliders
- Frequently Asked Questions About Ham and Cheese Sliders
- Nutritional Estimates for Ham and Cheese Sliders
Why You Will Love These Ham and Cheese Sliders
I’ve made hundreds of dishes for family brunches and impromptu gatherings over the years. When it comes to feeding a crowd without stressing out, these little pockets of heaven are my number one choice. They just hit all the right notes. They’re warm, they’re cheesy, and that glaze—oh, that glaze!
Perfect Make-Ahead Party Appetizers
This is the real star feature! You can put these sliders together completely the day before your guests arrive. Honestly, the flavor even seems better the next day. This means less scrambling on a busy Saturday afternoon and more time spent enjoying the company. They are the definition of low-stress entertaining.
Flavorful Poppy Seed Butter Glaze
Don’t mistake these for plain old ham and cheese sandwiches! That buttery topping—packed with Dijon and poppy seeds—is what elevates these **ham and cheese sliders** into something truly special. When it bakes, it crisps up the top ever so slightly and melts right down into those soft rolls. It’s the perfect marriage of salty, sweet, and savory.

Ingredients for the Best Ham and Cheese Sliders
When I’m baking for a crowd, I keep my ingredient list simple, dependable, and high-quality. You don’t need fancy stuff here; you just need the right foundation to let that poppy seed butter shine! The key to making these the very best **hawaiian roll sliders** is using good deli meats and those wonderfully soft sweet rolls. I’ve listed everything below exactly how I gather it from my pantry.
- 1 package (12 count) Hawaiian sweet rolls – Trust me, the slight sweetness of these rolls is what balances the saltiness of the ham perfectly.
- 1 pound thinly sliced deli ham – Get it sliced nice and thin!
- 1 pound thinly sliced Swiss cheese – I stick to Swiss because it melts beautifully and has that classic nutty flavor that works so well.
- 1/2 cup unsalted butter, melted – Make sure this is fully melted before you start mixing the topping.
- 2 tablespoons Dijon mustard – Dijon has a little more kick than yellow mustard, and you need that depth against all that richness.
- 1 tablespoon Worcestershire sauce – Don’t skip this! It adds a savory depth you can’t get anywhere else.
- 1 tablespoon poppy seeds – These give the top layer that signature spotty look and a delightful little pop when you bite in.
- 1 teaspoon onion powder
- 1 teaspoon dried minced onion – Using both forms of onion ensures the flavor disperses evenly through the glaze.
Essential Equipment for Baked Sliders Recipe
Before you start layering, just make sure you have your tools ready. Cleaning up is much easier when you know exactly what you need assembled on the counter! I learned this lesson the hard way when I was teaching, trying to manage parent meetings and bake for a school event simultaneously.
You don’t need any fancy gadgets here—this recipe uses standard tools you probably already have. Getting set up prevents little disasters, which is always my goal when sharing a simple baked sliders recipe.
- A sturdy 9×13 inch baking dish. You need that size to hold the entire 12-pack of rolls comfortably, giving the cheese room to melt sideways without oozing everywhere.
- A small mixing bowl. This is just for whisking up that glorious poppy seed butter topping.
- A pastry brush or a sturdy spoon. If you use a brush, silicone is best, as it makes spreading the butter mixture over the rolls so much easier than trying to spoon it on unevenly.
- A sharp, serrated knife for slicing the rolls horizontally. Be careful with this part! I always place the whole package on a cutting board and gently saw right through the middle, keeping the bottoms connected.
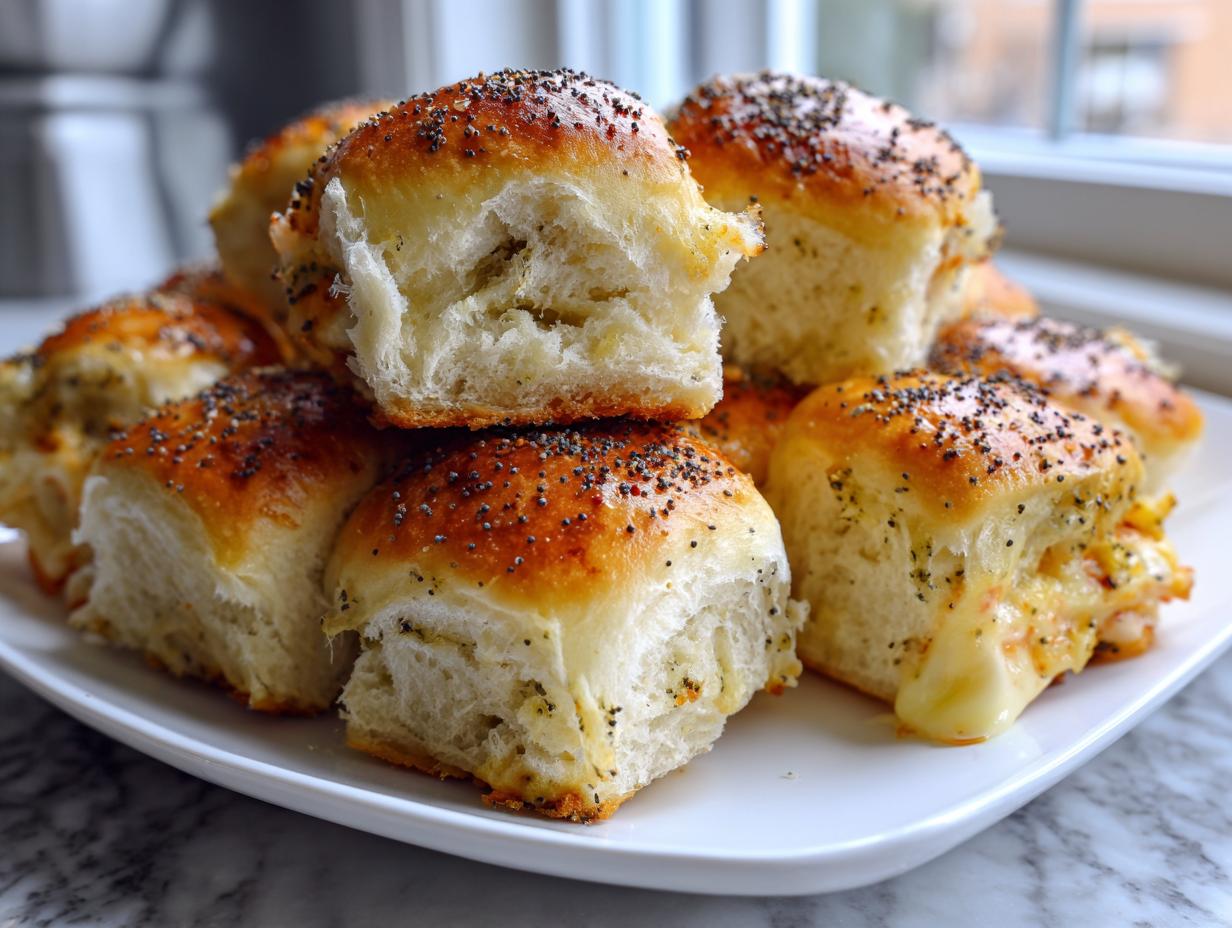
How to Assemble and Bake Ham and Cheese Sliders
Okay, this is the fun part—putting it all together! Even though these are simple, I always say that following the right order ensures maximum meltiness and flavor saturation. When I taught my grandkids how to make these, we treated the layering like a culinary construction project. First things first, get your oven warming up to 350 degrees Fahrenheit. While it heats, lightly grease that 9×13 inch dish you set aside. We want everything ready to go!
Preparing the Rolls and Layering the Ham and Cheese
Take your package of Hawaiian sweet rolls and watch closely here: slice the entire thing horizontally *without* separating the rolls themselves. Imagine cutting a loaf of bread straight across the middle. You want the tops and bottoms to stay connected! Put the entire bottom half into your prepared dish. Now, layer that deli ham on evenly—try not to bunch it up—and then cover the ham completely with the slices of Swiss cheese. Place the top half of the rolls gently onto the cheese layer. It should look like one big, rectangular sandwich ready for the oven.
Creating the Poppy Seed Butter Glaze for Ham and Cheese Sliders
This glaze is the magic wand for these **ham and cheese sliders**. Grab that small bowl and whisk together everything luxurious: the melted butter, the Dijon mustard, the Worcestershire sauce, and all those wonderful spices—the poppy seeds, onion powder, and the dried minced onion. Whisk it well! You want those poppy seeds to be distributed evenly, and the mustard should be fully incorporated into the butter so it doesn’t just sit on top of the rolls. When it looks like a slightly thick, fragrant sauce, you’re good to go.
Baking Your Ham and Cheese Sliders to Golden Perfection
Slowly pour that amazing butter mixture right over the top of the assembled sandwich mass. Use your pastry brush or spoon to gently nudge the topping into all those little crevices between the rolls. Don’t drown them, but make sure every single roll gets some butter love. Cover the dish tightly with aluminum foil—this traps the steam and melts all that cheese perfectly. Bake it covered for 15 minutes. Then, pull that foil off and let them bake uncovered for another 5 to 10 minutes, just until the tops are deep golden brown. Seriously, watch them closely at this stage! When they come out, let them rest for five minutes before slicing between the individual rolls. This lets the cheese settle just a tiny bit.

Tips for Perfect Make-Ahead Ham and Cheese Sliders
Now that you have the assembly down, let’s talk about my favorite efficiency trick! As a former teacher who juggled grading papers and dinner duty, I learned that prep work is the key to a relaxed gathering. These **ham and cheese sliders** are practically designed for the day-before cook. You can assemble the whole thing—rolls, meat, cheese, and that gorgeous glaze—up to 24 hours ahead of time. Just cover it tightly with plastic wrap or foil and tuck it into the refrigerator. It’s a game changer when you have company arriving! Since these are such a wonderful idea for feeding folks, they also make for satisfying quick healthy lunch ideas the next day if you happen to have leftovers.
Assembling Ham and Cheese Sliders Ahead of Time
If you are baking them straight from the fridge, the internal temperature is obviously much colder than my standard recipe calls for. So, you need to give them a little extra time under that foil tent. I mean a small adjustment, dear baker! You’ll add about 5 to 10 minutes to that initial covered baking time. This gives the heat time to penetrate the cold cheese and gets the whole batch warm enough before you uncover them for that final golden crisping. Honestly, having these ready to go saves me so much stress when prepping for informal gatherings.
Cheese Variations for Your Ham and Cheese Sliders
While I stand by Swiss for its classic melt and flavor profile, you shouldn’t feel chained to just one cheese! If you want to mix things up and add a layer of complexity to your **ham and cheese sliders**, I encourage you to blend things up. Try swapping out half of that Swiss for some nice Provolone or even a mild Cheddar. The Provolone melts beautifully and adds a slightly tangier depth, while Cheddar gives you a richer color.
Serving Suggestions for These Party Appetizers
These warm, savory sliders are fantastic all by themselves—truly they are a complete little meal in one square bite! But when you are setting out a platter of these wonderful party appetizers for a crowd, it’s always nice to have a few supporting players on the table. They pair beautifully with things that offer a little snap or tang to cut through all that wonderful melted cheese and sweet roll.
I often serve them alongside a bright, crunchy slaw—maybe something vinegar-based instead of mayo, so it stays fresh on the buffet table. Or, if you’re feeling extra fancy, a simple side of dill pickle spears is always welcome. For dipping, a little bowl of honey mustard or even warmed tomato soup for dunking works wonders. Really, anything light so that everyone still has room for seconds of those buttery, cheesy sandwiches!
Storage and Reheating Instructions for Ham and Cheese Sliders
When you’re feeding a big group, leftovers are often a sign of a recipe well-loved! The good news is, these **ham and cheese sliders** hold up really well, which is fantastic because nobody wants doughy, sad sandwiches the next day. If you’re lucky enough to have any remaining after your gathering, treat them like any other savory baked good.
Store them in an airtight container—or just cover that original baking dish tightly with foil or plastic wrap—and keep them in the refrigerator. They’ll be good to go for about three to four days tucked away in there. They reheat beautifully, but you have to be careful how you do it if you want that pretty golden top back!
Now, for reheating: I really, truly urge you to skip the microwave if you care about texture. The microwave works fast, yes, but it steams the beautiful crispness right out of the top of the rolls and makes the inside soft and sad. Instead, pop the desired amount of leftover **ham and cheese sliders** onto a baking sheet. Heat them in a preheated oven at 350 degrees Fahrenheit for about 8 to 10 minutes. If you want them nice and crusty, take the foil off for the last two minutes. This dries the tops out just enough so they taste almost as fresh as the first batch!
Frequently Asked Questions About Ham and Cheese Sliders
When I share a recipe, especially one that’s become a staple for my family gatherings, I always get the same few questions pop up. That’s perfectly fine! It means you’re thinking through the process, and I want to make sure you feel confident tackling these **baked sliders recipe** next time you have company. Here are a few things I hear often about assembling these wonderful treats.
Can I use bread other than Hawaiian rolls for these ham and cheese sandwiches?
That’s a great question about substitutions! The sweet little tenderness of the Hawaiian rolls is really important to this recipe. They are sturdy enough to hold up to the liquid glaze without getting soggy, but soft enough to be pull-apart perfection. If you absolutely cannot find them, you can try using soft slider buns or even brioche rolls, but I’d suggest you use a little less of the butter mixture—maybe use half the liquids initially—because other breads soak things up differently. Just know that the flavor profile in these **ham and cheese sandwiches** will change slightly without that signature sweetness.
What is the best way to reheat leftover ham and cheese sliders?
We just talked about this, but it bears repeating because it’s crucial for texture! Please, please avoid the microwave if you can. A quick blast in the microwave might warm them up, but it turns that beautiful, crisp, golden top into something chewy and sad. The oven is the best ticket for leftovers. Pop whatever you are saving onto a baking sheet at 350 degrees Fahrenheit for about 8 to 10 minutes. If you baked these **hawaiian roll sliders** correctly the first time, they will come back to life wonderfully in the oven. If you want them extra crispy, take that foil off for the last couple of minutes! I’ve even shared some of my favorite easy breakfast recipes where I use the toaster oven for small portions!
Do I have to use Dijon mustard in the glaze?
I highly recommend it! Dijon mustard cuts right through the richness of the butter and the sweetness of the ham and rolls. If you truly don’t have Dijon, you can use yellow mustard, but you might need to increase the onion powder slightly to compensate for the missing tang. If you happen to have a spicy brown mustard on hand, that works gorgeously too!

Nutritional Estimates for Ham and Cheese Sliders
Now, I know that when you’re serving up comfort food like this for a gathering, you’re not usually counting every single calorie. These are meant to be enjoyed with friends and family! But I understand that some folks like to know what’s in the pan, especially when you’re sharing party appetizers that look deceptively simple.
Based on the ingredients I listed—using standard deli ham and Swiss cheese atop the Hawaiian rolls—here are the estimated figures for one single slider serving. Please remember this comes from my home kitchen calculations, not a certified lab, so consider these good ballpark figures!
- Serving Size: 1 slider
- Calories: 320
- Fat: 16g (Note that 8g of that is saturated fat from the cheese and butter)
- Protein: 15g
- Carbohydrates: 30g
- Sugar: 10g (Mostly from the sweet rolls!)
- Sodium: 850mg (Ham and cheese are naturally salty, so this is a bit higher, which is why water is important with these!)
These numbers reflect the combination of the rich, buttery glaze and the sweet bread, balanced out by the protein from the ham and cheese. They’re hearty enough to really satisfy everyone without needing a whole second course!
PrintEasy Baked Ham and Cheese Sliders with Poppy Seed Butter

Assemble these simple, savory ham and cheese sliders the day before. They bake up golden brown with a flavorful poppy seed glaze, making them perfect party appetizers for feeding a crowd.
- Prep Time: 10 min
- Cook Time: 25 min
- Total Time: 35 min
- Yield: 12 sliders 1x
- Category: Lunch
- Method: Baking
- Cuisine: American
- Diet: Vegetarian
Ingredients
- 1 package (12 count) Hawaiian sweet rolls
- 1 pound thinly sliced deli ham
- 1 pound thinly sliced Swiss cheese
- 1/2 cup unsalted butter, melted
- 2 tablespoons Dijon mustard
- 1 tablespoon Worcestershire sauce
- 1 tablespoon poppy seeds
- 1 teaspoon onion powder
- 1 teaspoon dried minced onion
Instructions
- Preheat your oven to 350 degrees Fahrenheit. Lightly grease a 9×13 inch baking dish.
- Slice the entire package of Hawaiian rolls in half horizontally, keeping the rolls connected. Place the bottom half of the rolls in the prepared baking dish.
- Layer the ham evenly over the bottom layer of rolls. Top the ham with the Swiss cheese slices, covering the entire surface. Place the top half of the rolls over the cheese.
- In a small bowl, whisk together the melted butter, Dijon mustard, Worcestershire sauce, poppy seeds, onion powder, and dried minced onion until combined.
- Pour the butter mixture evenly over the top of the assembled sliders. Use a pastry brush or spoon to spread the glaze across all the rolls.
- Cover the baking dish tightly with aluminum foil. Bake for 15 minutes.
- Remove the foil and bake for an additional 5 to 10 minutes, or until the tops are golden brown and the cheese is melted.
- Let the sliders rest for 5 minutes before slicing between the rolls. Serve warm as easy lunch ideas or party appetizers.
Notes
- You can assemble these baked sliders recipe components up to 24 hours ahead of time. Cover tightly and refrigerate. Add 5 to 10 minutes to the covered baking time if baking straight from the refrigerator.
- For extra flavor, use a mix of cheeses like provolone or mild cheddar along with the Swiss.
- These are a great make-ahead option for informal gatherings.
Nutrition
- Serving Size: 1 slider
- Calories: 320
- Sugar: 10
- Sodium: 850
- Fat: 16
- Saturated Fat: 8
- Unsaturated Fat: 8
- Trans Fat: 0
- Carbohydrates: 30
- Fiber: 1
- Protein: 15
- Cholesterol: 45