
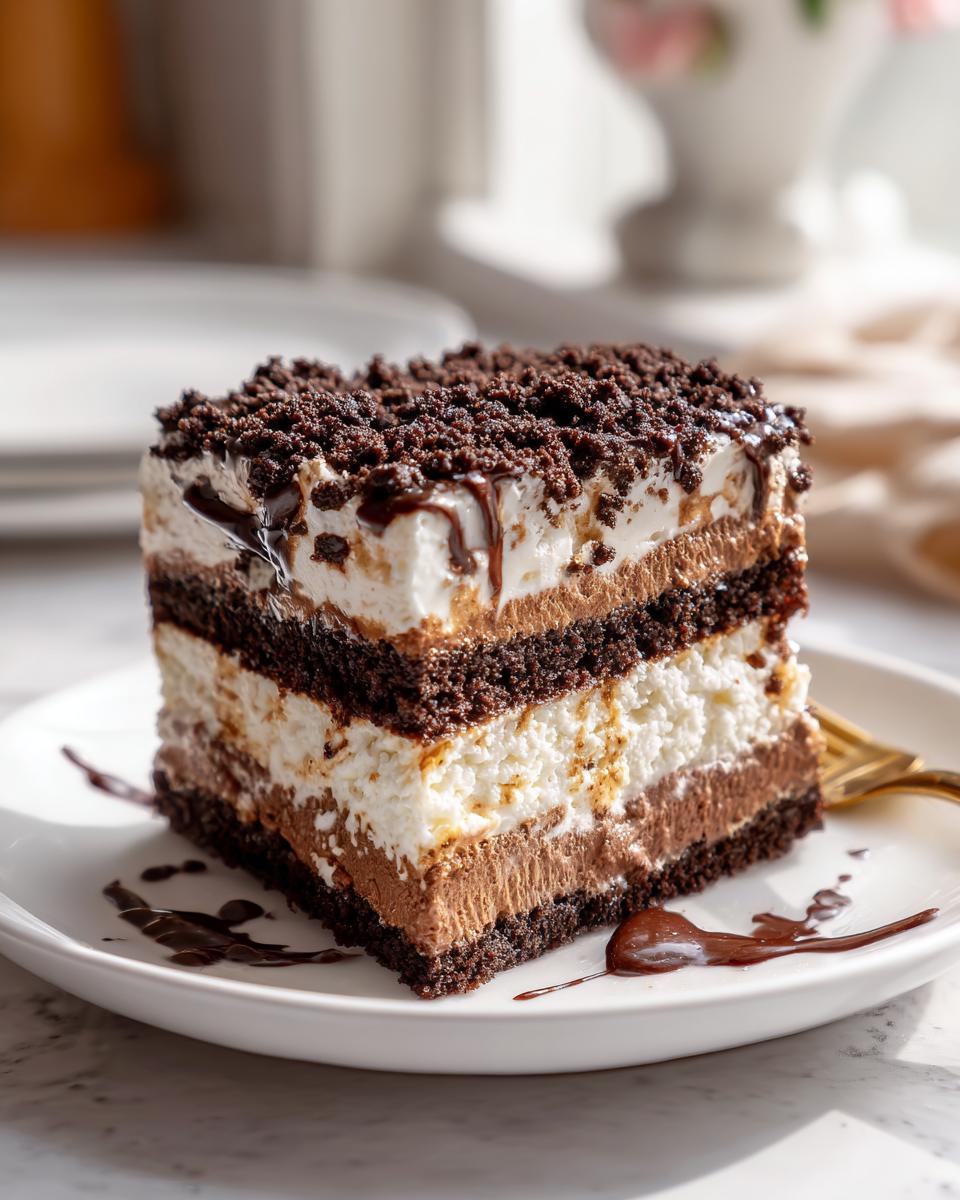
Oh, gathering around for a slice of nostalgia, there’s truly nothing better! Some desserts just take you right back to childhood parties and big family celebrations, don’t they? For so many of us, that special, chilly treat is that iconic layered dessert we all loved as kids. Well, I’ve spent some time perfecting my very own copycat Dairy Queen ice cream cake recipe, and folks, I finally nailed that homemade version! You won’t need a fancy bakery trip for this one. I’m sharing Carla’s straightforward method today so you can easily make those perfect vanilla and chocolate ice cream layers with that famous fudge and crunch right in your own kitchen. Get your springform pan ready; we’re going to build happiness, one frozen layer at a time!
- Why This Homemade dairy queen ice cream cake Tastes Like the Original
- Gathering Your Ingredients for the Best homemade ice cream cake recipe
- Step-by-Step: easy ice cream cake assembly for your dairy queen ice cream cake
- Tips for a Perfect dairy queen ice cream cake Every Time
- Making Variations on the classic ice cream cake recipe
- Storage and Serving Your Homemade dairy queen ice cream cake
- Frequently Asked Questions About Making a Copycat dairy queen ice cream cake
- Nutritional Estimates for This Frozen Dessert Layer Cake
- Share Your Homemade dairy queen ice cream cake Creations
Why This Homemade dairy queen ice cream cake Tastes Like the Original
When you try to copy a classic, you have to respect what makes it work! This isn’t just about stacking ice cream; it’s about texture and quality. That rich flavor comes from using two different kinds of ice cream—nice quality vanilla and chocolate—layered just right. The fudge sauce has to be the right consistency so it doesn’t crack when you slice it. My goal was creating that perfect fudge crunch ice cream cake everyone craves.
If you follow my layering instructions below, you’ll see we get the exact flavor profile that brings back memories of childhood birthdays and summer celebrations. It really can’t be beat. I even linked over to my favorite easy ice cream pie recipe if you needed a quick alternative, but this cake is worth the little extra freezer time!
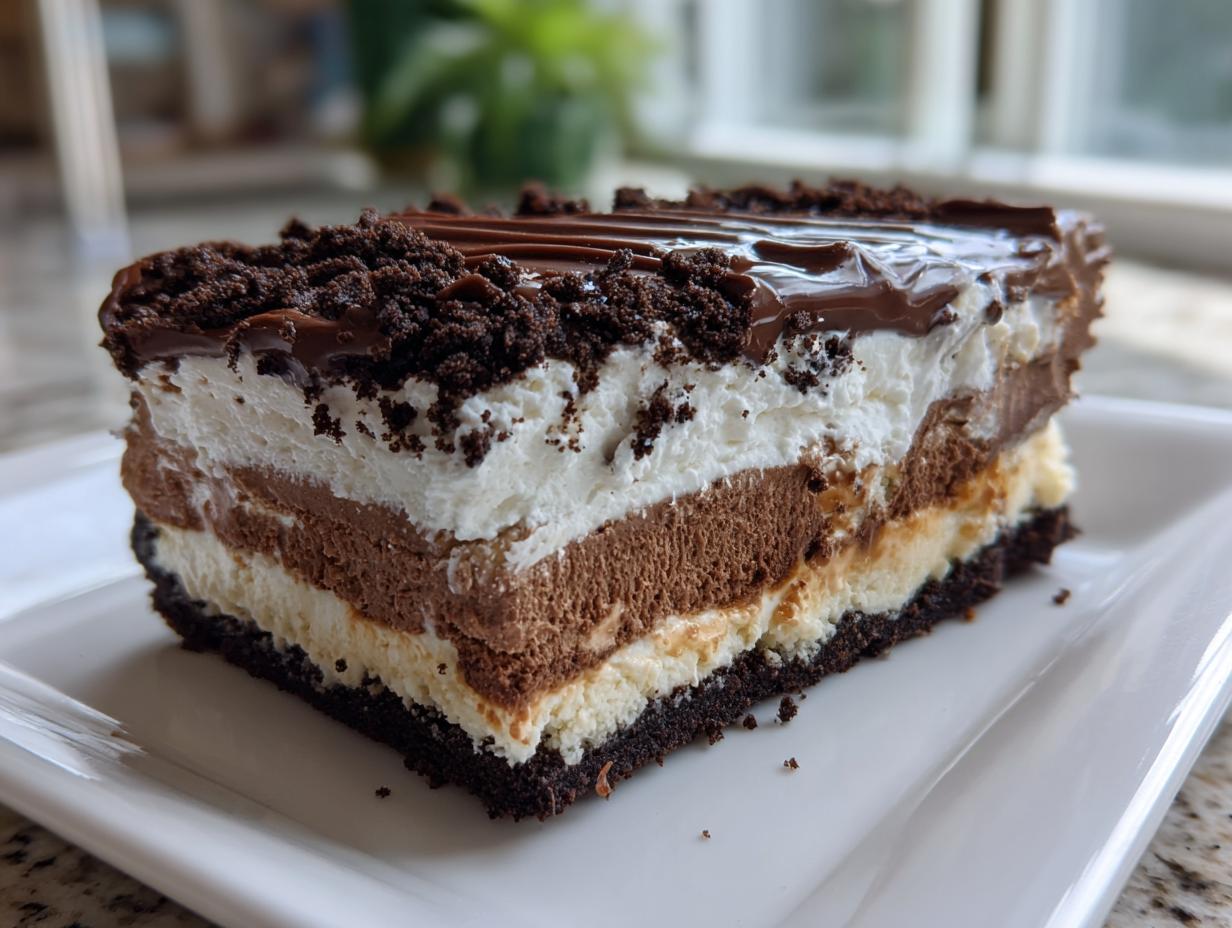
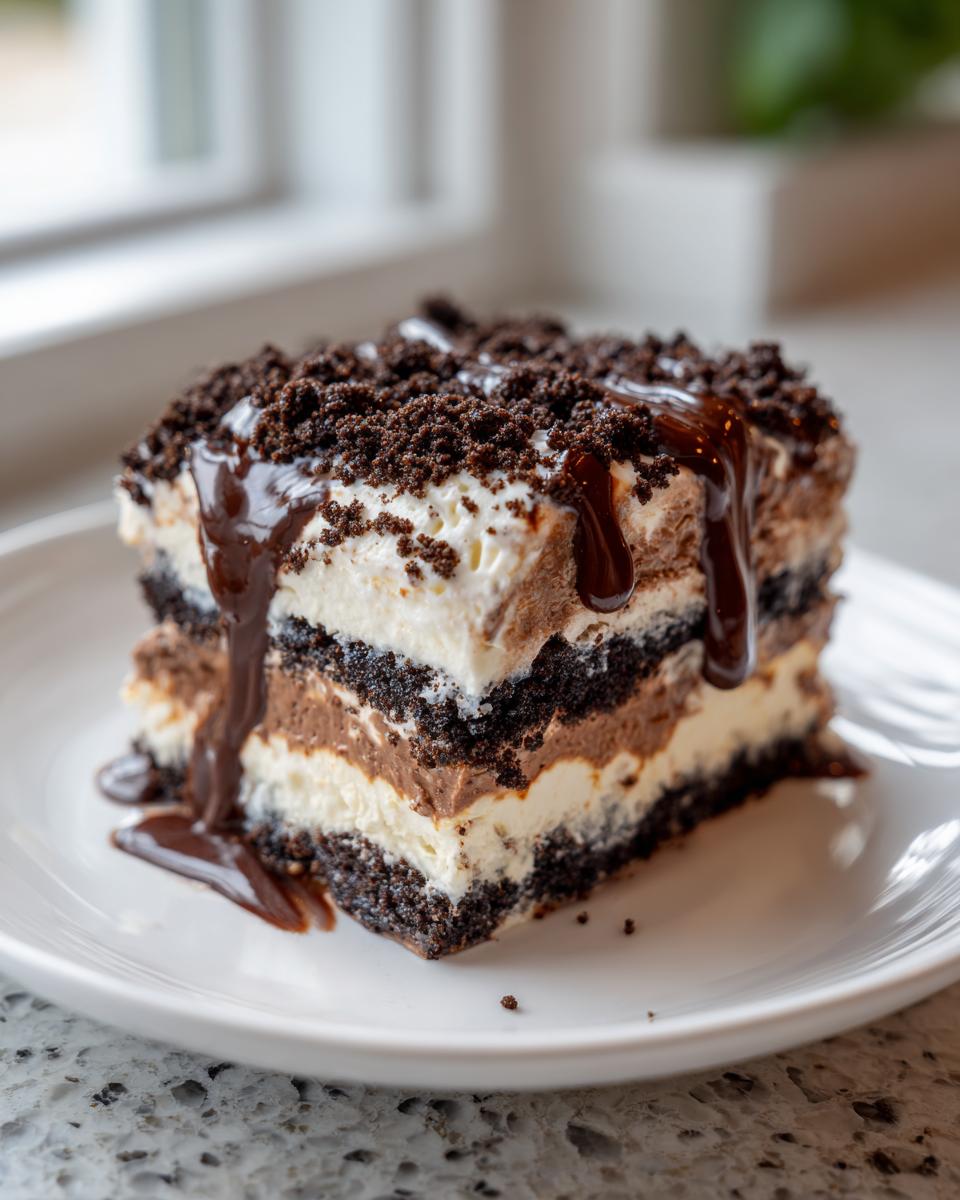
The Essential Components of a dairy queen ice cream cake
There are four pillars to this dessert. First, the ice cream itself, which needs to be slightly softened for spreading. Second, the thick, room-temperature fudge that creates that delightful seal between the layers. Third, we use chocolate chip/cookie pieces for texture. And finally, that fluffy homemade whipped topping brings the whole beautiful dairy queen ice cream cake home!
Gathering Your Ingredients for the Best homemade ice cream cake recipe
Now, you know I believe in using good ingredients, because even with a simple frozen treat, quality shows! For this homemade ice cream cake recipe, we keep things straightforward. Remember, the ice cream needs to be soft enough to spread, but not melted soup—that’s key for the best dairy queen ice cream cake.
You’ll need two big containers of ice cream. Also, make sure your chocolate fudge sauce isn’t straight from the fridge, or you’ll tear up your lovely bottom layer when you spread it! And don’t forget those crunchy bits; I use Oreos, but any chocolate sandwich cookie works wonders. You can check out my tips for making the perfect chocolate fudge sauce if you want to make that part from scratch, but store-bought works fine here!
Here is what you’ll be needing for a 10-inch celebration:
- 1.5 quarts vanilla ice cream, softened slightly
- 1.5 quarts chocolate ice cream, softened slightly
- 1 cup chocolate fudge sauce, room temperature
- 1 cup chocolate cookie crumbs (like crushed Oreos)
- 1/2 cup chocolate chips
- 1 cup heavy whipping cream
- 1/4 cup powdered sugar
- 1 teaspoon vanilla extract
Step-by-Step: easy ice cream cake assembly for your dairy queen ice cream cake
This is where the fun begins, but you have to be patient! Remember, this is a no bake ice cream cake tutorial; structure comes entirely from freezing time, so don’t rush these steps. We are building this gorgeous dairy queen ice cream cake layer by layer, and if you stick with the freezing times, you’ll master the easy ice cream cake assembly perfectly. Following the proper how to make ice cream cake layers is the secret to that signature look! If you’re looking for more general tips on making fantastic frozen desserts, I wrote up a whole guide on my no bake ice cream cake tutorial that might help you out!
Preparing the Pan and First Layer
First things first: pan prep! You absolutely must line that 9-inch springform pan with plastic wrap, making sure you have a nice long overhang coming up the sides. Trust me, this overhang is your absolute best friend when it’s time to lift this giant frozen thing out later. Once lined, take half of your slightly softened vanilla ice cream and gently press it down evenly over the bottom. Don’t mash it; just spread it to create a nice, flat base. Toss that into the freezer for a full hour, or until it’s rock hard.
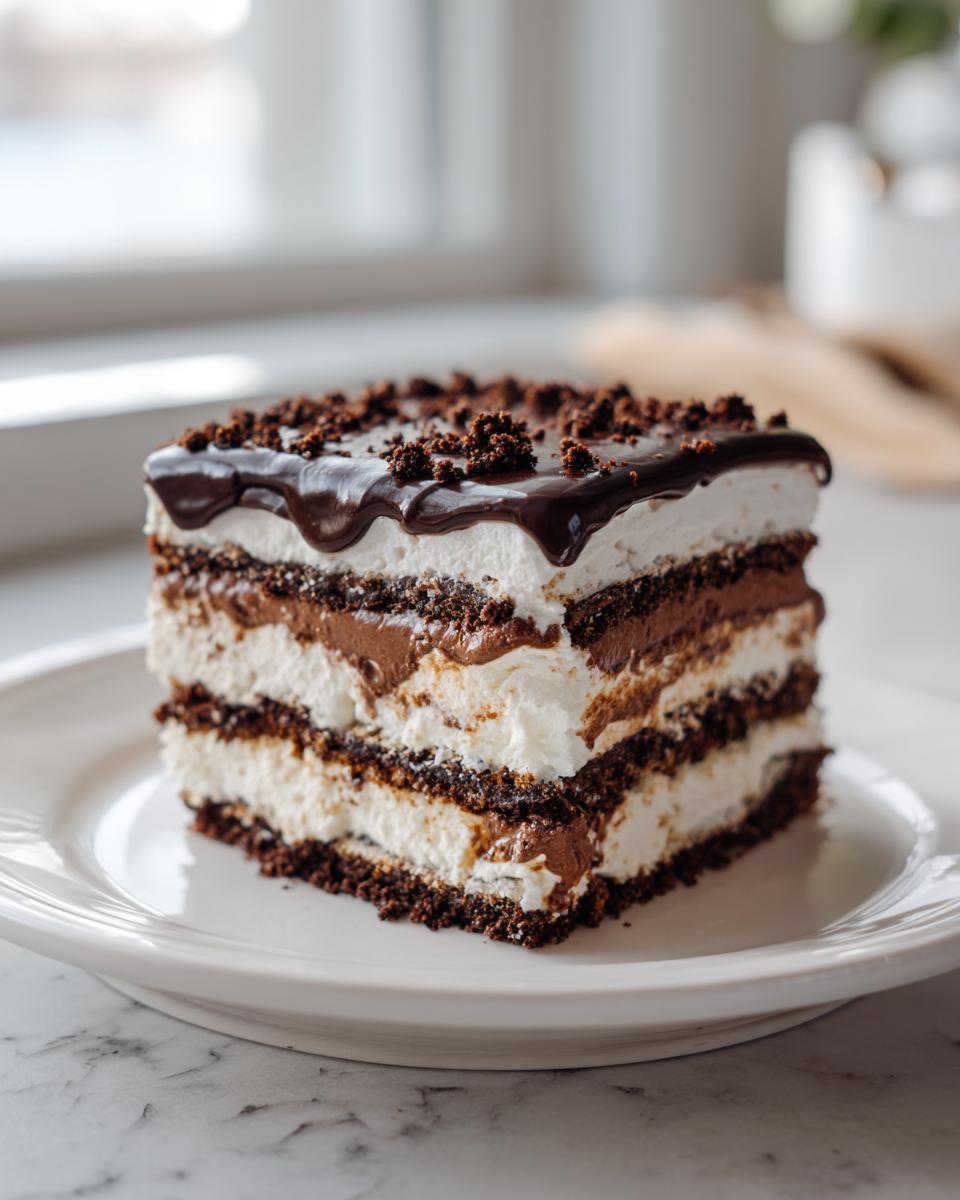
Adding the Fudge and Crunch Layers
Once that vanilla base is frozen solid, take out your room-temperature fudge sauce. Spread it thinly and carefully over the frozen vanilla layer. You want even coverage, but avoid letting the fork touch the ice cream too much! Pop it back in the freezer for just 30 minutes to set that fudge layer. Next, take your crushed cookies and chocolate chips—that’s the crunch! Sprinkle about half of that mixture over the fudge. Back into the freezer it goes for another 30 minutes.
Finishing the Layers and Whipped Topping
Now it’s time for the chocolate ice cream! Press the second half of your slightly soft chocolate ice cream right on top of the crunch layer. Smooth it out, and this layer needs a good hour to firm up completely. After that, sprinkle the rest of your cookie mixture on top of the chocolate. Freeze for one more hour. Finally, while that last layer sets, whip your heavy cream with the powdered sugar and vanilla until you get lovely, stiff peaks—this is your frosting base! Remove the cake from the pan using the plastic wrap handles, and frost the entire outside with your homemade topping. Make sure to press any extra crumbs onto the sides if you want that full dairy queen ice cream cake look. Now, it needs to truly set: freeze it for at least four hours, but overnight is best for the cleanest slicing!
Tips for a Perfect dairy queen ice cream cake Every Time
This is where my teaching experience really comes in handy, because just like in the classroom, routine is everything to get a great result! These little Tips for Success stop you from messing up the structure, ensuring your dairy queen ice cream cake is perfect for those big celebrations. We want the layers firm and distinct, not a sloppy mess, right? I know you want the best homemade ice cream cake, and these ideas from my kitchen will get you there.
Achieving the Right Ice Cream Consistency
This is the step where patience pays off! You can’t just scoop ice cream straight from the box and expect it to spread nicely for your frozen dessert layer cake. It needs about 10 to 15 minutes on the counter to soften just enough. I mean it, just enough! It should glide smoothly under a spatula, but if it starts looking runny—think soup—throw it back in the freezer immediately for a quick chill. This way, when you press it down, you get a solid, even layer ready for the next stage.
Maximizing the Crunch Factor
If you want true crunch in your fudge crunch ice cream cake, forget the cream filling inside the chocolate cookies. That white filling melts weirdly, and you won’t get that satisfying *snap* when you bite into the cake. My trick, which I learned after making too many mushy cakes, is to scrape out that center cream before you crush the wafers—I know, I know, extra work! But those dark cookie pieces mixed with the chocolate chips really mimic the texture you expect from the pros.
And hey, if you ever need to switch gears for a different kind of frozen treat, I have a wonderful guide on vanilla buttercream frosting if you decide you’re ready for a traditional baked cake next time!
Making Variations on the classic ice cream cake recipe
You know, just because we’re aiming for a specific classic doesn’t mean we can’t play around a little bit! My philosophy is always to use a beloved recipe as a starting point for creativity. These Variations are small tweaks that keep the structure sound so you don’t have to worry about collapse, but they give you a fresh taste for future celebrations.
Since the freezing structure relies on the density of the ice cream and the fudge layer setting up between the hard freeze times, as long as you keep those core elements, you can swap out the main stars. It’s all about finding that next best homemade ice cream cake flavor for your family!
Swapping Ice Cream Flavors for a unique dairy queen ice cream cake
If vanilla and chocolate feel too standard for your next big birthday bash, try mixing things up while keeping that necessary fudge layer right in the middle. One combination I just love is swapping the chocolate ice cream for coffee flavor. Coffee and fudge are just heaven together, creating a totally different vibe for your dairy queen ice cream cake. Or, if the kids are asking for something fruitier, try replacing the vanilla with strawberry ice cream—that pairs beautifully with the dark chocolate crunch!
For the fudge layer, if you want a little extra something, you could drizzle in some salted caramel sauce right along with the fudge before you freeze it, or check out my tips for making a richer chocolate ganache filling for cake if you want to get really fancy with your spreadable middle layer. But honestly, sticking close to the original fudge keeps it true to form!
Storage and Serving Your Homemade dairy queen ice cream cake
We’ve put so much work into these gorgeous, distinct layers, so we absolutely have to handle the storage and serving just right! If you’re making this for a big event or a birthday ice cream cake guide adventure, make-ahead capability is your best friend. Since this is a huge frozen dessert, the longer it stays in the deep freeze, the better it sets up. Honestly, an overnight freeze is my firm recommendation for the dairy queen ice cream cake.
When you cover it up, make sure you cover it well! Wrap the entire cake tightly in a layer of plastic wrap, followed by a layer of aluminum foil. This double wrap protects it from freezer burn and stops it from picking up any weird freezer smells. It should keep beautifully for a couple of weeks this way, though I doubt it’ll last that long once your family sees it!
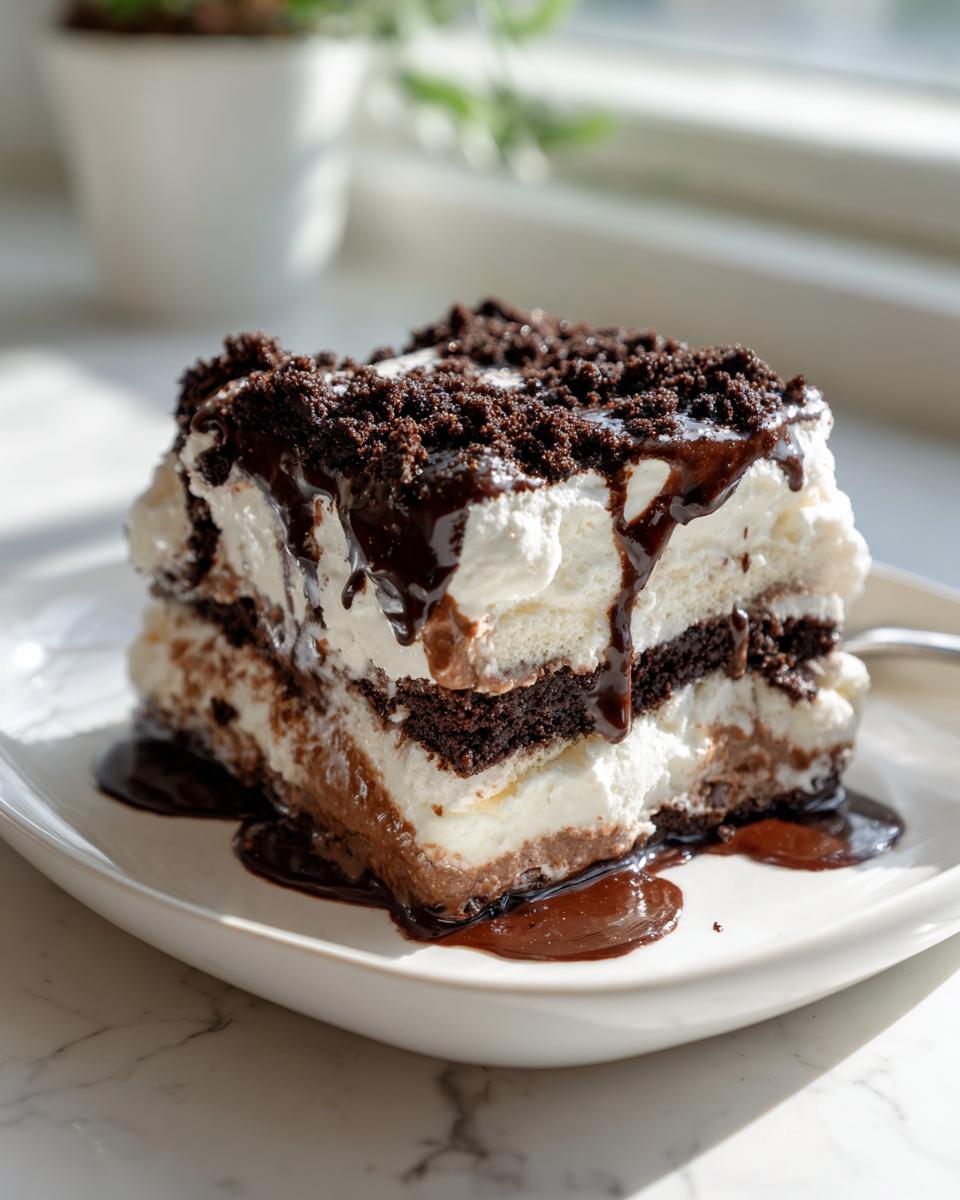
Now for the slicing part—this can be tricky when things are rock solid. Don’t just hack at it! You need a large, sturdy knife, like a chef’s knife. The trick to cutting this frozen monster cleanly is heat. Dip your knife into a tall glass of boiling water for about 30 seconds, then immediately wipe the blade completely dry before pressing it down through the cake. Wipe and reheat between every single slice. If you take your time and use the hot knife trick, you’ll get those beautiful, clean wedges that show off all your hard work! If you’re looking for another great option for your next celebration, check out my easy ice cream pie recipe for a simpler, flatter frozen serving!
Frequently Asked Questions About Making a Copycat dairy queen ice cream cake
When you are making something as beloved as the classic dairy queen ice cream cake, of course, you’re going to have questions! I taught third grade for thirty years, so I know exactly how it feels to need a little extra clarification before you start a new project. Don’t worry, nobody gets left behind in my kitchen, and we’ll get this assembly perfect so you have the ultimate copycat dairy queen cake for your celebration!
Can I use store-bought fudge sauce instead of making a homemade one?
Absolutely, you can! That’s one of the things that makes this recipe so appealing for busy home cooks; it’s designed to be dependable. If you use store-bought fudge, the most important thing—and I can’t stress this enough—is temperature. It must be the right consistency to spread without melting the ice cream layer underneath it. So, if it’s too cold and hard, let it sit out on the counter until it’s room temperature and nice and gooey. If it’s too runny, you’ll just have a soupy mess!
What is the best way to get clean slices when cutting the frozen dairy queen ice cream cake?
We covered this a little earlier, but it’s worth repeating because nobody wants a messy slice of cake, especially when it’s supposed to look professional! The secret is heat plus speed. You need a knife that’s long and sturdy—a big chef’s knife works great. Dip that knife into very hot water until the blade is heated up, wipe it vigorously dry (so water doesn’t get in your cake!), and then press firmly but gently through the slice. Wipe the blade again and repeat for the next cut. It works like magic!
Can I make this dairy queen ice cream cake without a springform pan?
You sure can! While the springform pan is my favorite for this kind of frozen dessert layer cake because it naturally releases the side wall, it’s certainly not required. If you use a standard 9-inch round cake pan, you just need to be extra diligent with your plastic wrap lining. Make sure you cover the entire bottom and sides, leaving huge flaps hanging over the edges of the pan. Once the cake is totally frozen, you use those plastic handles like a little elevator to lift the whole cake right out of the metal pan!
Nutritional Estimates for This Frozen Dessert Layer Cake
Now, I’m certainly not a nutritionist, and I learned a long time ago that counting every calorie isn’t the way I want to enjoy life or share food with my family! Food is meant to be enjoyed, especially when it tastes this much like a celebration!
But I know some of you like to keep track, so I’ve put together an estimate based on the ingredients we used for this wonderful frozen dessert layer cake. Please remember sweetheart, these numbers are just an idea based on standard brands and recipes. When you make substitutions—like using different cookies or fudge—these values will change a bit, so take this as a general guide!
For one slice of this dessert, here’s what you can generally expect:
- Serving Size: 1 slice
- Calories: 450
- Sugar: 45g
- Fat: 26g
- Carbohydrates: 55g
- Protein: 6g
That amount of sugar sounds like a lot, but remember, this cake is packed with whipped cream, ice cream, and chocolate fudge—all things we enjoy in moderation for a special day! The main thing is the joy it brings when you serve up that perfect slice.
Share Your Homemade dairy queen ice cream cake Creations
Oh, friends, seeing pictures of your successes is truly the best part of running Cooking by Carla! When you take the time to build this fantastic dairy queen ice cream cake at home, I absolutely want to see it. Whether you kept it classic or tried one of my flavor swaps, please leave a rating right here on the recipe card—those stars help other home cooks know they can trust this method!
And don’t just tell me how it tasted; tell me *when* you served it! Was it for a birthday? An anniversary? Or maybe just a super hot Tuesday when everyone needed a treat? Pop down into the comments below and let me know when you plan to serve up this copycat dairy queen cake for your next big celebration. I’m always looking for new reasons to pull out my springform pan!
If you’re already looking ahead for more ideas for your dessert table, I have loads more recipes waiting for you in my collection of the best dessert recipes. Happy baking—or, well, happy freezing!
PrintCopycat Dairy Queen Ice Cream Cake Recipe
Make the classic frozen dessert at home with this straightforward recipe that replicates the layers of vanilla and chocolate ice cream, fudge, and signature crunch coating.
- Prep Time: 30 min
- Cook Time: 0 min
- Total Time: 5 hours 30 min
- Yield: 10 servings 1x
- Category: Dessert
- Method: No Bake/Freezing
- Cuisine: American
- Diet: Vegetarian
Ingredients
- 1.5 quarts vanilla ice cream, softened slightly
- 1.5 quarts chocolate ice cream, softened slightly
- 1 cup chocolate fudge sauce, room temperature
- 1 cup chocolate cookie crumbs (like crushed Oreos)
- 1/2 cup chocolate chips
- 1 cup heavy whipping cream
- 1/4 cup powdered sugar
- 1 teaspoon vanilla extract
Instructions
- Prepare your pan: Line a 9-inch springform pan with plastic wrap, leaving an overhang for easy removal. This is key for easy ice cream cake assembly.
- Create the first layer: Press half of the softened vanilla ice cream evenly into the bottom of the prepared pan. Freeze for 1 hour until firm.
- Add the fudge layer: Spread the room temperature chocolate fudge sauce evenly over the hardened vanilla layer. Freeze for 30 minutes.
- Create the crunch layer: Mix the crushed chocolate cookie crumbs and chocolate chips together. Sprinkle half of this mixture over the fudge layer. Freeze for 30 minutes.
- Add the second ice cream layer: Press the softened chocolate ice cream evenly over the crunch layer. Freeze for 1 hour until firm.
- Add the final crunch layer: Sprinkle the remaining cookie crumb and chip mixture over the chocolate ice cream. Freeze for 1 hour.
- Prepare the whipped topping: In a separate bowl, beat the heavy whipping cream, powdered sugar, and vanilla extract until stiff peaks form.
- Frost the cake: Remove the cake from the pan using the plastic wrap overhang. Frost the top and sides of the frozen cake with the whipped topping.
- Decorate and freeze: If desired, press any remaining cookie crumbs onto the sides. Freeze the finished homemade ice cream cake for at least 4 hours, or preferably overnight, before slicing and serving.
Notes
- Softening the ice cream is important; it should be spreadable but not melted. Leave it on the counter for about 10 to 15 minutes.
- For the best crunch texture, use chocolate sandwich cookies with the cream filling removed before crushing.
- If you do not have a springform pan, you can use a standard 9-inch cake pan, but line it thoroughly with plastic wrap, ensuring you can lift the entire cake out later.
Nutrition
- Serving Size: 1 slice
- Calories: 450
- Sugar: 45g
- Sodium: 210mg
- Fat: 26g
- Saturated Fat: 15g
- Unsaturated Fat: 11g
- Trans Fat: 0.5g
- Carbohydrates: 55g
- Fiber: 2g
- Protein: 6g
- Cholesterol: 75mg